When does the steering rack need to be tightened on a Priora?
The steering rack is a vulnerable point for the Lada Priora.
The first sign indicating the need to adjust the rack is the appearance of a knocking sound when driving over small uneven surfaces. The knocking will be felt especially clearly when driving on country roads. In this case, the driver will feel shocks and vibrations on the steering wheel, which will also be transmitted to the entire car body.
In addition, if the steering wheel adjustment nut is loosened when driving on the highway, the car will “float” a little, and additional steering will be required from the driver, which will also immediately become noticeable.
Experts also say that a tightening is necessary if the driver begins to notice the appearance of a clearly audible crunching sound in the area of the steering column, as well as an increase in the amplitude of the steering wheel rotation.
You might be interested in
Repair of steering rack VAZ 1118 Kalina
The main signs that the steering rack needs to be repaired. For owners of a VAZ 11183 car, the first “bells” of what threatens
DIY steering rack repair
Signs that steering rack repair is needed If you hear knocking and extraneous noises in the area of the front suspension, then it is quite possible that
Steering rack repair: without useful knowledge - nowhere
Steering as a whole is a set of mechanisms that ensure the vehicle moves in the direction specified by the driver.
Main types of steering rack breakdowns
The steering rack is one of the most significant components of the steering mechanism in a car.
Cars are actively sold via the Internet.
What is the steering rack for front wheel drive cars?
In cars with front-wheel drive, there is no way to install the classic, long-proven front wheel steering control system. The transverse installation of the motor and power drives to the wheels will not allow this to be done. Therefore, the cumbersome system of levers was replaced by a steering rack. Its main task is to transfer force from the steering wheel to the steering arms.
Important! Most Priors are equipped with electric power steering (EPS) and not power steering. This is a feature of this model.
Problems in the operation of the hydraulic booster
All breakdowns of the Priora power steering, as well as the causes and methods of eliminating them, are listed in the table:
Malfunction
Remedy
| When turning the steering wheel, you feel a kickback (shocks in the opposite direction) | Worn or loose pump drive belt | Replacing or adjusting belt tension |
| It takes a lot of effort to turn the steering wheel. | The pump belt is worn or loose. Low fluid level in the reservoir. The fluid reservoir filter is clogged. Low pump pressure or air lock in the system. Insufficient engine idle speed. | Adjust or replace the drive belt. Add liquid to the reservoir. Replace or clean the filter. Replace the pump. Remove the air lock. Adjust idle speed. |
| More effort is required to rotate the steering wheel in the middle position | Pump or steering mechanism faulty | Check, repair or replace the pump. Find and fix the steering mechanism problem |
| More effort is required to turn the steering wheel to one side | The pump has failed | Pump repair or replacement |
| Steering is unclear | There is not enough fluid in the reservoir or it is leaking. Air in the power steering system. Resource development. | Add fluid and fix leaks if any. Remove the air lock. Check steering components and replace if necessary. Replace tires. |
| It takes a lot of physical effort to quickly turn the steering wheel | The belt tension has weakened. Air in the system. The pump is faulty. Failure of parts of the steering mechanism. Floating idle speed. | Pull the belt. Remove the air lock. Replace the pump if it cannot be repaired. Check and eliminate faulty parts of the steering mechanism. Adjust idle speed. |
| Noise during power steering operation | There is not enough liquid in the tank. The liquid is discharged through the safety valve (a whistle is heard when the steering wheel is turned to the extreme position). | Add fluid and fix the leak. Remove the air lock. Check the pump pressure, repair or replace the part. |
| Steering wheel vibration | Airlock. The wheels are out of balance or the tires are damaged. | Remove air. Balance wheels or replace tires |
How to replace the steering rack on a VAZ 2170-VAZ 2172?
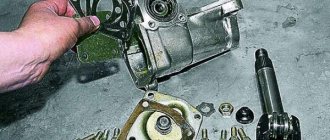
1. Well, let's start, in order to remove the rack from the power steering, you need to do preparatory work, in which you will need to drain the fluid that is needed for the power steering, to carry out this work, pick up a syringe or a rubber bulb and use one of these tools , pump out all the fluid from the power steering reservoir (This reservoir is shown in the photo below), then disconnect the hose going to the pump from the reservoir and lower it into an empty container, and plug the hole in the reservoir with some kind of rag, as soon as this is done, get into the car , turn the key in the ignition so that the steering wheel is not blocked and rotate it from one end to the other until all the fluid has completely drained from the entire system.
2. Now you will have to disconnect the return hose from the fitting to which it is connected, this hose is secured by a clamp, you can disconnect it by loosening the clamp by the screw using a Phillips screwdriver, and when the hose is disconnected, plug the hole in it using a bolt of a suitable diameter and as quickly as possible and finally, unscrew the nut that secures the high-pressure hose (It is metal, see photo below) and disconnect it, then plug it with a wooden stick.
3. After the work done, you can assume that the fluid has been drained from the steering mechanism, then hang the front part from the car and proceed to remove the rack (Now it is removed in the same way as a rack without power steering or like a rack with an electric steering system, in more detail the removal process, read the article: “Replacing the steering rack on the tenth family”), and at the very end, using a hex key, unscrew all the pipes that are attached to the rack and disconnect them, plug the threaded holes with clean foam so that dirt does not fly into the pipes and pull out the rack through car wheel arch.
Additional video: Study the article on replacing the fluid in the power steering, there you can roughly understand, using the example of a VAZ 2110 car, how to drain all the fluid from the steering mechanism of a car.
X
Video
This video shows how to repair the steering mechanism on Kalina.
Knock in Kalina steering rack. How to remove.
Installation of Kalina steering rack.
Repair of the steering column gearbox and the RR itself on Priora, Kalina, Grant.
How to install a steering rack from Kalina 2 to Kalina 1.
Steering rack for Lada Kalina Sport with a gear ratio of 3.1 instead of 4.02.
Do-it-yourself repair of the steering rack, but not Kalina, but Daevoo Sens / Daewoo Sens.
Kalina control rack - VAZ 11183 Kalina rack repair
Have you ever had a chance to monitor knocks and noises from the side? Probably it happened. They changed the control tips, changed the ball tips, even changed the springs with support bearings, but does the knocking continue? It's time to tug, make sure there is free play and start sorting out the rack. In this article I will talk about repairing the VAZ 11183 rack, but the development is identical to all other VAZ front-wheel drive racks.
The most interesting thing is that these motherfuckers from AvtoVAZ do not fundamentally change anything except the gearbox housing, I bought a repair kit 2110-2112, the rack is listed in catalogs as 2110, but the splined part is longer than 2110, and the gearbox is slightly different, so just change Unfortunately, 11183 for 2110 will not work, although 2110 costs 2500 in my town, and 11183 5500 costs 6000 rubles. The difference per pocket is very noticeable.
Well, it doesn’t fit and doesn’t fit, so we give the engineers a hard time and start disassembling it. Unfortunately, there won’t be a photo for the article, because I was up to my elbows in mud and didn’t want to wash myself for the sake of pictures, but I’ll try to describe everything carefully.
Removing the steering mechanism.
1. For convenience of work in the future, and so as not to climb into the interior with stains, unscrew the bolt securing the splined connection from inside the cabin (you will see it near the floor of the control shaft).
2. We lift the car on a lift, throw it down, and knock out the control tips from the steering knuckles.
Is it possible to tighten the steering rack on a Priora yourself?
Of course you can. In fact, this process will not take you much time. And it does not require any special expertise, so there is no need to go to the service center for this.
In order to tighten the steering rack on a Priora, you will need:
- this article is a guide;
- special key for adjusting the rack on 17>;
- inspection hole or overpass;
- flat blade screwdriver;
- key on 13.
It is recommended to perform this work with an assistant. Even a child or a girl can be used as it.
How to get to the adjusting nut:
- Disconnect the battery terminals and remove it.
- Using a 13mm , unscrew the bolt securing the battery stand and also remove it.
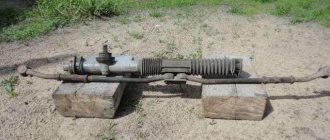
- From the inspection hole, look under the steering rack itself for the rubber plug of the adjustment mechanism. Pull it out with a flathead screwdriver.
Now you have access to a nut for adjusting the thermal clearance of the steering rack. Using a special key for adjusting the rack 17 , which can be purchased at any auto store, you need to tighten it so that the knocking noise disappears. In this case, you need to carefully monitor so that additional friction sounds do not appear and the steering does not become difficult to move. The nut should be tightened no more than 25-30o . Otherwise, when turning sharply, the steering wheel may “bite”. Therefore, ask an assistant to rotate the steering wheel, while you listen to the sounds from the steering rack. If the knocking noise disappears and no additional sounds appear, then the work is done correctly and you can install the rubber plug and battery in their places.
Assembly
Assembly is performed in the reverse order of disassembly. Before installation, all parts should be lubricated with the oil used in power steering. This is done to avoid scuffing during assembly and adjustment.
PTFE parts should be handled carefully; they are fragile and will burst from impact or excessive load. A socket head and an extension to it will help to carefully press in the bushings.
When inserting a gear rod, it must be centered according to the marks made before disassembly. After this, attach the drive shaft. Insert the pressure sleeve and washers behind it, tighten the adjusting nut to the required number of turns.
Manually turn the mechanism in both directions until it stops (twisting by the drive shaft). The rod should move without difficulty, this means that the assembly is done correctly. After this, the locknut is tightened. Tighten the mechanism rods and install the anthers.
When tightening doesn’t help and the mechanism needs to be changed
It’s worth thinking about replacing the rack when tightening it does not in any way affect the car’s behavior on the road, and also does not help get rid of the unpleasant knocking noise. A failed steering rack will cause significant play in the steering wheel. Moreover, it may begin to jam (this happens extremely rarely, but similar cases are known). If the rack begins to jam, then it is better to stop using the car, as this can lead to the most dire consequences.
You cannot do without a replacement even if after tightening it you managed to get rid of knocks and vibrations, but they reappeared later.
Gur
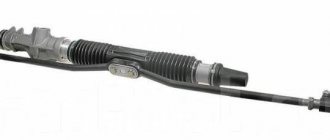
The entire set of rack with power steering for Lada Priora contains:
- Oil tank;
- High and low pressure hoses;
- Steering mechanism with built-in power steering of the rack-and-pinion type;
- Vane type oil pump.
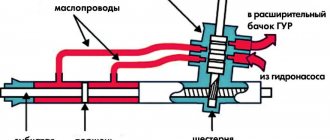
The power steering operation process is similar to the movement of a piston in a hydraulic cylinder: when the pump pumps out working fluid, it pushes the pistons, reducing the required driver effort to turn the wheels. At the same time, it is not for nothing that the power steering is praised for the fact that it leaves the driver the opportunity to feel the road, because with a torsion-type switchgear it acts on the pistons with exactly the same pressure that prevents the steering wheel from turning freely, and nothing more. Based on this, the greatest pressure in the system generally occurs when the car is stationary - that is, when the driver makes the greatest effort to turn the wheels.
When driving at speed (for example, in case of changing lanes), the steering movement is not so significant (can reach 0.2 turns), and there is no pressure on the system. That is why even in driving schools, students are taught to perform maneuvers so that the steering wheel turns when starting to move, and not when the car’s wheels are still held in place by the working brake system.
You will have to tinker with it: the pump drive belt must be fully tensioned, otherwise its complete breakage can cost a pretty penny
It is also important to monitor the condition of the hydraulic fluid: top it up to about 0, do not turn the steering wheel in a cold car with thick oil, contact a service center twice a year for professional diagnostics
There is also one “trouble” that, it would seem, is not related to the operation of the power steering: you should not jump on curbs, otherwise you can hit it and damage the control mechanisms. In return, the disadvantages of power steering will give the Priora owner increased directional stability even when one of the front wheels goes down, smoother driving over uneven surfaces and the relief of not having to try to forcefully twist the steering wheel for a normal maneuver.
Design features of the steering control of the Lada Priora VAZ 2170
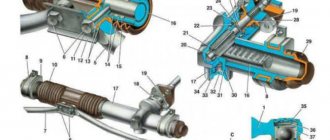
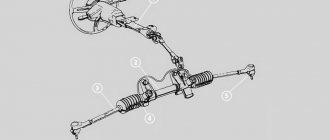
| On the Lada Priora VAZ 2170, the steering is injury-proof, with a rack and pinion steering mechanism, electric power steering, a steering column adjustable in height (tilt angle), and a damping element on the steering wheel. The steering mechanism, complete with tie rods, is attached in the engine compartment to the front panel of the body on two brackets using brackets 2 (Fig. 8.1). The mechanism is secured with nuts on welded bolts through rubber supports 6. In the housing 26 (Fig. 8.2) of the steering mechanism, a drive gear 8 is installed on ball and roller bearings, which meshes with the rack 9. The ball bearing of the gear and the separator 7 are pressed by a cover 5 assembled with an oil seal 4 and covered with anther 1. There are marks on the steering gear housing and on the boot for correct assembly of the steering mechanism. | The steering rack 9 is pressed against the teeth of the drive gear by a spring 15 through a metal-ceramic stop 18, sealed in the crankcase with a rubber ring 17. The spring is pressed by a nut 14 with a locking ring 16, which creates resistance to unscrewing the nut. A protective cap is put on the steering gear housing on the left side, and a pipe with a longitudinal groove is pressed on the right side, and a protective cap is also put on the pipe on the right side. The spacer bushings of the rubber-metal hinges of the inner tie rod ends 1 pass through the groove of the pipe and the holes in the protective cover (see Fig. 8.1). The steering rods are attached to the steering rack with bolts 20 (see Fig. 8.2), which pass through the connecting plates 22 and the spacer bushings of the rubber-metal hinges. The bolts are secured with a locking plate 21. | The steering drive on the Lada Priora VAZ 2170 car consists of two composite steering rods and rotary arms of telescopic struts of the front suspension. The length of each tie rod is adjusted by rod 5 (see Fig. 8.1), which is screwed into the inner 1 and outer 4 tips. Information about malfunctions in the operation of the electric power steering is provided by its electronic control unit when the ignition is turned on by flashing the warning light in the instrument cluster (malfunction light code) (see “Electromechanical power steering control unit (EPS)”). |
Steering of Lada Priora VAZ 2170 : 1 — inner tie rod ends; 2 — bracket for fastening the steering mechanism; 3 — steering rod joint nut; 4 — outer tie rod end; 5 — adjusting rod; 6 — steering gear support; 7 — steering mechanism; 8 — bracket for mounting the steering mechanism; 9 — coupling bolt; 10 - propeller shaft with hinge; 11 — electromechanical power steering; 12 — electronic control unit for electromechanical amplifier; 13 — steering column mounting nut; 14 — ignition switch; 15 — upper facing casing of the steering shaft; 16 - connector; 17 — steering column adjustment lever; 18 — steering wheel fastening nut; 19 — airbag; 20 — steering wheel; 21 — lower casing liner; 22 - sealing ring; 23 - fastening screw; 24 — lower casing of the steering shaft; 25 — element for fastening the engine shield; 26 - gasket; 27 - thrust plate; 28 — seal; 29 — spring ring; 30 — protective cover; 31 - sealing ring | Steering mechanism Lada Priora VAZ 2170 : 1 — boot; 2, 20 - bolts; 3 — washer; 4 - oil seal; 5 — crankcase cover; 6, 17 — sealing rings; 7 — separator assembly; 8 — drive gear with bearing assembly; 9 — steering rack; 10 — left protective cap; 11 — rod support; 12 — bracket; 13 - plug; 14 — stop nut; 15 — stop spring; 16 — retaining ring; 18 — rack stop; 19 — stop liner; 21 — locking plate; 22 — cover plate; 23 - clamp; 24 — protective cover; 25 — right protective cap; 26 — steering gear housing |
Briefly about the mechanism
The element is a cylindrical body containing the following parts:
- the gear rack itself, moving inside the bushings;
- drive shaft with helical gear, rotating on 2 bearings (connected to the steering column);
- 2 rods connected to the ends of the rack and pinion mechanism and the steering knuckles of the hubs;
- a system of stops and springs that limit the travel of the rack and select the backlash of the gear transmission;
- rubber covers (anthers) in the form of round “accordions” that protect the mechanism crankcase from dirt;
- the element body is filled with liquid lubricant.
This is the design of a conventional mechanical and so-called electric rack, operating in conjunction with an electric power steering (EPS). If the car is equipped with a hydraulic booster (power steering), then the design of the mechanism is supplemented with cylinders and pistons that help move the gear bar in one direction or another.
The element works on a simple principle: when the steering wheel rotates, the drive shaft moves the rack through a gear in the required direction. The ends of the part connected to the rods cause the front wheels to turn. The power steering or electric power steering reacts to the movement of the steering wheel and “pushes” the rack and pinion mechanism in the desired direction, relieving physical stress from the driver.
Tips for use
A complete replacement and repair is a series of actions, for the implementation of which you need to have not only special knowledge, but also a considerable amount of free time, so if the car owner does not have either the first or the second, it is preferable to go to the nearest service station.
It is better to entrust steering rack repair to service station specialists
At the same time, in order not to become their regular guest, you should know some secrets for operating the steering rack, which can significantly extend its service life.
- We strongly do not recommend “jumping” your car on curbs, or driving at high speed on rails, since each such trip causes cracks to appear on the rack itself, as well as deformation of the shaft that is part of the steering mechanism.
- It is not recommended to frequently turn the steering wheel all the way. Of course, in this case it will be very difficult to demonstrate your maneuvering capabilities, but this will significantly increase the life of one of the most important parts of the machine.
- Carefully monitor the condition of the protective anthers, which must maintain their tightness. Replacing anthers is several times cheaper than replacing the entire rack.
- It is also worth monitoring the level and condition of the hydraulic fluid, since its decrease or change in color is associated with problems in the vehicle’s hydraulic system, which can result in rack failure.
From time to time you need to undergo a full maintenance, which will allow you to eliminate faults in advance, which can cause irreversible consequences, injury to yourself, your loved ones and other road users. And also, if problems are detected in the operation of the car, it is better not to take risks and go to the nearest car service center as quickly as possible.
Complex car radio malfunctions
In this article we will try to answer the questions:
What is a complex fault?
How can error codes help when repairing car radios?
In the practice of repairing car radios, there are often cases when, in order to restore the operation of the car radio, it is necessary to find and eliminate not one specific malfunction, but several. It’s good if the breakdowns are not related to each other or relate to different electronic components of the car radio (for example: no sound - the amplifier chip is faulty; no disk reading - the laser reader lens is dirty).
What if both faults are in the CD drive? With such malfunctions, the process of diagnosis and repair becomes difficult, since, having eliminated one malfunction, we are immediately faced with the manifestation of another. Such a malfunction with several causes can be called complex.
Let's look at troubleshooting a complex problem using the example of repairing a Pioneer DEH-P3500MP car CD receiver. This is a case from real repair practice and its consideration will be useful for those who are interested in the topic of repairing car radios with their own hands.
The Pioneer car radio came to the repair table due to the lack of reading from the CD.
Upon external inspection, it was noticed that when the disk eject button is pressed, the process of ejecting the disk occurs slowly. The car radio was also heavily soiled with dust.
It is no secret that when heavily soiled, the optics are the first to suffer - the surface of the laser reader lens becomes covered with fine dust and this prevents the laser beam from focusing on the surface of the CD. In this case, there may be failures during playback (the sound “hiccups”), failures during the initial loading of the disc (“NO DISK”, “Error”), a long search for a recording when switching to another song. Do not forget that the cause of such a malfunction can be not only contamination of the optics, but also degradation of the laser diode in the optical unit.
For car radios, if any malfunctions occur, an error code appears on the display. Knowing the decoding of the error code, you can more quickly find the faulty unit and not waste time on diagnostics. So, for example, on the Pioneer DEH-P3500MP car radio in question, when turning on and loading a disc, the message “ERROR-11” appeared on the display. At the same time, spinning of the disk was observed - which means the spindle motor is in order.
ERROR-11
If you refer to the service documentation for this car radio model, the code “ERROR-11” stands for: – No beam focusing. Well, everything is quite simple here, as already mentioned, the violation of the focusing of the beam is associated with contamination of the car radio with dust.
In this case, it may be necessary to completely clean all mechanical parts of the car radio and its housing. Cleaning the laser reader lens is made more difficult by the fact that it is necessary to disassemble the CD mechanism and remove the laser reader from it. Read about how to disassemble the CD mechanism here and here (another type of drive).
After the laser unit is cleaned of dust, the operation of the car radio can be completely restored. But we are considering a complex malfunction.
Upon further testing the operation of the car radio on several MP3 discs, it turned out that when switching several songs forward or backward, a failure occurs. After a long and unsuccessful search for the desired track, the ominous inscription “ERROR-30” appeared on the car radio display.
Replacing the Lada Priora steering rack with a short-throw one
The steering rack had been knocking since the purchase (42,000 km), but not much, they tightened it once, it got a little better, and then it started knocking again. Closer to winter, it was completely broken, in a mess, on the washboard it constantly played all sorts of different musical compositions. Rack 11183-3400010-10 (3.1 turns) assembled with tips original VAZ I immediately ordered a disc spring SS 20
I studied the issue of lubrication of the rack in advance, since I don’t trust the factory, but I want it to last as long as possible. At the factory they put RENOLIT JP 1619 in it, a German lubricant. Substitutes
· “KALIPSOL 4D”, Kalipsol, England;
· “KALIPSOL JP1619”, Kalipsol, England;
· “FIOL-1” TU38USSR201-247-80 Ukraine
I made more than 30 calls to car dealerships, lubricant and oil stores, only one store offered to order RENOLIT JP 1619, price 800 rubles and wait a month - no way!)) We’ve already heard about Fiol 1 in two or three stores, but didn’t sell it anywhere , I found Fiol 1 only on the display of an exhibition stand in the largest Oils and Lubricants store in my city. I bought an 800 gram jar for 100 rubles. It stood on the stand for more than 5 years, and the guaranteed shelf life was 5 years, but it was decided not to worry about it + a friend argued that 20-year-old solid oil is still used :-) And the Azmol plant, the Ukrainian one where Fiol 1 is produced, has closed back in 2013, I think this is the reason that it is not on sale. All lubricants released after this date are counterfeit.
And as soon as I had the rack, after about 30 minutes its long-awaited installation began) The plastic clamps were removed, a visual inspection showed that there was not much lubricant there, without washing, 80 grams of Fiol 1 lubricant was added, the clamps were replaced with worm-type metal ones, and the factory spring was replaced with spring SS20.
SS20 spring on the left, factory on the right
We unscrew the 2 hex bolts, change the spring and don’t forget to install the black boot exactly as it is in the photo!
The process of removing and installing the rack is incredibly simple! I think even schoolchildren can cope with it, although they are not stupid. The day before the process, all 4 bolts securing the rack to the engine shield and steering tips were doused 3 times with WD-40, after replacing the struts with SS20 Comfort, you can read it in the logbook. I really don’t like it when the nuts are hard to unscrew!
In short: We align the wheels so that they look straight (we count the rotations of the steering wheel), remove the driveshaft, first from the top of the steering column, then from the bottom, unscrew the 4 nuts holding the steering rack, you can really get to them all. And then, if the cardan has not been removed from the lower mount, then we move the rack away from the engine shield, a cardan appears under the hood and then we knock it out with a pry bar and a hammer, this is what happened to me.
After lunch on the new rack, do not forget to set the steering tips to the same size as the old rack and also measure its position exactly in the middle (1.55 turns) so that the wheels point forward. Everything is installed in reverse order. I had read a lot about broken heels, and I really didn’t want to repeat the fate of these people. Tighten without fanaticism, even though there are rubber dampers. If you don’t hold it, the rack will not fall off immediately, you will hear this beating in the first stages, and for a week after installation it is better to visually observe the nuts than to bother with welding a new stud. There was only one problem with the installation - in the upper mount of the cardan, it did not fit into the mount, it was carefully driven into it with a wrench.
That's all there is to the installation. Don't forget to go to the service station and at least do an alignment. The steering wheel was straight and I didn't have to turn it over. The two of us did it in about 5 hours, without time for a trip to get metal clamps
Conclusions and sensations: The steering wheel has become a little harder to turn, but I think this will go away when everything gets used to it. In the extreme positions of the steering wheel, the shocks have disappeared, now the steering wheel gently “damps” The steering has become sharper, but to be honest, I expected more, but it has become easier to go around potholes (this costs 800 rubles compared to a regular rack.) The unbearable knocking noise is gone, now you float in the mess like a ferry, it’s nice).
This not particularly difficult, but extremely important work is best carried out on a repair lift. As a last resort, on a wide inspection hole. But then the car must be positioned so that both wheels can be removed.
So, the car is installed according to the mentioned conditions. The wheels have been removed. We can begin. First of all, set the steering wheel of the Priora car to the position of driving straight ahead. That is, the wheels point straight ahead. After this, it is advisable to secure the steering wheel. Loosen the electric power steering mount. Remove the cardan connecting the EUR to the splined end of the steering shaft. And go under the car. There are two options. You can unscrew the lugs from the wheel. But most craftsmen prefer to unscrew the bolts securing the steering rods to the rack. The fact is that it is much easier to remove it this way.
This is done as follows: two 17 bots holding the pressure plate are unscrewed. First, 1 is turned out, and the second is weakened. The pull moves to the side. Then the second one is removed, along with the plate, and the other rod is moved back.
Now the fastenings of the steering rack itself are dismantled. These are semicircular brackets with rubber seals. They are mounted on threaded rods in the Priora body and tightened with nuts 13. It is most convenient to unscrew them with a head. After removing the nuts, the staples are removed. The device being removed is pushed slightly towards itself. This is necessary for the worm device to come out of the hole in the passenger compartment. Now you can remove the steering rack. For this purpose, a technological window is provided in the left wing of the Priora. You can carefully push the edge of the knot into it and pull it out. Either for further disassembly and repair, or simply for replacement with a new copy. As usual, the entire installation of the part is carried out strictly in the reverse order. But before you start, you need to meet several very important conditions!
Special attention! The new Priora steering rack must be strictly in the middle position before installation!
Well, the second point. The fact is that at the factory, no components of this mechanism, except the shaft bearing, are lubricated. It is imperative to remove the anthers and generously lubricate the internal parts of the mechanism with grease or lithol through the side plugs. Once these requirements have been met, you can begin traditional assembly in reverse order. When everything is assembled, turn on the ignition to activate the amplifier and check the control status.
Necessarily! Upon completion of work, carry out wheel alignment adjustment! And you can hit the road!
Steering rack removal and repair
Removal work must be carried out with the necessary tools. Such as:
- Ratchet;
- Head at “13”, “15”, “17”;
- Key to "14";
- Hexagon at "6";
- Screwdriver "-";
- Hammer;
- The beard is blunt;
- Wrench for tightening the steering rack;
- Steering wheel end remover;
- Mount;
- WD-40 lubricant;
- Lubricant "Litol - 24";
- Steering rack repair kit;
Steering wheel removal process
- We align the steering wheel exactly in the center.
- Raise the left side of the car with a jack
- We unscrew and unscrew the steering end nuts, then use a puller to squeeze them out of the strut bipod.
- We unscrew the steering cardan in the car with a head on “13”, and forget the screwdriver into the slot of the cardan without damaging the splines. This is necessary for its easy removal from the rack splines.
- Remove the steel washer retainer from the tie rod bolts and unscrew the left steering arm from the rack and pull it out into the left window of the tie rods
- Unscrew the steering rack mounting brackets with a head on “13”
- Using a pry bar, move the rack to the side and remove it into the left window of the steering rods
The withdrawal process is completed
The process of disassembling the rack
- We unscrew the steering rods with a head at “15”
- We remove the anthers by biting off the plastic clamps with side cutters. We pull out the central steering boot to the right side without damaging it.
- We remove the “binoculars” from the rasp.
- Place a mark as shown in the picture and unscrew the nut securing the rack pipe using a punch and a hammer
- We take out the pipe
- We unscrew the steering tightening nut using a special wrench (don’t be afraid to turn it very tightly), take out the rubber ring and the pressure piston.
- To remove the pressure piston, you need to hit the back of the rack and the piston will fall out.
- We take out the rasp
- We unscrew the two bolts with a hexagon “6” and carefully remove the “worm” cover without damaging the oil seal.
- We clamp the worm shaft into the yew through a block and remove it by hitting the body of the rack
- Next, remove the old plastic sleeve from the pipe using a screwdriver
The rail is disassembled, we proceed to the assembly process using new parts
Assembly
- We install rubber rings on the bushing and insert it into the rack pipe
- We wash the worm shaft from the old grease, lubricate it with new and insert it into place, put a plastic bearing on it.
- Place a disc spring into the worm cover, and then a thrust washer on top. Lubricate well and close the lid.
- We lubricate the rasp and insert it into the worm mechanism, and then insert the pipe into the mechanism body and tighten the nut, aligning the previously placed marks.
Centering the steering rack
When assembling the steering wheel, it is necessary to follow a certain rule, which in the future will not lead to the rearrangement of the steering wheel on the splines.
- When the rasp is placed in the rack body, it is necessary to set it to “zero”, that is, the position in which the steering wheel will stand exactly in the center. To do this, you need to measure 235 mm from the right end of the case and put a mark with a marker. This will be “zero”. Next, you need to align the center of the rasp with this mark. The center of the rasp will be the recess under. We combine this notch with the previously installed mark.
- It should also be noted that when combining these marks, the worm shaft should face the flat to the right side at an angle of 90 degrees to the rack body.
- To combine all these parameters, you need to rotate the worm shaft with a key at “14” until all the parameters are combined.
Attention: the rack pressure piston should not be installed when the marks are aligned.
After the marks have been set, we continue assembling
- We install the pressure piston with the cuff on it into the “worm” body. We insert the cuff into the body, then the pressure spring, the nut and tighten it with a little force.
1 - thrust nut, 2 - thrust piston, 3 - collar, 4 - needle bearing, 5 - left side of the rack housing.
- We insert the binoculars onto the rasp, put on the anthers and secure them with clamps
- Then we screw the right swing arm to the rack and install the rack in place.
- We carry out assembly in reverse order.
- It should be noted that the easiest way to install the steering universal joint is by removing it from the steering wheel. Using a key set to “13”, unscrew the nut and remove the bolt, and then the cardan itself.
When installing, make sure that the steering wheel is centered.
- After the rail is installed, it is necessary to tighten it. To do this, tighten the nut until it stops, and then loosen it 90 degrees.
The rack nut has a left-hand thread, but when it is installed on a car, the nut must be tightened counterclockwise. Because the nut is pointing up.
- When turning or turning, the steering wheel should return to the zero point on its own.
The steering rack repair process is complete.
Airbag installation
Installation is carried out in reverse order. While working, stay outside the pillow deployment area. When you first turn on the ignition, stand outside the vehicle and turn on the ignition with your hand under the steering column.
Have you experienced a knocking sound in your steering? Let's solve this problem together.
Good day! Status: Verified
Story
: (Can be skipped). The steering rack was repaired, with removal and partial disassembly (without removing the steering tips, or as they are called “steering rods”). So, after installing the rack back, in order to get the bolt into the slots of the steering wheel with the rack, I had to turn the latter by 30 degrees, which ultimately resulted in an uneven position of the steering wheel.
In fact:
The steering wheel is not level relative to the level position of the wheels. Correction options:1.
Rearranging the steering rack by pulling out the steering wheel mounting with the steering rack from the splines. (I advise you to do this only if you need to re-assemble the rail). Time costs: 2 days .2.
Perform wheel alignment and tell people to set the steering wheel straight. Cost: 1 hour.
1000 rubles 3. Turn the steering wheel 30 degrees.
Costs: 1 hour, +1 neighbor.
I made decision No. 3 and after that go to the alignment. Does anyone think he did the right thing? I’ll add that the car was re-shoeed with summer wheels that were balanced.
Tools:
socket wrench (head) “24”, screwdriver with a flat blade, hex key “5”. Work:
Using the instructions “Removing and installing the steering wheel of Lada Priora, VAZ 2170, VAZ 2171, VAZ 2172” we do this:
1. Take a screwdriver with a 5 mm hex head. We insert it into the hole in the airbag mounting in the steering wheel. Unscrew the 2 bolts (They cannot be removed from the passes).
2. As soon as the bolts are unscrewed, the cushion will move slightly relative to the steering wheel.
3. Carefully turn the pillow sideways. Inspect the connector fastening.
4. Pry up the green clamp of the control wire block (which is in the center).5. Now we pull out the entire connector from the mounting groove.6. The pillow is removed and put aside.