The longer engine oil is used, the more impurities it contains: dust, dirt and fuel combustion products. All this pollutes it, makes it thicker - as a result, the oil cannot fulfill its purpose and does not reduce friction between the moving parts of the engine. The internal combustion engine that receives such a mixture wears out faster and breaks down earlier.
Therefore, to protect the internal combustion engine, a special cleaning device is used - an oil filter. Its design and principle of operation are simple: it is a cylinder-shaped filter element and a housing, which is a container for oil. Through the bottom with holes, the liquid penetrates into the device and passes through the filter paper. The purified oil then goes to the engine.
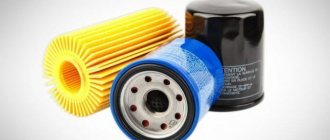
Oil filters differ for different car models. They come in two types:
- Non-separable. The metal housing of this filter is one-piece - it is removed along with the filter element inside. These devices are more expensive because they are easier to replace: you just need to unscrew the used part and install a new one in its place.
- Collapsible . In such a part there is access to the filter element - it is this that needs to be changed, while the housing remains in the filter seat. These devices are cheaper - in fact, only the cartridge with the filter curtain is sold. But installing it is not so convenient: each time you need to disassemble the structure, wash the housing and other reusable parts from oil and dirt, and then put everything back together before installing the filter.
Non-removable filters are more difficult to recycle and less environmentally friendly, but this type is the most common. Most of these parts are similar and interchangeable. Almost all of them are cleaned mechanically - with the help of special paper or cardboard, contaminants are filtered out, but oil passes through the pores.
However, over time, the curtain becomes clogged and may no longer allow liquid to pass through. Then the oil will enter the engine in another way - through a bypass valve, which, under pressure, passes the unclean mixture into the internal combustion engine. This is an extreme measure to which it is better not to take the cleaning system. To ensure that clean oil gets into the engine, and not a tarry mixture mixed with dust and soot, the oil filter needs to be replaced in a timely manner.
show more
Purpose of a car oil filter
The purpose of an oil filter is to extend the life of a car engine. During engine operation, various contaminants enter the lubricant, for example, soot, rust, and metal shavings, which are a product of engine wear.
The ingress of these substances into motor oil leads to its thickening and loss of its normal physical and chemical characteristics, increasing the rate of engine wear.
Based on the above, the function of a car oil filter is to remove contaminants from the lubricant circulating in the engine.
Selection of oils
Now to the question of what kind of oil to pour into the engine of the French Renault Logan car. According to the recommendations of the automaker itself, oil produced by Elf is optimally suited for their cars. They work closely together, which is why only this liquid is indicated in the instruction manuals.
The main recommendations for this car are two oils from Elf from the Evolution series:
Also in demand are:
- Turbo Diesel 10W40;
- Competition ST 10W40;
- Solaris RNX 5W30;
- Excellium LDX 5W40, etc.
Elf's line of motor oils includes universal lubricants, fluids designed for specific engines, as well as separate series for automatic and manual transmissions.
If you ask the owners of such cars about what kind of oil they use, the majority is inclined to think that Renault’s recommendations are correct, and the engine works well with these oils. There are also experiences with unsuccessful oil changes.
As for the type of oil, there are 2 options to choose from.
- Semi-synthetic. It is better to use it on cars whose mileage is already more than 100 thousand kilometers. Its thicker consistency helps prevent leaks through worn gaskets and seals. Well suited for winter as it easily starts the engine at low temperatures.
- Synthetics. Suitable for newer cars. Synthetic lubricants are recommended for use on all modern cars and their engines. Great fluidity and stability of physical and chemical characteristics guarantee protection against overheating, wear and frost.
Therefore, focus on the age and mileage of your Renault Logan when choosing between synthetics and semi-synthetics. Just keep in mind that when changing the oil, be sure to change the following in parallel:
- oil filter;
- gasket for the drain plug (made of copper).
This will allow the engine to run better with fresh oil and prevent unwanted lubricant leaks.
How often should you change the oil filter?
The oil filter is changed along with the oil. The recommended guideline for replacement is every 10,000-15,000 kilometers of the vehicle. It should be borne in mind that the degree of wear of the lubricant and filter is affected not only by the mileage, but also by the idling speed of the engine, as well as the load on the engine.
Oil filters in high-speed vehicles or heavy-duty vehicles with trailers require more frequent replacement due to the greater load placed on the engine of such vehicles.
Which way to unscrew the oil filter?
When difficulties arise with unscrewing the filter element, the motorist may begin to be tormented by doubts regarding which direction the device should be unscrewed. Remember that the oil filter must be unscrewed counterclockwise (to the left). In the same way, a regular nut or bolt is unscrewed (if you do not take into account fasteners with reverse threads).
If you cannot unscrew the oil filter on your own, ask a stronger person for help. In fifty percent of cases this method works. The main thing is to achieve a breakdown from the starting point. This is easier to do with a warm engine. When the engine cools down, it becomes difficult to unscrew the filter.
Safety precautions when replacing the oil filter
- The vehicle must be securely secured.
- Work should be carried out outdoors or in a well-ventilated area due to the flammability of the materials.
- You should work in safety glasses, work clothes and household gloves.
- The used oil must be completely drained before starting work.
- The oil and oil filter are replaced with the engine warmed up to normal temperature. Avoid touching the engine, clutch mechanism, gearbox and structural elements of the exhaust system with unprotected areas of the body.
- After the oil is drained, some of it remains in the filter. When carrying out work, you must position yourself relative to the filter in such a way as to prevent hot oil from getting on your body.
- Oil and oil filter are environmentally hazardous materials and must be disposed of as industrial waste.
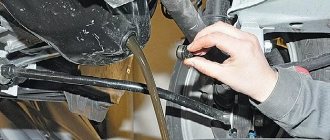
Fuel pump mesh
The mesh is a coarse fuel filter and serves to protect the fuel pump from large particles of debris entering the fuel pump, which can damage it.
The mesh is located in the fuel pump glass and to replace it you need to dismantle it.
Replacing the Granta fuel pump mesh
Relieve the fuel pressure from the fuel line. We dismantle the gas pump glass and take out the pump itself, replacing the mesh in it and assembling the structure in the reverse order.
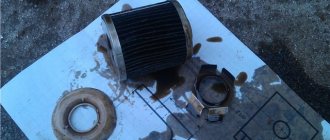
Causes of oil filter sticking
The main reasons for filter sticking:
- Prolonged heating of the filter and melting of the rubber gasket;
- Changes in the physicochemical properties of oil trapped in the thread under the influence of high temperatures;
- Excessive force applied to tighten the thread when installing the filter;
- Thread mismatch during installation.
What to do next?
When the old filter is removed, before installing a new one in its place, be sure to wipe the mounting area with a rag, pour oil into the filter itself, and do not forget to lubricate the rubber gasket with it. Only after this can the new part be considered ready for installation. Screw it into place (you don’t need to put much effort into this), turn on the ignition and let the engine warm up, while you observe the repair site. If everything is done correctly, oil will not ooze out from under the filter.
We recommend: How to replace the air filter on a Ford Fusion?
Dismantling methods
The most convenient way to remove a used oil filter is to dismantle it using special pullers, which according to their design are divided into:
- Ticks;
- Crabs;
- Tape;
- Belt;
- Crescent;
- End;
- Chain.
However, it may happen that special equipment will not be available at the right time and there will be nowhere to get it.
There are time-tested methods for dismantling the oil filter using improvised means or universal tools.
Method 1: Using sandpaper
To perform work using this method, you only need a sheet of coarse sandpaper and significant muscle effort.
- Before starting work, remove all contaminants from the filter housing, especially oil, to prevent the sanding paper from sliding along the filter housing.
- A sheet of sandpaper is tightly wrapped with the rough side along the filter body, after which it is firmly pressed against the filter by hand and turned to the left.
- Once the filter has moved out of place, unscrewing it completely is not difficult.
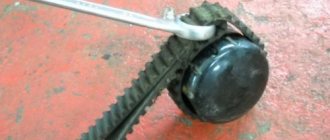
Method 2. Using a belt
Any belt will do the job.
Examples:
- An old timing belt from a car's timing mechanism;
- Ribbon belt from the generator;
- In extreme cases, you can use a leather trouser belt.
The belt folds into a self-tightening loop and is put on the filter housing, forming a lever. To dismantle the filter, try to turn the filter to the left with sharp jerks.
If the adhesion of the belt to the filter housing is weak, you can place a strip of sandpaper between it and the filter, or use the same sandpaper to scratch the material of the housing to improve adhesion.
Method 3. Using a pipe wrench.
If the filter is easily accessible, you can try to dismantle it using a pipe wrench.
The method is very simple; the longer the key handles, the easier it will be to turn the filter.
Since the clamping force of such a tool is greater the longer the handle, you should clamp the filter housing carefully so as not to crush it.
Method 4. Using a screwdriver or metal rod.
For this method you will need a hammer, as well as a long slotted screwdriver (minus) or a long rod, which will serve as a lever.
- The essence of the method is to make a through hole in the filter, install a lever in it and, acting on it, rotate the filter along the axis to the left.
- The housing must be punched through with a hammer and screwdriver so as not to damage the fitting onto which the filter is screwed.
- To do this, holes are made in that part of it that is remote from the engine.
- A screwdriver or rod is inserted into the resulting hole and the filter is turned with force to the left.
The main disadvantage of this method is the inevitable leakage of engine oil through a damaged filter housing.
Method 5. Using a hammer and chisel.
If all of the above methods do not help, you can try to turn the filter using a hammer and chisel.
To do this, the chisel is installed at the base of the filter (closer to the motor block) at an angle, so that when it is hit with a hammer, the housing rotates to the left, after which, by hitting the chisel with a hammer, attempts are made to rotate the filter along the axis.
This method is best avoided, since the filter housing will most likely be damaged by the chisel, which will lead to engine oil leakage, and inappropriate handling of the tools can lead to the chisel slipping off the filter and damaging the engine block or other mechanisms.
Method 1: Using a strong, sharp screwdriver and hammer
This is the simplest of all possible options. The principle is as follows:
- Take a large flat screwdriver and use it to punch a through hole in the filter housing (the metal is thin, so this can be done with almost one blow).
- Next, you need to grab the handle of the screwdriver and apply force in a counterclockwise direction. Due to the increase in the force arm, the filter breaks off quite easily, after which it can be unscrewed by hand.
Please note that the oil can remain hot for a long time, so safety precautions must be observed.
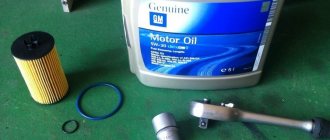
Installing a new oil filter
Compliance with the technology for installing a new oil filter will avoid problems with dismantling in the future.
During installation you should:
- Remove old grease and other contaminants from the oil filter fitting on the engine block.
- Lubricate the oil filter sealing rubber with the oil that will be poured into the engine. This will ensure proper tightness of the connection and maintain the elasticity of the seal.
- The filter should be tightened by hand as much as possible.
- The final tightening should be done using a torque wrench with a torque set at 17 N*m. If there is no such tool, then you should turn the filter with another available tool along the axis to the right by ¾ of a turn.
In the name of the revolution
We remove it in the most brutal but manly way - we simply pierce the filter housing with a screwdriver and begin to remove this tin can from the engine of your swallow. Of course, there is a certain probability that you will cut the can along the contour and not unscrew anything.
And yes, if someone says, “what about the central glass, which is attached directly to the filter thread?”, then “cutting” it is only a little more difficult than the filter housing itself. In general, there are certain risks in this method (but in my experience this has never happened before).