Adjusting the valve mechanism of the 16-valve VAZ-2112 engine is a rather complicated operation, but can be done with your own hands. Thus, many motorists have come across the concept of hearing valves ringing, especially when moving from low to medium speeds. In this article, we will look at how to properly adjust the valves on a car, and also talk about some of the nuances of the process.
Video about adjusting valves on the front-wheel drive family of VAZ cars (2110-2112)
The video will tell you how to properly adjust the valves on a 16-valve engine, as well as give some tips and tricks.
Setting rules
Any owner of a VAZ-2110 8-valve injection machine can familiarize yourself with the standard regulations specified in the operating instructions. It is worth noting that the adjustment of the VAZ-2110 valves and the 8-valve injector is carried out during the production process of the car. The car owner must perform the first adjustment after the car has completed the first 10,000 km, and this procedure is usually called running-in. After this, the procedure will need to be repeated regularly until the next 45,000 km are reached, but in some cases, engine operation does not require any additional manipulations even before 80,000 km have been traveled.
Adjustment process
Replacing the thermostat on a VAZ-2112 16 valves with your own hands (+ video)
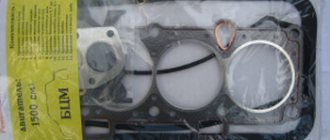
You should not buy adjusting washers in advance, since the cost of these parts is quite high. First of all, you should decide on the size of the gaps, and only then go to the store in order to select the right size of washers and buy them in the right quantity. All work should be carried out in a garage with good lighting, since a closed room will protect the car from the extremely undesirable effects of rain and wind, which inevitably carry dirt into the uncovered camshaft.
At the same time, do not forget to cool the engine before adjusting the valves of the VAZ-2110 eight-valve engine
Disassembling VAZ 2110 valves
Adjusting the VAZ-2110 valves (8 valves) always begins with dismantling the necessary components, which is performed as follows:
- The battery terminal is disconnected.
- The air filter housing is dismantled (if the car uses a carburetor engine).
- The gas cable bracket, as well as the crankcase gas hoses, are disconnected from the valve cover.
- All the bolts that secure the timing case are completely removed. Once the cover is removed, you can freely work with the pulley.
- Get the spark plugs. Due to this, the rotation of the crankshaft will be simplified, which will help to find BDC and TDC.
- The valve cover is removed.
Before proceeding with the actual adjustment, you should understand the features of the timing mechanism.
Read the instructions for your car and read the operating order of the valves. In particular, there will be a table indicating the order in which the valves are adjusted. It is worth noting that the adjustment of the VAZ-2112 valves (16 valves) provides for a completely different scheme.
How to adjust gaps yourself
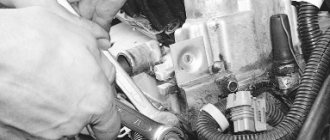
After dismantling the valve cover, any remaining engine oil near the tappets should be completely eliminated. To do this, you should use an ordinary rubber bulb or a special medical syringe. If you have a retaining rod, you will need to place it on the two outer studs, with which the cylinder head cover is secured.
After this, you can proceed directly to the repair:
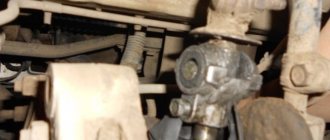
- The top dead center is set. To do this, you will need to align the marks located on the inner timing case and the camshaft pulley. To do this, you can hang and spin one front wheel, then use a spanner to turn the camshaft, securing it to the bolt securing the pulley. However, you should immediately warn that this operation may result in the bolt breaking, so it should be performed extremely carefully, and it is even better to first stock up on an additional bolt.
- Once top dead center is located, the camshaft should be rotated to move the pulley approximately 40-50 degrees from TDC. Now you will need to put your mark, from which several more rotations of the camshaft will be carried out with additional marks.
- The thermal clearance of the exhaust valve is measured. To do this, one of the screws should be placed between the pusher and the camshaft cam. The standard gap is 0.35 mm.
- If the probe passes without any obstacles, you should take a larger one and repeat the procedure in increments of 0.05 mm.
- If a probe with a diameter of 0.4 or 0.45 mm can no longer pass, this indicates the need to replace the adjusting washer.
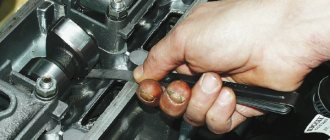
- The pusher turns so that the groove is facing you, after which you will need to push the locking rack lever on it and remove the used washer from there using simple tweezers. There will be numbers on it indicating the original size.
- To obtain the required size, you need to subtract the difference between the measured and nominal gap from the thickness of the used washer, and then write it down in a notebook so that you can later buy the required washer in the store.
- The nominal clearance in the intake valve is 0.2 mm. The gap is measured in the same increments as in the previous case.
- The washer is replaced in the same way as in the previous case.
- In accordance with the table, the crankshaft is rotated to the desired angle, after which the procedure is performed with each valve separately.
- All the necessary washers are purchased at the store.
- The washers are mounted in the pushers.
- All gaps must correspond to the standard ones, that is, 0.2 or 0.35.
- New thermal clearances are being checked.
- When the new washers are installed, all dismantled components are returned to the workplace.
- The engine is started and its operation is monitored.
Basics of the design and operation of a hydraulic compensator
Configuration
The idea of automatic regulation of thermal clearances can be implemented in two versions: a conventional hydraulic pusher and a hydraulic support. The latter is used in gas distribution modules with rocker arms. On the Lada Priora in the sixteen-valve version, the intake and exhaust are equipped with individual camshafts. The optimal solution for this arrangement is the use of a hydraulic pusher.
The Priorov hydraulic compensator on the 126 engine consists of the following parts:
- A plunger pair, including a cylindrical cage and a piston with a ball valve.
- The outer housing is a pusher.
- System of grooves and holes for oil supply.
Principle of operation
The oil composition enters the internal cavity of the piston and, overcoming the resistance of the spring, pushes the ball away to fill the closed cylinder. When filling the liner, oil pushes the piston out and the hydraulic tappet rests against the cam. Next, the ball valve is locked and the assembly unit works like a regular pusher on motors with an adjustable valve mechanism.
Detailed diagnostics of hydraulic compensators on Lada Priora
Sometimes, to determine the causes of knocking hydraulic compensators on a 16-valve Lada Priora engine, the thermal state of the engine alone is not enough. A set of tests makes it possible to more accurately determine the factor that causes extraneous noise.
Diagnosing the condition
One of the common complaints is knocking noise both cold and hot. However, as the speed increases, the symptom disappears. One of the following options is relevant:
- Worn or damaged ball valve. You can't do without replacing the hydraulic compensator.
- Contamination of the internals of the hydraulic fluid with wear products due to the choice of incorrect lubricant or untimely replacement. Washing the internals and changing the oil composition to a standard one eliminates the problem.
If the clatter appears only on a hot power unit and disappears at high speeds, and on a cooled unit no extraneous sounds are observed in any mode, the plunger pair has worn out. The hydraulic compensator must be replaced as an assembly.
The knocking is observed only at high speeds in any thermal state, and at idle there is silence, a problem with the oil level or in the low emulsion suction system. It is not recommended to go beyond the extreme marks on the dipstick; driving with a damaged oil receiver is also not recommended. Restoring the acceptable level resolves the problem.
For your information
- New hydraulic compensators can also tap. This usually happens after capitalization and is observed within a short period of time after the first start-up. It is not a malfunction if it does not recur during subsequent starts.
- If the hydraulic modules knock after changing the oil, the reason is the quality of the lubricant or the filter.
- The knocking of hydraulic pushers during startup should not be considered a malfunction. Over a long period of parking, the oil is drained from the working chambers and at the beginning of work the containers are filled.
Are the consequences dangerous?
What are the consequences of ignoring the fact that the hydraulic compensators on the Lada Priora 16-valve engine are knocking or neglecting to investigate the causes of the noise? At a minimum, acoustic discomfort. At the most, the camshaft cams will wear out and will have to be replaced.
Roll up our sleeves: adjusting the gas distribution mechanism on LADA 2110
Any machine consists of many parts that tend to wear out and deform plastically.
The service book for any car provides a list of all necessary adjustment operations for some components. Their service period is indicated either by time or by mileage.
Unfortunately, these figures for domestic cars cannot boast of a large number of zeros.
How to eliminate the knocking of hydraulic pushers on Lada Priora
Timely and high-quality maintenance of the engine oil system is the key to flawless operation of the hydraulic compensator mechanism. After all, the unit is designed for use throughout the entire resource of the power plant.
Use of recommended lubricant
When the hydraulic pushers just start knocking, the manufacturer recommends changing the lubricant to a proven option. Therefore, when the question arises of what kind of oil to pour in principle, it is worth analyzing reviews to determine the acceptability of a certain model of oil product for hydraulic compensators.
Of course, the best choice for Lada Priora will be the composition recommended by the manufacturer, specified in the instruction manual. However, not all current popular products are included in the list.
An analysis of opinions shows that, indeed, with the universal viscosity of 10W-40 or 5W-40 specified by the factory, not every oil is suitable. For example, Shell Helix Ultra 5W-40 causes knocking already at 15,000 km, while on Liqui Moly Optimal Synth 5W-40 the hydraulics are silent even at 80,000 km.
Reviews show that it is optimal to choose the following lubricants:
- Total Quartz 9000 Energy 5W-40.
- Mobil Ultra 10W-40.
- Wagner Windigo 10W-40.
Flushing
Many owners, in advanced cases, resort to general engine flushing. However, the effectiveness of such an event in the fight against knocking GCs is low. This is explained by poor oil pumpability in the area of the hydraulic pusher chambers. If changing the lubricant does not help, the best solution is to remove the cylinder head cover and find which hydraulic compensators on the Lada Priora 16-valve engine are knocking and determine the reason for this. Defective parts are identified by diagnosing running resistance with a wooden wedge. A fast movement speed in comparison with other hydraulic supports indicates wear of the hydraulic module, the presence of a constant gap indicates its coking.
Attention! The wooden wedge must be pressed against the non-working surface of the cams.
Effective removal of carbon deposits inside the cylinders is their local washing. Worn assembly modules cannot be repaired.
Additives
Additive compounds help delay identifying the causes and cleaning the timing belt. There are several products available in the market. The most popular products are from Liqui Moly and XADO. The effectiveness of substances depends on the specific case. Fans of motor additives often equate this class of chemistry with a waste of money.
see also
- 16 valve engine for VAZ carburetor
What to do to prevent valve bending on a 16 valve engine- 16 valve engine 124
- Parking with the engine running in a residential area
Engine resources of foreign cars table- Why is a throttle valve needed in an engine?
- VAZ 21124 engine mounts
- Niva engine modification
- How to flush the engine cooling system
- What is the best way to flush the engine cooling system?
- What is the best way to flush the engine cooling system?
We adjust valves on a VAZ-2112 16 valves with our own hands
Adjusting the valve mechanism of the 16-valve VAZ-2112 engine is a rather complicated operation, but can be done with your own hands. Thus, many motorists have come across the concept of hearing valves ringing, especially when moving from low to medium speeds. In this article, we will look at how to properly adjust the valves on a car, and also talk about some of the nuances of the process.
Video about adjusting valves on the front-wheel drive family of VAZ cars (2110-2112)
The video will tell you how to properly adjust the valves on a 16-valve engine, as well as give some tips and tricks.
Valve adjustment frequency
After using the car for a long time, its owner may notice that the engine is no longer performing as well as it was before. In principle, all changes in engine operation should always alert the driver, since this is often fraught with quite serious consequences. In most cases, adjustment of the VAZ-2110 valves (8 valves) is required if the following symptoms are present:
- excessive noise when starting the engine after the car has been idle for a long time;
- lack of compression in the cylinders (a noticeable decrease in engine power);
- oil leaks through the cover gasket;
- regular “shots” in the muffler or carburetor;
- increased fuel consumption.
It is not necessary to go to a specialized car service in order to diagnose the above problems.
Video on adjusting valve clearances on a VAZ 2110-2112
This review was provided by me specifically for this material and embedded from the YouTube channel. If you have questions about this video, you can ask them under the video on the channel.
It is worth noting several important points regarding adjustment.
Location of intake and exhaust valves
If you look from left to right, when you are facing the engine, the arrangement of the valves will be as follows: exhaust-intake, intake-exhaust, etc., I talked about this in detail in the video review. If you have the instructions for repairing and operating the car at hand, the location is also explained there.
Nominal clearances
As for the installed clearances between the camshaft cams and valve tappets, they should be as follows:
Checked at engine temperature close to 20 °C. That is, the engine must be cold.
Calculation and selection of the thickness of new adjusting washers
If, when measuring the gap, it turns out that some of the adjusting washers need to be replaced with new ones, with greater or less thickness, then you need to know the following simple formula:
H=B+AC— where A is the value of the measured gap, B is the thickness of the old washer, C is the nominal gap, H is the thickness of the new washer
Again, the instructions above explain all this in more understandable language.
After adjusting the valves on a VAZ 2110-2112, you must install all the removed parts in the reverse order of removal and start the engine. Listen for knocking noises while the engine is running, both when the engine is cold and when it is hot. Also, pay attention to starting the engine so that there are no problems with this. If there is still a knock or other symptoms, it is necessary to re-measure the gaps of the non-problem valves.
Source
Tool for adjusting VAZ valves
Before adjusting the VAZ-2110 valves (8 valves), you should acquire all the necessary plumbing tools:
- a rack with which the pushers will be pressed out;
- micrometer;
- multi-part probe.
The latter is required in order to measure the thermal gap formed between the adjusting washer and the camshaft cam. If you couldn't get the rail out, you can replace it with two powerful slotted screwdrivers.
Today, you can easily find all the necessary installation kits in any store that sells spare parts for cars. The cost of such a set in most cases ranges from 200 to 500 rubles. You should definitely get a kit, since having the necessary tools will greatly affect the success of the adjustment.
Types of valve clearance adjustment
There are several types of adjustment of thermal clearances of valve mechanisms .
The first type is automatic clearance adjustment using hydraulic compensators. A hydraulic compensator is a device that, due to oil pressure, maintains the required thermal gap. Such a mechanism does not need adjustment, and if it has not failed, then the gap is always normal.
The second type is screw adjustment of thermal clearances . The most convenient and comfortable option, from a regulatory point of view. The gaps are adjusted with special screws, and there is no need to buy any parts for the procedure. All you need is new gaskets. Also, in most cases, significant disassembly of the cylinder head is not required for the procedure.
The third type is adjustment using washers or pushers . A fairly common and problematic option. The difference between a washer and a pusher is that in the case of a washer, the washer and the pusher are two separate parts, and only the washer changes. In the case of the pusher, it’s all one part, and the whole thing changes. The complexity of this method lies in the fact that to set the required gap, the old pusher is removed and a new one with a different size is installed in its place. Several difficulties arise here: to replace the pusher you need (almost always) to remove the camshafts (washers can sometimes be replaced without such disassembly), not all sizes of pushers are available in Ukraine, and you often have to order them and wait, and the last thing is the price of the pusher. As a rule, the cost of pushers is hundreds of hryvnia, and there are as many of them in the engine as there are valves. The budget for such adjustment of valve thermal clearances can be very large. But if this is not done, sooner or later, the engine will stop working.
The camshafts have already been removed from the cylinder head to remove the valve lifters. One of the pushers lies on the cylinder head.
Preparing the workplace for the phase control unit setup operation
Techniques aimed at adjusting the operation of a heat engine should be carried out in a room with an air temperature of about 20-30 degrees Celsius. In addition, you should arm yourself with:
- probes;
- a table reflecting the dependence of the intake/exhaust processes in certain cylinders on the relative position of the marks on the pulley and the housing;
- calibrated washers;
- a set of heads and a wrench;
- a device for pressing and fixing the pusher;
- sealant.
VAZ 2110: 16 or 8 valves - that is the question!
If you are on this page, then you are one of those people who decided to buy a VAZ 2110 8 or 16 valve car and don’t know which is best for you. This article will show you all the advantages and disadvantages of each car option and help you choose what really suits you.
- A short list of disadvantages and advantages
- Eight valves
- Sixteen valves
- Review of engine technical characteristics
- Comparison from different points of view
- Favorable cost
- Maintenance - repair difficulties
- Tuning and the opportunity to participate in racing
- Results
A short list of disadvantages and advantages
So, let's first figure out what the pros and cons of 8 and 16 valve engines are relative to each other.
Let's compare which is better - VAZ 2110 8 valve or 16
Eight valves
Advantages of this engine:
- If the timing belt breaks, the valves do not bend
- You can fill in motor oils that are not of very good quality
- Takes up little space in the engine compartment - good access to other components
- Torque is concentrated at low revs
- Easier and cheaper to maintain
Negative aspects of the engine:
- Has higher noise and vibration levels than a 16-valve engine
- Requires regular engine tuning (valve adjustment)
- Timing belt tension needs to be adjusted
Installation and adjustment of a split gear on a VAZ
| During engine production, a slight deviation in the dimensions of the parts of the gas distribution mechanism and the crank mechanism is allowed. Due to this, the valve timing (GDP) of an engine of one model may differ from the nominal ones. Sometimes the error can be within one tooth on the gear, which negatively affects the operation of the power unit. To compensate for this error, it is recommended to install adjustable camshaft gears. |
Why do you need a split camshaft gear?
The standard solid gear is fixed in only one position, and it can only be changed by a tooth forward or backward in increments of 17° along the crankshaft. The split gear makes it possible to change the position of the camshaft relative to the crankshaft in increments of tenths of a degree, which makes it possible to compensate for errors in the dimensions of engine parts. It also becomes possible to make adjustments without loosening the timing belt tension.
Installing a split gear on a VAZ 2110
Instructions for the 16 valve VAZ-21124 engine (see also timing belt replacement):
- We turn out the spark plug of the 1st cylinder and install a micrometer with an extension of about 200 mm.
- We engage 5th gear and begin to slowly rotate the wheel in the direction of travel.
- We determine the top dead center (TDC) using the instrument (the needle has stopped or gone in the opposite direction).
- We remove the timing belt and mark the tooth on the gear in the position in which they are well fixed.
- We remove the standard one and put on the split gear, marking it with a mark.
- We put on the belt according to the marks made on the toothed part of the gears.
- We set the TDC indicator and combine the marks with the real values.
Instructions for an 8 valve engine on video:
Adjusting split gears, changing the FGR
Thanks to the ability to change the position of the camshaft relative to the crankshaft in increments of tenths of a degree, it becomes possible to change the characteristics of the engine (shift the phases forward or backward), without weakening the tension of the timing belt. By moving the shafts in different directions (no more than 2-4 degrees), we get an increase in air at low speeds, and by moving them - at high speeds. By moving the right gear clockwise and the left gear counterclockwise, the overlap becomes larger than standard. This increases torque at high speeds. Disadvantages:
- deterioration of low-end dynamics
- Fuel consumption increases at high speeds
- idle speed is less stable
- In winter, the engine warms up more slowly
Advantages
- fuel consumption at idle speed decreases (by approximately 0.1-0.2 l/100 km). Good for cities with traffic jams.
- good pickup at high speeds (from 3000 rpm to 6000 rpm), increase in power by about 4%.
By moving the right gear counterclockwise and the left gear clockwise, we reduce the overlap, which allows us to increase torque at low speeds. The pros and cons are reversed. To summarize, we can say that using the settings of the split gears, you can shift the valve timing, changing the characteristics of the engine under certain conditions. Have you done this type of engine tuning? What adjustments do you recommend? Let us remind you that adjustable gears are often installed together with sports camshafts and a zero-resistance filter. Taken together, such improvements provide a noticeable increase in power. xn--2111-43da1a8c.xn--p1ai
Adjustment procedure
The procedure for adjusting the valves on all modifications of the 8-valve vase is the same. There are differences only in injection Grant cars, Kalina 2 with a Grant engine. They have a lightweight piston group and metal-ceramic seats. In this regard, the gaps differ upward by 0.05 mm. Knowing the order and adjustment scheme, you can adjust the valves yourself. The downside is the lack of a set of washers for adjustment. It’s expensive to go to the market to buy them every time, and it’s also expensive to buy the entire range.
Here is a detailed diagram of valve adjustment for VAZ 2108, 2109, 2114, 2115
- First you need to cool the engine. You can use an additional cooling fan from any VAZ car. Place it on top so that the airflow is towards the internal combustion engine and turn on the 12 V power supply;
- When adjusting 8 valve engines (11186, 11113 oka, 1118, 1111) with a mechanical throttle assembly, unscrew the throttle cable from the intake manifold receiver;
- Disassemble the valve cover, timing belt side casing. Disconnect the large and small breather hose going to the throttle body pipe;
- Pump out the oil near the valve cups using a syringe or bulb. It is most convenient to use a regular medical syringe with a white silicone hose at the end;
- Install a device for adjustment - a rack for pressing the valve, also called a ruler;
- Set the first adjustment position. Turn the camshaft clockwise to the mark and tighten 2-3 teeth. For cars with a lightweight piston group (Granta, Kalina 2, Priora), turn strictly by the crankshaft. If you turn the camshaft, the timing belt may slip, and if this is not noticed and the engine is driven, the valves may bend;
- Adjust in the following sequence: 1 outlet and 3 inlet valves;
- Rotate the camshaft 90 degrees. Adjust 5 outlet and 2 inlet valves;
- Rotate 90 degrees. Adjust 8 exhaust and 6 inlet ports;
- We make the last turn by 90 degrees and adjust the 4th exhaust and 7th inlet valves;
- Reassemble in reverse order. We install a new gasket under the valve cover to prevent oil from leaking out.
- On carburetor engines, everything is done in a similar order. First you need to unscrew the filter housing and the suction cable. The frequency is the same as on the injector 30,000 km.
On engines with 16 valves, adjustment is not required, since thermal clearances are selected automatically using hydraulic compensators.
Checking the gaps is also required after repairing the cylinder head. Especially after replacing the guides. When replacing bushings, the seats are countersunk with a special tool and deliberately recessed into the head. Accordingly, you need to follow the sequence, set the optimal gaps and repeat after 1000 km.
Adjusting the 8kL engine for gas increases the mileage between adjustments. If the engine is not intended to operate on gas equipment, the seats and valves will quickly burn out, and in order to somehow extend the service life, the clearances should be made a little larger than standard. Usually they do +0.05 mm. If the gap is not set, that is, does not expand, then the saddle is sunk a decent distance into the head. In this case, you need to measure how much the gap needs to be increased, disassemble the cylinder head and file the end of the valve. The second option would be to replace the seat or the cylinder head itself.
Location of valves in a VAZ 2110, 2111, 2112 car
Using the above diagram, we will look at the structure of engines and the arrangement of valves in the VAZ 2110, 2111 and 2112 (with an injector and carburetor) for 8 valves.
None 2 – valve;
3 – pusher; 4 – surface of the bearing housing;
5 – shaft for distribution; 6 – washer for regulating fuel supply;
7 – oil reflecting cap; A - gap between the mechanism cam and the adjusting washer.
In this diagram we will look at the structure of VAZ 2110, 2111 and 2112 engines with 16 valves. The 16-valve engine version uses a DOHC-type twin-shaft timing belt as shown in the picture below.
Next you can see a side section of the engine. As you can see, the 16-valve engine uses two camshafts, but otherwise the system is not much different from the 8-valve version.
And now a little about the innovation in the VAZ 2112, where an injector is used instead of a carburetor. Gasoline engines have either a fuel injector or are equipped with a carburetor. These two units perform the same function - they form a combustible mixture for supply to the engine. But how are they different? Differences between a carburetor and an injector:
- In the carburetor, the combustible mixture is sucked into the engine, and in the injector it enters the engine cylinders through injection.
- The carburetor is unstable, while the injector ensures efficient engine operation.
- The operation of the injector does not depend on weather conditions. The carburetor freezes in severe frosts.
- An injection engine picks up speed easier than a carburetor engine.
- The injector is more picky about fuel quality.
DIY adjustment
So that not a single valve on the VAZ 2110 burns out after our intervention, and accordingly, it does not need replacement, and the car works “like a clock,” adjustment should be carried out only with the help of special probes.
- We remove the hoses from the valve cover and crankcase ventilation fittings;
- Then remove the valve cover and its gasket. Remember: there are rubber bushings in the holes of the cover, you must not lose them;
- Install the adjusting device;
- Having placed marks on the camshaft and crankshaft, set the first cylinder to TDC (top dead center);
- We rotate the crankshaft an additional 40-50°, which corresponds to approximately 2.5-3 teeth on the camshaft pulley;
- Be sure to put your marks, which will be necessary for further work;
- We count 11 teeth from the first mark, put a new mark behind them, then put the mark at 10.5, and again after the 11th tooth;
- Now we need a special probe, which is mentioned above. In principle, every car owner should have one, but purchasing one is also not a problem. We measure the gaps one by one and select new washers. To do everything as accurately as possible, we use a formula that determines the thickness of the new washer. N (required thickness of the new washer that you will install under the pusher) = B (thickness of the old washer) + (A is the gap that you measured – C is the nominal gap). That is, H=B+(A-C). We check the thickness of the new washer with a micrometer.
There is a special table according to which you need to check the sequence of turning the crankshaft half a turn in order to adjust each valve.
The washers are replaced using a valve adjuster. It is more convenient to work with it, although some people make do with two strong flat-head screwdrivers. Using tweezers, you need to pry and remove the old washer, and install a new one in its place, always with the marking down.
After replacing the washer, you need to remove the retainer, then check the valve clearance with a feeler gauge again. If the feeler gauges 0.20 (for the intake valve) and 0.35 (for the exhaust valve) enter the gap with little force and can be moved, then the adjustment was successful.
We carry out the same adjustment with each valve of the VAZ 2110. At the same time, we look to see if it has burned out. This is followed by replacing the gasket and replacing the valve cover. Here, of course, you need to look at the condition of the gasket. If it is already worn out, then only replacement, because compression largely depends on it, as well as the “retention” of oil inside the engine. If the cover gasket is relatively new, it may still serve.
After the adjustment, start the VAZ 2110 and listen to how it works. If the valves do not knock, the car operates stably, it means that everything has been done correctly, and you can hit the road.
Replacing hydraulic compensators on the 21126 Priora engine 16 valves
First of all, you need to buy new hydraulic compensators for the Priora engine. It is important to take into account that if one main valve fails, then everything should be changed. To carry out the work you will need the following tools.
Tool
- Set of wrenches with socket heads;
- Screwdrivers;
- New set of compensators;
- New cylinder head cover gasket;
- Camshaft seals;
- Sealant;
- Magnet (optional).
Why are hydraulic compensators knocking?
The 21126 engine is a reliable design with a long service life, but even with such characteristics, difficulties may arise in the operation of the gas distribution mechanism. Over time, when driving a Priora, a characteristic knocking sound of the hydraulic compensators occurs when cold or hot. In this case, there is a drop in the power of the power unit and an increase in the noise level of the latter.
It is worth noting that the service life of this part for VAZ 2170-72 Priora cars is about 100 thousand kilometers. It may vary and depends on the quality of the oil used.
The main reason why knocking occurs is the characteristics and quality of the engine oil. The design of hydraulic compensators implies increased sensitivity to the characteristics of the lubricant and, accordingly, deviations from the manufacturer’s recommendations directly affect the service life of the hydraulic fluid.
Video on the topic:
» Quite often the knocking problem is solved by changing the engine oil. In this case, it is necessary to flush the engine with a special liquid.
Almost always, after an oil change, a characteristic noise from the compensators follows, because the new oil has not had time to rise to the plunger pair of the hydraulic valve. This is observed for about the first five minutes of engine operation, after which the knocking stops.
If after changing the oil the situation has not changed and the knocking continues, then there is the option of flushing the power unit, which is done in two ways:
- Use of special flushing fluid. It is poured into the engine and temporarily used in it. However, its effect is questionable, since there are often fakes on the market, and they do not help.
- Dismantling and manual washing of each hydraulic compensator.
What to do if the valve is bent
Many VAZ owners have encountered the problem of bent valves on their cars. Although those who have not personally encountered this, but have heard from acquaintances or friends, are also interested in why such trouble occurs and whether this will happen to their “engine”. So on which VAZ 2110 engine does the valve bend? The valves bend on a 16-valve engine, which is due to its design.
Important! The exception is engines with a volume of 1.6 liters with 16 valves, in which recesses were made in the pistons.
This happens due to a broken timing belt. Subsequently, the “plate” or leg of the intake/exhaust valves is bent. Motors whose pistons have recesses specially created in case of a belt break are insured against such a problem.
To prevent such incidents from happening, you need to inspect the belt more often for wear. If the belt is worn out, then you need to change not only it, but also the tensioner roller, because quite often, due to a faulty roller, the belt wears out many times faster.
VESKO-TRANS.RU
AutoNews / Reviews / Tests
Adjusting Valves on a 16 Valve Engine
Are the valves adjustable on a 16 valve engine?
March 19, 2004 Posts: 42 From: Orenburg Auto:
Published: Friday, September 24, 2004, 2:57 pm Message Title
: a question about the valve will prompt you
to adjust
the valves on a car with 79,000 miles (never been adjusted before), otherwise the call is to leave our client as is? Return to top Viktor_21102
March 11, 2003 351 posts From: Khanty-Mansiysk Auto:
Published: Friday, September 24, 2004, 15:12 Post title
: If the engine is 16
valve
. not required if there are 8 valves. It's been a long time, it's strange that the engine is still running. _ Happiness in family life, success. personally. Return to top alex
September 19, 2003 886 messages
Published: Friday, September 24, 2004 3:24 pm. Post title In the sense that at 16V there are none at all.
The only ones that have multi-valve gaming slots. improved ventilation of the combustion chamber. this is noticeable at high engine speeds. You can use this main advantage of slots in slots in a narrow rpm range (3000 to 4000 rpm, in fact). So the engine becomes unpleasant and elastic.
there is no bottom difference in the top 8 cells. loses. So who will have to switch more often? Compare engines 124 and 114 as an example. More thrust | band 124 spectrum width | range 114, spectrum width | 110 nm | 1550-6000, 4450 | 1450-4600, 3150 120 nm | 2000-5300, 3300 | 2200-3950, 1750 130 nm | 2700-4900, 2200 | 2600-2700, 100
As we've already learned, 8 cells operate in much narrower spectra, which means moving to them more frequently.
This message was edited by Transparent Pepper: May 9, 2011.
In this case, only valve adjustment is considered on a VAZ 2110 with an 8-valve engine, since this is not done on a 16-valve engine, since hydraulic compensators are installed for them. So, if you are the owner of a 10 with a sixteen-valve engine, then when detonation occurs, you only need to change the “hydraulic system,” but if your VAZ 2110-12 has an eight-valve engine, you need to adjust the thermal valve clearances.
This procedure can be done independently if you have the right tools. We will help you with a step-by-step annotation for the photo.
Self-regulating valves included VAZ 2110 looks like this:
Remove the valve cover;
Install a special adjustment device (many do without using 5 massive flat-head screwdrivers);
Set cylinder 1 to TDC. To do this, place a mark on the crankshaft and camshaft (8 engine cells; 16.
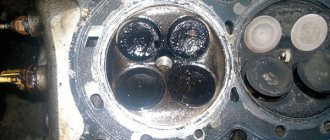
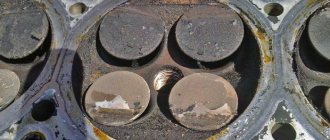
Some owners are not yet aware of the dilemma of timing belt failure before purchasing a car, and therefore, on some engines, the pistons collide with the valves and are bent by them. This problem occurs not only on Russian cars, but also on modern foreign cars, and all this can lead to quite expensive repairs. This problem existed in older Lada models, unfortunately, at the moment we are interested in modern engines, we can get to know each other. And the consequences of this problem are only shown on the left of the picture, so read the information below carefully to avoid such a picture, because they say that for this reason no one is immune.
Why and is this necessary? ADJUSTING VALVES? BE WANTED!
Probably, beginners do not understand why adjust the valve
by car, but what if they went
to regulate
in general.
Control valve for VAZ 2110, 2114, Kalina, Granta, 2109, 2108
Video summary on regulation of thermal clearances of valves
on VAZ cars front-wheel drive from 2108 to.
Bends valves on the following engines
Just recently I received two letters from AUTOBlog, both letters about Lada Priora engines and, in particular, about the valve.
First letter: “Hello. I have a question. a year earlier I bought a Priora, had a long trip and on the road the timing belt broke, most of the valves were bent. He hired a tow truck and pulled the car to the official station. They looked and said that they would not pay anything, no repairs, no tow truck. And they said I was guilty! To the nuts! How can I control the timing belt? But how to go without it breaking? Andrey "
2nd letter: “Good current time of day, I would like to know what are the priorities for the valve not bending? Thanks in advance, Kazbek"
You see, the question is really about one topic. Let's think, if the valve changes on a Priora, if your belt breaks and the valve bends, who is to blame? Read more.
Is the valve bent in priority?
First I will answer the second question that Kazbek asked. Which priors are not depressed.
Sanya: In principle, the car is excellent, reliable. For 3 years of work, he did not stand in the way. Of course, the breakdowns were unfortunately minor. Front-wheel drive with good tires performs well in mud, snow and ice. in general, it's better to think about Ferrari in the 10s than about the big one! 09: 01/01/2011
whitefish: it's normal that in my 10th gear it comes out normally at a very low speed and a little faster than the scratch answer 23:30 01/29/2011
Vovan is their problem, I advise you to pedal fully and wait 2-4 seconds and then stick with it Reply 18:39 May 23, 2011
Vadim, I have the same thing and I’m not doing anything. such a box is the answer
Arteta: Tell me, who has the car from the Cherkasy meetings? What is the quality of the car? Answer 10: 02/14/2011
The invited men say that you need to take Cherkasy 21104 or better take 2115 Answer 19: 02/21/2011
Kalbasoff I have a Circassian collection, although she claims.
Site navigation
Types and properties of viburnum engines, their pros and cons
Various types of engines are installed on Kalina, the first one is installed with a conventional 8 valve
with a displacement of 1.6 liters under 11183, in the end they began to install 11194 engines with the smallest 1.4, but with 16 valves, on more expensive cars such as Kalina Sport, they also install the Priorovsky engine under No. 21126, which has a volume 1,6 and 16 valves.
In 2012, AvtoVAZ released a new engine number 21116 with 8 valves and a displacement of 1.6, the main difference from 11183 is a lightweight piston (due to this power, unfortunately, the engine was included). Although this engine was only installed on a grant that came in exchange for a Kalina car, unfortunately, I think that in the future it will be installed on a Kalina.
Main pros and cons of engines
VAZ 11183 (1.6-8cl):
The engine has been recognized and tested (repaired).
Completely on all classic engines, including the VAZ 2106, sometimes it is necessary to adjust
. Otherwise, some valves will gradually tighten, or, conversely, the gap will be large and they will knock. To avoid this, you need to make timely adjustments. First of all, I will give you a list of tools that will be useful for this VAZ 2106 job.
13 key open end wrench for 17 keys Probe set, to be precise we will need one probe 0.15mm wide. Additionally, there is a list of tools needed to remove the valve cover.
Step-by-step guide to adjusting the thermal clearance of valves on a VAZ 2106
As you continue this work, keep in mind that the car's engine must be cold, in other words, its temperature must be very close to room temperature. It is also worth noting that the timing circuit voltage will be.
Technical characteristics of VAZ engines
VAZ 2110 engine
VAZ 2111 engine
VAZ 2112 engine
Ivan: The car is no problem, convenient, in good working order. I’m driving for the 3rd year, usual pre-sale preparation, timely service, mileage about 40 thousand. During this time, only the main muffler, which stalled in the 2nd year, and one rear brake light were replaced. And spark plugs with our cheap Ukrainian cheap gasoline need to be changed every 10,000 km. The gas system should be cleaned after 10,000 km by pouring modern chemicals into the gas tank and then replacing the fuel filter. The engine has 1.6 and 16 valves, and fuel consumption is within 5-6 liters. in the suburban cycle and 6-10 liters. in the city. Reply 08: 05/23/2008
Causes of pinched valves
The first factor is most often observed on those cars whose owners have equipped their cars with LPG equipment (gas equipment).
Gap too small
As you know, the valve has a plate - its widest part, which is located directly in the combustion chambers. On the reverse side it is attached to the cylinder head. As the car's mileage increases, the chamfer on the surface of the plate and the mounting location begin to wear out. As a result, when the rod is raised, the pusher is pressed too tightly against the camshaft cam. This is how compression occurs.
Such a phenomenon does not bring anything good to the motor.
Processes
Consequences
The intake elements, unlike the exhaust elements, have the opportunity to be cooled by a new portion of the fuel mixture. There is virtually no exhaust heat removal.
Increased clearances
Another situation is when the gaps between the valve and the piston are too large. With use, natural metal wear occurs on the camshaft journals and on the surface of the cams. Accordingly, an increase in gap values appears. If adjustment is not carried out according to the regulations, for obvious reasons the gap will increase even more, including from shock wave loads. You can find out about this by the characteristic clatter of the engine even after reaching the optimal operating temperature.
Gradually, the valve timing begins to be disrupted, and the power of the power plant decreases. This happens due to the delayed opening of the intake and exhaust elements. The air-fuel mixture arrives late, and the exhaust gases cannot escape completely, as a result the engine begins to operate unstably, noise increases, etc.
It is important to carry out adjustments in a timely manner and not neglect this procedure. The last resort in the most advanced cases is a major overhaul of the cylinder head.
Setting procedure
The first step is to put the adjusting device in place, then by turning the crankshaft, align the mark on its pulley with the protrusion on the cylinder block. In this case, the mark on the camshaft gear should also align with its protrusion. In this position, the piston of the first cylinder is at the very top (TDC), which can be easily checked with a screwdriver through the spark plug hole.
Then proceed in the following sequence:
- Check the tension of the timing belt by turning it around its axis as far as possible. A well-tensioned belt will not turn more than 90°. If you find any slack, tighten the belt using a pulley, otherwise further adjustment will be difficult.
- Using a wrench, turn the camshaft slightly clockwise so that the gear moves 2.5 teeth relative to the protrusion. Scratch your own mark on the gear with a sharp metal object - it will be useful to you in the future.
- Use feeler gauges to check the clearances in valves No. 1 and 3; they should be 0.35 and 0.2 mm, respectively. When the gap is set correctly, the feeler gauge moves in it with some effort.
- The size of the gap is adjusted with washers. If it is too small or large, remove the installed washer with tweezers and look at the markings where the thickness is electrographically applied. To be sure, it can be measured with a micrometer.
- Select the total thickness of the washers to maintain the specified gaps, check them with feeler gauges.
- Counting 11 teeth from the first mark, place the second, after 10.5 teeth - the third, and after another 11 - the fourth.
- Turning the camshaft clockwise and aligning your marks with the protrusion, repeat the valve adjustment in accordance with the table:
| Number of teeth between new marks | 11 | 10,5 | 11 | ||
| Intake valve number | Gap 0.2mm | 3 | 2 | 6 | 7 |
| Exhaust valve number | Gap 0.35mm | 1 | 5 | 8 | 4 |
Upon completion of the adjustment, remove the device, replace the plastic timing belt shield and reassemble it. Next, start the engine and check its operation by ear and while driving.