The vehicle control system is responsible for the direction of its movement, as well as, to a large extent, for the safety of the driver and passengers. One of the most important elements of this system is the steering rack. Its role is to transfer force from the steering wheel to the rods, which, in turn, force the steered wheels to turn in one direction or another.
With the exception of the latest versions in VAZ-2110 cars, the steering rack is not equipped with a power amplifier, but this does not mean that its mechanical design will last forever. Like any other moving mechanism, it sometimes fails. We will talk about what the VAZ-2110 steering rack is and what problems happen with it in this article. In addition, we will figure out how to repair or replace it yourself.
Design and role of the steering rack in the control system
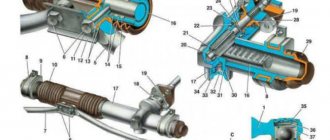
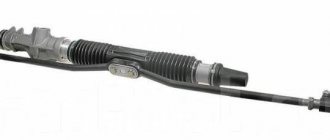
The VAZ-2110 steering rack is a steel form, one side of which has teeth that mesh with the teeth of the drive gear. The latter is driven by the steering wheel through the shaft and its cardan. In VAZ-2110 cars, the steering rack is located in a column, which is mounted on the partition between the engine compartment and the passenger compartment.
Its upper part has a mount for two rods, which are connected to the shock absorber struts through the tips and their fingers.
When you turn the steering wheel, its shaft rotates and transmits force through the cardan to the drive gear. As it rotates, it moves the rack along with the rods in the desired direction. This is how the car is controlled in such a simple way.
Naturally, to ensure normal operation of the rack, the design of the steering mechanism includes a number of other parts:
- column housing (case);
- protective casing (corrugation) with clamps;
- two drive gear bearings (ball and needle);
- support sleeve (fluoroplastic);
- emphasis;
- thrust nut;
- anthers, plugs, washers, etc.
Cotton steering wheel and how to deal with it
The design of front-wheel drive VAZ cars corresponds both to its price niche and partly to its purpose. An average car for economical travel over average distances at average speed. Know-how of the 80s of the Soviet automobile industry, the MacPherson suspension coupled with rack and pinion looked like something perfect in the early 80s. Although, in fact, the long-travel steering rack 2108 and the classic MacPherson of the 1948 model are not the most progressive solution even for a cheap car.
Compared to classic VAZ models, rear-wheel drive, with a classic steering mechanism and double-wishbone front suspension, the 2110 has more sluggish and imprecise handling. In a word, a wadded steering wheel. It won’t take long to figure out why this happened. Elementary geometry - MacPherson does not hold the car well in turns and during acceleration and braking, and the steering had a long stroke and an unsuccessful upper rack location. Hence the looseness of the steering wheel. It is technically inherent and cannot be cured by any settings or adjustments.
Video tutorial on repairing a VAZ steering rack
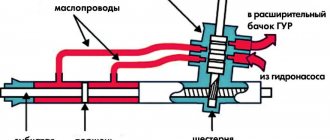
However, since the 2000s, a slightly improved design of the power steering rack has been used. There wasn’t enough for everyone at once, because first of all, cars with hydraulic booster were exported. Later, when Europe was full of Zhiguli cars, cars with power steering began to appear more often. But the hydraulic booster did not save the situation. And that's why.
How to eliminate backlash?
If you identify signs of a malfunction, do not despair; perhaps everything will cost you with minor repairs, especially since the rack itself very rarely fails. First, let's figure out whether there is play in the steering wheel and how to tighten the steering rack on a VAZ-2110 to get rid of it. First of all, open the hood and find the location of the column. We dismantle the engine elements that interfere with free access to it (air filter, air duct). Holding the steering rods with both hands, try to move the rack left and right. If play is detected, we get rid of it by adjusting the thrust nut.
Preparatory activities
The first thing you need to do is buy a steering rack repair kit. Without it, starting work is completely useless. The set may have different configurations.
- Minimum (washers, fasteners, bushings, nuts, bearings).
- Medium (in addition to all of the above, shafts are added). The cost of such a kit is twice as much.
- Maximum (everything is included here, including the rack).
Please note that there are different slats - old and new. The former are intended mostly for the VAZ 2108, and the latter for the VAZ 2110. It is better, of course, to give preference to the second option, because in this case the bushing is much easier to change (there is no need to disassemble the entire rack).
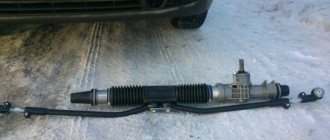
Removing the steering column
If after adjustment the problem with the rack does not disappear, you will have to disassemble and repair it. But to do this it needs to be removed. There are two methods of dismantling: with and without tie rods. The latter method is preferable as it requires much less time. Before removing the steering rack on a VAZ-2110, the front part of the car needs to be jacked up on both sides. This is necessary in order to unload the traction.
In the cabin, in the area of the pedal block, you need to unscrew the steering shaft cardan bolt. After this, we go to the engine compartment and unscrew the 2 bolts securing the rods, having previously bent the locking plate. Then you need to unscrew the 4 bolts securing the steering column to the car body. When this is done, remove the column and remove it through the opening of the left wheel arch.
Selection of repair kit
Before starting repair and restoration work, you should decide on the choice of repair kit.
Minimum set. This set includes the necessary list of fastening and sealing elements: washers, bearings, nuts and fluoroplastic bushings.
The basic set has bearings and shafts in addition to the minimum set, but its cost can be twice as high as the first option.
Please note that the steering rack can be either old or new. The old racks are designed for the VAZ 2108, while the new ones are designed for the “tenth” model. The new version is also more convenient to repair. If there is a need to repair the steering rack, which involves replacing the bushing, then there is no need to disassemble the entire mechanism. Remove the corrugation, unscrew the central nut and disassemble the rack into two component parts. One part will contain the mechanism, and the other part will be the one where the bushing is located.
What is a do-it-yourself VAZ-2110 steering rack repair?
Take care of your tools in advance. Here you will need two special keys: a 17 octagon and a 24 octagon, as well as bearing pullers. It is worth noting that repairing the VAZ-2110 steering rack involves replacing parts that are most susceptible to wear. These are bearings and a drive gear boot, a stop, retaining rings, a support sleeve, and seals. All these elements can be purchased as a set. There are three types of repair kits on sale:
- minimal, including a support sleeve, boot, retaining rings and seals;
- standard, which in addition to the listed parts includes bearings;
- complete, which also includes a new rack.
It is recommended to buy a repair kit only after you remove the column, write down its markings (different versions of the VAZ-2110 may have different configurations) and disassemble it, identifying the spare parts that need to be replaced.
Necessary tool
Now let’s look at what tools you will need to repair the rack yourself. This list is no less important than the list of spare parts, because if you do not have the correct key, then the repair may stop at the most interesting place.
Let's start with the most exotic and most important key, on which the repair of the rack depends entirely. You will need it at the moment when the rack is already removed from the car and turning it over you will see the rack stop nut . In preparation for the repair, I stuck my camera under the rail and took a couple of pictures. And this is what I saw. the rack stop nut looks like (bottom view):
The steering rack key comes in two types: for rack 2108 and for rack 2110. For rack 2108 it is a simple 17 octagon, it is not suitable for us. Our option is a 24 octagon, with a recess in the center, this is exactly what the wrench for the rack stop nut 2110 looks like. I’ll say right away, do NOT buy this option under any circumstances:
The stop nut sits quite tightly in the body; in addition, its thread is jammed during assembly so that it does not unscrew. Such a wrench is not capable of unscrewing this nut; at the first attempt it falls apart:
To avoid running around looking for a solution when the rack is removed, immediately buy a more reliable wrench that does not have flimsy welded joints. I was lucky, and in the nearest store I bought this good-quality key, the handle of which is screwed into the head:
Now let's look at the second, no less important for rack repair, key. We will not disassemble the suspension parts and thereby violate its geometry. We simply unscrew the steering rods from the steering rack, and during assembly we will install them in place, so we will not need to adjust the camber after repair. However, the steering rods are attached to the rack with fairly powerful bolts, which you are unlikely to be able to unscrew with a regular wrench. To do this, you need a powerful 15 mm socket and a wrench with a long handle of about a meter.
I had at my disposal an articulated wrench with a 40 cm handle and a half-meter piece of steel pipe that served as an extension.
The third key, which, in my deep conviction, is mandatory for repairing the rack, is a ratchet wrench , which is incomparably more convenient for unscrewing and tightening the nuts securing the rack to the body. The fact is that the nut needs to be driven along almost the entire length of the stud, and you have to work “by touch” - there is very little space there. With a ratchet, you can unscrew and tighten all 4 nuts securing the rack to the body in 5 minutes, but without it you can carry it for an hour.
For the ratchet, it is necessary to prepare heads for 10 and 13, and the head for 15 must fit the wrench mentioned above. Also useful are spanners 10 and 13 (for removing the battery and the platform under it), a jack, a sharp knife (to cut off the clamps), a pair of gloves, a flashlight, a medium-sized flat-head and Phillips screwdriver for unscrewing steel clamps. To work in the area of the pedals, you will need a flashlight, and for removing and installing the rack, I found a large pry bar very useful.
A pry bar or something similar is a must if you install the rail without a partner. I wanted to call my neighbor in the garage, but I managed this operation myself. However, wiping the sweat from my forehead, I’ll say right away that this is not an easy task and it’s better to call your neighbor in advance.
Here is a list of tools used in the repair:
- Special wrench for steering rack stop nut 2110
- Large hinged knob (for head 15)
- Medium ratchet wrench (for heads 10 and 13)
- Heads for 10, 13 and 15
- Socket wrenches 10, 13 (optional).
- Knife
- Screwdriver flat and Phillips
- Jack
- Flashlight
- Large mount
Disassembling the steering column
We begin disassembling the control unit by removing the protective casing by cutting the plastic clamps. After this, use a special key of 17 to unscrew the thrust nut, take out the retaining ring, the spring and knock out the rack stop. Next, remove the boot and drive gear seal, remove the lock washer, and then use a 24mm wrench to unscrew the nut securing the ball bearing. We remove the gear. Now that there is nothing holding the rail in the case, we remove it through the right side of the case. We remove the needle bearing of the drive gear from its seat. To do this you will need a special puller. Check the drive gear bearings for play. If present, the bearings will have to be replaced.
The support sleeve must also be replaced. It has a cylindrical shape and is located inside the steering housing. The bushing is removed by prying it off with a screwdriver.
Conclusions and recommendations for repairs
Particular attention should be paid to the condition of the support bushing and the worm gear mechanism. Damage to the anthers causes excessive corrosion of the rack, destruction of the gear teeth, destruction of the locking spring and clogging of all parts with dirt.
The parts need to be washed, bearing play checked, and cleaned. Also generously lubricate all mating surfaces. The rack stop and retaining ring must be replaced, as the parts most susceptible to friction and wear.
Replacing the steering rack of a VAZ-2110
It is rare, but it happens that replacing consumables is not enough. The steering rack, although made of steel, is still subject to wear. Most often, the reason for this is the negligence of car owners who do not monitor the condition of the steering mechanism. In addition, the rack may also be damaged as a result of a traffic accident. But there is no need to despair here either. The VAZ-2110 steering rack is replaced according to the scheme described above. The only thing you need is to purchase a complete repair kit, which costs on average about 1,500 rubles.
Useful tips
Finally, here are some useful tips that will extend the life of the steering rack and other elements included in the control unit:
- At least once a quarter, check the condition of the steering at a service station or yourself.
- Pay attention to the condition of the steering column protective cover.
- Try to limit driving on uneven surfaces, especially at high speeds.
- Do not test the strength of the steering rack and the entire mechanism by moving away with the steering wheel turned all the way to the side.
- If play or other signs of steering rack malfunction are detected, repair or replace it.
The steering mechanism of dozens has undergone several ongoing improvements throughout the entire production period of the car, but in general, the steering system is not far removed in design from the VAZ 2108-09 design. Perhaps that is why almost everyone who operates a ten repairs and adjusts the steering rack with their own hands. There is nothing complicated about this and now we will see it.
The design of the steering rack on the VAZ-2110
First, let's decide what we will regulate. The design of the rack is extremely simple. The hydraulic booster is not provided, so even with dismantling (which is not at all necessary), all the work will take an hour or an hour and a half.
Scheme and design.
The steering mechanism of the VAZ-2110 is a rack and pinion gearbox that converts the rotation of the steering shaft 27 into the movement of the rack 16 itself. Steering rods 5 and 7 are attached to the rack with bolts 6, which turn the racks with the steering knuckle. The contact point between the drive gear 21 and the rack 16 is most subject to load and, accordingly, wear .
When adjustment is necessary
between these parts , which leads to the appearance of symptoms indicating the need for adjustment:
- knocking in the steering rack when driving over bumps;
- increased steering wheel play;
- the steering wheel is too tight, the wheels do not align after turning;
- the rack “bites” periodically, this indicates critical wear of the rack or drive gear 21.
Clearances and adjustment
In these cases, it makes sense to try to adjust the gap between the rack and pinion in order to delay a major overhaul of the entire mechanism. And we will adjust the gap by pressing the adjusting nut 33 through the spring 32 and the rack stop 31, the rack to the gear.
We tighten the rail ourselves
We will carry out the work from under the car, so it is advisable to use an inspection hole or overpass. You can tighten the nut from under the hood, but this is extremely inconvenient and will take more time, we checked.
We install the car and secure it with the handbrake; just in case, we put wheel chocks under the rear wheels. Next we do this:
- Remove the engine protection.
We extend the carrier so that it can be seen better.
This is the same nut.
This is what the plastic plug looks like.
You will have to try a little to get the wrench into the nut.
Checking the steering play
To perform a play test, place the front wheels of your vehicle in a straight-ahead (straight-ahead) position. Take a long-blade slotted screwdriver and tape it to the dashboard with the blade facing the steering wheel. Now carefully turn the steering wheel in one direction and the other until the wheels begin to turn. When the wheels begin to turn, use chalk or thread to mark the limits of its free play on the steering wheel rim. Measure the distance between the marks and determine the free play of the steering wheel, which should not exceed 15 mm. If the free play of the steering wheel exceeds 15 mm, you need to check the condition of the steering rack, tie rods and ends, front wheel hub bearings and strut swing arms. After this, sharply jerk the steering wheel from side to side at a small angle. Make sure there is no knocking noise in the steering column universal joints or steering gear. If necessary, tighten loose fasteners or replace faulty parts with new ones.
Direct implementation
- First, we disassemble everything, wash it and begin cutting fragments of the required length. A PVC pipe with a diameter of 5 cm will act as a cracker; we will cut it and lay it in four layers. The length of the improvised bushings is 24 cm, so you don’t need to adjust anything, everything is tested from personal experience :).
- In the center of the pipe, it is necessary to remove a strip about 3.5 cm wide. This is necessary so that during installation the cracker can shrink to the shape of the rail.
- When the first fragment is cut out, you can begin installation. We carefully squeeze the cracker and push it inside so that nothing sticks out or sticks out anywhere, since during operation this can create a lot of problems.
4. Cut out the second cracker in the same way. The only nuance, and it needs to be taken into account, is that each new plastic element will shrink more, so the strip that we cut in the center should be wider than the previous one. After cutting, install the second fragment in place. If necessary, carefully trim everything using a sharp knife.
The 3rd and 4th crackers are manufactured and installed in the same way. You should get something similar to the one in the photo. Another important point is to make sure that the edges of the pipe do not protrude into the working window of the rack and do not interfere with the free movement of the steering rods and shaft.
When you install the last fragment, the free play between the housing and the shaft will become exactly what we need, as they say, snugly. For better results, add the required amount of graphite lubricant, change faulty parts (oil seals, tips, etc.), if necessary, and then reassemble in the reverse order.
- I personally and many who repeated this experiment are happy with the result! I hope you will also be able to remove the steering rack knock, and you will not regret the work done. Thank you for reading to the end. I would be grateful if you share this article with your loved ones on social networks using the special buttons located below. Good luck to everyone and see you again at VAZ Repair. Bye!
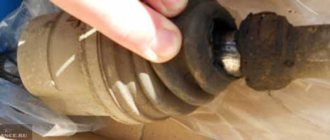
Checking the condition of the tie rod ends
You will need an assistant to perform this test. Take 2 jacks and lift the front of the car. Secure the machine to support stands. If you have a lift at your disposal, use it. Ask an assistant to grab the wheel and jerk it sharply in a horizontal plane, i.e. pull the rear part of the wheel toward you and the front part away from you. During this, you place your hand on the body of the ball joint of the steering tip and the swing arm and evaluate their mutual movement relative to each other. If you feel the ball joint move freely, replace the tie rod end immediately. In addition, change the steering tip if, during the inspection, you notice that the ball joint boot is torn.