10.10.2020
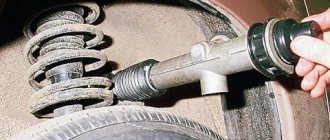
When driving a car, steering plays an important role. The mechanism ensures precise movement; a breakdown can result in serious trouble. In the device, the main role is played by the steering rack, which has a certain resource. The article will discuss how to repair a VAZ steering rack with your own hands. Car repair shops charge a lot of money for such work.
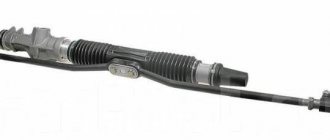
The rail is a kind of rod with attachments and 2 outgoing parts. You can understand that it is broken when you hear knocks from the front of the car when you turn the steering wheel. If a characteristic sound is heard while the car is stationary, the mechanism requires urgent replacement and it is dangerous to drive further.
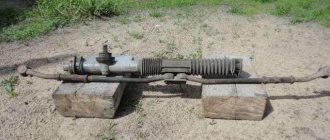
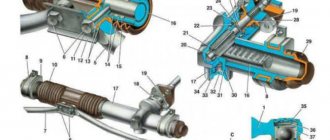
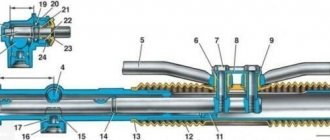
Steering rack diagram
Dismantling, diagnostics and installation of the steering rack
Regardless of whether the rack is being repaired or replaced, it must be properly removed and reinstalled.
List of DIY tools
For dismantling and repair you will need the following tools:
- flat screwdrivers of different sizes;
- pry bar or mounting blade;
- small hammer;
- pliers;
- torque wrench;
- a set of socket and ring wrenches ranging in size from 10 to 27;
- open-end wrenches for 10, 13, 15;
- special key for adjusting the steering rack. Such a key can be purchased at a car dealership or made independently.
Example of a wrench for tightening a steering rack
How to remove a part from a car for inspection
You need to know the location of the parts in the rack in order to carry out diagnostics carefully and scrupulously
Removal sequence for the rack:
- We unscrew the fastening of the steering cardan to the steering rack shaft in the cabin.
Remove all mounting bolts
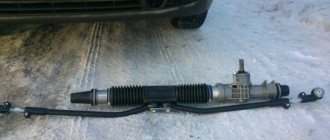
Removing the dismantled part
The need to replace the steering rack: diagnostics
To restore the performance of the steering rack, it is not always necessary to replace it; often the problem can be solved by carrying out maintenance with the replacement of tips, covers and bushings. Beginners should not service the steering wheel on their own. The design of this mechanism has many springs and pressing washers, and not everyone can disassemble the mechanism, sort through the parts and correctly replace them with new ones. Unprofessional installation of these parts will lead to incorrect functioning of the mechanism. The same applies if you need to loosen the mechanism or tighten it. It is also necessary to remember that repair work may well be more expensive than replacement, so the choice is sometimes obvious.
Experienced car owners restore the slats themselves, but this is not always possible
It is necessary to change the part in the following cases:
- a crack in the rack body or the threads for fastening the tips are broken;
- very strong knocking in the rack, increased play in the steering mechanism;
- corrosion of the internal parts of the steering rack caused by rupture of the rubber boot;
- the rack was deformed after the accident.
In the above cases, restoring the removed part does not make sense. Restoration by professional craftsmen will cost a lot of money. Therefore, it would be more expedient to change the entire rail, which will require less time and financial costs. It will be much easier to purchase a new one in the store and install it assembled in place of the old one, ensuring excellent operation of the steering mechanism for several years to come.
Installing a new
After diagnosing and repairing the rack, we install it in place:
- We set the rack to the middle position. To do this, unscrew the shaft in any direction until it stops and return it 2.5 turns. The shaft flat should be on the right and located vertically.
- Carefully insert the mechanism through the arch and secure it in the reverse order of dismantling. Tighten the bolts with a torque wrench.
If the steering system malfunctions, you should not immediately call a service station or buy the entire unit. If you have basic plumbing skills, you can repair and adjust the steering rack in your own garage. At the same time, you will be sure that you did not spend extra money and the work was done to a high standard.
Every car enthusiast in the country who owns the tenth model of a Lada is faced with the issue of a faulty steering rack. When such a defect appears, the car does not “hear” well while driving, especially when moving on an uneven road surface. A strong play appears, radiating to the steering wheel.
In addition, this malfunction affects the performance of the front axle. It creates sound that sound insulation does not protect against. The listed factors indicate that it is necessary to repair the steering rack on the VAZ2110 or replace the mechanical unit.
Useful tips
Finally, here are some useful tips that will extend the life of the steering rack and other elements included in the control unit:
- At least once a quarter, check the condition of the steering at a service station or yourself.
- Pay attention to the condition of the steering column protective cover.
- Try to limit driving on uneven surfaces, especially at high speeds.
- Do not test the strength of the steering rack and the entire mechanism by moving away with the steering wheel turned all the way to the side.
- If play or other signs of steering rack malfunction are detected, repair or replace it.
Malfunctions and their symptoms
There are not so many malfunctions that can occur with the mechanism itself. However, they can occur not only with it, but also with other steering elements - rods, ball joints, steering column.
Therefore, when they appear, all elements should be checked.
• An increase in the free play of the steering wheel may indicate wear of the gear sector due to dust and dirt getting inside the mechanism, as well as an increase in the gap between the rack and its stop. In this case, the engagement of the rack with the gear is reduced. Also, such a malfunction may indicate wear on the steering rod silent blocks or loosening of the ball joints in the steering knuckle;
• Knocks and noise from the steering when driving may indicate the appearance of a gap between the stop and the rack, or wear of the plastic bushing of the rack. A knock may also occur due to severe wear of the silent blocks of the rods, ball joints, or if the fastening of the gear shaft to the steering column shaft is loosened;
• Stiff steering usually indicates damage to the rack bushing or damage to the pinion shaft bearing. But ball joints and suspension strut bearings can also be to blame.
POPULAR WITH READERS: Lada Vesta 2022 – a new model with changes and improvements
Before starting repair work, you must first determine which element is faulty.
If the steering rods, ball joints and steering column do not cause suspicion, then you should look for the cause in the mechanism itself. But to do this it must be removed from the car.
How to make repairs
- Fix the rail in a vice in a vertical position. Clean the surfaces with a brush or cotton cloth previously soaked in white alcohol.
- Take out the steering rods. To do this, unscrew the bolts on the bracket that hold the rods, bend the force at the locking plate using a 22mm wrench.
- Remove the plate rods - locking and connecting.
- Pull out the tie rods.
- On the right side of the steering assembly housing, remove the retaining ring and support.
- Cut off the clamps that hold the protective cover. These are disposable items made of plastic. Replacing them is very easy and cheap.
- Remove the cover.
- On the left, remove the support and protective cap.
- Armed with a 17mm wrench, unscrew the nuts that are located on the rack stop. Remove it, take out the spring and ring.
- Knock the rack stop out of the socket. Hit the crankcase against a wooden base. To seal the groove, install a rubber ring on the stop.
- Remove the seal, remove the gear boot by prying it off with a screwdriver.
- Remove the lock washer.
- Using a 24mm wrench, unscrew the nut that holds the gear bearing.
- Remove the nut from the shaft.
- Using a 14mm wrench, unscrew the gear from the crankcase, simultaneously with the bearing itself.
- Remove the rack and remove the bushing. The element is pryed off with a screwdriver so that the protrusions fit into the holes in the crankcase. This will allow you to get the part without any problems.
- Install a new bushing. It is recommended to attach new damper rings made of rubber to it. This must be done so that the thin part of the ring is opposite the cuts in the bushing, and the protrusions on the bushing are freely placed in the crankcase hole.
- The rings need to be cut along the edges of the sleeve and the excess elements removed.
- Remove the retaining ring from the gear shaft.
- Use a two-jaw puller to compress the wide bearing.
- Press out the needle bearing with the same device, or make two holes with a diameter of 2 mm in the end of the crankcase, and then the bearing will come out onto the ring.
- Rinse the crankcase thoroughly, press in the needle bearing using a piece of pipe. Treat the holes made with cold welding.
- Using Fiol 1 lubricant, treat the bearings, rack and gear teeth. Place UNIOL 1 grease into the cavity under the nut securing the drive gear bearing.
- Reassemble the structure in reverse order.
- Place the new cover in place.
- Be sure to try to maintain a gap of 0.12 mm between the rack stop nut and the stop itself.
- Tilt the nut after adjusting the gap, which will prevent it from unscrewing.
If such a DIY repair of the steering rack on a VAZ 2110 does not give the desired result, simply replace the element. You have already become familiar with the process of dismantling the rail. Having taken out the old unit, put a new one in its place, following a strict sequence of steps.
Repair
The first thing you will need to carry out your own repairs is a repair kit. They are available at almost any auto parts store. However, we strongly recommend that you buy only high-quality kits so that the result of your DIY repair lasts as long as possible.
What you need for work
The proposed kits are incomplete and complete. You will definitely need the following kit components:
- Needle bearing;
- A pair of rubber seals for the bushing;
- Support sleeve made of plastic;
- Set of gaskets;
- Spring;
- Retaining rings;
- Support bearing;
- Drive gear;
- Boot cover;
- Rail;
- Set of ties for the boot.
Repair kit Now that the kit is ready, the tools are available, and there is enough free time, you can get to work.
- First, remove the boot, end caps and stops. As you disassemble elements, even the smallest and insignificant at first glance, be sure to evaluate their current condition. If necessary, all worn-out elements will be replaced with new ones taken from the repair kit.
- Using an octagon, unscrew the screw plugs, which will allow you to remove the springs, retaining rings, and thrust bushings.
- Remove the bearing and check if it has any play. The repair kit includes a new bearing, so if the old component is in satisfactory condition, it is better to replace it immediately. It’s not for nothing that you took on such a complex process to get everything done 50%.
- Remove and inspect the drive gear. Next, you can completely remove the rail itself.
- Be sure to replace the support shaft bushing, not forgetting about the rubber bands. They are also included in the kit.
- Take your time to remove the rubber bands from the sleeve. First, insert the element into the crankcase, after which you can cut off the elastic with scissors or a sharp knife.
- The most difficult step is replacing the needle bearing. To remove it, you will need a special key. But you can do without it. In this case, arm yourself with a 1.5 mm drill bit and a drill. Using a drill, make a hole in such a way as to loosen the end of the bearing. Use a punch to knock out the old bearing from the crankcase.
- Before installing the new needle bearing, be sure to thoroughly clean the steering rack housing of accumulated debris and steel shavings from drilling.
- The hole made cannot be left. To eliminate it, you can mix metal filings with superglue. This mixture will harden quickly and give an excellent result.
- Lubricate literally everything that can be lubricated in the steering rack assembly. Experts advise using Litol 24 or other lubricants of similar quality. It wouldn't hurt to lubricate the CV joints.
- Reassemble the unit by following the reverse sequence of dismantling.
If you don’t have a key to remove the needle, repairing the steering rack yourself allows you to significantly save on replacement, plus gain a lot of experience in performing far from the simplest work related to your VAZ 2109. But you can do it easier, without taking any risks, by contacting a trusted car service center.
Unit in a vice
Checking status
Having completed the repair, you should not think that now the steering rack will serve tens of thousands of kilometers and will no longer cause you trouble. Like many other components, the condition of the rack must be periodically monitored.
What to look for
Your actions
Mounting nuts and bolts
These fasteners are subject to vibration after repair as they are used. Therefore, it is recommended to check and tighten them every 250-300 kilometers.
You can check it a little less often, approximately every 500-1000 kilometers, depending on the operating conditions of your car. Due to different quality, some anthers can last quite a long time, while others will require replacement after 10 thousand kilometers. The choice is yours which parts to use
The rack itself should be constantly monitored
Listen to the behavior of the steering mechanism, pay attention to the above signs of malfunction. As part of a scheduled technical inspection, be sure to include a check of the steering racks in the list of activities.
The repair cannot be called complicated, but it takes a lot of time
Plus, it is extremely important to perform all operations as carefully and efficiently as possible. Otherwise, the result will not last long and you will soon have to interfere with the design of the VAZ 2109 steering unit again
Disassembling the steering column
We begin disassembling the control unit by removing the protective casing by cutting the plastic clamps. After this, use a special key of 17 to unscrew the thrust nut, take out the retaining ring, the spring and knock out the rack stop. Next, remove the boot and drive gear seal, remove the lock washer, and then use a 24mm wrench to unscrew the nut securing the ball bearing. We remove the gear. Now that there is nothing holding the rail in the case, we remove it through the right side of the case. We remove the needle bearing of the drive gear from its seat. To do this you will need a special puller. Check the drive gear bearings for play. If present, the bearings will have to be replaced.
The support sleeve must also be replaced. It has a cylindrical shape and is located inside the steering housing. The bushing is removed by prying it off with a screwdriver.
Diagnostics
First you need to make sure there is a problem. To do this, you need to turn off the engine, having first placed the car on the inspection hole. Then you need to turn the steering wheel several times until it stops in one direction and the other.
At the same time, at least two people are needed to determine the malfunction. One will turn the steering wheel, the other will evaluate the work of the rack from below. This will allow you to check for any gaps in the hinges. If the knocking noise remains even after disconnecting the rods and levers, the unit will have to be replaced.
There can be many reasons why the steering rack knocks. Therefore, diagnostics plays a huge role in repairs. The most common knocking noises are the tie rod ends and rods. The main sign of a torn tip is a damaged boot. It is because of this that the ball joint becomes unusable. Diagnosing a broken rod is much more difficult.
Unfortunately, it is difficult to verify that the steering rack is knocking precisely because of traction, because if the car was purchased with mileage, then the previous owner could easily replace the torn spare part without bothering with more serious repairs.
Important! To understand that the steering rack is knocking precisely because of the traction, you need to remove the boot and check the traction for any play
In most cases, the reason why the steering rack knocks is the bushing. This is part number 7 in the picture. It does not have a rigid fixation and is pushed forward by a spring, which is adjusted by a bolt with a lock nut.
Important! Most service centers, instead of replacing only the bushing, offer to install a new unit. Most often, such a policy of service centers is associated with a banal desire to make money from a motorist
Indeed, there are parts that change only during assembly. But this is not the case. The bushing for Honda cars is available for public sale. Moreover, you can do it yourself if you have the drawings.
Most often, such a policy of service centers is associated with a banal desire to make money from the motorist. Indeed, there are parts that change only during assembly. But this is not the case. The bushing for Honda cars is available for public sale. Moreover, you can do it yourself if you have the drawings.
Noise when turning
If you hear a hum when the steering wheel is turned to its extreme (or close to it) position, it means that you need to check the condition of the hydraulic or electric booster and the components of its working system. In this case, a hum may occur even if the fluid level is normal. You need to check the condition of the pump blades (often, over time, the pump’s performance decreases), the condition of its bearings, and the tension of the drive belt.
Power steering fluid leak
Regular leakage is a reason to check the power steering system and its seals. In particular, if the car owner is forced to frequently add fluid to the system’s expansion tank. In this case, a concomitant symptom of a faulty steering rack will be a fluid leak from the line. It can drain directly onto the ground under the car (usually right under the expansion tank) or streaks can be seen on the steering linkage boots.
Often, when a liquid leaks, air enters the system (the system is “aired”). It can be seen by the bubbling liquid in the expansion tank. As stated above, the cause of the leak may be rust on the rack. To get rid of it in the future, it is advisable to use non-standard plastic clamps to tighten the anthers, and their metal counterparts, which provide a higher level of tightness.
Knock when driving in the front axle
In fact, such a knock may also indicate a malfunction in the vehicle’s chassis, so additional diagnostics must be performed. The knock can be either in the center or on the left or right side. In the best case, a knock may indicate a torn traction boot; in the worst case, it can indicate problems with the rods, levers or other elements.
To understand exactly why such a malfunction occurred, it is better to remove and disassemble the rack. After all, the most harmless thing may be a loose adjusting nut or wear of the bushing (when there is a knock on the right), but a more serious problem is wear of the worm pair.
Torn boot on traction
When checking the performance of the rack, it is necessary to pay attention to the integrity of the traction boot. Ideally, it should be intact and the rubber should be elastic
If it is torn and dirt has gotten inside, it must be replaced, lubricant must be added after removing dirt, moisture, and debris from the mechanisms.
Electric power steering rack
To localize faults in the electric steering rack, it is necessary to check the following elements.
Correct diagnosis of the defect
The steering rack, like other mechanisms, may break sooner or later. And it is important to timely and correctly diagnose and determine what exactly the problem is.
This mechanism is invariably present in all cars. It’s just that sometimes it is equipped with a hydraulic or electric booster.
Loud knocks and impacts often reverberate through the steering wheel. This can happen both during normal driving or parking, and when turning the steering wheel. Especially when turning, the sounds are often amplified several times, which indicates a clear problem.
For correct diagnosis, you must do the following:
- Grasp the steering shaft, exactly in the part where it connects to the rack.
- Shake with sharp, but not too strong jerks up and down. If the sound repeats, it means that either the entire rack will need to be replaced, or the steering rack housing itself will need to be repaired.
- But it is quite possible that the knocking noise may be due to insufficient lubrication in the steering rack bearing. Apply grease to the bearing or replace this part.
- Next, you will need to check the bushing in the steering rack for play. And also, the place where the rack joins the steering gear.
To do this, you need to, under the hood, grab the joint of the steering rods and try to move the steering shaft.
Insufficient tension in the steering units can also cause knocking. This problem can easily be solved manually or by a specialist without additional costs.
If, after carrying out these manipulations under the hood, a knock is clearly heard from the rack, then the malfunction is located in this mechanism. Here the question is whether to change the steering rack or repair it.
Complete replacement of the steering mechanism is not a cheap pleasure, but this option is the most reliable. Since, after replacing the rack with a new one, the parts will last, with careful use, for quite a long time.
Repairing the VAZ 2110 steering rack at a service station, although it will be cheaper, will also cost a pretty penny. And, besides, there is no certainty that after repair the steering rack will not break again.
Lada 2110 ツɐʞdиҺツ (FORMER) › Logbook › Do-it-yourself repair of the VAZ 2110 steering rack.
Dear Drivers, any mechanism in a car does not last forever, so when driving on an uneven road, at one fine moment a knock
.
which gives into the steering wheel
.
Or standing still, there may be a knock when turning the steering wheel
.
These are the first signs that it is time to repair the steering rack
.
The following signs will help you determine the condition of the steering rack:
1.Grip the steering shaft where it meets the rack and move it up and down. If it knocks, then repair the rack housing (most often the reason is that the needle bearing is running without lubrication). 2. You can check the play of the bushing and the contact of the rack with the steering gear by grasping the joint of the steering rods from under the hood.
It’s good if the reason turns out to be poor tightening of the components, but if there is knocking in the rack, then you can do the following: 1. buy a new steering rack 2. restore the steering rack at a service station 3. repair the steering rack yourself
If the price of a new rack does not bother you, then of course it is better to install a new unit. Restoring it at a service station will also cost a pretty penny. Well, the cheapest way to get rid of knocking is to do everything yourself.
What should you know before starting work?
Repair kits are sold to restore the steering rack. The steering rack repair kit can vary in configuration: 1. The minimum set with a washer, bearing, new nut and fluoroplastic bushings costs 250 rubles. 2. A more complete set with bearings and shafts costs about 500 rubles. 3. A complete rack repair kit, which includes the rack itself, will be cost from 850 to 1100 rubles.
In addition, depending on the year of manufacture of the car, the rack may be old (VAZ 2108) or new (VAZ 2110-12). In the latter case, the difference is that you do not need to disassemble the entire mechanism to replace the bushing. It is enough to tighten the corrugation, then unscrew the nut in the middle and the rack is disassembled into two parts (one part is the entire rack mechanism, the second part is where the bushing is located).
The design of the steering rack is as follows. Removing and installing the steering rack on a VAZ 2110. The instructions are clear, except for one point. In order to pull out the shaft, you need a special 24 octahedron key, and there must be a hole inside the key.
If you don’t have such a key, then you can take a long bolt with a 17mm head. Then grind it out of a hex head - almost triangular (one of the edges is slightly sharpened). We sharpen the sides of the bolt to a 10mm wrench. The special wrench for the steering rack is ready!
Any mechanism in a car does not last forever, so when driving on an uneven road, at one point a knock may appear, which can be heard in the steering wheel. Or, standing still, there may be a knock when turning the steering wheel. These are the first signs that it is time to repair the steering rack.
The following signs will help you determine the condition of the steering rack:
- Grasp the steering shaft where it meets the rack and move it up and down. If there is a knock, then repair the rack housing (most often the reason is that the needle bearing is running without lubrication).
- You can check the play of the bushing and the contact of the rack with the steering gear by grasping the joint of the steering rods from under the hood.
It’s good if the reason turns out to be poor tightening of the nodes, but if there is knocking in the rack, then you can do the following:
- buy a new steering rack
- restore the steering rack at a service station
- repair the steering rack yourself
If the price of a new rack does not bother you, then of course it is better to install a new unit. Restoring it at a service station will also cost a pretty penny. Well, the cheapest way to get rid of the knock is to do it yourself. What should you know before starting work? Repair kits are sold to restore the steering rack. The steering rack repair kit can be configured differently:
- The minimum set with a washer, bearing, new nut and fluoroplastic bushings costs 250 rubles.
- A more complete set with bearings and shafts costs about 500 rubles.
- A complete repair kit for the rack, which includes the rack itself, will cost from 850 to 1100 rubles.
In addition, depending on the year of manufacture of the car, the rack may be old (VAZ 2108) or new (VAZ 2110-12). In the latter case, the difference is that you do not need to disassemble the entire mechanism to replace the bushing. It is enough to tighten the corrugation, then unscrew the nut in the middle and the rack is disassembled into two parts (one part is the entire rack mechanism, the second part is where the bushing is located).
The design of the steering rack is as follows. Removing and installing the steering rack on a VAZ 2110. The instructions are clear, except for one point. In order to pull out the shaft, you need a special 24 octagon key, and there must be a hole inside the key. If there is no such key, then you can take a long bolt with a 17 head. Then grind the hex head into an almost triangular one (one of the edges is slightly sharpened ). We sharpen the sides of the bolt to a 10mm wrench. The special wrench for the steering rack is ready!
How to prevent steering rack failure
There are several ways to slow down the wear and tear of the VAZ 2110 steering rack, because it is not only expensive to operate, but also a very important mechanism.
- It is recommended to regularly go for technical inspections and check important components on your car.
- If a knock is detected in the rack, the smartest thing to do is to immediately go to a service station for diagnostics.
- You need to treat the steering wheel with care (do not make sudden jerks and turns unnecessarily).
- Maintain a careful driving style and do not overload the car with luggage or passengers.
Repair or complete replacement
If funds allow, then it is worth purchasing new parts, as they guarantee maximum service life. However, the cost of the gearbox is quite high. There is always a temptation to buy non-original parts. Sometimes they will not be inferior in quality to products from the official manufacturer, but there is always a chance to stumble upon a low-quality product.
An alternative option is to make high-quality repairs. To do this, a special repair kit is purchased, and then the oil seals, anthers and other components are replaced. If you have some experience in car repairs, then you can do it yourself. Otherwise, it is naturally recommended to contact a specialized auto repair shop. Repairing a power steering system is difficult, so it must be done by highly qualified craftsmen.
Steering rack price for Lanos
For orientation, we have selected several options for replacing the rack on Lanos. It’s not a fact that it will have to be changed, however, we will know how much you can save if you spend time diagnosing and, in extreme cases, repairing the steering wheel.
- An original GM steering rack without power steering with catalog number 096275011, Korean, will cost $82 (or 2092 UAH) at the 2018 exchange rate. The quality is good, but you can find cheaper and no worse.
- For example, the Czech rack Profit 30418040. Its price is 79 dollars. A little worse in quality, but no crime.
- Lauber, made in Poland, catalog number 668267. This rack has power steering, which is why it is expensive, about $450. There is no point in changing it, just repairing it.
The prospect of completely replacing the rack is not bright, especially since the service station will most likely insist on replacement. No one wants to tinker with the steering wheel of a car of an outdated design; it is not profitable for them. It’s easier to change, but more expensive for us. It turns out we'll figure it out ourselves.
Interesting on the topic: How to change the timing belt on a Chevrolet Aveo T300 quickly
Carrying out replacement work
Again, watch the video on how to repair the steering rack on a VAZ 2110 with your own hands. This will make it easier to go through each stage.
Before pulling the steering rack off your VAZ 2110, treat all fastening joints with WD40 . Wait an hour and a half and repeat the procedure again. This must be done a day before the repair itself. This will make it easier for you to unscrew all connections.
Proceed in the following sequence:
- Before repairing the steering rack, your VAZ 2110 must be firmly fixed so that the car does not move.
- Place supports under the rear wheels.
- Put the car on the handbrake.
- Lock the steering wheel.
- Disconnect power from the battery.
- Place the car on a jack.
- Remove the front wheels.
- Buy a new boot for the rack in advance, as it will require replacement. Even if its condition is satisfactory, it is better to change it immediately.
- Unscrew the nuts from the ends.
- Remove your fingers from the strut levers. To do this you will need to arm yourself with a puller. It is mounted on the lever, the screw is tightened until it stops and the lever is hit with force with a hammer. In this case, be sure to hold the puller screw with a wrench.
- Unscrew the nuts from the clamps.
- Unscrew the bolt located in the passenger compartment on the steering floor near the floor.
- Pull the bar towards you using progressive and oscillatory movements.
- Please note that disconnecting the gear shank from the shaft is problematic. When the rail is just detached through the hole, tilt the assembly to the right side and remove the entire structure. Make sure the splines on the element are intact.
- Through the right hole on the body, remove the entire assembly.
Replacing the rack will require larger financial investments than repairing it. Therefore, first try to repair the steering rack on a VAZ 2110 with your own hands.
VAZ 2110 steering rack repair
Among all the sounds that surround the driver of a VAZ 2110, the most annoying is the crunching and knocking of the steering rack. It is not difficult to determine. It will drill itself into your ears until the rack jams at a busy intersection during rush hour, and you will learn a lot about yourself from other drivers. To prevent this from happening, the rack must be treated with respect and understanding.
What is needed to repair the rack
Not everyone has 10,000 in free circulation for a new rack, so we try to listen as carefully as possible to its operation in order to avoid a complete replacement. It will be enough to buy a repair kit. They come in two types - complete and incomplete. The complete repair kit includes absolutely all parts that need to be replaced during a major overhaul of the steering rack. The incomplete set mainly consists of rubber products, plastic bushings, boots and seals, which allow for routine and preventative repairs of the VAZ 2110 steering rack.
At service stations, special pullers and calibrated punches are used to dismantle some parts. If you don’t have them in your garage, it’s not fatal. Let's make do with what we have. But a minimum of tools is still required. There is nothing unusual in this set; just in case, it is advisable to have a drill and a set of drill bits on hand.
And one more very important point. A VAZ 2110 may well have a rack from an eight or a nine, so they have different repair kits. Before purchasing a set, check which rack you have: according to the documentation or the markings on the rack housing, so that you don’t have to go to the store and ask for a replacement.
Signs of wear on the steering gear
The following symptoms may be the reason to start repairing the VAZ 2110 steering rack:
- increased knocking noise in the left front part of the body;
- crunching sound when turning the steering wheel;
- lubricant leaking from under the boots;
- increased effort on the steering wheel when turning;
- periodic jamming of the steering wheel.
Even if one of these signs is present, it is worth carrying out work on the rail, and if all the troubles pop up at once, even more so.
Removing the steering rack
Before you start removing the rail, you should ensure easy access to it. There is no need to disassemble half of the car; it will be enough to remove the wheel and protective cover. Once access is granted, if possible, clean all accessible areas related to the steering. It is recommended to remove the rack assembly with transverse rods, because this will make it easier to unscrew them, and even more so, to put them in place. When installing, you will save at least an hour of time if you attach the rods in the vice. Now you can get started.
- Using a spanner wrench or a socket with a cross, unscrew the bolt securing the steering shaft. It is located in the passenger compartment in the pedal area.
- Unsplint the nuts on the tie rods and use a puller to press the pins out of the king pin.
- We unscrew the bolts securing the rack housing and remove it from the side of the removed wheel.
Disassembly and fault detection of the rack
After dismantling, we clean the rack from dirt, wash it and additionally check for lubricant leaks. Having clamped the rail through wooden blocks in a vice, we begin disassembly and defect detection.
- We take out the support plug and stopper, dismantle the cover by removing the plastic clamps.
- Using an octagonal head of 18, unscrew the thrust nut and remove the spring with the locking ring. The rack stop is removed by tapping the crankcase on a wooden block.
- Remove the lock washer by removing the boot from the gear.
- We unscrew the nut securing the gear and bearing, after which you can use a wrench and a mounting spatula to remove the steering gear along with the bearing.
- Now you can remove the rail itself and conduct an inspection.
- It is not difficult to remove the old bushing and replace it with a new one using a screwdriver. We put rubber dampers on the new bushing; when installing the new bushing, we carefully control its position relative to the technological holes.
- We remove the ball bearing from the shaft with a standard two-legged puller, and the needle bearing will have to be drilled out with a thin drill. After drilling a hole with a diameter of 1-1.5 mm, the bearing should come out without problems.
- We thoroughly wash the rack housing, lubricate all the parts, and with special care the rack itself and its gear, not sparing Litol24 or Fiol1.
- We assemble the assembly in the reverse order and do not forget to lock the threads on the adjusting stop bolt. We put on the cover, secure the boot with new plastic clamps and install the rack on the car.
Victory. Work is done. You can go for a test drive. Just don’t forget to tighten all threaded connections after 200 - 300 km and make adjustments when the new parts rub against each other.
↑ VAZ 2110 steering mechanism assembly with drive
1, 12 – inner tie rod ends;
2 – steering gear mounting bracket; 3 – steering gear support; 4 – protective cover; 5 – steering gear housing; 6 – coupling bolt; 7 – elastic coupling flange; 8 – adjusting rod; 9 – outer tie rod end; 10 – ball joint of the tip; 11 – rotary lever; 13 – bolts securing the inner tie rod ends to the rack; 14 – intermediate steering shaft; 15 – elastic coupling flange; 16 – boot; 17 – protective cap; 18 – support sleeve; 19 – rack; 20 – sealing ring of the stop; 21 – rack stop; 22 – spring; 23 – stop nut; 24 – retaining ring of the stop nut; 25 – roller bearing; 26 – drive gear; 27 – ball bearing; 28 – retaining ring; 29 – protective washer; 30 – sealing ring; 31 – bearing nut Steering – safety, with height (angle) adjustable steering column. The steering mechanism is rack and pinion type. It is secured in the engine compartment on the front panel of the body with two brackets through rubber supports. The fastening bolts are welded, two on each side of the front shield.
