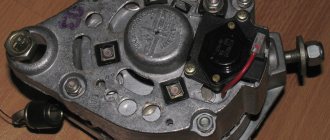
We will show you how to repair, disassemble and diagnose the Eltra generator with your own hands, which was installed on VAZ 2115, VAZ 2114, VAZ 2113 cars. The reason for the repair was that the owner’s battery was discharged on the road, the car twitched and stalled, when they tried to start the relay crackled, the battery was completely empty discharged. After that, the car was lit, it drove for some distance and stalled again. It was clear that the generator was faulty. A charged battery was taken, and when it was connected, the generator began to smoke. As soon as partial disassembly was completed, a malfunction immediately became visible; several diodes burned out on the diode bridge. Before further disassembly and subsequent repairs, it is necessary to re-solder the diode bridge to check the winding and everything else. The places where the winding will be soldered must be cleaned with a brush with metal bristles.
Video of repair and disassembly of the ELTRA generator in the VAZ 2115 2114 2113:
Reserve video on repair and diagnostics of the ELTRA generator in the VAZ 2115, VAZ 2114, VAZ 2113:
The generator is easy to disassemble, all its fastenings are 8 nuts, it is convenient to unscrew them without changing the head, plus a couple of screws for a flat-head screwdriver.
The VAZ 2114 generator is the main source of voltage in the car. It is this that generates electricity when the engine is running. Remember that the battery is actually needed for one purpose - to start the internal combustion engine. But, like any other component, the generator can fail completely, or some of its elements. And therefore it is necessary to carry out repairs, and you can do it without much difficulty with your own hands, without resorting to the help of specialists at service stations.
Unfortunately, there are always masters who, let’s say, “starred.” In other words, they don’t undertake repairs of domestic cars, although recently they were even ready to repair mopeds. Well, it’s better for us - DIY repairs will cost much less. By the way, if the generator is completely “bad”, there is damage to the covers, windings, and rotor, then it will be much easier to buy and install a new one. Now let’s look at the features of the operation of the generator set on a car as a whole and smoothly move on to repairs specifically on the VAZ 2114.
The principle of operation of a generator in a car
The peculiarity of the generator is that it produces alternating current. Whatever one may say, when operating this electric machine, you can only get alternating current, and only then convert it to direct current. General generator design:
- Back and front covers with pressed bearings.
- Rotor with excitation winding.
- The stator with power windings is where the voltage is removed.
- Diode bridge - three-phase rectifier.
- Electrolytic capacitor - to get rid of the alternating component of current.
- Voltage regulator - necessary for accurately setting the supply voltage of the rotor winding.
- Carbon-graphite brushes are necessary for transmitting voltage from the relay regulator to the rotor winding.
- And the remaining components - brackets, nuts, bolts, belt.
For normal operation of the generator, two components are required:
- Rotation.
- Magnetic field (constant).
It is enough to remember the school physics course - an electric current will appear in the winding only if it is affected by a moving magnetic field. Moreover, the output voltage will depend directly on the magnitude of this magnetic field. This means that the rotor winding is a source of a constant magnetic field, and it is powered through a voltage regulator, therefore, the output will always have the same voltage.
The alternating voltage is removed from the stator winding. Moreover, there are three windings, they are connected in a “star”. Consequently, we get three phases at the output. This is necessary primarily in order to reduce current ripple in the on-board network. With the help of a diode bridge, which contains six semiconductors, the current is rectified. And the capacitor cuts off the entire variable component. According to Kirchhoff's law, an electrolytic capacitor is replaced by a gap when operating in a DC circuit and by a conductor in an AC circuit.
Disassembling the generating device
It is noteworthy that generators come in two types: old and new. The differences between them are in the diameter of the shaft. A 15 mm shaft is installed on old generators, 17 mm on new ones. This means that different bearings should be selected for replacement. The 302nd is suitable for a 15mm shaft, and the 303rd for a 17mm shaft. As for the rear bearing, it goes with all generators and is marked as 202.
So, disassembling the generator begins:
- First, remove the plastic cover;
- then the diode bridge is dismantled;
- remove the tablet (regulator with brushes);
- To unscrew the pulley nut, you will have to clamp the generator in a vice, and then use a 24mm socket.
Advice. The gene must be clamped in a vice very carefully so as not to damage its parts. To avoid damage, the pulley is clamped using rubber gaskets.
- the relative position of the covers of the generating device is marked;
- then the tightening screws are unscrewed.
Note. The fastening screws are tightened very tightly. They are made of soft metal, so the usual methods of turning out oxidized bolts will not work. Here you will need an impact screwdriver or a shaped one, but with a large tip. Fasteners must be pre-treated with WD-40 or brake fluid and wait a little.
It is also recommended to treat the joints of the covers with the device body with WD-40.
- take a mounting spatula or an ordinary, but flat screwdriver, and halve the gene.
I can’t understand why remove the copper, i.e. leveling the commutator, what does this mean for the operation of the generator... in such cases, I only polish the place where the brush works with fine sandpaper on the machine... And wear in the commutator can only complicate the removal of the brush holder or the regulator relay when disassembling the genes....
While my mother is making coffee, let's wait for your mother, let's wait for your mother
I gave 500 rubles to the grinder and that’s it.
I’ll tell you a wild secret. Grinding a commutator is, in principle, a pointless task. This is pure scam of the client for money. At best, this action does not have the slightest change in the operation of the generator. If new brushes are installed, it is enough to slightly chamfer the ends of the brushes and that’s it. If the commutator wiped off, then only replace it, but as long as there is an unbroken layer of copper, everything will work exactly the same.
Good time of day.. tell me what you think about the generator Pramo Electro 5162.3771.. 14V.. 125A.. I had a katek 115a, it became unusable, I changed it to a Pramovsky one, when the load is turned on and the air conditioner appears, a slight hum appears, like the load passes in a minute and the speed rises to 1000 when the air conditioner is turned on.. but on the Katekovsky one, on the contrary, the speed dropped when the air conditioner was turned on.. what to do with the Pramovsky one?? The seller assured that it is more reliable than katek 140a... is it worth changing? Pramo 125a to Kotek 140a
Tell me, is it necessary to make such a groove on the new rings just installed on the generator?
I agree with using a file, but you need a rest for your hand, it will be tougher and there will be less possibility of disturbing the shape of the rings. I don’t agree with abrasive paper at all. It is possible that the copper surface of the rings and abrasive grains will wear out the brushes greatly. For the same reason, it is prohibited to clean the contacts on the relay with abrasive, only with a small needle file.
You will definitely remove the wear this way, but you will get runout of the surface on the rings relative to the bearing seat. It is necessary to sharpen the rings on a lathe with the obligatory alignment of the bearing seat according to the indicator, or sharpen based on the bearing, which is more preferable.
As always, NOTHING! When working deeply, you don’t need a turner, but you need to change the rings and this is not difficult. If it's too low, you need to lightly whiten it with 600-grit sandpaper... that's it! Where do you get so many subscribers uncle?
Very competent and intelligible, thank you.
As I understand it, the technology is purely aesthetic in nature, it did not increase the resource; rather, on the contrary
Grandfather, did you serve in the landing force?
To make the rings last longer, during the first maintenance of the generator and resoldering of the brushes (80 thousand km) (Iskra Slovenia generator, on a VAZ engine 21083) I noticed that the brush springs were too tight, the rings were a little worn, and I removed a couple of turns on springs. To tear the rings with a file, as for me, is the destruction of their resource, what is left there, a layer of foil for a month?! Regular grinding with a zero polish – yes! Bottom line, mileage is 220 thousand km on brushes alone, (300 in total) rings are original, counter wear is only 30%. The voltage is normal and there have never been any problems. Sorry, there is no way to attach a photo. Oh yes, the brushes are black graphite, that is, soft. Not copper graphite!
The rings will serve, but this is not true about reliability and long service life. Grind the rings in this way, assemble the generator and spin it on the stand at maximum load, remember the ammeter reading. Disassemble the generator again and turn the rings in the machine, repeat the test on the stand and compare the results .This experience will show the unreliability of your proposed method due to loss of power due to the so-called. The brush “dances” along the ellipse of the ring, and the ellipse with this type of processing is inevitable. For the same reason, there is no long service life, but this will be shown not by the stand, but by the time of operation. I have been turning the ring and commutator for more than 15 years, it was time to compare. As a short-term emergency method, it is quite possible. With uv.
The generator rotates at xx at the same speed, you can do this on the car without removing
Do not sand in this manner under any circumstances. There will be an ellipse. Only on a lathe, in centers.
Man, good job, go head and good luck. Je. Saudi Arabia.
Thanks for the lesson. Subscribed.
Today, January 21, 2022, I watched this video and remembered that there are decent wears on the slip rings of my Niva’s generator. He removed the generator and halved it, secured the front cover in a vice, and placed a wooden block under the rear rotor bearing and pulled the bearing to it through a tin plate with self-tapping screws so that the rotor in the vice did not move from the file, then the rotor was rotated with a drill through the pulley nut. I slowly ground off the sides of the slip rings with a file, sanded them with 240-grit sandpaper, checked the rotor, stator and diode bridge with brushes - the brush springs were excessively elastic (the brushes had wear with chamfers on the edges of the working surfaces), checked the bearings. I assembled the generator and installed it back. The voltage became 12.20 V, before it was 13.30 V at idle, I waited about five minutes - nothing changed, turned off the engine and went home. Thirty minutes later I came to the garage and started the engine, the multimeter at idle speed began to show 13.5..., after 3-4 minutes it was already 13.78..., after five minutes 13.9 - 14 volts with consumers turned on. It turns out that the brushes with the old pattern have slightly worn in to the aligned planes of the contact rings and have begun to move wider. When I've driven a little, we'll look at the generator voltage readings on the multimeter.
Major breakdowns of the VAZ 2114 generator
To make repairs yourself, you need to know the main breakdowns and methods for eliminating them. So here's the whole list:
- If a fuse fails, a new one must be installed after thoroughly checking the circuit. It is necessary to establish the exact reason why the failure occurred.
- If the supply circuit is broken, you must ensure that the negative wires are securely fastened.
- If there is a problem with the ignition switch, check its contacts; if it cannot be eliminated, replace the entire assembly.
- A burnt-out test lamp installed in the instrument panel is necessary for diagnosing the power circuit of the rotor winding. If it burns out, the VAZ 2114 battery will not be charged and you will not see it right away.
- If the VAZ 2114 brushes fail, they are replaced only together with the voltage regulator. The latter cannot be repaired.
- If the battery charge level is insufficient, the cause may be a loose belt.
- Humming and crackling noises from the bearing (usually in the front cover) can be treated by replacing it. Fortunately, its price is low, but you will have to almost completely disassemble the VAZ 2114 generator.
Checking system status and malfunction
If the generator fuse fails, such a breakdown is easy to fix; you just need to install a new part. However, the fuse does not just light up. The cause must be established. Here are the main ones.
- The circuit through which power is supplied to the devices has broken. To find out the reason, you need to check how tight the contact of the neutral wire is.
- There was a malfunction in the ignition switch. The ignition switch board needs to be checked.
- The control lamp has burned out.
- Poor brush performance. To carry out repairs, it is necessary to replace the brushes of the VAZ 2114 generator. If the contacts are oxidized, they are cleaned with gasoline.
- The voltage regulator has failed.
- The belt received mechanical damage. In this case, the VAZ 2114 alternator belt needs to be replaced.
- The generator bearing has failed. There can be only one solution - replacing the bearing.
When the device starts to malfunction, many parts of the VAZ 2114 may fail. The consequences of a generator failure are always unpredictable.
When the charge is low, the battery dies and the engine stalls. High voltage is considered the most dangerous. The voltage regulator may fail. The result of such a failure will be a disruption of the entire electrical system of the VAZ 2114. The power of the system is checked with a conventional tester. When the ignition is turned on, all lights on the instrument panel should light up. Only after making sure that they are in good condition can you start the engine.
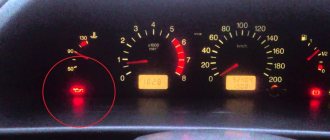
If the battery relay light remains on, you can conclude that the electrical circuit has been damaged. The engine temperature should reach 90 °C. Then you need to turn off all devices that consume the maximum amount of energy. The tester is connected to the battery. If, with increasing gas, the voltage reaches 14 V, therefore, the generator and relay are operating normally.
Looking for a problem
Before you start checking the unit for malfunctions, you need to know what symptoms indicate problems with this unit.
- After turning on the ignition, the warning lamp on the instrument panel does not light up, and most of the instruments also do not work.
- The warning lamp does not light up even after starting the engine.
- After starting the engine, the warning light does not go out, which indicates that the battery is not receiving charging from the generator.
Also, if the light on the panel is too bright, this indicates that the battery is overcharging. And finally, a faulty generator can make a lot of noise during operation.
To check the electric generator with the engine running, you need to acquire a special measuring device with which you can monitor the readings of the vehicle’s on-board network. Algorithm of actions: first, turn the key in the ignition switch to the first position. All warning lights should light up on the dashboard. Secondly, start the power plant. And if the control lamp does not go out, but dimly or, conversely, continues to burn too brightly, the generator is faulty.
Generator diagnostics
If charging is lost or its level is insufficient, then the battery will receive much less current than necessary. Consequently, one generator will also not be enough to power the entire on-board network and the battery will come to its aid, which will discharge after some time. But even worse is excessively high voltage - it can cause fuses, lamps, ECUs, etc. to blow out. To diagnose the VAZ 2114 generator you will need a multimeter:
- Turn on the ignition and start the engine.
- If there is damage in the power circuit of the rotor winding, you will notice that the lamp on the instrument panel is on.
- The engine must be warmed up to operating temperature and the low beam headlights and radio must be turned on.
- Measure the voltage at the battery terminals. A necessary condition is that the crankshaft speed should be approximately 2500-3000 rpm.
- If the generator is working properly, the voltmeter readings will be about 13 V (an error of 0.1 V can be ignored).
- Turn off the lights and radio, the voltage should increase to 14.7 V. This is the maximum value.
When conducting diagnostics, be sure to pay attention to the sounds the rotor makes. Very often the bearing in the front cover fails.
This is where the maximum load from the belt is applied. Several reasons why the voltage of a VAZ 2114 may drop:
- The alternator belt is loose.
- There is a fault in the voltage regulator.
- Wear of the brush assembly.
- The generator is completely worn out.
Please note that a lit lamp with a battery icon indicates that there is a malfunction in the rotor winding power circuit. Consequently, no current will be generated in the stator windings since there is no rotating magnetic field.
Replacing the generator armature commutator
We have a generator from Delco Remy, installed on cars, often Daewoo Lanos. Now we will change the manifold; it has already been disassembled. We have an erased collector in stock. To do this, you need to tighten the bearing, unsolder it, or, in this case, bite off the wires and pull off the collector. We remove the bearing. We have a special puller for this. Slowly pull off the bearing.
The bearing, after we removed it with a puller, is not suitable for use. Even if it is initially touched by hand - it is good, then it is not suitable for use. We bite through the leads, it is advisable not to damage the wires, since they will be short and will not reach the collector. We carefully bite it off; we don’t need the old collector. We can carefully bite off the conclusions themselves. We took a bite, you see, we still have a whole wire. And we still have the second wire intact. After which we will seat the collector and can easily compress it.
Now we tighten the collector with the same puller. The collector fits very tightly, so the puller must be clamped tightly. We are trying to tighten the collector. Here is an old manifold with a worn out track. Here's the seat. We have in stock a new manifold for the Delco Remy generator, exactly the same as our old one. You can take a closer look at how worn the upper contact ring is.
Why are we changing the collector? This makes repairs much cheaper. Since, if it is not possible to change the collector, you have to buy the entire armature. It turns out to be much more expensive. Why does the ring wear out? The ring wears out due to heavy loads. That is, if you, for example, have a 100 Amp generator and you load it at almost 100 A, connecting all kinds of additional equipment, or lights, fog lights, someone connects a 220 Volt invector. The ring lasts approximately from 90 to 150 thousand vehicle miles. If you connect an additional load, then it comes out much less. And so, we install a new collector. We simply put it on the anchor, our contact wires are cleaned, that is, we can easily solder to the collector.
We just put it on the anchor and then push it in with hammer blows. Since we have a collector here, there is also a bearing on top of the collector, that is, behind it. You need a tube type attachment so as not to damage the collector. So we take a guide, specially turned by a turner, you can pick up any tube of a similar diameter. The main thing is that our anchor, that is, the core, goes inside it. We take and fill the collector carefully so that it does not crack or break, using smooth blows. And so, as we see, we have the collector in place. Now we take and solder the wires accordingly, they are simply inserted and soldered with a regular soldering iron. And we take the bearing from above, install the new bearing naturally not along the outer, but along the inner radius of the bearing, and then assemble the generator.
We also provide services:
Related Posts
Tips for using a car air conditioner
Below are simple ways to keep your car air conditioner in good working order: Run your car air conditioner for at least 10 minutes once a week. This will maintain the gas pressure required for normal operation of the compressor.
Purchasing a turbine. What you should know before buying a turbine
Turbochargers have many advantages for those who value power and speed. Many car owners are considering buying a car equipped with a turbocharger, but not everyone can afford it. Installation may be the solution.
What is the difference between a turbocharger and a supercompressor. What is a super compressor
Let's start with similarities. Both turbochargers and supercompressors are boost systems designed to force air into an internal combustion engine. The advantage is that the more air gets into the engine cylinder.
How to replace brushes on a VAZ 2114
This job is not difficult, you only need a screwdriver and a little dexterity. However, it wouldn’t hurt to use a “10” wrench or pliers to disconnect the terminal from the battery. Reasons for replacing the VAZ 2114 relay regulator:
- No charging.
- Headlights emit too little light in the dark.
- Reduced tension.
- Disconnect the ground wire from the battery.
- Disconnect all wires from the brush block.
- Using a Phillips screwdriver, unscrew the two bolts and carefully remove the brush block.
- The permissible length of the brushes is at least 0.5 cm. Otherwise, change them.
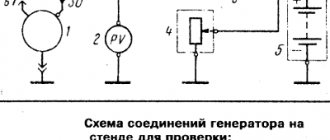
1. Battery. 2. Negative terminal of the regulator. 3. Relay-regulator VAZ 2114. 4. Brush contact. 5. Positive output of the regulator. 6. Indicator lamp.
The relay-regulator is structurally combined with the brushes, so when replacing one unit, you also install a second one. Regulator diagnostic method:
- Connect the positive battery to the terminals as shown in the figure.
- The lamp turns on between the brushes.
- Under tension
12 V lamp is on.
- When the voltage exceeds 16 V (2-3 AA batteries can be connected in series with the battery), the lamp goes out.
This is normal operation of the VAZ 2114 voltage regulator and other devices of this type. If the lamp does not light up or lights up constantly, you can judge that the relay regulator is broken. Only replacing it will help; repairs are impossible.
Modern vehicles have many basic and additional equipment that require electric current to operate. The source of such current in the car is the battery, and to recharge it while the engine is running, a generator set is installed.
Generator
Removing and replacing the unit
How to remove the generator? To carry out the work, you must have a set of wrenches and a pry bar. First, the negative terminal is disconnected, then the protection is removed, after which the boot is unscrewed and access to the bolts securing the generator is opened. There is no need to remove the boot completely; you can simply lower the protection along with it. Next, replacing the VAZ generator is performed in the following sequence.
- The generator belt tension bolt is unscrewed.
- The device moves towards the engine.
- The alternator belt is removed.
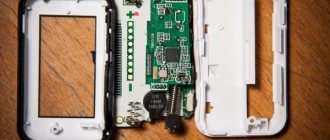
Disassembling the generator: 1 – generator drive pulley; 2 – bracket for the right engine mount; 3 – mounting plate; 4 – tension bar; 5 – generator; 6 – generator mounting bracket; 7 – generator drive belt
- The tensioner bar is removed by unscrewing it from the engine.
- The plug is disconnected and the terminals are removed.
- The generator is fixed on an axis. It is secured with a nut. Usually it is very difficult to remove such an axis. Therefore, it is better to release the mount of the generator with the block.
- The device is removed.
- The axle unscrews. It must be carefully knocked out of its seat. You can use a long bolt for this.
- The element is completely free.
Now the VAZ generator is being replaced. Assembly and installation are performed in reverse order. The belt can be tensioned using a conventional mount. They rest it against the engine and press on the device. It begins to move away from the engine and tighten the belt. Having obtained the desired tension, tighten the bar fastening nut.
The belt tension must be within normal limits. If it is too weak, the belt will start to spin. If the tension is too strong, the bearing will crumble. Such a breakdown sometimes leads to a complete replacement of the device. Basically, the tension is measured by the deflection of the belt. Its normal value is 1 cm. With this tension, the relay will always indicate a charge, and the battery will receive the required charge.
A review of messages on auto forums indicates that many VAZ 2114 owners, after a breakdown of the factory unit, strive to choose and install another powerful generator. However, not everyone knows which device needs to be purchased so as not to make any additional modifications to the mounting brackets.
Professionals recommend installing a generator from a Priora; a Kalina generator with air conditioning is also suitable. These devices are designed for 115 A. For the factory one, this figure does not exceed 80 A. It should be noted that such a replacement will not affect the relay in any way.
The VAZ 2114 generator is the main source of voltage in the car. It is this that generates electricity when the engine is running. Remember that the battery is actually needed for one purpose - to start the internal combustion engine. But, like any other component, the generator can fail completely, or some of its elements. And therefore it is necessary to carry out repairs, and you can do it without much difficulty with your own hands, without resorting to the help of specialists at service stations.
Unfortunately, there are always masters who, let’s say, “starred.” In other words, they don’t undertake repairs of domestic cars, although recently they were even ready to repair mopeds. Well, it’s better for us - DIY repairs will cost much less. By the way, if the generator is completely “bad”, there is damage to the covers, windings, and rotor, then it will be much easier to buy and install a new one. Now let’s look at the features of the operation of the generator set on a car as a whole and smoothly move on to repairs specifically on the VAZ 2114.
WHAT IS A GENERATOR?
The VAZ 2114 generator can be imagined as an electric three-phase alternating current machine. It has a built-in rectifier unit that converts alternating current to direct current. The device consists of the following parts:
- Front and back cover made of aluminum alloy. Each of them has slots for installing bearings. On the back cover body there is a battery connection terminal and a connector for supplying voltage to the excitation winding. There is also a capacitor installed on the back cover, which suppresses radio interference; there is a place for installing and fastening the brush assembly;
- Stator core cylinder made of transformer iron. Inside it there are grooves for laying the power windings of the generator. They have leads for connection to the rectifier block. Both covers are attached to the stator with four bolts;
- Excitation winding on the rotor shaft. It is connected with its leads to slip rings made of copper, which are installed on the same shaft. The front of the shaft has a keyway to accommodate the drive pulley;
- The brushes of the VAZ 2114 generator are a non-separable unit combined with an electronic relay controller. The relay in a metal case is riveted to the brush holder;
- A block of power and additional diodes is attached to the back cover from the inside. It contains six power and three additional diodes. To cool semiconductor devices, they are mounted on horseshoe-shaped aluminum alloy plates.
Replacing rings
Such partial disassembly of the generating device is sufficient to replace the slip rings and the bearing on the shaft (armature bearing).
Attention. Even if the armature bearing is new, it is recommended to replace it after pressing.
Method for replacing ring block 1
- the anchor is clamped in a vice;
- the bearing is pressed out;
- then use a knife to remove the plastic contact protection, which is located directly under the bearing;
- after this, you need to open the bracket of the contact block and tear out the soldered wires so that you can remove the old slip rings (again, you can use a knife).
Attention. If it is not possible to open the bracket due to oxidation, etc., then you can use the old-fashioned method - press out the block with the contacts using a chisel and any long tool, directing the force of the lever upward.
- a new block with rings is put on the shaft (a spacer and light blows from above on the block with a hammer - the main thing is that the tails of the block accurately hit the seats);
- the wires are tucked into the proper places and sealed.
Note. During the soldering process, it is recommended not to use soldering acid (if used incorrectly, liquid can easily get inside the winding). After this, crimp the soldered contacts with pliers.
Next comes the assembly process:
- put the contact protection back on (it should fit tightly);
- then a new bearing is installed.
Method for replacing ring block 2
The old block with rings can be removed in another way (a more barbaric method, but effective).
In general, the wire strands that are soldered to the sides of the installed slip ring block should be thoroughly cleaned with a sharp object (knife, screwdriver, etc.) before removal. They are cleaned for the only reason - to make it easier to unsolder.
Then take a side cutter tool (you can use pliers) and use it to bite the eye where the vein is inserted. Move the eyelet up and down until the wire comes off. The same is done with the other ear.
Now you need to put the rings on the anvil (place only the part of the block that has the rings). Take a sharp chisel and a hammer, cut out the rings (not all the way) and pull them out with a side cutter.
With this method of dismantling the ring block, the plastic protection also breaks off. In the future, you can install new protection or leave the contacts without it (this is also done, but not recommended).
The protection is carefully broken off in the area adjacent to the contacts. As a result, the armature shaft should be completely freed from the remnants of the old block of rings; on the sides below, the ends of both wires should be visible, onto which the tails of the new block will be soldered.
Note. By the way, the anchor does not have any polarity, so you don’t have to “bother” with the correct position of the tails of the ring block.
The block, as in the case described above, is stuffed from above through a spacer.
Attention. The contacts (both wires on the side) rise upward so that when the contact block is lowered, they remain on top, and the tails of the block go to their original places. You can guide the wires with a screwdriver more often, thereby eliminating the clamping of the wire tails. The slip ring block should fit tightly into place.
Next, the wires are smoothed to the metal pads of the block to which they must be soldered.
Attention. There should be no empty spaces left on the site during the sealing process. The entire space must be completely treated with tin and rosin.
If you look at the factory solder of some “generator” models, you will see that the wire in this case is twisted into a ring, and the solder itself is carefully and completely filled inside.
After the generator is assembled, it should be checked. After starting the car, we look at the voltage - it happens that it shows a value below normal. This means that you need to put on the excitation wire and start the engine again. More than 14 is the ideal voltage parameter.
- The shaft should be thoroughly cleaned of any remaining epoxy, and before installing a new block with rings, the shaft should be coated with poxypol;
- It is also recommended to cold weld the junction of the protective cover with the anchor;
- When installing a bearing, it is advisable to strike the inner race with a suitable mandrel, or even better, heat the bearing with a special heating pad and place it manually (with gloves on);
- All possible contacts that occur during work should not be forgotten to be cleaned.
GENERATOR FAILURES
Malfunctions of the VAZ 2114 generator can be divided into “mechanical” and “electrical”. Let's look at them in that order.
MECHANICAL FAULTS
Indirect confirmation of the presence of such a breakdown is the increased noise of the generator set while the car engine is running. It can “make noise” in some other cases, but this will be discussed a little later. The source of increased noise in most cases is worn generator bearings. This primarily concerns the bearing in the front cover of the generator. It experiences increased radial loads, so it can fail faster . Excessive tension on the drive belt increases the load on the bearing.
ELECTRICAL FAULTS
There may be several of them, these are:
- Lack of battery charging voltage;
- The generator produces low voltage;
- Exceeding charge voltage.
An initial check of the functionality of the generator set can be carried out without removing it from the machine. To do this, you need to have a measuring device such as a tester, multimeter or DC voltmeter. Even a simple Chinese tester will do. By measuring the voltage at the battery terminals, you can make a definite conclusion about the functionality of the generator.
The method of checking the generator, in which the positive terminal is removed from the battery, cannot be used to avoid failure of the electronic relay-regulator or other electronics of the car. We'll look at more specific verification methods a little later. Now let’s remember how to remove the VAZ 2114 generator for further inspection.
Steel rings and their advantages
Replacing slip rings on a VAZ 2110 generator
There is no point in installing copper rings, as they wear out very quickly. Therefore, it is better to opt for steel rings, which have a number of advantages:
- They hardly wear out, so the brushes remain in almost perfect condition for a long time.
- They are easy to install.
Note: by the way, for more reliable fixation, they are first lubricated with a flux solution, and then washed with soda.
- Once installed, they are securely fixed, remaining motionless in all situations.
HOW TO REMOVE THE GENERATOR FROM THE CAR
It is installed in a special bracket on the cylinder block; there is also a bar for tensioning the generator belt. Find the generator in the front part of the engine compartment on the right side in the direction of travel of the car. To remove it, you need to prepare the following tools:
- Wrench set to “10”;
- The same key for "13"
- Open-end wrench 17x19;
- Head at "15"
- Mount.
We remove and do not touch the engine protection
Removal is carried out in several ways, where it is necessary to remove the engine protection. They are well described in various sources. Let's try to remove it without removing the protection. The procedure will be as follows:
- The first step is to disconnect the terminals from the battery;
- Loosen the belt tension, remove first the belt, and then the entire tension mechanism;
- Disconnect the wires from the battery, they are covered with a rubber cover, and the connector for supplying voltage to the excitation winding;
- The generator on the bracket is mounted on a long bolt and nut. It’s not very convenient to get it, so use a “15” head to unscrew the two bolts securing the bracket to the block. They are found at the back of the generator, one bolt is long and the other is shorter. Now the generator can be turned clockwise and it will be possible to remove the axis of its attachment to the bracket;
- Unscrew the nut with a wrench to “19” and remove it together with the spacer sleeve;
Use a small punch or something similar to knock the axle out of the bracket. The generator is lifted up. Now you can use it to repair the generator or perform maintenance.
Slip rings
The generator slip rings for synchronous and asynchronous machines with a wound rotor are located on the shaft.
The rotor winding is connected to them. Synchronous machines are equipped with two, and asynchronous machines with three contact rings. Through the fixed brushes of synchronous generators, the power sources of the inductor winding are connected to the rings. In asynchronous machines, the power source is replaced by a starting rheostat or regulator. The slip ring is one of the most important parts of the generator. Therefore, its current condition and wear must be constantly monitored. Contact rings during rotation ensure the transmission of voltage or signal from stationary elements and assemblies to moving ones and vice versa.
To produce these parts, we use materials characterized by high strength and wear resistance. For example, the generator slip ring can be made from steel forgings of grade 40X or grade 38ХН3МА. When choosing a material, the power of the generator is taken into account. Installation of contact rings on generator components is carried out by shrink fit. Stable contact and reliable distribution of current between the brushes are ensured by decompression screw grooves cut directly on the rings.
Monitoring the technical condition of contact rings and repairing the rotor
According to the technical requirements for defect detection and repair of turbogenerator parts, inspection and repair of the rotor occurs in the following order:
- the rotor is inspected visually before and after cleaning, the presence of defects such as displacement of the groove wedges, fastening of balancing weights, leakage of varnish, weathering of insulation, etc. is noted. Particular attention is paid to the presence of cracks on the rotor shaft and barrel, the condition of the bandage, contact, centering rings, fans;
- if cracks are detected on the groove wedges and fan blades, the parts must be replaced;
- cracks on the rotor barrel, generator slip rings and shaft are eliminated by local metal sampling. If the removal of metal to eliminate cracks can lead to a decrease in the mechanical strength of the part, the issue of its further use is decided by the manufacturer;
- During repairs, the bandage rings are removed, marked, and the underband insulation is removed from the frontal parts. The frontal parts of the winding are checked for correct wedging, and the technical condition of the wedging parts is monitored. Segments of underbanding insulation are checked for the absence of delamination, burns, and cracks. Defective segments must be replaced. The condition of accessible areas of the frontal parts is checked for the presence of deformations, the quality of inter-coil connections, displacement of individual turns, etc.
Slip ring repair
The peculiarities of the procedure lie in the complexity of the manipulations and the scale of the work. For example, when repairing a generator, it is necessary to remove dark spots and burns from the surface of the slip rings, eliminate short circuits between the rings, and restore the operation of the devices for lifting the brushes and closing the rings.
To remove darkening and burns, fine-grained glass sandpaper is used. If it is not possible to cope with the problem using this method, more severe methods are used, for example, local removal of metal with further grinding and polishing. To eliminate the short circuit between the slip rings, the ends of the rotor winding are disconnected from them and the insulation between the rings is checked using a megohmmeter. If the short circuit is caused by brush dust on the insulation of the contact pins, it is removed. If the cause of the short circuit is a breakdown of the insulating material between the rings, they are removed from the shaft for major repairs.
Overhaul of slip rings is carried out when:
- ring wear;
- burnout of contact pins;
- loosening of the fit of the rings on the bushing.
When replacing the rings, the bushing insulation is repaired, damaged pins along with the insulation are replaced with new ones.
Contact rings from the manufacturer
Production facilities and office are based in Novosibirsk. For many years we have been producing and supplying Russian and foreign energy enterprises with various products and spare parts for turbogenerators of various types of domestic production.
Today, REM-Energo LLC is the official representative of Energozapchast JSC. Cheboksary is a leading manufacturer of spare parts for electrical and electrical high-voltage equipment for more than 57 years. The production of the enterprise includes such components as powder metallurgy, foundry, mechanical assembly, stamping, winding, and tool shops. All products are subject to multi-stage quality control - quality control control, mandatory high-voltage tests, etc.
"REM-Energo" - reliable supplies of high-quality products
guarantees its partners and clients the quality of the products offered. When manufacturing a part at the manufacturer's plant, strict control is carried out at each technological stage of the production of slip rings for generators.
The cost of a unit of production starts from 450,000.0 rubles per piece. To calculate the exact price, REM-Energo specialists must familiarize themselves with the drawings of the slip ring or find out the type of turbogenerator. The company needs at least 30 days to process an order.
The most important thing is to understand that the generator, like all components of the car, must be monitored and serviced in a timely manner. Change brushes in a timely manner, do not allow large amounts of dust and dirt to get in, not to mention water. Ensure that the alternator V-belt is properly tensioned so that it is neither loose nor overtightened.
It is recommended to check the technical condition of the generator every 15,000 km. mileage Typically, with proper care of the generator, it can last up to 160,000 km. mileage and repairing the generator with your own hands is simply not necessary, you just replace it and that’s it.
But in order for a car generator to last for so long, you need to learn how to properly maintain it, and you can’t do this without disassembling the generator.
- bearing puller;
- a pair of locksmith screwdrivers;
- hammer;
- a pair of socket heads;
- soldering iron
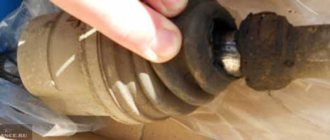
It is necessary to disassemble the generator and remove the rotor. He is clamped in a vice. Using a puller, the bearing is removed.Behind it is a cross-shaped contact protection. It is pryed off with a screwdriver and is also removed.
Next you need to cut the contacts from the windings. To do this, a screwdriver is attached to them one by one from the side of the rings, and they are interrupted with a hammer blow.
2 socket heads are placed on the anchor. They are used as a stop for screwdrivers, which need to be used to hook the rings into the slot.
The collector is removed, the dry glue on the shaft is cleaned off. The winding contacts are also protected from varnish. New rings are pressed onto the shaft through a wooden or plastic lining.
Then the contacts on the collector and windings are soldered. If necessary, a jumper made of copper wire is laid between them.
Next, a cross-shaped protection is installed, the bearing is pressed in, and the generator is put back together. Everything is done with a minimum of tools, so replacing slip rings can be done without going to a car service center.
HOW TO DISASSEMBLE VAZ 2114 GENERATORS
To complete the work you will need an open-end wrench 10", 19" and a Phillips screwdriver.
Disassembly of the VAZ 2114 generator is carried out in the following order:
- Press out the three latches and remove the plastic protective casing on the body;
- The relative positions of the covers and the stator are marked to facilitate subsequent assembly;
- Using a screwdriver, unscrew the screws securing the brush assembly and remove it from the body;
- Disconnect the wires from the regulator output;
- Unscrew the four screws securing the rectifier unit, disconnect the winding terminals and remove it together with the noise suppression capacitor;
- Unscrew the four tightening screws, which were tightened with great force during assembly, and remove the cover from the side of the generator slip rings;
- The rotor shaft is clamped in a vice so that it cannot turn, and the nut securing the pulley is unscrewed. Now you can remove the generator pulley and thrust washer from the rotor shaft;
- Remove the cover from the generator rotor.
After this, you can carefully inspect all parts for wear or damage.
Replacing slip rings
After disassembling the generator, its armature is clamped in a vice. The bearing is removed from the rotor shaft using a puller. After this, the cross-shaped plug covering the contacts is dismantled. It is simply pryed off with a screwdriver and removed.
Next, you need to disconnect the contacts of the slip rings from the armature windings. A mechanic's screwdriver is used for this. Its tip is applied to the contacts closer to the shaft, and they are cut one by one with a hammer blow. Having cut the contacts, you can begin dismantling the rings. To do this, 2 identical heads or simply pipe cuttings are placed on the sides of the shaft. Screwdrivers rest in them, the ends of which pry the rings from below. Using 2 screwdrivers as levers, you need to rip the rings off the shaft.
After removing the manifold, dry glue will remain on the shaft splines. It needs to be scraped off with a knife or the tip of a screwdriver. Then the armature winding contacts are cleaned. New rings are put on the shaft and seated completely with hammer blows. You need to hit through a wooden block so as not to deform or split them.
Next you need to solder the contacts of the winding and rings. To do this, they are first treated with a solution of rosin or soldering acid. Then the contacts need to be tinned one by one and soldered together. Perhaps the distance between them does not allow soldering, then a jumper should be used. It uses copper wiring. It is also tinned and soldered between the contacts. It is important to check that the solder does not touch the metal surfaces of the armature, but only connects the contacts. After soldering, the contacts are closed back with a cross-shaped plug, a bearing is mounted on top of the shaft and the armature is installed back. In fact, nothing is difficult, the main thing is to act without haste, cut the contacts when dismantling closer to the rings, and then, when installing, do not hit the new collector directly with a hammer.
SIGNS OF GENERATOR SET PROBLEMS
- The charging indicator lamp lights up constantly or flashes while the engine is running;
The battery is not charging
MALFUNCTIONS OF THE BRUSH UNIT
This unit may have problems with the electronic regulator and brushes. Replacing the brushes of the VAZ 2115 generator can be done without removing it from the engine. It is impossible to check this unit without removing it from the generator, so if there is such an opportunity, you can simply change the brushes. You can check its operation; there is an adjustable power supply and a control light. Connect the power to the “+” and “-” of the regulator, and the light bulb to the brush. It should glow, and when the input voltage increases to 15-16 volts, the light goes out. If this does not happen, then the tablet needs to be replaced. Let's look at the signs of brush wear. This will be indicated by:
- Low on-board voltage;
- Lack of battery charging;
- Charging voltage surges.