The need to replace the generator on a VAZ car may occur when its windings burn out, an interturn short circuit occurs, the case breaks, and other reasons. But today, I would like to talk about replacing the VAZ generator in the case when its power is no longer sufficient...
Imagine the situation - you are the owner of a VAZ 2101 - 2106, you bought and installed a powerful amplifier, installed fog lights of 50 W each. A standard generator that produces a maximum current of 42A cannot cope with such a load.
And if all additional equipment is turned on, then there will be nothing left to charge the battery. After all, judge for yourself, the high beam in the VAZ 2106 has become “heavier” by 100 W, while with a standard generator and on a penny it does not shine with its parameters. It’s these types of cases of replacing a VAZ generator that I want to talk about. Let's consider which generators can replace our long-suffering G-221.
Features of the VAZ 2101 generator
VAZ 2101 has two sources of electricity - a battery and a generator. The first is used when the engine is off, and the second while driving. The operating principle of the VAZ 2101 generator is based on the phenomenon of electromagnetic induction. It produces only alternating current, which is converted into direct current by a special device.
VAZ 2101 is considered one of the longest-living models, largely due to the performance of the generator
The main task of the generator is to uninterruptedly generate electric current to maintain the functionality of all electronic devices in the car, including recharging the battery.
Technical characteristics of the VAZ 2101 generator
The generator is connected to a crankshaft pulley that drives the water pump. Therefore, in the VAZ 2101 it is installed in the engine compartment to the right of the engine. The generator has the following technical characteristics:
- rated voltage - 12 V;
- maximum current - 52 A;
- the direction of rotation of the rotor is to the right (relative to the motor housing);
- weight (without adjustment unit) - 4.28 kg.
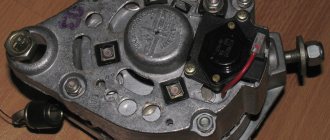
The manufacturer installed G-221 generators on the VAZ 2101
How does the generator 2106 2107 work?
Correct operation of the generator 2106 2107 ensures the proper functioning of all vehicle devices. According to the attached operating instructions, the technical condition of the VAZ 2106 generator is checked at least once every 4 months. Failure to pay attention to this requirement leads to wear and tear of the device. As a result, the question of which generator is better to install on the VAZ 2106 becomes relevant.
If the car is involved in an accident or major repairs, it is imperative to ensure that the device is in working order. Otherwise, the voltage drop will cause serious damage to all electricity consumers in the car. In most cases, a VAZ generator malfunction can be repaired in a garage.
Selecting a generator for VAZ 2101
The manufacturer equipped the VAZ 2101 with generators of the G-221 model. The maximum current of 52 A was enough to operate all standard electrical appliances. However, the installation of additional equipment by car owners (powerful acoustics, navigator, additional headlights, etc.) led to the fact that the G-221 could no longer cope with increased loads. There was a need to replace the generator with a more powerful one.
Without any problems, you can install the following devices on the VAZ 2101:
- A generator from a VAZ 2105 with a maximum current of 55 A. The power is enough to operate a conventional speaker system and, for example, an additional LED strip for lighting. It is installed on standard mounts for the VAZ 2101 generator. The only differences are that the regulator relay is built into the generator housing, while on the G-221 it is located separately.
- Generator from VAZ 2106 with a maximum current of 55 A. Withstands slight overloads. Installed on standard G-221 mounts.
- Generator from VAZ 21074 with a maximum current of 73 A. Its power is sufficient to operate any additional electrical equipment. It is installed on standard VAZ 2101 mounts, but the connection diagram is slightly different.
- Generator from VAZ 2121 Niva with a maximum current of 80 A. The most powerful among its analogues. However, its installation on the VAZ 2101 will require significant modifications.
- Generators from foreign cars. The best option is generators from Fiat. Installing such a device on a VAZ 2101 will require noticeable changes in the design of the generator mounting and its connection diagram without guarantees of high-quality operation.
Photo gallery: generators for VAZ 2101
The generator from the VAZ 2105 is installed on the standard mounts of the VAZ 2101
The generator from the VAZ 2106 can withstand slight overloads and is installed on standard G-221 mounts
The generator power from the VAZ 21074 is sufficient to operate any additional electrical equipment
It is quite difficult to install a Niva generator on a VAZ 2101
In fact, it will be enough for the driver of a VAZ 2101 to install a generator from a “six” or “seven” to satisfy all his electricity needs. Even with complex tuning, a power of 60–70 amperes is enough to maintain the operation of all devices.
Which generator is better to install on a VAZ 2106 - Lada master
The generator of any car, even a diesel one, is the gray eminence under the hood. Without it, the car won't even take a step. It can be annoying when the engine is tuned well and runs within decency, but for some reason the electrical equipment refuses to work properly. If we are talking about our VAZ 2106, then with a high degree of probability the whole problem lies in the G 221 generator, which was installed on the descendants of the Fiat 124.
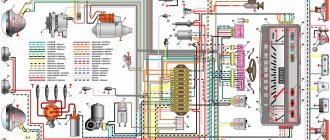
Electrical diagram of VAZ 2106
As a matter of fact, if we look at the electrical circuit of the VAZ 2106, which we have given below just in case, it turns out that it differs from the 2101 circuit only in the presence of additional electrical appliances, which entailed some changes. And the generator in the base of the six is the same as in the 2101, its name is G 221.
There can be no complaints against it as long as it works. But the fact is that the design of an electric machine is not at all designed to use such a number of consumers. As a result, insufficient current is supplied to the relay regulator, which in turn leads to undercharging and slow death of the battery. Disorder.
How to connect a standard generator G221
This is expressed quite clearly. Especially if the owner installs additional, non-standard consumers in the car that work almost constantly. It can be:
- fog lights;
- powerful audio system;
- preheater;
- refrigerator, TV, additional heater.
In short, any step that leads to an increase in electrical energy consumption threatens premature battery discharge, even on the road, with the engine running and at high speeds. That’s why it’s worth understanding how the VAZ 2106 generator connection diagram works and what alternatives there are.
Replacing a VAZ 2106 generator with a G222
The easiest option is to replace the standard generator. On new. It makes no sense to talk about the generator design as an electric three-phase synchronous machine. Not about that now. We are faced with the problem of connecting the standard G 221 generator in order to avoid mistakes when installing another, more powerful and stable G 222 generator, which was already installed on the VAZ 2105.
How is it better than the standard six? Actually nothing. With the exception of a few nuances that can be decisive when the load on the on-board electrical circuit increases. It can be installed on a VAZ 2106 engine using one of two methods:
- Install a generator with a built-in relay instead of the standard one.
- Install the modernized G 222 generator.
Actually, it’s much easier not to complicate life by altering the wiring, albeit minor, but to take the simple path.
Modification of the G222 generator for the VAZ 2106
Relatively simple. Make some adjustments to the design of the 222nd generator. Externally, these two units are almost identical. They are distinguished only by a built-in battery charging relay. It is installed in the 222nd generator along with the brush block and it is clearly visible from the back, even if you don’t read the markings.
The difficulty of installing a 222 generator is that you need to thoroughly know the connection diagram. After studying all the nuances of the circuit, you can simply connect the standard remote battery charging relay to the new generator without making any changes to the circuit. This is the simplest and most rational way.
The difference in these two generators is not only the presence of an integrated charging relay. The fact is that the G221 operates with an output of 42 A, and the generator from the 2105 G222 produces 50 amperes. The increase in power was achieved by increasing the cross-section of the rotor winding, and structurally, this is the same generator that was installed on all Zhiguli classics.
Checking the functionality of the 2106 power system
In order for the G 222 generator to be installed without making changes to the connection diagram, it is enough to install the brush block from the six generator. It installs instead of the integrated one without any problems. At the same time, it is better to replace the remote charging relay.
After replacing the generator and connecting it according to one of the provided diagrams, it is enough to check the functionality of the system as a whole. To do this, it is necessary, with minimal current consumption by third-party electrical appliances, to check the voltage at the battery terminals at medium engine speeds. This is approximately 2.5 thousand revolutions per minute. The voltage at the battery terminals at these speeds should be 14 V.
Thus, you can solve the problem of insufficient power of the standard generator and replace it with a more powerful G222 from the VAZ 2105 engine. Good luck to everyone!
ladamaster.com
Connection diagram for the VAZ 2101 generator
The VAZ 2101 generator is connected using a single-wire circuit - one wire from the generator is connected to each device. This makes it easy to connect the generator yourself.
The VAZ 2101 generator is connected using a single-wire circuit
Features of connecting the VAZ 2101 generator
Several multi-colored wires are connected to the VAZ 2101 generator:
- the yellow wire comes from the warning light on the dashboard;
- a thick gray wire goes from the regulator relay to the brushes;
- a thin gray wire goes to the relay;
- The orange wire acts as an additional connector and is usually connected to a thin gray wire during installation.
Incorrect connection of wires can cause a short circuit or voltage surges in the electrical circuit of the VAZ 2101.
For ease of installation, the wires for connecting the VAZ 2101 generator are painted in different colors
The device of the VAZ 2101 generator
For its time, the design of the G-221 generator turned out to be quite successful. It was installed without modifications on subsequent models of the plant - VAZ 2102 and VAZ 2103. With proper maintenance and timely replacement of failed elements, it could be used for many years.
Structurally, the G-221 generator consists of the following main elements:
- rotor;
- stator;
- regulator relay;
- semiconductor bridge;
- brushes;
- pulley.
The G-221 generator is attached to the engine on a special bracket. This allows you to firmly fix the device and at the same time protect it from high temperatures.
The bracket firmly fixes the generator even when driving on uneven roads
Rotor
The rotor is the moving part of the generator. It consists of a shaft, onto the corrugated surface of which a steel sleeve and beak-shaped poles are pressed. This design serves as the core of an electromagnet rotating in two ball bearings. Bearings must be closed type. Otherwise, due to lack of lubrication, they will quickly fail.
The rotor (armature) is the moving part of the generator
Pulley
The pulley can be considered either part of the generator or a separate element. It is installed on the rotor shaft and can be easily removed if necessary. When the engine is running, the pulley rotates by the crankshaft through the belt and transmits torque to the rotor. To prevent the pulley from overheating, there are special blades on its surface that provide natural ventilation.
The generator pulley is driven by the crankshaft through a belt.
Stator with windings
The stator consists of a number of special plates made of electrical steel. To increase resistance to loads in four places on the outer surface, these plates are connected by welding. A winding of copper wire is laid on them in special grooves. In total, the stator contains three windings, each of which consists of two coils. Thus, six coils are used to generate electricity by the generator.
The stator consists of plates made of electrical steel, on which a winding of copper wire is laid
Regulator relay
The regulator relay is a small plate with an electrical circuit inside, designed to control the voltage at the output of the generator. On the VAZ 2101, the relay is located outside the generator and is mounted on the rear cover from the outside.
The regulator relay is designed to control the voltage at the generator output
Brushes
Generating electricity from a generator is impossible without brushes. They are located in the brush holder and attached to the stator.
Only two brushes are fixed in the brush holder of the G-221 generator
Diode bridge
The rectifier (or diode bridge) is a horseshoe-shaped plate with built-in six diodes that converts alternating current to direct current. It is important that all diodes are in good working order - otherwise the generator will not be able to provide power to all electrical appliances.
The diode bridge is a horseshoe-shaped plate
Generator brushes - easy replacement + Video
Alternator brushes are an important element of the automotive system for supplying and discharging electrical current. Without their participation, the car's generator will not be able to generate voltage.
Generator brushes - element information
The brushes we are interested in are made of graphite, which is why they are often called carbon. They are used not only on cars with an internal combustion engine, but also on a wide variety of mechanisms and machines equipped with an electric motor (machine tools, lifting devices, urban public transport, and so on). The most common are EG-4 brushes.
This brand is suitable for installation on many cars of different years of production, as it has standard operating parameters. Less commonly used are other products (for example, EG-61), which are characterized by a high margin of safety due to their impregnation with special compositions.
On domestic cars, the generator and brushes for it are located under the right front headlight of your “iron horse”. They are not difficult to find. It is enough to open the hood to see the generator - its winding and two lids, which look like tin cans, come to the surface.
When do you need to change generator brushes?
During scheduled maintenance, no one pays attention to the small elements of the generator, of course. It is for this reason that the breakdown of its brushes always comes as a surprise to the driver. Experts advise that after 50 thousand kilometers (or once every four years) you must check their serviceability and functionality, and then no problems will arise with the operation of the generator.
It is noteworthy that you can check the brushes (and, if necessary, change them) without dismantling the rather bulky generator. In addition, the following symptoms may indicate the need to look under the hood of your car and check the graphite brushes:
- unpredictable shutdown of electronic devices in a vehicle, occurring for unknown reasons;
- reducing illumination of the car interior and external light sources;
- voltage reduction;
- a car battery that discharges unreasonably quickly, which, moreover, is then very difficult (and sometimes impossible) to charge.
Any of these symptoms tells the motorist that he most likely needs to remove the old brushes and install new ones instead. You can check old products for functionality very simply. We should remove the negative from the battery, remove the voltage regulator and visually evaluate to what height the graphite parts we are interested in protrude from their “shelter”. Brushes need to be changed urgently if their height is less than five millimeters.
Replacing generator brushes - from A to Z
Let’s say right away that this operation is very simple and does not require any special skills from the driver. First, as already mentioned, you need to remove the negative from the battery, then remove the regulator (it is located on the opposite side of the generator), and then perform the following steps:
- Thoroughly clean the holder seat, as well as the pressure springs and slip ring, from soot and dust. This operation is performed using a soft bristle brush. Sometimes it may be necessary to grind the graphite brushes into the commutator using fine glass sandpaper (its grain size should be about 100).
- Install new products and make sure that they move freely in the brush holder.
- Reassemble the assembly in reverse order, and then connect the previously connected wire to the battery.
If you bought a prefabricated structure (regulator plus brushes), its installation also does not cause any problems.
Turn off the “minus” wire, remove the cap made of rubber from the “positive” wire, and then dismantle the block by unscrewing the fastening nut. Then you will need to remove the plastic casing and remove the three spring clips located around the perimeter of the block. Using a Phillips screwdriver, unscrew the brushes along with the voltage regulator, and disconnect all the wires leading to it. Mount the purchased prefabricated structure in the vacant space. Operation completed!
carnovato.ru
Diagnostics and troubleshooting of the VAZ 2101 generator
There are a number of signs and signals by which you can determine that the generator is faulty.
The charging indicator light comes on
On the dashboard of the VAZ 2101 there is a battery charging indicator. It lights up if the battery charge is close to zero. This usually happens when the generator is faulty, when electrical appliances are powered from the battery. Most often the light comes on for the following reasons:
- Slipping of the V-belt on the generator pulley. It is recommended to check the belt tension, and if there is severe wear, replace it with a new one.
- Failure of the battery charging indicator relay. You should check the serviceability of the relay using a multimeter.
- Break in the stator winding. It is necessary to disassemble the generator and clean all its elements.
- Severe brush wear. All brushes in the holder will need to be replaced, even if only one of them is worn out.
- Short circuit in the diode bridge circuit. The burned out diode or the entire bridge should be replaced.
The battery indicator lights up if the battery charge is close to zero.
Battery won't charge
One of the tasks of the generator is to recharge the battery while driving. If this does not happen, you should pay attention to the following points.
- Sagging V-belt. It is necessary to adjust its tension or replace it.
- Loosening of the wire ends connecting the generator to the battery. All contacts should be cleaned or damaged tips should be replaced.
- Battery failure. This can be checked and fixed by installing a new battery.
- Damage to the voltage regulator. It is recommended to clean all contacts of the regulator and check the integrity of the wires.
The problem with the battery not charging is most often associated with a malfunction of the battery itself.
The battery is boiling over
If the battery begins to boil away, then, as a rule, its service life is coming to an end. In order not to risk the new battery, it is recommended to accurately identify the cause of boiling. It could be:
- Lack of permanent contact between the generator voltage regulator housing and ground. It is recommended to clean the contacts and replace them if necessary.
- Short circuit in the regulator. The voltage regulator needs to be replaced.
- Battery failure. A new battery must be installed.
If the battery begins to boil away, it will need to be replaced in the near future.
Loud noise while driving
The VAZ 2101 generator usually operates quite noisily. The cause of the noise is the presence of contacting and rubbing elements in the generator design. If this noise has become unusually loud, knocking, whistling and rumbles have appeared, it is necessary to identify the cause of this situation. This is usually due to the following problems.
- Loosening the fixing nut on the generator pulley. Tighten the nut and check all fastener joints.
- Bearing failure. You will need to disassemble the generator and replace the bearings.
- Short circuit in the stator winding. The stator assembly needs to be replaced.
- Brushes creaking. It is recommended to clean the contacts and brush surfaces.
Any extraneous noise from the generator is a reason to troubleshoot
Step-by-step procedure for replacing the generator. Option two is not complete
3.1. Remove the old generator, mounting bracket (pictured) and generator tension bar.
3.2. Pull out the split steel bushing installed in it from bracket 21214.
3.3. Install bracket 21214 in place of the old bracket.
3.4. Install a new tension bar.
3.5. Remove the silent ring with two rings from this bolt.
3.6. Install it in a bracket that is already attached to the block.
3.7. Then everything is simple. As usual, we install the generator, tighten the bolt on the bracket from the bottom, put on the belt, tighten it, tighten the generator with a tension bar using an M8x25 bolt with a nut and a groover.
3.8. Now connection. On the driver's side, under the hood, a voltage regulator is attached to the fender; 2 wires are connected to it; we disconnect them from the regulator and isolate them.
3.9. On the new generator there are only two places for connection, a bolt and a terminal. We place a terminal on the bolt, just like on the old generator; tighten it with a nut and put the rubber casing on the bolt. As for the remaining two wires going to the generator, we place the yellow wire on the remaining terminal of the generator, and the gray one (it was attached to the brushes of the old generator) is also insulated and left dangling.
3.10. And one last thing. There is a RS-702 relay under the hood on the passenger side; it needs to be replaced with the purchased RS-527. We connect in the same way as the old one was connected, i.e. contact 85 to 85, 86 to 86, etc.
3.11. It’s probably worth replacing the battery))) and running to start the engine! Everything works for me, it’s one of the few things that works after my hands.
Thanks Tretyakov Oleg “STALKER”, VAZ-2106 Auto Club
More information about connection diagrams The issue of connection is discussed on the forums. Opinions and advice vary: from replacing relay 702 with 527 and connecting PP 380 wires to soldering in diodes, etc. Therefore, share your experience which path is correct. And if possible, describe the connection step by step, because in diodes, field windings, etc. I’m not cutting much yet. Changing one relay is the simplest solution. In the instrument panel, you can solder not “-” to the light bulb (as it is there by default), but “+ from the ignition” with a parallel resistor - and then you will connect this wire (which goes from the relay to the light bulb) directly to the generator. This is how you need to connect. In principle, you can not use resistors, but then if the light bulb burns out, charging will disappear. 9 - resistors 2W (mlt-2, omlt-2) 100 Ohm
We take the “+” wire from the ignition switch “15” (a “+” appears when the ignition is turned on) and connect it to one of the contacts of the light bulb. From the other contact of the light bulb we pull a wire to the generator and connect it to terminal 61. EVERYTHING! It will work until the light bulb burns out.
You can connect 2 100 Ohm resistors with a power of 2 W or 1 50 Ohm resistor with a power of 2 W in parallel to the light bulb (actually you need 4 W). Then, when the light bulb burns out, charging will not be lost.
By simple combinations you can use the original wiring and the original light bulb on the dash
The operating principle of the 2110 generator is identical to Niv's. The resistor there is also 50 ohms. Any diode can be used for a direct current of 5A.
Checking the functionality of the VAZ 2101 generator
The generator going out and breaking down is a rather unpleasant situation. Experts recommend periodically (at least twice a year) assessing its performance to determine the remaining resource.
You cannot check the functionality of the generator on a VAZ 2101 when disconnected from the battery while the engine is running, since there is a high probability of a voltage surge.
This can be done either at a stand in a service station or using an oscilloscope. However, no less accurate results can be obtained in a garage using a conventional multimeter.
Checking the generator with a multimeter
To test the generator, you can use either an analog or digital multimeter.
The specificity of the test does not allow the work to be carried out alone. Therefore, it is necessary to invite a friend in advance, since one person will have to be in the cabin, and the other will have to monitor the readings of the multimeter in the engine compartment of the car.
You can check the performance of the VAZ 2101 generator using a multimeter
The verification algorithm is extremely simple and consists of performing the following steps.
- The multimeter is set to DC current measurement mode.
- The device is connected to the battery terminals. With the engine not running, it should show between 11.9 and 12.6 V.
- The interior assistant starts the engine and leaves it idling.
- When the engine starts, the multimeter readings are recorded. If the voltage drops sharply, the generator's life is insignificant. If the voltage, on the contrary, jumps (to about 14.5 V), then the excess charge will lead to the battery boiling in the near future.
Video: checking the VAZ 2101 generator
The norm is a small voltage drop when the engine starts and a quick recovery of performance characteristics.
Belt replacement
To make it more convenient to work, you will have to remove the battery.
- Unscrew the fastening nut. Using a mounting spatula, we move the device closer to the cylinders. If this is difficult to do, then unscrew the lower mounting bolt.
- Now that the generator has been moved to the engine, you can easily remove the old belt and put on a new one instead.
- We move the generator away from the engine, monitoring the belt tension. Having achieved the required tension, tighten the fastening nut to the adjustment bar.
- We adjust the belt tension more accurately. To do this, we measure the deflection in the place between the pulleys and the pump with a force of 10 kgf. It should be from 10 to 15 millimeters. And between the pump and the crankshaft it should be equal to 12 to 17 millimeters.
- Once the correct adjustment has been achieved, tighten the fastening nuts and put the engine mudguard in place.
Do-it-yourself VAZ 2101 generator repair
Repairing a VAZ 2101 generator with your own hands is quite simple. All work can be divided into five stages:
- Removing the generator from the car.
- Disassembling the generator.
- Troubleshooting.
- Replacement of worn out and faulty elements with new ones.
- Generator assembly.
First stage: dismantling the generator
To dismantle the VAZ 2101 generator you will need:
- open-end wrenches for 10, 17 and 19;
- mounting blade.
Before dismantling the generator, you must disconnect the negative cable from the battery.
To remove the generator you will need to perform the following steps:
- Remove the right front wheel from the vehicle.
- Securely secure the car on a jack and additional supports.
- Climb under the car on the right side and find the generator housing.
- Loosen, but do not completely unscrew the housing fixing nut.
- Loosen, but do not completely unscrew the nut on the bracket stud.
- To loosen the V-belt, slightly move the generator housing.
- Disconnect the power cable going to the generator.
- Disconnect all wires and contact connections.
- Remove the fixing nuts, pull the generator towards you and remove it from the studs.
Video: dismantling the VAZ 2101 generator
Stage two: disassembling the generator
The removed generator should be wiped with a soft cloth, removing the main layer of dirt. To disassemble the device you will need:
- open-end and ring wrenches 19;
- extension;
- heads for 8 and 10;
- hammer.
Before disassembling the generator, it is best to prepare small containers for storing washers, screws and bolts. Because there are a lot of small details in the design of the generator, and in order to understand them later, it is better to classify the elements in advance.
Disassembling the VAZ 2101 generator is quite simple
The disassembly itself is carried out in the following order:
- Unscrew the four nuts on the back cover of the generator.
- The nuts securing the pulley to the body are unscrewed.
- The pulley is removed.
- The housing is divided into two parts (one will contain the stator, the other will contain the rotor).
- The winding is removed from the part with the stator.
- The shaft with bearings will be pulled out from the part with the rotor.
Further disassembly involves pressing out the bearings.
Video: disassembling the VAZ 2101 generator
Third stage: generator troubleshooting
At the troubleshooting stage, faults of individual generator elements are identified and eliminated. In this case, some of the work can be performed at the disassembly stage. Particular attention should be paid to:
- signs of wear on the surfaces of parts;
- the appearance of carbon deposits on wires and contacts;
- the presence of dirt and working fluids inside the generator housing;
- cracks, nicks and other mechanical damage to parts.
All damaged and worn elements must be replaced with new ones.
When troubleshooting, you do not need to pay attention to the generator housing: after several years of service, it may have an unsightly appearance, but at the same time it will protect the insides of the device well.
Stage four: generator repair
The difficulty of repairing the G-221 generator is that it is difficult to find spare parts for it. If bearings can still be purchased on the Internet, then choosing a suitable winding or rectifier will be very difficult.
Video: repair of VAZ 2101 generator
"Kopeyka" left the factory assembly line in 1970. Mass production ended in 1983. Since Soviet times, AvtoVAZ has not produced spare parts for repairing the rare model.
Therefore, the list of situations for repairing a VAZ 2101 generator is very limited. So, if bearings jam or brushes wear out, replacement elements can be easily found in car dealerships.
Removing the generator on a Ford Focus 2
The Ford Focus 2 uses several modifications of power plants with different design features that affect the removal algorithm.
On 1.4 and 1.6 liter engines, the generator is located in the upper part, which makes dismantling somewhat easier.
Removal algorithm for a 1.6 liter engine
For example, let's look at the technology for removing a unit from a Ford Focus 2 equipped with a 1.6-liter unit.
To complete the work you will need:
- Wrenches for 8, 10, 12 and 13 (better - heads of the indicated sizes with extensions and a wrench equipped with a ratcheting mechanism);
- Flat screwdriver;
- Torx bit E10.
These tools will be enough to get the job done. Dismantling is carried out on a cold engine.
The work algorithm is as follows:
- Disconnect the power wire going from the battery to the generator (do not confuse it with the positive terminal of the battery). This is done so that you do not enter the radio code later and do not reprogram the power windows. Many people disconnect only the negative wire, which is not entirely correct;
- We cut the drive belt of the generator and attachments (when removed, it must be replaced with a new one);
- Unscrew the nut securing the power steering reservoir;
- We disconnect the clamp securing the cooling system pipe to the power steering expansion tank and move the tube to the side;
- We move the power steering reservoir to the side;
- We disconnect the brackets for fixing the expansion tank of the cooling system (by pulling it up) and move the tank forward and to the left to provide space for removing the generator;
- Disconnect the wire from the generator and remove it;
- We disconnect the block with wires from the generator (by pressing the latch with a flat-head screwdriver and pulling the chip upward towards you). We take him aside;
- The device is mounted on two bolts and one stud with a nut. First, unscrew the bottom bolt (located under the pulley). We use a 15 head;
- Unscrew the top mounting bolt. We also use a 15 head;
- We unscrew the top nut located to the right of the already unscrewed bolt. We use the same head for 15;
- Remove the plate - the power steering reservoir mounting bracket;
- We turn out the pin. To do this, we use a 10 Torx head;
- We remove the generator.
POPULAR WITH READERS: Replacing the alternator belt on a Priora Inspect the device for external damage. Smell it, if it smells burnt, then the wiring is most likely burnt out.
Installation of a repaired or new unit is performed in the following sequence:
- First, the stud and nut are screwed in (Torx head 10, head 15);
- We put on the plastic bracket that holds the power steering reservoir;
- Insert and tighten the lower bolt under the pulley;
- We attach and tighten the upper bolt (to the left of the stud);
- Install the belt;
- We connect the connector and the generator wire. In the latter case, use a 10 nut;
- We put the coolant reservoir in its original place;
- We install the pipe clamp;
- We install the hydraulic booster barrel;
- Connect the power wire;
- Do not forget to install all hoses in their places;
- We start the car and check the operation of the generator.
You need to select a new generator based on the vehicle's VIN code. The original products are produced by the Italian company DENSO.
The sticker should indicate that this is a FORD company, the amperage and the original engineering code are 115 IM.
Alternator belt VAZ 2101
In classic VAZ models, the generator is driven by a V-belt 944 mm long. On a VAZ 2101 you can also install a belt with a length of 930 mm, but other options are no longer suitable.
The factory equipment of the generator involves the use of a belt 2101–1308020 with a smooth surface and dimensions 10x8x944 mm.
The old-style VAZ 2101 generator belt has a smooth surface
The alternator belt is located in the front of the car and connects three pulleys at once:
- generator pulley;
- water pump pulley;
- crankshaft pulley.
How to properly tension the alternator belt
When replacing the alternator belt, it is extremely important to tension it correctly. Any deviation from the norm will affect the operation of VAZ 2101 electrical appliances.
To tighten the VAZ 2101 generator belt, use a crowbar, spatula or thick screwdriver
Reasons for replacing the alternator belt are:
- the appearance of cracks and signs of severe wear on the belt;
- belt break;
- manufacturing defects.
To replace the belt you will need:
- mounting spatula (or metal crowbar);
- wrenches 17 and 19.
The work is performed in the following order:
- Reinstall the generator by tightening the two mounting nuts halfway. The nuts must be tightened until the stroke of the generator housing exceeds 2 cm.
- Insert a pry bar or pry bar between the generator housing and the water pump housing.
- Place the belt on the pulleys.
- Without releasing pressure from the pry bar, tighten the strap.
- Tighten the top nut securing the generator.
- Check the belt tension. It should not be too tight or, conversely, sagging.
- Tighten the bottom nut.
Video: tensioning the VAZ 2101 alternator belt
To make sure that the belt has a working degree of tension, it is necessary to sell its free space with your finger after completing the work. The rubber should yield no more than 1.5 centimeters.
Thus, even an inexperienced car enthusiast can independently diagnose the malfunction, repair and replace the VAZ 2101 generator. This does not require any special skills or exclusive tools. However, you should not overestimate your strength either. It must be remembered that a generator is an electrical device, and in the event of an error, the consequences for the machine can be quite serious.
Step-by-step procedure for replacing the generator. Option one is not complete
2.1. Pull out the split steel bushing installed in it from bracket 21214 and install a silent instead (with the metal side inward).
2.3. Remove the contact extension 61 (excitation winding) from it under the protection cover - however, you can do it yourself :).
2.4. Unscrew the old bracket from below (head with 17, 2 or 3 bolts).
2.5. Unscrew the old strip from above (17 head, one nut).
2.6. Hang a new bar - but do not fix it completely, let it dangle.
2.7. Secure the new bracket with the silent insert inserted into it (metal ring inside).
2.8. Hang the generator 214, having first placed the excitation winding contact extension on it (so as not to do it by touch). Insert the bolt, put on the shaped washer (with the ribs inward, of course) and tighten with the nut (not too much).
2.9. Putting on the belt - by the way, is noticeably easier than on 213, insert the bolt into the bar and the upper ear of the generator, tighten it (not all the way, again).
2.10. Finally tighten the fastening of the bar to the engine.
2.11. Pull the belt, fix the ear fastening to the bar, fix the lower fastening.
2.13. After drinking beer first, start up and enjoy life.