Obviously, the oil pump (OP) in the VAZ 2110 car system serves to transport the lubricant.
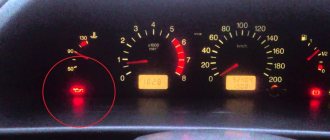
It’s not uncommon that when you get behind the wheel and start the engine, a warning light with an image of an oil can lights up on the dashboard and does not go out. In this case, the likely cause of the signal may be a failed pump.
Step-by-step instructions for repairing and inspecting oil pump parts:
1. For a detailed inspection, it is necessary to remove the oil pump.
2. First, you need to unscrew the bolt (1) and remove the crankshaft position sensor (2), which is only available on engines with a fuel injection mechanism.
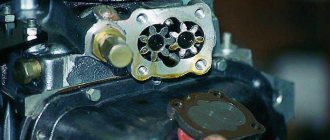
3. When disassembling the pump, you need to unscrew the six bolts and remove the pump cover.
4. Using two screwdrivers, you need to lift the pump housing so that the pins on the housing can come out of the holes located in the cover of the VAZ 2110 oil pump. Now remove the housing itself by disconnecting it from the cover.
5. We take the gears out of the cover: first the driving one, and then the driven one.
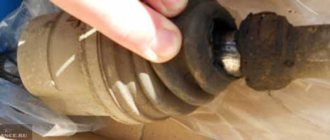
6. Now you need to unscrew the pressure reducing valve plug. An O-ring must be installed under this plug. Inspect the ring - if it is too compressed, it needs to be replaced.
7. Having unscrewed the plug, we take out the spring of the pressure reducing valve.
8. Now we take out the valve itself, gently tapping the body on a clean wooden stand. If the valve does not come out, it must be removed using a thin pointed object, preferably also wooden, so as not to damage the surface.
9. Now you need to carefully inspect the aluminum cover for visible signs of wear, mechanical damage, deep scratches in the contact areas of the gears. If found, the cover must be replaced with a new one.
11. The size of the maximum permissible diameter of the driven gear socket is 75.1 mm, so we measure the diameter, and if it exceeds the permissible one, we will also have to replace the housing.
12. Now you need to measure the width of the body segment in the middle part. If the measured value is less than 3.4 mm, the VAZ 2110 pump housing must be replaced.
13. Check the gears. The thickness of the drive should not be less than 7.42 mm. We measure: if it is less, we replace the gear.
14. The same applies to the slave. If the thickness is less than 7.35 mm, the gear must be replaced.
15. Then we check the axial clearances of the gears. It is necessary to install the drive gear back into the housing, after which we apply a steel ruler to the housing and use a feeler gauge to measure the gap between the gear and the ruler.
16. In the same way, measure the axial clearance between the attached ruler and the driven gear. For the drive and driven gears, the maximum permissible axial clearance is 0.12 mm and 0.15 mm, respectively. In cases where these values are exceeded, the gears must be replaced with new ones.
17. Through calculation, more accurate values of axial clearances can be obtained. To do this, a micrometer is used to measure the thickness of the oil pump housing along the outer surfaces, as well as the thickness in the area of the sockets for the drive and driven gears along milled surfaces in several places. The axial clearance is calculated based on the difference between the arithmetic mean of the socket depth and the measured thickness of the gears.
18. The next stage of repair is to inspect the pressure reducing valve seat to detect rough scratches and other deep mechanical damage on the inner surface. If found, the cover must be replaced.
19. If burrs and deep mechanical scratches are detected on the pressure reducing valve itself, it must also be replaced with a new one.
20. We also replace a bent, broken/broken or cracked pressure relief valve spring. The height of the spring in its free state is normally 44.72 mm; the same parameter under a load of 4±0.24 kgf is 31.7 mm. If there is a discrepancy, the spring must be replaced.
21. Assembling the oil pump. We install the driven gear with the chamfers on the teeth towards the housing.
22. Then install the drive gear in the same way - with the chamfers on the teeth facing the body. The gears must be lubricated with engine oil before installation.
23. Now you need to install the cover on the body and tighten the fastening bolts.
24. Before installing the pressure reducing valve into the seat with the bottom down, it must be lubricated with engine oil. Then you need to install the spring and tighten the plug with the aluminum O-ring of the oil receiver tube, also pre-lubricated.
25. It is necessary to pour engine oil into the pump through the oil receiver tube.
26. At the end of the repair and complete assembly of the car’s oil pump, turn the gears several turns so that the working surfaces of the gears are well lubricated.
Purpose
The purpose of the oil pump is to circulate oil through all engine components to lubricate them evenly and increase their service life. It is driven by an internal combustion engine (internal combustion engine) and is structurally divided into two different types, based on the principle of coupling with the crankshaft. In our case, it connects directly to the crankshaft, that is, it rotates with it. This is the operating scheme of the unit for front-wheel drive VAZ cars. Cars with all-wheel drive, as well as classics, have a more complex system installed. There, the drive contains additional links: an intermediate shaft, a timing chain (gas distribution mechanism), and toothed gears, through which torque is transmitted from the crankshaft to this device.
Common faults
- Most often, the pump of the VAZ 2112 and other VAZ models with front-wheel drive leaks through the seal, which has to be changed.
- The oil receiver also often fails, especially if you use low-quality oil, or missed replacing it in a timely manner, or the oil does not meet specifications (too thick).
- Too liquid simply will not be pumped and the pressure sensor will immediately light up.
- In this case, the oil receiver mesh becomes clogged, the circulation of oil through the engine becomes difficult, causes oil starvation, and as a result, the service life of the engine is significantly reduced.
- This includes a malfunction of the pressure reducing (bypass) valve: either it is stuck in the open position, and then the oil pressure drops. Either it does not bypass, and then the oil will squeeze out through the oil seal
What oil to fill and at what frequency?
The manufacturer recommends changing the engine oil after 10 thousand kilometers, however, it is recommended to shorten this period if possible, and at the same time change the oil filter. You should only buy oil from well-known companies and, when choosing it, beware of counterfeits. The ideal option is to pour oil recommended by the manufacturer and not be fooled by cheapness or high cost (expensive does not mean high quality).
Recommendations for choosing spare parts
- The oil pump usually does not cause car owners much trouble, since it has a service life of at least 120 thousand kilometers. However, no one is immune from breakdowns
- If suddenly you still need to replace the oil pump on a VAZ 2112, it is better to take original spare parts and not save
- Among the well-known suppliers of parts for VAZ cars, the official one is the Tolyatti Automobile Assemblies Plant (TZA for short).
- It also produces oil pumps for the VAZ 2112
- This is one of four varieties of such units in the VAZ line, which fits all front-wheel drive fuel-injected cars
- Typically, removing the oil pump on any car occurs when disassembling the engine.
- Only if necessary, this work is carried out on the car without removing the engine from it.
- Before starting this procedure, first drive the car into the inspection hole.
- And immediately purchase everything you need to carry out a full replacement, as shown in Photo No. 2.
Photo No. 2, everything you need to replace the pump
Designations in the photo:
- 1 - oil pump
- 2 – pan gasket
- 3 - pump gasket
- 4 - sealing ring
- 5 - sensor mounting bracket
Necessary tool
- A set of wrenches (open-end - spanner preferably)
- Socket set and ratchet
- Two strong flathead screwdrivers
- Hexagon set
Basic data
The VAZ 2110, 2112 oil pump is designed to uninterruptedly supply oil to the engine to lubricate its rubbing parts, which effectively extends their service life. On these cars, this product is connected to the crankshaft and directly receives energy from it for operation (rotation), which is traditional for all front-wheel drive VAZs. The product is located in the engine oil sump.
Signs of pump failure:
- 1. Increased or decreased oil pressure at idle speed;
- 2. There is no oil pressure at idle, under load;
- 3. Continuous lighting of a red light signal with an image of an oil can, indicating a lack of oil pressure in the system.
You need to know that the burning of a lamp with an image of an oil can, without confirmation, is not grounds for immediate replacement of the unit. First you need to make sure that the wiring of the oil pressure sensor is in good condition; if everything is in order with it, then you definitely need to check the sensor itself. To do this, it is dismantled and inspected - if there are no traces of lubricant on it (no circulation), the pump will need to be replaced; when the sensor is lubricated, the sensor should be replaced.
The most common pump failures include:
- 1. Oil leakage through the oil seal;
- 2. Breakdown of the oil reservoir, which most often occurs due to the driver’s fault, namely the use of low-quality oil, too thick, or untimely oil changes. Oil that is too thin simply will not be pumped through the pump, which will be immediately signaled by a lamp with an oiler;
- 3. Clogged oil receiver grid, which leads to difficulty in oil circulation through the engine. In this case, oil starvation occurs with increased wear of parts and assemblies of the VAZ 212 engine and other models.
- 4. Damage to the pressure reducing (bypass) valve. It can stop in different positions: if it “hangs” in the open position, the oil pressure will drop, but if it stops in the closed position, then the bypass will not occur, this will be evidenced by oil leakage through the oil seal.
The manufacturer AvtoVAZ recommends changing the oil every 10 thousand km, but operating experience shows that it is better to reduce the mileage between changes. You need to buy oil only from reputable manufacturers, and you also need to be wary of counterfeits.
DIY pump repair VAZ 2110/2112
The driver does not always have the opportunity to replace a faulty pump. In some cases, it is possible to repair the device by restoring the operating functions of the pump. If the pump has not yet exhausted its service life (50 thousand kilometers), then you can repair it. However, the pump cannot be repaired without using a special repair kit. This is a set of rubber gaskets and parts that most often fail and need to be replaced.
Repair kits for pumps may vary in composition, depending on which spare parts need to be replaced
In addition, you will have to thoroughly prepare for repairs: the place for disassembling and repairing the pump must be clean and level.
How to disassemble a water pump
Once the pump is removed from the machine, it will need to be disassembled. Only after disassembly and thorough cleaning will it be possible to replace the leaked parts of the pump.
To disassemble the pump, it is recommended to follow the following diagram:
- Wipe the product with a dry cloth.
- Unscrew the pump pulley.
- Pull out the thrust ring.
- Use a hammer to knock out the bearings from the shaft.
- Pull the shaft itself out of the housing.
- Unfasten the impeller.
- If something remains from the oil seal, then remove the remaining rubber from the housing.
The procedure for disassembling the water pump is intuitive: until you remove the pulley, it is impossible to get to the shaft and impeller
After this, the cavity of the pump itself must be thoroughly cleaned of dirt and old deposits - you can wash the pump with the same gasoline that is usually filled into the VAZ 2110/2112 tank.
Video: disassembling the pump
Replacing the oil seal
An oil seal is a gasket made of rubber and metal inserts. During normal pump repairs, changing the oil seal is included in the list of mandatory procedures, since the gasket is a rubber product in its structure, and therefore wears out quickly.
Replacing the oil seal is not difficult:
- The old gasket is removed from the shaft.
- The landing site is cleared of dirt.
- A new oil seal is installed.
The rubber-metal product that ensures the tightness of the pump is called an oil seal.
Changing the shaft with bearings
Most often, it is the bearings that have become loose that need to be replaced. But knocking them out of the shaft is a very tedious task. In addition, a hydraulic vice is required, which not every driver has. Therefore, it is easier to replace the bearings along with the shaft.
Again, the procedure for replacing the shaft is not associated with difficulties: a new one is driven in in place of the old shaft.
It is not possible to knock out the old bearings from the pump, so it is easier to replace the shaft along with them
How to replace a pipe on a pump
Sometimes, due to unstable pressure in the cooling system, the antifreeze supply or discharge hoses may become deformed. New pipes cost pennies, and new metal mounting clamps are not difficult to buy.
To make a replacement, you must:
- Use a screwdriver to loosen the clamp.
- Remove the clamp.
- Disconnect the pipe from the pump.
- Loosen the clamp on the back of the pipe and remove the fastener.
- Remove the pipe from under the hood.
The clamp, when compressing the pipe, can severely damage the rubber, which can cause antifreeze leaks
Why is it necessary to change on time?
Naturally, timely repair of parts that have become unusable will extend the life of both the engine and the VAZ-2110 vehicle itself. The time after which it is necessary to change the oil seal directly depends on how old or new the car is, on the driving style of the car owner and operating conditions.
We recommend: Three ways to close the starter directly
If you change them in a timely manner, this will help reduce the cost of car repairs, because such measures eliminate engine oil leaks, which negatively affect the operation of the engine.
If you do not change it in time, the VAZ-2110 car will “eat” more motor oil, and the engine itself will begin to collect dirt and dust, which cannot but affect the stability of its operation. Engine oil leaks negatively affect car parts that are not made of metal, and the contact in the terminals will become much worse, which, in turn, will affect how the car starts.
Any car has parts, for example, crankshaft cuffs, that need to be changed according to the manual or as they wear out. Replacing the VAZ 2110 crankshaft oil seal, as well as valves, can be done at a service station or with your own hands.
Oil pump replacement and repair
The oil pump of VAZ 2110–12 cars is replaced in an inspection pit or overpass. In extreme cases, you can use a jack. To work you will need the following tools:
- wheel wrench;
- keys for 10, 13, 17;
- hexagon socket wrenches 5 and 8;
- large slotted screwdriver;
- special key for tension rollers (to adjust the timing belt tension);
- clean, dry container to drain the oil.
Removing the oil pump
The procedure for dismantling the oil pump on a VAZ 2110–2112 is as follows:
- Remove the timing drive casing, having first unscrewed the mounting bolts on it with a 10mm wrench (on an eight-valve engine - 3 bolts, on a sixteen-valve engine - 6).
To remove the timing case, you need to unscrew 6 bolts
To loosen the alternator belt, you need to unscrew the bolt with a 13 mm wrench.
To remove the pulley, you need to unscrew the bolt with a 17 mm wrench
The marks on the camshaft gears must match the marks on the rear timing cover
Before removing the timing belt, make sure that the marks on the pulley and on the pump cover match
To loosen the timing belt, you need to unscrew the bolts securing the tension and guide rollers
When removing the crankshaft timing belt, be careful not to lose the key.
To make the oil drain faster, unscrew the filler neck.
To remove the pan, you need to unscrew the 16 bolts securing it with a 10mm wrench.
If the gasket is deformed or damaged, it must be replaced
The oil receiver is secured with three bolts to the main bearing cap and the oil pump.
To remove the oil pump, you need to unscrew 6 bolts with a 10mm wrench
When installing the oil pump, assembly is performed in reverse order.
Oil pump repair
Practice shows that in most cases it is better and easier to replace the pump as an assembly. If the device malfunction is not critical, you can try to repair it. Before this, the pump should be disassembled and the reason why it failed should be determined.
Pump disassembly
The procedure for disassembling the pump is as follows:
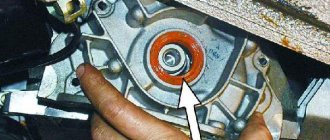
- Using thin pliers, remove the crankshaft oil seal from its seat. If it shows signs of damage, it will need to be replaced.
The crankshaft oil seal is removed using thin pliers
To disassemble the pump you will need a 5mm hex key.
The drive gear is located in the cover, and the driven gear is located in the housing
The valve plug is unscrewed with an 8mm hex key
The pressure reducing valve is pressed by a spring
Assessing the condition of oil pump elements
In order to understand whether the pump can be repaired, it is necessary to inspect all its elements and assess the degree of wear in the following order:
- Inspect the internal surfaces of the pump housing and cover. There should be no burrs, roughness or dents on them.
- Using a caliper, measure the diameter of the driven gear seat in the pump housing. It should not exceed 75.1 mm.
If the diameter of the seat is greater than 75.1 mm, the housing must be replaced
The segment thickness must be at least 3.4 mm
The thickness of the driven and driving gears should not be less than 7.42 and 7.45 mm
When free, the spring should have a length of 55.72 mm, when compressed - 31.7 mm
Attention!
Before installing the VAZ 2110 oil pump, you need to lubricate the pressure relief valve and gear. In addition, along with replacing the pump, it is worth replacing the oil seal.
- After the pump is installed, you need to put the timing belt on the tension rollers and align it to the marks.
- Put the plastic protection back in place and put the wheel back in place.
- Install the oil pickup onto the oil pump.
- Degrease the crankcase, after which sealant is applied.
- Install a new gasket on the crankcase and apply sealant again. Degrease the block and put the crankcase in place (to make the task easier, first fasten 3-4 bolts at different points, then tighten the remaining ones).
- Place the flywheel guard (also, if equipped, the crankcase guard).
- Fill with oil, start the engine.
Malfunctions in the operation of the pressure reducing valve
The structure of the pressure reducing valve is quite simple, which ensures its reliability and reduces the likelihood of breakdown. However, sometimes this still happens. Most often this is due to wear and tear of the mechanism, so do not forget to regularly diagnose all components of the car, as well as promptly replace outdated parts.
There are two main types of mechanism failure.
- The valve creates insufficient pressure. Usually the cause of this problem lies in the spring. With prolonged use, it becomes less elastic and stretches. As a result, the valve remains slightly open all the time. Due to this, the pressure decreases, and the oil does not reach some engine components. Sometimes it happens that unprofessional craftsmen install a spring with insufficient elasticity during repairs. This has the same effect.
- Excessive pressure builds up in the valve. As a rule, the cause of this breakdown is the entry of debris into the mechanism or the use of old viscous oil.
How to determine that the pressure relief valve is broken?
It is impossible to determine at first glance that the valve is broken. It is necessary to carefully inspect other elements of the system and exclude the possibility of damage to other parts of the oil pump. In order to understand that there are malfunctions in it, you should look at the dashboard. Most car models have a sensor located there that indicates problems in the system. It is a warning light with a pictogram that lights up at high speeds.
If this happens, you should stop the car immediately, as further movement may lead to permanent engine damage. Turn it off and get out of the car. Next, you will need to take the following steps.
- Wear protective gloves. At the moment, the engine compartment of the car is hot, so you can easily get burned.
- There is no point in checking the oil level if you have just stopped. It will take time before it drains into the crankcase. At this time, you need to inspect the engine: look for fresh oil leaks or damage to the crankcase.
- If the problem is a broken crankcase, you will need to seal it. This can be done using available materials: an ordinary rag, a piece of rubber and even tape.
- Inspect the oil filter. Damage to its gasket can also cause a breakdown.
- If the above items are in order, you should check the oil level. This is done with a special probe with o and “maximum”. Ideally, the oil level should be between them. If there is a lack of lubricant, simply add it.
All further actions are carried out on the valve removed from the pumping system. Examine it carefully. Often the cause of breakdown is clogging of the mechanism. This usually happens to drivers who are too lazy to change the oil. Dirt accumulates on the surface of the valve or spring, which prevents normal operation. If you have recently carried out a major overhaul of your car, then there is a risk that the valve was not properly washed and there are particles of chips and other debris left in it.
There is an unusual way to check the functionality of this element. Take a small piece of cotton (or other breathable) fabric and place it on the fitting that is parallel to the lid. Now you need to take a sharp breath through the material. If you feel strong resistance, it means that the valve is working as it should: it blocks the air flow and passes it through a special hole. A working mechanism should not be easily blown through.
Table: diagnosis of low pressure in the oil pump, causes and remedy
| Guide to diagnosing hypotension | ||
| Malfunction | Cause | Remedy |
|
|
|
| Low oil pressure throughout the entire engine speed range | There is too little oil in the engine. The oil intake screen is dirty, the oil intake tube is broken | Add oil to the engine. Remove the oil sump, clean the mesh, if necessary, replace the tube. |
| Worn oil pump | Remove, check, replace if necessary | |
| Engine bearing wear | Repair the engine |
Causes of oil pump failure
There are a number of typical breakdowns due to which the oil pump completely or partially fails:
- physical wear of the housing, rotor or driven gear. There is a gap of 0.2 mm between the pump gears and the housing. There is also a gap between the teeth of the pump gears - 0.5 mm. As wear occurs, these gaps increase, and the pressure created by the pump at the outlet pipe drops. Since replacing and adjusting worn gears is a very labor-intensive process and not everyone can do it, car enthusiasts follow the path of least resistance and simply change the entire oil pump;
- clogging of the oil receiver. If it becomes clogged, the pressure in the car's lubrication system drops sharply, and a red light comes on on the dashboard. A clogged oil receiver is a consequence of a completely clogged crankcase. The solution is to completely drain the used lubricant, remove the pan, crankcase, oil pump and thoroughly wash all these parts in kerosene;
- oil leak. Sometimes oil begins to leak directly from under the pump. Typically, the driver does not notice a leak immediately, identifying it by indirect signs, for example, by a sharply increased lubricant consumption and oil stains under the car. The cause of the leak is a leak in the pump gasket. Often, when replacing an oil pump, car enthusiasts do not change the gasket located under it, believing that it will serve for some time. This is an error that leads to leaks. The rule is simple: when changing the oil pump, you must also change the gasket, even if it does not look worn out.
Separate mention should be made of motor oil. Its quality also has a significant impact on the service life of the pump and its serviceability. The fact is that the oil pump is the only engine element that is lubricated with unfiltered oil (because the oil filter is installed only on the pump outlet). And if the car owner is used to saving on high-quality oil, then he may not count on long and uninterrupted operation of the oil pump.
Disassembly and repair
After completing the dismantling work, you can proceed in two ways:
- Replace the old pump with a new one;
- Repair the old oil pump.
Repair allows you to identify worn elements and replace them with new ones, which will restore functionality. If the breakdown is more serious than simple wear and tear of consumables, the optimal solution would be to completely replace the oil pump.
Where does withdrawal begin?
To disassemble the pump, follow the instructions.
Divide the pump into two parts. To do this, we have already unscrewed 6 bolts securing the cover to the body and used a screwdriver to pry off this cover. It came out of the pins on the body. So we remove the element and put it aside. Inside the pump housing there are driven and drive gears, which need to be removed and placed aside for now. Then we will check their condition. Next, the pressure reducing valve is removed. To do this, first unscrew the valve plug and remove the spring from the hole, and then the valve. In some cases, problems may arise with removing the valve. If you encounter this situation, gently tap the oil pump body against a piece of wood or use a wooden cone-shaped pin. It is inserted into the valve hole, the valve is hooked and removed. Having disassembled your oil pump on the VAZ 2109, thoroughly wash all its components using clean kerosene
Don't forget to wipe the parts dry afterwards. Check the condition of the cover and body of your pump for mechanical defects, chips, cracks. Pay special attention to the landing spots of the gears, where there should be no signs of wear or other mechanical defects. If they are, the pump will have to be replaced.
Condition assessment
In many ways, the performance and maintainability of the old oil pump depends on the results of checking the characteristics of the cover and body of the device. It is necessary to take measurements of the gaps.
Check location
Requirements
Driven gear seat diameter
The diameter may increase as the pump operates and friction occurs. The normal diameter of this place for the VAZ 2109 is 75.1 millimeters. If there is a deviation in the direction of increasing diameter, the pump must be replaced.
Thickness of the mating wall
Under normal conditions, this parameter is 3.4 millimeters. If the gap is less than specified, the pump is replaced completely
Drive gear thickness
The normal value is 7.42 millimeters. When the size is reduced, the pump goes to a landfill, and a new one is installed in its place.
Driven gear thickness
For her, the normal parameter is a thickness of 7.35 millimeters. As with the drive gear, deviation from the norm means replacement
Drive gear axial clearance
To measure, take a metal ruler and feelers of 0.12 and 0.15 millimeters. The gap is checked as follows: a gear is placed in the pump housing and a ruler is placed on top with its end. The gap between the end of the ruler and the plane of the feeler gauge is measured. For the drive gear, the gap is 0.12 millimeters
Axial clearance of driven gear
The method for checking the gap is exactly the same. Only for the driven one the normal indicator is 0.15 millimeters
Condition of the pressure reducing valve and socket
Assessing these parameters is very important. If you find mechanical damage on the surface, the element cannot be used further.
If the spring is bent or stretched more than normal, then replace the element. There is no need to completely change the entire pump.
Determining which gear is which is not difficult. The leading one has an external tooth, and the driven one has an internal one, that is, the element is smooth on the outside.
driven gear
Reassembly
Having completed the repair and reassembly of the old oil pump, or having decided to completely replace it, pay attention to several important nuances of reassembly
- Before installation, rotate the pump gear so that the lugs match the flats on the crankshaft.
- Be sure to lubricate the working edge of the oil seal with engine oil. This will allow you to easily slide the oil seal onto the crankshaft journal.
- When installing, be sure to trim the edges of the seal using a thin piece of wood. After this, you can fix the pump and return to their places all the elements dismantled at the stage of preparation for repair.
- After completing assembly of the unit, be sure to adjust the tension of the generator belt and camshaft belt.
«>]
Replacing and repairing an oil pump is quite simple if you have a repair kit and the necessary tools at your disposal. The main objective difficulty lies only in dismantling and reassembling the unit.
Dismantling
Depending on the situation, the oil pump can be completely replaced, or repair work can be performed - change gears, return the pump pressure reducing valve to functionality.
But let's talk about everything in order. In any case, work begins with dismantling the oil pump:
- Before you remove the pan to gain access to the pump, you will definitely need to drain the oil.
- To do this, warm up the engine to operating temperature, open the drain hole and wait until all the liquid drains out.
- Draining can also be done when it is cold, but due to its high viscosity, the oil can flow for a very long time and most of it will still remain inside the crankcase.
- After draining the oil, remove the three mounting bolts from the crankcase protection using an 8 mm wrench. The protection blocks access to the flywheel near the crankcase.
- Remove the flywheel guard and then remove the bolts from the crankcase. That's it, now the crankcase can be removed.
- In front of you is the crankshaft and the oil sump where the desired pump is located.
- By unscrewing the three mounting bolts, you can remove the intake from the pump.
- Let's move on to the engine compartment. Lift the hood and remove the plastic cover. This is a guard that covers the timing belt.
- Next, you need to remove the front right wheel to remove the pulley fixing washer, and then remove the pulley itself.
- Remove the timing belt and remove the six mounting bolts that hold the oil pump in place. Here you will need an 8 mm wrench.
- Remove the oil pump from the crankshaft.
Disassembly
If you do not want or cannot yet purchase a new pump, you can try to repair it. Perhaps the problem is a malfunctioning valve or worn gears.
- Remove the gasket from the pump;
- Remove the bolt holding the crankshaft position sensor;
- By unscrewing the six mounting bolts, you can remove the cover from the pump;
- Using a pair of screwdrivers, lift the housing so that the pins on it come out of their holes freely;
- Remove the body, disconnect it from the cover;
- Now you need to remove two gears from the cover. The drive gear is removed first, and then the driven gear is removed;
- Next in line is the pressure reducing valve. You need to unscrew the plug under which the o-ring is located;
- Check the condition of this seal. If the ring shows signs of damage or is too squeezed out, be sure to replace it with a new one;
- Remove the valve spring;
- Now you can remove the valve itself. To do this, gently tap the case on a stand made of pure wood;
- The valve may be stuck. Do not worry. Take any thin, sharp object, pry it up and remove the element. It is better not to use metal objects so as not to damage the surface;
- Check the current condition of the aluminum cover. If there are deep scratches or signs of wear, replace it;
- If the pump body shows signs of wear, do not even try to repair anything. The only correct solution would be to completely replace it;
- You also need to make sure that the gears and the diameter of their sockets comply with the standards;
- The maximum diameter of the driven gear socket is 75.1 millimeters. If it is larger, the case must be replaced;
- Measure the width of the body in the middle. If the indicator is less than 3.4 mm, it is worn out and needs to be replaced;
- As for the thickness of the gears, according to the requirements, the thickness of the drive is at least 7.42 mm, and the driven one - 7.35 mm. In case of deviations from the norm, the gears are changed.
Assembly and installation
If you managed to repair the oil pump, then all that remains is to assemble it and install the unit in place. If you decide to completely replace the device, skip the first part of the further instructions.
- Install the driven gear onto the housing with the chamfers on the teeth.
- Also, the new pump drive gear is returned into place using chamfers on the teeth.
- Be sure to remember to lubricate the gears with oil so that they work more reliably and longer.
- Replace the pump cover and screw back all the fasteners.
- Lubricate a new or repaired old relief valve before installing it in its proper place.
- The valve fits into its seat. Make sure installation is done bottom down.
- Now it’s the turn of the spring and the plug, which is wrapped with an o-ring. Again, these elements are pre-lubricated with engine oil.
- Using the oil pickup tube, oil is poured back into the unit.
- Once assembly is complete, rotate the pump gears several full turns. This will ensure effective lubrication of all surfaces inside the pump.
The unit is assembled and can be returned to its place. For this:
- Return the timing belt to its place by pulling it onto the rollers. Don't forget to set according to the labels;
- Return the plastic belt protection to its rightful place, install the wheel;
- Now you need to crawl under the car to install the oil pick-up on the pump;
- Be sure to treat the crankcase with compounds, removing all fat. Treat with sealant;
- We recommend installing a new gasket on the crankcase, after which another layer of sealant is applied;
- The block is degreased, the crankcase is returned to its rightful place;
- To make it easier to attach it, tighten several bolts at different points, and then screw in all the rest;
- Protection is installed on the flywheel, the crankcase protection is returned to its place;
- Pour oil back into the system, start the engine, and allow the oil to distribute throughout the components.
If you carry out all the manipulations correctly and first determine that it is the pump that has failed, the warning light on the dashboard will go out.
The oil pump plays a huge role in the functioning of the engine’s lubrication system, so at the first sign of its breakdown, immediately go to the garage, or entrust the replacement to specialists from trusted service stations.
Didn't find the information you are looking for? on our forum.
We recommend reading:
Turning relay for VAZ 2107 diagram
VAZ 2114 signs of internal CV joint failure, diagnostic methods
VAZ 2107 with a Priora engine
How to remove the gearbox on a VAZ 2107
How to clean the breather on a VAZ 2106
The speedometer on the VAZ 21099 injector does not work
Lada Kalina, what kind of gasoline to fill in a car, 92 or 95
Similar articles
What kind of oil to pour into the VAZ 2115 engine
Choosing oil for VAZ 2110
VAZ color chart, codes, names, description
VAZ error codes - table with a list of all errors
Replacing the oil pump on a VAZ 2110, where it is located, removal and installation, repair Link to main publication
Replacing the oil pump
As was said, on the VAZ 2109 the oil pump, which is replaced in the cases given above, must first be removed. Let us give again the main reasons why the oil pump needs to be dismantled:
- at idle speed when the engine is warm, there is not enough oil pressure (often this is due to foreign particles getting under the pressure relief valve or the problem is associated with wear of the oil pump gears);
- When the engine is sufficiently warmed up, excessive oil pressure is observed (the pressure relief valve in the pump gets stuck).
We arm ourselves with the necessary tools:
- keys 10 and 13;
- socket heads;
- extension cord;
- cardan joints.
What value should it be?
To begin with, it is worth noting that pressure is measured in bars (BAR), because we are measuring liquid. It’s unlikely that anyone will tell you the exact values now, because the structures of the engines are different, but there is a certain normal interval.
AT idle speed it is 2 BAR (or 0.2 MPa), for most cars
At 4000 - 5000 rpm - this is 4.5 - 6.5 BAR (0.45 - 0.65 MPa), also for most brands
If we take our VAZ 2112 16 valve version, then the pressure at idle is slightly higher, about 1.5 - 2.5 BAR. But at 4000 - 5000 rpm 0.4 - 0.6 BAR.
Actually, I’ll end here, I think the information was useful, read our AUTOBLOG.
(4 votes, average: 2.75 out of 5)
Similar news
Why do you close the radiator in winter? Let's say with cardboard, the necessary knowledge
Mileage 100,000-150,000 km. Is it a lot or a little, what needs to be changed? Ra.
OTTO cycle. ATKINSON. MILLER. What is it, what are the differences in ra.
Comments
Good day everyone, I decided to write my review of the 2010 Toyota Avensis. Just want…
TOP articles for the month
I have many different articles and videos on various gearboxes, for example here...
I already have an article on the website about choosing memory cards (you can see it here), it’s very...
In the article - is it possible to open windows when the air conditioner is running (you can read it here), I was asked...
How to check oil pressure?
The actual check is carried out using a special device - a pressure gauge. It is also worth noting that you need to warm up the engine to operating temperature, usually 90 degrees Celsius.
In order to check the pressure, you need to find the emergency sensor, which is responsible for the indication on the dashboard. It is worth noting that it is not always located nearby and it is convenient to unscrew it. We unscrew it, and in its place we attach the test output connected to the pressure gauge.
The check can then be divided into two options:
- AT “idle” it is usually from 900 to 1200 rpm.
- Then at “higher” speeds, usually 4000 - 5000 engine speeds.
It is also worth noting that if you unscrew the emergency sensor, the “oil can” will light up on your instrument panel, this is normal.
Now a short video showing how measurements are taken.
What value should it be?
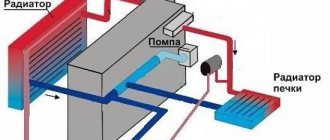
Additional pump for the stove, "gazelle". additional pump for the gazelle stove: description, price, reviews
To begin with, it is worth noting that pressure is measured in bars (BAR), because we are measuring liquid. It’s unlikely that anyone will tell you the exact values now, because the structures of the engines are different, but there is a certain normal interval.
AT idle speed it is 2 BAR (or 0.2 MPa), for most cars
At 4000 - 5000 rpm - this is 4.5 - 6.5 BAR (0.45 - 0.65 MPa), also for most brands
If we take our VAZ 2112 16 valve version, then the pressure at idle is slightly higher, about 1.5 - 2.5 BAR. But at 4000 - 5000 rpm 0.4 - 0.6 BAR.
Actually, I’ll end here, I think the information was useful, read our AUTOBLOG.
(4 votes, average: 2.75 out of 5)
Similar news
Why do you close the radiator in winter? Let's say with cardboard, the necessary knowledge
Mileage 100,000-150,000 km. Is it a lot or a little, what needs to be changed? Ra.
OTTO cycle. ATKINSON. MILLER. What is it, what are the differences in ra.
Comments
Good day everyone, I decided to write my review of the 2010 Toyota Avensis. Just want…
TOP articles for the month
I have many different articles and videos on various gearboxes, for example here...
I already have an article on the website about choosing memory cards (you can see it here), it’s very...
In the article - is it possible to open windows when the air conditioner is running (you can read it here), I was asked...
Instructions for verification
- First, check the serviceability of the electrical circuit going from the sensor to the instrument panel. Throw the wire going from the sensor to the engine to ground, the light will go out if the circuit is working properly.
- The second reason could be the oil filter. Such a breakdown is determined by unscrewing the oil pressure sensor. It should be moistened with oil; a dry sensor means that the filter is clogged or its valve is stuck.
- When replacing the filter does not have an effect, open the pan and check the oil receiver itself and the condition of its rubber sealing ring.
- After these checks, one reason remains - a breakdown of the unit itself.
- The engine of the VAZ 2110 model is equipped with a combined lubrication system. On machines of this model there is a gear oil pump, which is located at the front end of the cylinder block.
- Special gears with trochoidal internal gearing reduce mechanical losses during rotation.
- The oil pump itself is equipped with a fully in-line, non-separable filter. With bypass and anti-drainage valves. This device ensures good oil circulation and lubrication through all components of the internal combustion engine (ICE).
- It works by rotating the crankshaft. The connection method to the crankshaft is direct, which is typical for all VAZ cars with front-wheel drive.
- On all-wheel drive and classic models, the system is supplemented with special transmission parts: a timing chain, an intermediate shaft, and a set of gears that transmit torque from the crankshaft.
- The service life of this pump is from 120 thousand km, it works properly when the engine has already undergone a major overhaul. However, during operation, breakdowns are not excluded.
If replacement is still required, it is better for you to choose the VAZ 2110 oil pump from among reliable manufacturers.
Recommendation: If you still need to remove the oil pump, replace the front crankshaft oil seal at the same time.
Operating procedure
- Disconnect the negative cable from the battery terminal.
- Drain the oil from the engine (through the drain plug in the oil pan).
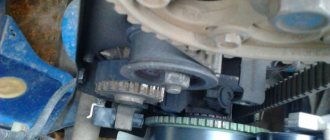
- We take out the camshaft drive belt.
Warning: After removing the timing belt (timing belt), do not try to turn the crankshaft or camshaft, the pistons may bend the valves. Then the price of repairs will increase significantly, as will the volume of work performed.
- Now remove the oil sump.
- On engines with a fuel injection system, disconnect the block with wiring from the sensor that counts crankshaft revolutions.
- Using two screwdrivers, remove the pulley from the crankshaft.
We pull out the pulley with two screwdrivers
- If the key does not fit tightly in the crankshaft groove, take it out so that it does not get lost.
- We unscrew the bolts securing the oil receiver (there are three bolts, there are flat washers under the bolts) and remove the oil receiver.
- We clean the oil receiver mesh from dirt and wash it with white spirit. When the mesh cannot be washed or is damaged, we replace the oil receiver.
- We replace the lost elasticity or torn sealing ring of the oil receiver.
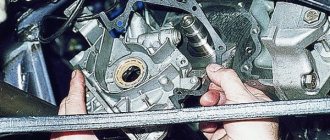
- We unscrew the bolts securing the oil pump to the cylinder block (there are six of them) and remove the pump along with the gasket. Be careful - there are flat washers under the bolts.
Unscrew the bolts securing the pump
Helpful Hint: Every time you remove the pump, replace the old gasket with a new one. It is recommended to install only a factory-made gasket; a non-standard gasket has a different thickness and will cause problems with the operation of the oil pump.
- We turn the pump drive gear to ensure correct installation on the crankshaft: the protrusions on the gear should coincide with the flats on the crankshaft.
- Before installing the pump in place, lubricate the lip of the oil seal.
- When putting the pump in place, carefully tuck the working edge of its oil seal onto the crankshaft journal using a wooden stick.
- Only after this do we tighten the bolts securing the pump.
- Then install all the parts back in reverse order.
- Adjust the tension of the camshaft drive belt.
For VAZ 2110, replacement of the oil pump is completed. All that remains is to change the engine oil. We also recommend watching a video on replacing the oil pump.
Helpful advice: When installing a repaired or new oil pump, we recommend replacing the oil filter at the same time.
Removal
- First of all, disconnect the “-“ (minus) wire from the battery, as with any other repair.
- Drain the oil (through the plug on the oil pan) from the engine
- We take out the camshaft drive belt
Attention: After removing the timing belt (timing belt), do not turn the crankshaft or camshaft, otherwise the pistons will bend the valves, and you will have more repair work and the PRICE will increase.
- We take out the crankshaft toothed pulley, then its key, using two flat-head screwdrivers.
- Now remove the oil pan
- Unscrew the oil intake fastener
Unscrew the oil intake fasteners and remove it
- Using a 10mm socket with an extension and a ratchet, unscrew the six bolts securing the oil pump to the cylinder block.
Unscrew the mounting bolts using a ratchet socket
- Remove the unit from the engine.
Note: There is a gasket between the oil pump and the cylinder block.
- Be sure to wash the new oil pump with gasoline to wash off the preservation lubricant.
- We fill it with oil before installation so that it does not rotate dry when starting.
- It is also important to rotate the drive gear to install the pump on the crankshaft: so that the protrusions on the gear coincide with the groove on the crankshaft
- Lubricate the lip of the oil seal before putting the pump back
- Carefully tuck the seal lip onto the shaft journal using a wooden stick.
- When tightening bolts, be careful and careful not to strip the threads.
- Install the remaining parts in reverse order.
Disassembly
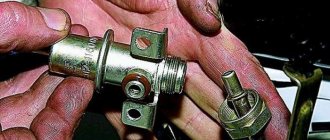
- We clamp the pump body in a vice, placing soft pads on the jaws and, using a 8-mm hexagon, unscrew the bypass valve plug.
Unscrew the valve plug
- We remove the piston and spring of the bypass valve.
- We check the seat of the bypass valve - the presence of burrs and scratches is unacceptable
- Using a 5mm hexagon, unscrew the six bolts securing the pump housing to its cover.
Unscrew the bolts securing the housing to the cover
- We take out the pump housing.
- We take out its drive gear from the cover.
- Behind it, we remove the driven gear.
- We wash all pump parts with gasoline, diesel fuel or kerosene, wipe the gears dry, and lubricate them with clean oil before installing them back.
- We carefully inspect the body for cracks, chips, and severe burrs, and if found, replace it.
Note: We check that the driven gear seat located in the pump housing does not exceed 75.10 millimeters in diameter. And the permissible minimum thickness of the partition between the driven and driving gears was no less than 3.4 millimeters. The permissible axial play at the drive gear should not exceed 0.12 millimeters, and at the driven gear - 0.15 millimeters
Permissible seat diameter and permissible partition thickness
- The same goes for pump gears; scuffing, chips, and cracks are not acceptable.
- We check the condition of the pressure reducing valve spring; if it is broken, cracked, or very short (compressed and does not match the dimensions), we replace it.
Pump repair
- First, remove the gasket from the device.
- Then unscrew the bolt that secures the crankshaft sensor.
- If you unscrew the fasteners from the pump, you can remove the cover.
- Using screwdrivers, remove the cover, and then the body itself.
- Then the gears are taken out, and one of them is driving, and the second is driven.
- Now you can begin to remove the pressure reducing valve; there is a special plug and a sealing ring on it.
- The sealing ring should not be damaged; if any, replace it with a new one.
- Remove the spring on the valve.
- And after that, you can remove the valve itself, it is not so easy to remove; to do this, you need to have a knife on hand to pry and remove the part.
- Check the condition of the cover; if there is deformation, the cover must be replaced.
- Also, do not forget to check all pump elements; if there are even minor deviations, then it is best to replace the part with a new one.
After replacing all the elements of the parts, it is necessary to lubricate everything thoroughly and, together with the oil pump, the oil seal is immediately changed.
Design
On Lada cars of the tenth family, the design of the oil pump is quite simple and has been proven over the years:
- Cover and body.
- Two gears - driven and driving.
- Reducing type valve with return spring.
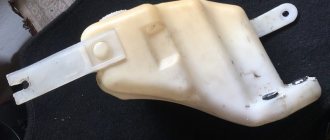
- Oil intake in the form of a mesh.
Nothing superfluous, the design is simple and works flawlessly.