The first model of the Volzhsky Automobile Plant, released in 1970, was the Zhiguli brand of cars. The car became very prestigious and was in great demand until the end of the 1980s. Then foreign foreign cars came to the car market. Competition forced us to change and improve the model to the LADA brand. Since 1999, the car was modified, and it continued to be in mass demand; improving its body to a modern design, improving driving performance, dynamism and comfort made it possible to increase quality and demand. Production of the VAZ-2112 began in 2000 with periodic technical changes and qualitative improvements to the model.
VAZ 2112 fuse diagram
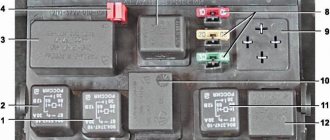
With an 8-valve and 16-valve engine, it is equipped with a main mounting block, and since 2008 an additional console has been added. A diagram with element markings is printed on the left side of the main block cover and placed below.
The designations of all elements are presented below. You can find the transcript in the table.
| Circuit breakers | Power, A | What protects |
| F1 | 5 | Lamps for turning on the license plate lighting, instruments, side lights, trunk, left side. |
| F2 | 7,5 | Low beam |
| F3 | 10 | Further |
| F4 | 10 | PTF |
| F5 | 30 | Door windows |
| F6 | 15 | Portable lamp (socket) |
| F7 | 20 | Engine cooling fan. Sound signal. |
| F8 | 20 | Rear window heating element. Relay for turning on the heated rear window. |
| F9 | 20 | Recirculation valve. Cleaners, windshield and headlight washers (wiper fuse). Relay for turning on the heated rear window. |
| F10 | 20 | Spare |
| F11 | 5 | Starboard side marker lamps |
| F12 | 7,5 | Middle left |
| F13 | 10 | Far left. Power indicator lamp |
| F14 | 10 | Left PTF |
| F15 | 20 | Electrically heated seats. Trunk lock lock |
| F16 | 10 | Turn signals and emergency lights. |
| F17 | 7,5 | Interior lighting. Ignition switch. Stop signal. Watch. |
| F18 | 25 | Glove compartment lighting. Heater controller. Cigarette lighter fuse. |
| F19 | 10 | Locking door locks. Relay for monitoring the serviceability of brake light lamps and dimensions. Direction indicators. Reversing light. Generator excitation winding. On-board control system display unit. Instrument cluster. Watch. |
| F20 | 7,5 | Rear fog lamps. |
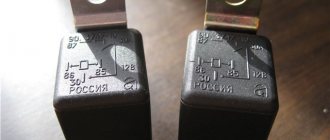
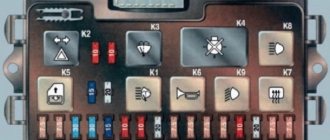
Relay
- K1 - lamp health monitoring;
- K2 - windshield wiper;
- KZ - direction indicators and emergency lights;
- K4 - switch on low beam;
- K5 - high beam;
- K6 - additional relay;
- K7 — heated rear window;
- K8 - rear PTF.
Starter fuse and relay
Installed on the device itself between the engine and the fan radiator. If signs of a malfunction appear, it is better not to delay replacing the element and install a new relay.
Fuel pump fuse and relay
Located in the additional interior installer - No. 3. Responsible for the fuel pump relay No. 5.
Relay and fuse for cigarette lighter
No. F18 is rated at 25 Amps.
Stove
The 25 A element F18 is responsible for protecting the operation of the electrical circuit of the heater motor.
Turn signals
The elements are marked as F19 and are rated at 10 Amps.
Brake lights
Located in the main block - No. F17. Its power is 7.5 A.
Where is the alarm fuse located?
No. F16 and rated 10 A.
Cooling Fan
The F7 element with a power of 20 Amperes is responsible for its protection.
Which fuse goes to the radio?
This is an F4 rated at 20 A.
Window lifters
F5 at 30 A.
Fuse and relay for central locking VAZ 2112: where is it located
They can be found in a separate box behind the main mounting block.
Ignition
The main relay is located in the additional cabin unit, where it is number 6.
Reverse
F19 with a rating of 10 Amperes is responsible for the lamps.
Fogs
Protected by three inserts: right - F4, left - F14, and rear - F20. The power of all PTFs is 10 Amps. In case of tuning, you may need to replace them with new ones along with the fog lights. The connection occurs via switch K8.
Lamp health monitoring relay
Marked as K1 in the main block of the VAZ 2112.
Brake
Installed under the brake pedal.
Relay and fuse for injectors
The additional element F3 is rated at 15 Amps.
Fuse for interior light
The F17 element with a power of 7.5 A is responsible for the safe operation of the VAZ 2112 interior lighting lamp.
Number plate illumination
Corresponds to F1 with a rating of 5 Amps.
Generator
A three-level relay voltage regulator is located on the device. It is better to replace the factory element with a new one, since three-level voltage regulation often leads to a short circuit.
Heated rear window
Relay K7 is responsible for turning on. Protects the F8 electrical circuit with a rating of 20 Amps.
Seat heating
It is protected by a 20 Amp F15 insert.
Wiper relay
This is a K2 and without its stable operation there will be no washer supply to the windshield, and the wipers will not be able to do their job.
Charger
They placed it next to the device - one of the few elements of this kind under the hood of a car.
Low and high beam VAZ 2112
It is protected by fuses F2 and F12 (left and right headlights), and the high beam is protected by F3 and F13 (left and right). The first has a rating of 7.5 A, and the second has a rating of 10 A.
Fuse for the dashboard of VAZ 2112
Located in the wiring harness leading to the instrument panel from the battery.
Dimensions
There are 2 fusible elements - F1 and F11, left and right. The power of both is 5 Amperes. Factory fuses require replacement due to the fact that the dimensions often burn out due to their malfunctions.
Heated seats
It is protected by an element marked F15 for 20 Amperes.
VAZ 2112 speedometer fuse: where is it located?
He's gone.
Opening the trunk
This is an F1 and is rated at 5A.
Fuse F6
Responsible for protection against burnout of the car socket. Its rating is 15 Amperes.
VAZ 2112: fuse F17 blows
Most often, this element, which is responsible for interior lighting, fails due to a battery failure. Its power is 7.5 A.
Fuse F19
Responsible for protecting the brake light, reversing lights and dimensions.
Relay K1
An element of lamp serviceability, which in older versions is replaced by a jumper.
Relay K6
This is a reserve item.
Speed sensor
Located on the wiring harness leading to the device.
Stories from our readers
“Fucking basin. "
Hi all! My name is Mikhail, now I’ll tell you a story about how I managed to exchange my two-wheeler for a 2010 Camry. It all started with the fact that I began to be wildly irritated by the breakdowns of the two-wheeler, it seemed like nothing serious was broken, but damn it, there were so many little things that really started to irritate me. This is where the idea arose that it was time to change the car to a foreign car. The choice fell on the melting Camry of the tenth years.
Yes, I had matured morally, but financially I just couldn’t handle it. I’ll say right away that I am against loans and taking a car, especially not a new one, on credit is unreasonable. My salary is 24k a month, so collecting 600-700 thousand is almost impossible for me. I started looking for different ways to make money on the Internet. You can’t imagine how many scams there are, what I haven’t tried: sports betting, network marketing, and even the volcano casino, where I successfully lost about 10 thousand ((The only direction in which it seemed to me that I could make money was currency trading on the stock exchange, they call it Forex. But when I started delving into it, I realized that it was very difficult for me. I continued to dig further and came across binary options. The essence is the same as in Forex, but it’s much easier to understand. I started reading forums, studying trading strategies. I tried it on a demo account, then opened a real account. To be honest, I didn’t manage to start earning money right away, until I understood all the mechanics of options, I lost about 3,000 rubles, but as it turned out, it was a precious experience. Now I earn 5-7 thousand rubles a day. I managed to get the car buy after half a year, but in my opinion this is a good result, and it’s not about the car, my life has changed, I naturally quit my job, I have more free time for myself and my family. You’ll laugh, but I work directly on the phone)) If If you want to change your life like me, then here’s what I advise you to do right now: 1. Register on the site 2. Practice on a Demo account (it’s free). 3. As soon as you get something on the Demo account, top up your REAL ACCOUNT and go to REAL MONEY! I also advise you to download the application to your phone, it’s much more convenient to work from your phone. Download here.
- The controller controls the on/off of the additional starter relay depending on the crankshaft speed and the time the starter cranks the engine.
- After setting the ignition key to the “Starter” position and the crankshaft rotation speed not exceeding 500 min1, the controller sends a signal to an additional relay and thus turns on the starter.
- After being turned on, the starter will work until the ignition key is in the “Starter” position for no more than 20 seconds, provided that the “correct” password has been received from the immobilizer and the crankshaft speed has not increased to 500 min1. This prevents the starter from turning on when the engine is running and its overheating during prolonged cranking.
In other words, why do you need an additional starter relay:
- To protect the starter from accidental (due to wear, prolonged starting) sintering of contacts in the ignition switch;
- In order to turn off the power to the starter when the engine has started, but the key, for some reason, continues to be in the “starter” mode;
- Relieves the load on the ignition switch contacts.
How to check the additional starter relay, is it installed in the “ten”?
- First, check the presence of an additional starter relay in the mounting block. This relay is mounted and is indicated by an arrow in the photo.
- Secondly, you can check its operation as follows: turn the starter in the cylinder purging mode, after 12-13 seconds the starter should turn off automatically.
Installing an additional starter relay
By the way, stores have a kit of additional starter relays for self-installation. For example, a kit from Avtoelektronika, which contains everything necessary for installation, however, the circuit included in the kit turned out to be unfinished. For the additional relay to operate correctly, it was necessary to add a 1A direct current diode to the circuit (1N4000-1N4007 or the Russian analogue KD243(A-Zh)).
The absence of an additional starter relay does not mean that there is an urgent need for it. For example, many foreign cars do not install such a relay either. And car enthusiasts whose relay has failed do not see the difference after dismantling it, so it makes sense to devote time to other modifications to the car’s electrical system.
On-board computer
Fuse element F17 or F19 is responsible for it. In the first case, the power is 7.5 A, and in the second - 10 A.
before–>
VAZ 2110 2111 2112 (Lada 110 111 112) - a family of cars produced in 1995, 1996, 1997, 1998, 1999, 2000, 2001, 2002, 2003, 2004, 2005, 2006, 2007, 2008 and 2009 with sedan and hatchback bodies and a station wagon mainly with 8 and 16 valve gasoline engines ( injector , carburetor). In this article you will find a description of the fuse and relay blocks of the VAZ 2110 2111 2112 with diagrams , photographs and their locations. Electrical connection diagram. Let's highlight the fuse responsible for the cigarette lighter.
p, blockquote1,0,0,0,0–>p, blockquote2,0,0,0,0–>
The purpose of fuses and relays in your VAZ 2110 (2111 / 2112) relay may differ from those presented and depend on the year of manufacture. The current purpose can be printed on the block itself.
p, blockquote3,0,0,0,0–>
Additional block
h22,0,0,0,0–>
It is located under the center console and is covered with a lid. One part is accessible from the right side.
p, blockquote23,0,0,0,0–>p, blockquote24,0,0,0,0–>
Scheme
p, blockquote25,0,0,1,0–>p, blockquote26,0,0,0,0–>
Designation
p, blockquote27,0,0,0,0–>
- 15A - Ignition module, controller
- 15A - Canister purge valve, vehicle speed sensor, oxygen concentration sensor (heating), air flow sensor
- 15A - fuel pump, fuel pump fuse, injectors
- Electric fan relay
- Fuel pump relay
- Main relay (ignition relay)
The other part is on the left side of the console:
p, blockquote28,0,0,0,0–>
Scheme
p, blockquote29,0,0,0,0–>p, blockquote30,0,0,0,0–>
Decoding
p, blockquote31,0,0,0,0–>
- Central locking control unit
- Immobilizer block
- Relay for turning on rear fog lights.
On our channel we also prepared a video on this publication. Watch and subscribe.
p, blockquote32,0,0,0,0–>
p, blockquote33,0,0,0,0–> p, blockquote34,0,0,0,1–>
Do you know how to make the material better? Write in the comments.
after–>
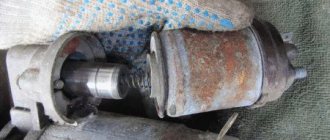
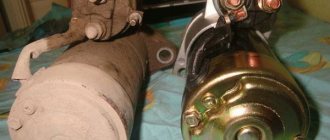
VAZ 2110 starter solenoid relay: where is it located, do-it-yourself replacement
Many owners of the domestic “ten” are faced with a situation where it is impossible to start the engine using the starter. Moreover, they do not blame the starter itself, but the relay.
But when the process of searching the engine compartment begins, they fail to find the starter relay on the VAZ 2110. It is not surprising that numerous websites, forums, and social networks regularly publish questions of approximately the same nature - where is the starter relay on a VAZ 2110.
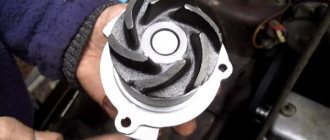
The answer is very simple - nowhere. The fact is that most of the domestic “ten” do not contain this element in their design. There is a retractor relay located in the structure of the starter itself, under its contacts. And to get to it, you will first have to dismantle the starting device.
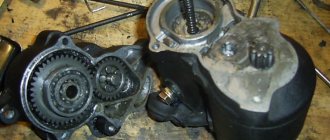
Electronic device repair
Where is the Niva 2131 starter relay located
? The engine does not start, the car does not move, there is no characteristic click of the relay, perhaps there is a problem here. The reason may be burnt and loose contacts. The engine injection system is located in the passenger compartment, below the main control panel in a plastic casing, which greatly simplifies access to parts and their manual repair:
- The box is dismantled, under it between the two elements there is a block for the fuel pump relay.
- A plastic plug connects the main relay to the network, current passes through the coil, magnetizing it. Consequently, the necessary voltage is created, the circuit is closed, the starter is turned on, and the module is turned off by a signal from the control panel.
- Using a special screwdriver, remove the casing panel.
- No. 3 block with injectors, fuel pump and relay.
- Check the terminals for voltage, repair the break, clean the wiring or tighten the clamps.
- Remove the module relay from the housing, connect the contacts with a jumper and check:
- operation of the electric pump;
- operating noise indicates the health of the fuel engine itself;
- change the relay to a working one and check the operation of the system again;
- A good helper would be to use a multimeter;
- Carry out vehicle diagnostics regularly.
Contacts “30” and “87” are used to connect to a multimeter, check the voltage in the system and assess the suitability of the relay.
How it works
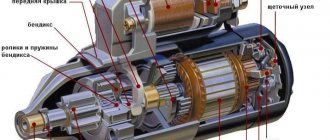
The design of the “ten” starter is such that inside it there is a retractor relay, which is responsible for the rotation of the drive gears. When the gears engage the teeth of the crankshaft flywheel, starting occurs. Therefore, if the retractor does not work, then you will not be able to start the engine.
Plus, when the contacts on the traction winding are closed, the starter motor is supplied with power from the battery. The contacts are washed out, the blocking is activated, due to which the retractor winding is “cut out”.
The retractor is controlled directly from the ignition switch. Plus it plays the role of starter protection. The fact that the relay will require an impressive amount of current leads to gradual wear of the contacts in the contact group.
This can be noticed by the unclear start of the power unit; periodically the starter may not operate or may rotate the engine slowly. You can solve this problem on your own.
Operating principle and device
First, let's look at the purpose and device, then the principle of operation, to make it easier to do the replacement and repair yourself:
- The purpose of the retractor relay is to ensure that the starter bendix comes into contact (engagement) with the flywheel (more precisely, with its crown)
- The triggering system is based on the effect of electric magnetism
- The core is made in the form of a hollow tube, inside which the armature is placed; a wire winding (coil) is located on top of the core.
- The current in the coil creates an electromagnetic field, the armature is drawn into the core under its action
- Stopping the current supply to the coil releases the armature, and under the action of the spring it returns to its initial position
- Armature, housing, electromagnet with windings, return (return) spring and electrical contacts
- An electromagnet looks like two independent coils: one is called holding, and the second is called retracting.
- Only the holding coil is connected to the control terminals and docked with the body
- And the retractor coil is connected to the control terminal, as well as to the starter motor.
- When power is applied to the control contact, at this time electromagnetic induction occurs in the coil under the influence of current, which creates a magnetic field
- This field attracts the anchor, the anchor begins to compress its return spring
- At the same time, the bendix is pushed out (see Replacing the bendix on a VAZ starter on your own), connecting the starter to the engine via a flywheel
- When the contacts are closed, then the pull-in winding receives power from the positive terminal, and the magnetic field is no longer generated on the coil, however, the armature remains inside under the influence of the electromagnetic field in the holding coil
- As soon as the engine starts, the power is immediately turned off, the return spring pulls the armature to its position
- The contacts open and the bendix immediately leaves contact with the flywheel
Dismantling
The dismantling process cannot be called difficult; even a beginner can handle it. Just follow the given instructions.
- Disconnect the negative cable from the battery.
- Remove the air filter.
- Disconnect the set of wires that go to the retractor.
- Remove the nut responsible for securing the tip of the power wire. To do this you will need a 13 key.
- Now it is the turn to dismantle the nuts that hold the starter. Here you need a larger key - 15 millimeters. But if the top one unscrews without any problems, then it will not be easy to get to the bottom one. But it will have to be done.
- Remove the starter.
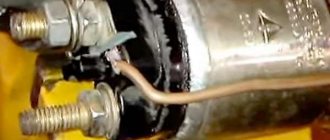
- Remove the nut of the lower terminal of the solenoid relay and disconnect the wiring.
- Unscrew the relay mounting bolts using a size 8 wrench and remove it completely.
Examination
Installation and connection of an additional starter relay
To make checking more convenient:
- Take two wires 30-40 centimeters long and then connect these wires to the battery
- Then you need to directly connect the wire that comes from the negative terminal to the corresponding terminal on the relay, then connect the wire that connects to the positive terminal
- The relay should retract the core with a characteristic click.
- When this does not happen, then the cause of the problem is really the relay, install it back, you can screw the starter back
- When replacing a relay, it is definitely worth performing preventive maintenance for the starter itself.
- Unscrew the rear cover, having first (if necessary) cleaned the dirt from it, and inspect the condition of the brushes, except for the Bendix fork
- If you find that the brushes or fork need to be changed, then it is best to do it right away, otherwise soon you will definitely have to remove the starter again and repair it
Typical breakdowns
Now let’s figure out how to check the starter solenoid relay on a VAZ 2110. It must be carefully inspected after dismantling.
This unit is characterized by certain breakdowns, which we will talk about.
- The fastening is loose or the nuts responsible for fastening the wire end are completely loose. Everything is simple here, as you understand. You just need to tighten the fasteners.
- Oxidation has formed on the windings, connections or wiring. If everything is not too serious, you can simply clean the contacts. In case of serious oxidation, it is better to replace them with new ones.
- The power supply circuit has breaks. Again, you don’t need to come up with anything fancy, just replace the chain.
- The armature exhibits idle operation or slow operation. Just replace the armature and that's it, problem solved.
- Check the short circuit of the turns of the two windings using an ohmmeter.
Replacement
In fact, it is theoretically possible to repair the relay. But in reality this is rarely justified in terms of financial and time costs.
A much simpler and more rational solution is replacement. The procedure will not take much time, but the unit will definitely work properly and reliably. It is unknown what the result of the repair will be.
If the relay is incorrectly repaired, this can lead to blocking the start of the power unit. The cost of repairing such a problem is much higher than buying a new high-quality relay.
Replacing and installing a new solenoid relay will not be a problem, since the procedure is performed in the reverse order of disassembly.
Proceed with caution, keeping an eye on each item you take apart and put back together. Clean some contacts, if necessary, tighten loose fasteners. Whatever one may say, as the car is used, it shakes violently and vibrates, which leads to the banal loosening of nuts and bolts. What's most interesting is that this often leads to a whole range of problems. Therefore, make sure that each individual fastener is securely fastened.
Didn't find the information you are looking for? on our forum.
If you find an error, please select a piece of text and press Ctrl+Enter.
We recommend reading:
How to change a VAZ windshield with your own hands? Step-by-step instructions How to remove the immobilizer on a VAZ 2114 Stop lights on a VAZ 2111 do not light up reasons Which box is suitable for a VAZ 2106, device, replacement and installation Replacing thresholds on a VAZ 2107 VAZ 2109 to a cold carburetor troits - causes of automatic transmission malfunction on a VAZ 2110 with your own hands How to install a panel from a Priora on a VAZ 2110