For a long time, the carburetor engine was the most common power unit installed in passenger cars. The natural method of delivering the working mixture to the combustion chamber made it possible not only to produce relatively inexpensive engine models, but also to restore the car’s power system in a garage.
Modern engine manufacturers abandon this design and use forced fuel injection. The complication of the design not only led to an increase in the cost of such units, but also significantly complicated engine repairs. Adjusting and repairing injectors has become a particularly difficult task for motorists. The main symptoms of a malfunction, in which one may suspect that the engine injectors are the cause of unstable operation, will be described below.
Nozzle sprayer repair
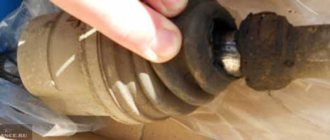
Since the purchase and installation of a new nozzle is associated with quite serious financial costs, often only the atomizer is replaced. It consists of a body and a needle located inside. During operation, the seating surfaces become deformed and the sprayer begins to work incorrectly.
Sprayer repair is possible in the following cases:
- Sticking of the needle in the body due to contamination, deformation, scuffing or chipping of the working surfaces.
- Spray nozzle is dirty.
Procedure for repairing a sprayer
There are several ways to repair a sprayer. One of them is ultrasonic cleaning, which is used to remove carbon deposits from internal surfaces. However, if the sprayer is highly coked, complete removal of carbon deposits using this method is impossible. Moreover, ultrasound cannot restore mechanically worn surfaces.
One of the options for repairing a sprayer is ultrasonic cleaning.
Another option for repairing nozzles is grinding in using polishing pastes of varying degrees of grit. The disadvantage of this method is the possible violation of the geometry of the relative position of the parts. As a result, fuel may leak into the injector from the atomizer. Lapping will not help in case of severe mechanical deformation of the surfaces.
The injector elements are arranged in a strictly defined sequence
Grinding is carried out as follows.
- The nozzle is clamped in a vice. The nut securing the sprayer is unscrewed.
- The needle is washed in a container with fuel, wiped with a clean rag and blown with compressed air.
- To grind the needles, use a paste containing an abrasive and a cast iron lap for final processing. The needle is passed over the lap to remove marks. At the same time, the appearance of new damage should be avoided.
- Nickel plating restores the working volume of the needle.
- The spray body is machined. It should take on a smooth and shiny appearance.
- The needle is inserted into the body. The gap between the needle and the body should not exceed 1–2 microns. Otherwise, nickel plating should be repeated.
Thus, repairing the sprayer consists of cleaning it from carbon deposits, grinding it and increasing the volume. This process is quite labor intensive. If almost every car owner can replace an injector nozzle, then for independent repairs you will need special equipment.
Grinding in the sprayer
To avoid mistakes, the process of grinding in nozzles should be considered in more detail. For grinding you will need:
- paste GOI;
- thick automobile oil;
- drill.
GOI paste is crushed into powder and diluted with oil in a ratio of 1 to 2. Then the composition is applied to the sprayer body, the needle is clamped into a drill, and grinding into the body is carried out at the lowest speed. In this case, it is necessary to tap the needle on the body for a minute. Then the parts are washed in clean fuel and purged with a compressor. After this, grinding is carried out only with oil.
All elements, including the nozzle itself, are washed in kerosene, purged and assembled.
The seat for the needle in the sprayer body is restored by grinding in using special pastes
How to extend the life of your sprayer
To increase the service life of the sprayer, it is recommended to adhere to a number of simple but important rules:
- refuel only with high-quality fuel at proven gas stations;
- change the fuel filter promptly;
- use fuel additives that clean the fuel system from water and impurities;
- If problems arise in engine operation, immediately carry out diagnostics at a service station.
These simple recommendations will help you avoid serious expenses when unscheduled replacement of injectors.
The algorithm for replacing injectors on a diesel engine is quite simple. Even an inexperienced car enthusiast can do this. Sprayer repair is more complex and time-consuming. However, if you have the desire and the necessary tools, you can also do it yourself. Refuel with high-quality fuel, change fuel filters in a timely manner, and problems with injectors will occur much less frequently. Good luck on the roads!
(4 votes, average: 2 out of 5)
What are fuel injectors
When talking about the design of an injection engine, one cannot fail to mention such an important element as the fuel injector. This part is a valve mechanism with a sprayer. It is responsible for supplying fuel to the engine cylinders. Its main feature is that it provides the required amount of gasoline, that is, it also performs a dosing function.
In the modern automotive industry, these parts are used on both gasoline and diesel engines, as they provide accurate fuel dosage and the most efficient injection of the air-fuel mixture.
Three types
The development of injection systems in fuel-injected cars began in the 1960s. Today, three types are used, which differ in the method of injection:
- Electrohydraulic: its main area of application is in engines that run on diesel fuel. Structurally, the electrohydraulic fuel injector consists of a control chamber, a valve, an inlet throttle and a drain channel. It works by applying the existing fuel pressure in the system. The valve opens and fuel enters the injector through the intake throttle. The injector needle regulates the amount of incoming diesel fuel and directs it to the drain area. In this way, the necessary pressure is built up in the housing, so the needle mechanism sprays a dose of fuel through the drain throttle. The electrohydraulic injector is considered one of the most accurate, since during the injection period the solenoid valve opens for only 1 or 2 milliseconds.
- Electromagnetic: used primarily on gasoline power units. The nozzle and needle valve play an important role in the device. The signals received from the control unit ensure a continuous supply of voltage to the injector winding. That is, an electromagnetic field is formed that can overcome the force of the needle valve spring and open the injection nozzle. After injection, the voltage drops sharply, the spring returns the needle to its place, and the nozzle closes.
- The piezoelectric injector can currently be considered one of the most advanced devices for injecting fuel into engine cylinders. Mainly used on diesel vehicles, as it allows to increase engine thrust. The part consists of a pusher, a special piezoelectric element, a needle and a switching valve mechanism. At the beginning of the cycle, the needle is held in the valve seat by the force of fuel pressure. After applying an electrical signal to the piezoelement, it increases in length and transmits force to the pusher. At this moment, the valve opens and fuel enters the drain pipe. Then the pressure inside drops, so the needle rises and injects fuel.
Photo: design differences
The main working element is the nozzle. It is considered the most budget model among all injection devices. It has an elongated body and a powerful pushing element.
Pros and cons of fuel injectors
The use of injectors is the latest technology, as many drivers would say. Compared to carburetor engines, in which injection occurs in a different way, the parts have a number of advantages:
- fuel economy;
- reduction of exhaust toxicity;
- the ability to increase engine power up to 10%;
- ease of starting even at low temperatures;
- ease of maintenance.
All these advantages allow you to reduce the cost of operating and maintaining your vehicle. But injectors are very demanding on the quality of fuel consumed. If you fill up with fuel at dubious gas stations, the delicate mechanism will soon fail, since the elements are very sensitive to impurities and dirt that may be contained in the fuel. The second disadvantage is the price of the part. In the event of a malfunction, it may be necessary to replace all these elements in the engine, which leads to significant expenses for the purchase of new ones.
Diagnostics and prevention of faults
Fuel injection systems differ from carburetor systems not only in efficiency, but also in efficiency. By dosing gasoline during injection, you can achieve an increase in engine performance by 7–10%. But, unfortunately, units with fuel injectors also have their weaknesses.
Signs of breakdown
The following may indicate that your car has something wrong with its fuel injection system:
- malfunctions of the unit in transient and/or idle mode;
- problems starting the engine;
- loss of power and decreased acceleration dynamics;
- dips and jerks when trying to increase the load;
- increased gasoline consumption;
- exhaust system pops and a significant increase in exhaust gas toxicity.
- failure of the oxygen level sensor and catalytic converter.
In all these cases, it is recommended to first pay attention to the condition of the injectors. And, if necessary, clean them or replace them
How to check injectors?
To find out if everything is okay with the injection system, you can:
- Check the injectors by ear. Just start the engine and listen to the sounds it makes while running. If the cylinder block whistles dully or clicks, then it’s time to disassemble it;
- Check the power supply at ignition. The block is disconnected from the injectors, two wires from the battery are attached to the contacts. If, after turning on the ignition, you notice that fuel is flowing, then the cause of the malfunction is problems in the electrical circuit;
- measure the resistance on the injectors with a multimeter. To do this, you need to find out the impedance of the injectors, reset the negative terminals from the battery and disconnect the electrical connectors. If during the measurement it turns out that the resistance deviates from the norm in one direction or another, the injectors must be replaced;
- contact the service center and carry out diagnostics on a test bench. This will allow not only to assess the general condition of the injectors, but also to determine the efficiency of fuel supply, determine the shape of the torch, etc.
The main cause of injector failure
As a rule, injectors fail not because they have already exhausted the service life declared by the manufacturer. The main cause of breakdowns and malfunctions is a clogged filter. Poor quality gasoline and exposure to high temperatures contribute to contamination of fuel supply elements.
To avoid the accumulation of mineral deposits on the injectors, do not forget to clean them regularly. To do this, you can use various fuel additives and cleaning fluids. It is recommended to carry out the cleaning procedure every 15-20 thousand km.
What injectors are installed on VAZ 2110–2112 cars
The main advantage of injectors for VAZ cars of the tenth family is that they are interchangeable. There are only two types of sprayers - produced by Bosch and Siemens. And each of them, regardless of marking and year of manufacture, can be replaced with another.
Bosch injectors are traditionally manufactured in black housing
When selecting, there is only one limitation - engine size. 1.5 injectors are not suitable for 1.6 liter engines.
The Siemens injector has a blue tip
Both Bosch and Siemens injectors of any marking can be installed on 8-valve and 16-valve engines.
Table: how to select injectors for VAZ 2110–2112 by marking
| Siemens | Bosch |
| Injector DEKA VAZ 6238 | 0 280 150 996 and 0 280 158 110 |
| Injector DEKA VAZ 6393 | 0 280 158 502 |
| Injector DEKA VAZ 20734 | 0 280 158 017 |
| Injector DEKA VAZ 20735 | 0 280 158 022 |
| Injector DEKA VAZ short 20734 | 280158017 |
| Injector DEKA VAZ short 20735 | 0 280 158 022 |
Repair and cleaning of injectors
There are several ways to clean injectors.
- mechanical method
- ultrasonic cleaning
- chemical cleaning
In garage conditions, you can clean it using chemicals. To do this, a special injector cleaner is poured into the fuel tank, which removes a significant part of the pollution during vehicle operation.
In order to clean injectors with ultrasound, you need a special stand. The essence of the method is that the nozzles are immersed in a special liquid, in which bubbles are formed under the influence of ultrasonic waves, thanks to which contaminants are removed.
This method is very difficult to implement in a garage, so you will have to go to a service station and pay money for this procedure.
Bottom line
Fuel injectors are the main element of the injection system. It is worth monitoring and maintaining them in working condition, preventing clogging and periodically doing preventive maintenance, which consists of driving at a speed of 100-110 km/h.
Stand for washing injectors
If self-cleaning does not produce results, then the car owner will have to use a stand. It is not possible to manufacture such equipment in a garage. Therefore, the car owner will have to contact a specialized service center that has such stands.
BLUSTAR washing stand, used in most modern car services
During bench washing, all parts are removed from the engine, placed on a bench, where they are washed in a special solvent. In addition, they are processed with ultrasound. This comprehensive approach ensures the removal of even the most stubborn and hard stains.
Washing stands for injectors from BOSCH began to appear in services relatively recently.
In most centers, washing is carried out at stands of BOSCH and BLUSTAR. The cost of bench washing of injectors varies from 1000 to 1800 rubles.
So, it is quite possible to repair and wash the nozzle yourself, unless the case is severe. Well, if the contaminants turned out to be very persistent and even a high-quality washing liquid did not remove them, there is only one option left: remove the parts and take them to a service center, to an ultrasonic stand.
Copywriter with five years of experience.
Do-it-yourself flushing of the diesel fuel system
The appearance of the first symptoms of injector contamination requires the car owner not only to diagnose the malfunction, but also to carry out a set of measures to flush the fuel system.
The future expenses of the car owner depend on the timeliness of this work. Chronic contamination leads to breakdown of expensive parts and the need to replace them.
Self-cleaning of the fuel system of a diesel engine is most often done using special additives that are added to the fuel tank, mixed with fuel and provide high-quality cleaning of various “garbage”.
After using the additive, you can use the car as usual, being confident in the effective operation of the product.
The flushing composition is mixed with fuel, passes all the way through the diesel fuel system, is supplied to the injectors and cylinders, where it burns under pressure.
To get results, it is advisable to give preference to products from well-known brands.
Saving in this matter can lead to a lack of results or even greater contamination of the system.
Experts note that this method is ineffective, because it will not be possible to remove 100% of the contaminants.
But the additive copes with a certain percentage of “garbage”, eliminating the main signs of a malfunction - increased fuel consumption, decreased dynamics and a drop in engine power.
Good results are achieved by regular use of additives that perform a preventive function. As a result, the fuel system remains clean for a long time, and there is no need to flush it at a service station.
If the car owner has not maintained the system for a long time, it is unlikely that it will be possible to remove stubborn dirt. In such a situation, it is better to contact a service where cleaning is carried out using special equipment.
It should be noted that there are a number of other methods for cleaning diesel injectors. One of them is the dismantling of products for direct cleaning by simulating work.
This option is suitable for old-style engines, but in the case of new diesel engines it is dangerous. The main risk is the difficulty of dismantling the nozzle. Even if the latter can be removed, there remains a high risk of damage to the device.
As a result, you will have to buy a new part, the cost of which will cover the savings of replacing it yourself several times.
There is another cleaning option - using washing liquid.
Below we will consider the principle of performing the work using the example of a composition from the manufacturer Wynns.
Algorithm of actions:
- Take a pair of gasoline-resistant hoses with a length of 70-80 cm. The diameter of one tube should be 0.8 cm, and the second - 1.0 cm.
- Remove the original tubes from the injection pump and put the purchased products in their place. Place the second edges of the hoses in a container with the product poured into it.
- Place a standard Zhiguli filter on the thicker tube that supplies fluid to the injection pump. Be careful when doing this - the hose must reach the bottom of the container to prevent air entrapment. In this case, the bottle itself must be secured under the hood.
- Start the engine and leave it running for 15 minutes at idle. After this, press the accelerator pedal several times, wait another 3-4 minutes and turn off the engine.
- Wait 15-20 minutes until the liquid has completely cooled and the deposits have left the surface.
- Carry out the procedures discussed above until the rinsing composition runs out.
Monitor the mixture carefully. You cannot allow a diesel engine to stall due to lack of fluid. On many modern cars, fuel-cooled electronics are installed in the internal part of the fuel injection pump.
If there is a shortage of flushing fluid or fuel, it may suffer. To optimize flushing, you can make a special coil and lower it into a bucket to ensure high-quality cooling of the liquid.
After the composition has been developed, return the fuel pipes to their original places and start the engine. As soon as the diesel engine's operation returns to normal, turn it off.
The work of self-flushing the fuel system is completed, and the car is ready for use.
Be careful and remember the dangers of the working fluid. It helps to wash your hands, but after using it, it is advisable to rinse your skin with clean water and lubricate it with cream.
If the fuel injection pump of the car is very dirty, it is recommended to take two cans of liquid and then proceed according to the algorithm described above. Empty the contents of the can to the end so that the engine does not stall.
After this, turn off the diesel engine, and the next day perform the same manipulation, but using the second can.
Upon completion of the work, all that remains is to return everything to its place.
How do you know when it's time to repair?
Start changing if:
• the engine is difficult to start and runs intermittently at idle and in transition mode
• dips are felt when you press the gas pedal
• noticed a decrease in engine power
• acceleration dynamics are lost
• fuel costs increase
• engine toxicity increases, black smoke comes out of the exhaust pipe.
If one of the above problems occurs, there is nothing left to do but change the injectors. Otherwise, the car will let you down at the most unexpected moment (when overtaking or in other circumstances). To avoid getting into an emergency situation, take this problem seriously.
Repair of diesel injectors
Contamination of the channels inside the injector through which fuel passes leads to poor fuel atomization and disruption of the formation of the air-fuel mixture. The most uniform spraying is disrupted by the resins contained in the solarium. Flushing can help eliminate the problem of poor fuel supply to the injectors. This procedure ensures the removal of contaminants inside the fuel channels. To implement this, the following methods are used:
1. Ultrasonic cleaning. An effective way to remove dirt, which is carried out using special equipment. The removed nozzles are placed in a special liquid and exposed to ultrasonic vibrations, during which the dirt in the nozzle is destroyed within a short time.
2. Flushing with fuel containing special additives. It is most popular among car enthusiasts, as it does not require the use of expensive equipment. It is the addition of an additive to the fuel, which, when passing through the injector, will dissolve deposits. The effectiveness of the method has not been proven.
3. Washing on the stand using special liquids. Purification occurs at high pressure due to circulation. The method is reliable and highly efficient.
4. Manual washing, which simulates the operation of a nozzle. A fairly effective and inexpensive method that does not require the use of special equipment. To carry it out, the nozzles are dismantled along with the rail and fixed above the container. The cleaning liquid is supplied through a transparent silicone tube. The injector dispenser is activated by electric current supplied through wires from the battery. Complete cleaning occurs after 5-10 minutes. spraying liquid. The process itself consists of the following stages:
- Remove filters and rubber seals from the nozzle so that they do not fail under the influence of liquid;
- Organize a sealed connection between the liquid cylinder and the nozzles through a silicone tube;
- Power is supplied from the battery using a pair of wires;
- A button is connected to the break in one wire to open the circuit, the second wire is left intact;
- When you press the button, an injection occurs, which continues until the jets of liquid are uniformly sprayed.
Quite often, poor-quality injection occurs due to clogging or wear of the injector nozzles, which is quite clearly visible in the process of diagnosing faults. To eliminate damage, the body of the part is disassembled and thoroughly washed in kerosene, external carbon deposits are removed with a wooden scraper, and the holes are cleaned with soft steel wire, the diameter of which is smaller than the nozzle hole. If the nozzle size increases by more than 10%, or the difference in hole diameter by 5%, the nozzle is replaced with a new one.
Sometimes the nozzle may leak, which can be eliminated by grinding the needle to the seat. A leak can also occur if the seal at the end of the needle (sealing cone) is broken. Grinding is carried out with GOI paste diluted in kerosene, which avoids getting it into the gap between the guide and the needle itself. After grinding in, everything was washed in kerosene or clean diesel fuel, blown with compressed air, and after assembly, tested again for leaks.
To ensure that your injectors last a long time, use a fine diesel fuel filter.
How is the replacement made?
Each car model and the engines used inside were developed in their own way, so they have a number of design differences from all analogues. If a diesel injector is completely out of order, it is necessary to completely replace it, using instead of the damaged product a model that is ideal for your car. After this, you can replace it in the following order:
- the engine cover is removed, the injectors are freed from the tube intended for draining fuel and from the power supply;
- disconnect the fuel pipes;
- unscrew the bolt securing the injectors;
- remove injectors and rings;
- install a new product and reassemble in reverse order.
Sometimes diesel engine injectors stick to the surface, but they cannot be removed roughly. Instead, use special aerosols that soften the contact area. If you are not sure which model is best to choose for your car, take advice from experts.
When is cleaning required?
Despite all the advantages, the injector quickly becomes clogged when using low-quality fuel for a long time, which reduces engine efficiency. This is the main drawback of this element of the fuel system. Then the question of flushing the injector arises.
Note! Experts recommend cleaning every 20,000 km. But the frequency may vary depending on the quality of the fuel used and the design features of the injection system.
There are a number of signs that indicate the need to flush the fuel system elements. The most common ones include:
- dirty spark plugs;
- difficult engine starting;
- uneven operation of the motor;
- the appearance of smoky air from the muffler;
- power reduction;
- increase in fuel consumption (as a rule, consumption increases sharply).
Signs of faulty injectors
These are not all the reasons, as there are many of them. Therefore, if you have the slightest doubt, you need to seek help from specialists to conduct a full diagnosis of your vehicle. The cost of this service may vary depending on the city in which the procedure will be performed.
What to do if the engine on a VAZ-2114 is malfunctioning
To understand the causes of malfunctions in the VAZ-2114 engine, you need to know its configuration. He has:
- there are eight valves in the cylinder head;
- 1.6 liter internal combustion engine with 16 valves.
Experts advise that at the first signs of tripping, immediately check the functioning of the spark plugs. To do this, carry out the following steps:
One by one, pull off the high-voltage wires from the cylinders. Pay attention to changes in engine operation: if there are no changes, the cylinder does not work.
The next step is to check the spark in the ignition system. This procedure is also simple:
- The first step is to remove the tip from the high-voltage wire.
- While the car engine is running, bring the wire from the cylinder head (ground) to the “break” position.
- Check for a spark between ground and wire:
- If there is no spark or the spark is too weak, then the ignition system is faulty.
But the following situation also happens: the spark is powerful, but malfunctions are still heard in the engine. This means that the time has come for the next step of testing - to measure compression in the cylinders, preferably in all of them at once. If the cylinder is operating correctly, there should be no difference in the pressure gauge readings (minor deviations are allowed). If the cylinder is faulty, there will be no or very weak compression.
A malfunction in the cylinder may be due to one of the following reasons:
- cylinder head gasket is broken;
- exhaust valve burnt out;
- piston rings burst;
- The piston itself burned out.
If you are unable to independently identify the reason that the VAZ-2114 engine is malfunctioning, you definitely need to do computer diagnostics. This can be done in two ways:
- On a special computer stand.
- Using a portable scanner (for example, ASKAN).
An experienced motorist himself will be able to figure out the malfunctions of the VAZ-2114 engine, but if he does not have sufficient experience, then it is best to contact qualified specialists at a service center for servicing cars of this model.
Symptoms of a problem
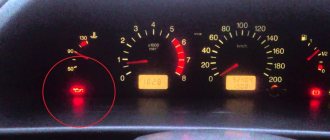
Injectors can be faulty not only on a gasoline injection engine, but also on diesel units. The main symptoms of failure of these parts are identical, therefore, regardless of the type of fuel on which the engine runs, the following signs may indicate a malfunction of this part:
- Increased fuel consumption;
- Unstable engine operation in idle mode;
- Difficulty starting, reminiscent of “overflow” of a carburetor engine;
- Jerks during uniform movement, and dips during sudden acceleration.
These are the main signs of a malfunction, but the injectors should be checked only after other possible causes of such manifestations have been completely excluded. The engine may operate unstably if the fuel pump malfunctions, when the hoses are leaking, or when the lumen of the pipe becomes clogged with various deposits. A clogged fuel filter can also negatively affect engine performance. Jerking on a gasoline engine can also be caused by a faulty ignition system. All of the above options for engine breakdowns must be completely excluded before proceeding with a full diagnosis of engine injectors.
Do-it-yourself washing
First, let's consider the most acceptable option for the car enthusiast: washing the injectors without removing them from the car. To carry out this procedure you will need the following things:
- Wynns flushing fluid;
- empty plastic bottle with a capacity of 1.5 l;
- rubber hose 1.5 m long;
- 2 nipples for car wheels;
- automobile compressor;
- injector filter, 1 piece;
- steel hose clamps, 4 pieces.
Flushing sequence
Before you start washing, you will have to assemble a simple washing device that will work like an IV for the patient.
- The rubber hose is cut into two parts. The end of the first hose mat is put on the ramp fitting. A filter from the injector is connected to the second end of this half. Injection filter for fine fuel purification, connects to the bottle
- A pair of holes are drilled in the cork and bottom of the bottle into which wheel nipples are installed. The nipple is unscrewed from the nipple installed in the bottom, and then the end of the second half of the hose is connected to it. And the other end of this hose is connected to the outlet of the injection filter. Nipples for car wheels that will be installed in the holes of the bottle
- The result is the design shown in the photo below. Homemade flushing system for Common Rail injectors, made from a bottle
- Now you need to open the fuel tank of the car (this is done in order to completely relieve the pressure in the fuel system).
- Fluid for flushing is poured into the bottle, then a car compressor hose is connected to the nipple in the neck and secured with a clamp. Flushing fluid for injectors from Wynns is the best choice for self-flushing
- The compressor turns on. The pressure should not exceed 3 atmospheres.
- The car starts and idles until all the flushing fluid is used up.
- When the engine stops, allow it to cool for 30 minutes. After this, the remaining flushing liquid is poured into the bottle, and the whole process is repeated until the engine stops again.
What is the Common Rail system
The Common Rail system today is the latest stage in the development of diesel and gasoline engines with direct fuel injection. A special feature of the system is that the injection process and the process of pressurizing the fuel rail occur separately from each other.
Today, the Common Rail fuel system is considered advanced
That is, first fuel under high pressure accumulates in the ramp, and then is supplied in portions to the injectors for subsequent atomization in the combustion chambers. Fuel is pumped into the rail by a high-pressure fuel pump (HPF), and the Common Rail system is controlled by an electronic control unit (ECU).
How to determine if an injector is not working on a running engine
Let's say you found a sign of a faulty injector and now want to know how to check your engine injectors? I would like to immediately note that the injectors themselves come in several types (mechanical and electromagnetic) and their design has significant differences, which means their testing methods should also differ. You can check injectors using several methods: checking injectors without removing them from the engine, checking removed injectors, checking injectors at home, checking gasoline or diesel injectors, etc. We will analyze the most popular methods.
To find out how to check the functionality of the injector nozzles, it is not necessary to remove them. This method is one of the simplest checks and involves a sound test (or analysis of the noise emitted by the motor during operation). As a rule, clogged or damaged injectors produce a muffled high-frequency noise (the sound usually comes from the cylinder block).
Checking the power supply to the injectors
Checking the power supply to the injectors is carried out if the injectors themselves are working when any of the injectors break down. To check it is necessary to carry out the following procedure:
- disconnect the pads;
- connect 2 wires to the battery, the end of which is fixed to the injectors;
- turn on the engine.
After turning on the engine, you need to pay attention to the possible leakage of the fuel mixture - this may occur due to faults in the electrical circuit
Checking the resistance on the winding with a multimeter (tester)
Checking the resistance on the winding with a multimeter (tester) also allows you to check the engine injectors without removing them. To do this, you need to make sure the resistance level of your injectors. Next we perform the following steps:
- with the engine off, disconnect the negative terminal from the battery;
- then disconnect the electrical connector on the injector itself (located on the block, in the form of a clamp);
- We set the value of our injectors on a multimeter and connect its contacts directly to the injector itself.
Normally, at high impedance the value should be 11-17 Ohms, at low impedance 2-5 Ohms. If the values do not match, the injector must be replaced.
Injector assembly
Let's install a new atomizer and start assembling the nozzle. Hand-tightened parts are tightened with a spanner. You don't need to tighten the nut too much yet, you may need to disassemble it again.
Now the injectors must be checked again on the stand. If the injector works as it should, then tighten the nut and install it in the internal combustion engine. During final assembly, it must be taken into account that the nut securing the nozzle must be tightened with a torque wrench with the force specified in the repair manual for each specific motor. Before tightening, protect the injector openings with protective caps.
Replacing just the atomizer rarely leads to the return of good performance of the device. This is due to the fact that the injector fires at a pressure different from that specified by the manufacturer. This is where you will need to configure. It is carried out by selecting the thickness of the adjusting washer.
The higher the pressure required, the greater its thickness should be.
To get the job done efficiently, stock up on several washers of different thicknesses and a micrometer to measure them. Increasing the washer by 100 microns increases the pressure by 10 kg/cm2.
The washers are taken of the same diameter as those previously installed. It is important that they are made of good hardened steel, because... this increases their durability.
If previously installed washers had additional holes, it is prohibited to replace them with analogues without holes. In the case where the manufacturer supplied washers that do not have additional holes, it is allowed to use another type of the corresponding diameter.
Adjust the injection pressure 10-15 kg/cm2 higher than the manufacturer recommends, because during operation the parts will grind in and the washer will slightly sag. If you do everything very well, the pressure will differ from the recommended from 5 to 10 kg/cm2.
When setting up, keep in mind that wear is possible in the fuel injection pump itself (the plunger may be worn out), and it creates a pressure lower than a new one. Then it is better to reduce the injection pressure by 5 to 10 kg/cm2. Sometimes this does not help, for example, a rotary pump will require precise settings.
If you installed a new nozzle and fuel continues to flow, there could be two reasons. The first is the drying out of the factory preservative lubricant in it, the second is wear of the spring or defects in the pressure pin.
The first one rarely happens. Defects in a spring or pin are easy to notice when they are carefully troubleshooted. If the spring is the cause of the malfunction, you can unwrap it, but this will only help for a while. It is advisable to replace the spring and other parts with new ones without hesitation.
After assembly and adjustment, the injector can be mounted back onto the engine. Pay attention to the O-rings. They must be replaced if the injector was tightened with the specified force, even if it was not in operation and for some reason had to be dismantled again. This is due to the fact that after tightening the rings are compressed and lose their shape.
The rings both ensure tightness and prevent the injector from overheating, acting as an obstacle to the transfer of excess heat from the cylinder block. Their quality determines how quickly the moment comes when the injectors coke while heating.
Self-check of injectors
Let's start with the fact that automobile injectors are divided into several types, of which two types have found widespread use at different times: mechanical injectors and electromagnetic (electromechanical) injectors.
Electromagnetic injectors are based on a special valve that opens and closes the injector to supply fuel under the influence of a control pulse from the engine ECU. Mechanical injectors open as a result of increased fuel pressure in the injector. Let us add that modern cars often have electromagnetic devices installed.
To check the injectors with your own hands without removing them from the car, you can use several methods. The simplest and most affordable way to quickly check injection nozzles without removing them from the car is to analyze the noise emitted by the engine during operation.
Main types of injectors used in this system
The Common Rail system uses different types of parts of this type. They differ in both design and performance characteristics. We list the most popular models.
Piezoelectric
The vast majority of engines with Common Rail systems use piezoelectric injectors, since they are considered advanced and have many advantages.
The actuator mechanism of the piezoelectric injector is based on a compact piezoelectric element
As the name suggests, the actuator is based on a piezoelectric element. Using such an element provides a number of advantages:
- an injector with a piezoelectric element switches 8 times faster compared to analogues made on the basis of electromagnetic valves;
- the needle in it weighs 70% less;
- such a part can inject fuel several times during one engine stroke;
- the fuel injected into it is very accurately dosed.
Electromagnetic
Electromagnetic injectors are used primarily in gasoline engines. The needle in it is driven by a spring and an electromagnet, and during one engine stroke the part can produce only one fuel injection. The design of this device can be seen in the figure below.
This is interesting: Tuning Soviet cars in Soviet times
Common Rail electromagnetic injectors are used primarily in gasoline engines
It should be noted that in terms of fuel dosing accuracy, the electromagnetic one is significantly inferior to the piezoelectric one. This indicator directly depends on the type of control system. For example, if a car is equipped with a modern ECU, the accuracy of gasoline dosing increases by 10–12%. There is a certain error in the timing of electromagnetic injectors. For example, an injector needle can hold the nozzle channel open for 2–2.5 ms with an error of 6%. This figure is very far from ideal.