Below watch the video about how to change the trunk lock cylinder on a VAZ 2114 and express your opinion about it in the reviews to the article.
Video quality: PDTVRip
The video was uploaded to the admin from the user Avner: for immediate viewing on the portal.
To give the correct answer to the question How to change the trunk lock cylinder on a VAZ 2114, you need to watch the video. After viewing, you will not need to seek help from specialists. Detailed instructions will help you solve your problems. Enjoy watching.
Humor on the topic: Odessa, beach... - Hot sweet sugar corn! - How much? - 15 each. If you choose, then 20 each.
1200 rub. for the photo report
We pay for photo reports on car repairs. Earnings from 10,000 rubles/month.
Write:
The lock cylinder (lock cylinder) is a type of lock security mechanism, in the form of a cylinder, the working part of which can be rotated in the body only when a key is inserted into the cylinder hole. The uninterrupted operation of the lock cylinder protects the car from unauthorized entry and protects the owner’s property. Therefore, a malfunction of the lock cylinder is a serious concern that requires an immediate solution, and many car enthusiasts are seriously thinking about how to change the lock cylinder of a VAZ 2114 with their own hands.
Repair of interior door locks
Losing keys or jamming a lock is an unpleasant situation for any car enthusiast. Do not break the door or locking mechanism. Carefully open the door so as not to damage the rods and the body of the locking mechanism. After this, proceed to the rest of the work. Instructions for removing and replacing the Euro handle cylinder are as follows:
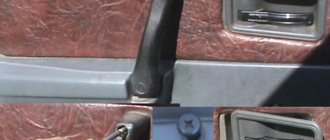
- Remove the door trim. This job won't take much effort, but be careful not to damage the material.
- Disconnecting the rods is one of the most difficult parts of the job. Pick up the bottom one with pliers and remove it from the handle. Then it is easy to insert it back. To remove the top one, press the screwdriver against the handle, thread the unnecessary wire through the rod and pull sharply. Without a screwdriver, the rod will bend.
- Using a 8 key, unscrew the handle.
- Before further work, remember the position of the lock. Pull out the pin from the side and remove the rod.
- Remove the spring and pull out the cylinder.
- Lubricate the groove where the cylinder was located with WD-40.
- The new cylinder is supplied with the key. Do not remove it until the lock is installed. Sometimes a new part needs to be carefully finished with a file. This happens if it is made in China or is simply of poor quality.
- If the pin does not fit into the hole freely, then you need to lightly file the place for it.
Assembly occurs in reverse order. Don't forget to connect the rods and check the lock's functionality before you lock the car for the first time. This work will take you no more than an hour. The trim is always installed last, after adjusting the locking mechanism.
Features of door adjustment
The adjustment work involves changing the height of the rods.
The rods are attached using plastic tips that have a ball joint inside. Correct adjustment of the door lock is carried out by pulling out the groove. Next, you will need to twist slightly counterclockwise or clockwise. The lock is adjustable by selecting the ideal length. So please be patient. After the repair, you will have to adjust the sash slamming mechanism. By the time you move on to setting it up, you can already return the trim back to the door, since the work will be carried out with the latch on the body. Move the clamp up or down until you achieve the perfect result. The door should latch easily, without noise or effort. This adjustment can be made without replacing the lock cylinder if you are not satisfied with the need to apply force when closing.
Replacing and adjusting the trunk lock
The work is carried out in the following order:
- The casing is removed.
- Replace the support mechanism. If the lock's supporting tooth breaks. Replace not only the cylinder, but also the new body. In general, this work is no different from what needs to be done to repair a door lock.
- Adjustment is carried out using the lower clamp. Unscrew the nuts and remove the washers. Assembling and disassembling the lock will help you adjust the lock. In this case, you need to act using the selection method. The desired result is the moment when the door closes effortlessly and does not vibrate when slamming and driving the car.
More extensive work is required if the retainer bushing is broken. If you are changing the lock assembly, then before its fasteners are fully tightened, you need to adjust the latch. Only after the lock closes perfectly can you tighten the fastening nuts to the maximum.
Replacing the Door Lock of a VAZ 2114
Replacement of all door locks, rods and cylinders on VAZ 2113, VAZ 2114, VAZ 2115
The door consists of a cylinder, a rod, an external lock, an internal lock, etc., thanks to which the door of the car is held while moving, preventing it from opening; over time, the locks or the cylinder itself become unusable and when the key is inserted into the cylinder, turning it in it, the door may not open or close, this will indicate that either the cylinder, or the rod, or the internal lock has become unusable and it’s time to change them, this is not very difficult to do and can be dealt with Even an ordinary car enthusiast can do this if he does everything carefully and follows the instructions that we described in this article.
To replace the lock on a car door, you will need to take from the tools: an impact screwdriver, as well as a regular screwdriver, you will also need grease, and the new parts themselves!
Where are all the door locks, rods and cylinders located?
As you already understood, there are only two locks, one of them is internal, which is located inside the door and is hidden by the trim, and the other is external, you see it constantly when you open the door and for clarity in the photo below it is also indicated by an arrow, in addition to this, the larva is also present thanks to which opens the internal lock and there is also a thrust that goes from the cylinder to this lock, by the way, if the thrust suddenly jumps off the cylinder, then you will no longer open the door and therefore you will have to remove the trim from the door on which the cylinder is faulty or replace it with a new one (If the old one is deformed) or simply put the rod on the larva as it was put on before (This is done with the help of your hands) and everything will start working for you again.
When do you need to change all door locks, rods and cylinders?
If any of the things listed in the question itself become unusable, then your door will either stop opening (This may be due to a malfunction of the locks), or it will open, but by inserting the key into the cylinder, you will be able to close and open the car too (This either the rod has jumped off the cylinder, or the cylinder itself has worn out), it may also be that the key simply does not turn (the lock cylinder itself is definitely to blame for this and it must be replaced).
Types of trunk lock failures
The lock on the trunk of a VAZ 2114 becomes faulty for various reasons.
Main problems:
- The larva breaks. The reason is vibration from the trunk lid.
- Deformation. This is caused by a strong blow from a foreign object.
- Exhaustion of working resource. Associated with abrasion of the locking tooth or breaking off. The part wears out and requires replacement.
- Failure of silumin elements. A complete replacement of the product is required.
- Wear of seals. The lid will rattle and sometimes open on its own.
The problem must be solved by installing a working mechanism.
Attention! The part does not always require replacement. Sometimes the mechanism needs to be adjusted. By mistake, motorists often replace a working product with a new one.
How to replace all door locks, rods and cylinders on a VAZ 2113-VAZ 2115?
1) First, let's start with the most important thing, without this you won't be able to replace the locks, but in general you won't be able to start the operation because all the work to replace all the things that are listed in the title is carried out with the trim removed from the door, it can be removed quite easily and for more details on how to do this if you don’t already know, read the article: “Replacing a door on a VAZ” in points 1-8, and after the trim is removed, proceed to removal, let’s immediately note a couple of facts to replace the cylinder the rods will definitely need to be disconnected from it, but to replace the rods, you don’t need to remove or disconnect anything, the same with the door locks, the rods from them will also need to be disconnected and only after that unscrew the screws that secure the locks, so first with the rods themselves let's start and explain how they are removed, firstly, you can start disconnecting them from absolutely any side and from any place, for example, start disconnecting the rod first from the internal lock as shown in photos 1 and 2 (Photo 1 shows disconnecting the lock washer with a screwdriver holds the rod, and photo 2 shows the disconnection of the rod itself from the internal lock), then using a screwdriver and your hands, disconnect the other rods and continue the entire operation until the rods on both sides are disconnected, once they are disconnected on both sides, completely remove them from the car (there are several rods in the car and each one goes to the locks and there is even a rod on the cylinder, they are disconnected, as you already understood, with a screwdriver and your hands, in the beginning just disconnect all the lock washers or plastic clamps and pull the rod with your hand , disconnect it from the lock or from the cylinder, etc., but the rod is not always secured with the help of clamps, sometimes it is hooked at one end to something, in this case, also disconnect its end with a screwdriver and then completely remove the rod itself) , thus remove all the rods from the car.
Replacement of external and internal door locks on VAZ 2110, 2111 and 2112
Detailed video review of replacing the door lock
: internal and external for
VAZ
2110-2112 with your own hands...
VAZ 2114 - replacing the lock cylinder and door handle
Test drives, reviews, repairs and much more, everything related to automotive topics.
2) After the rods are removed or disconnected from those things that you are going to replace, proceed to removing these things themselves, first we will look at the removal of both door locks, the internal lock and the external one are removed together, that is, if you decide to change the external lock, then you the internal one will have to be touched (You don’t even have to replace the internal lock with a new one, but you’ll just have to tinker with it even if you only need to replace the external one) and vice versa, everything is the same, to remove the external lock you will need to loosen the two screws that it is secured (Please note, loosen, the impact screwdriver does not serve anything else, we recommend that you completely unscrew the screws with a regular screwdriver) these screws are also indicated by arrows in photo 1, as soon as the screws are unscrewed, go further and pull the lock, remove it from car (see photo 2) if you also need to replace the internal lock, then in this case remove the door opening handle (read how to do this in the article: “Replacing a window lifter on a car”, everything is described in the paragraphs) and then into the internal climb up part of the door and use a screwdriver and your hands to disconnect the two rods (Those rods that you will need to disconnect from the internal lock are shown in the photo below under number 1), as soon as the rods are disconnected, pull out the internal lock and as soon as it is removed, proceed to disassembling it, to do this, remove the lock washer from it using a screwdriver that secures the internal drive rod (see. photo 3, on it the lock washer is indicated by an arrow) and then disconnect the rod itself from the lock (see photo 4), disconnect the other rod in almost the same way, it is attached to the internal lock by a plastic retainer, you just need to move it and the rod can then be safely disconnected from the lock; see the video clip at the end of the article for more details.
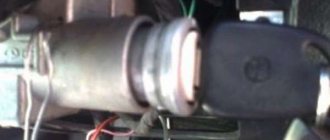
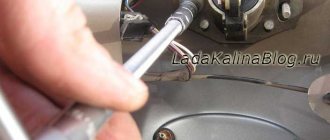
3) Now we’ll talk about how to remove the cylinder from the outer handle, it is inserted into the handle itself and in order to remove it, you will have to first remove the handle from the door and then remove the cylinder, this is all done as follows, from the outer handle to the inside doors, both rods are disconnected (see photo 1) and after the rods are disconnected, unscrew the two nuts that secure the handle to the door (see photo 2) and by pulling the handle with your hand, remove it completely from the car, after the handle is removed (It By the way, it will be removed with the rods), take an awl in your hands and use it to push out the side pin that holds the cylinder and the cylinder leash (see photo 3, the leash is indicated by a red arrow, when the pin for its fastening is pushed out, remove the leash completely from the cylinder), then use a screwdriver pry up the spring that secures the same cylinder and remove it (see photo 4), and finally, when the leash and spring are removed, insert the key into the cylinder and turn it, thereby you will unlock the mechanism and you can easily pull the key to remove the cylinder from external handle.
All parts are installed in their places in the reverse order of removal, but do not forget to use an impact rotary screwdriver to tighten the screws securing the locks until they stop, but keep in mind the fact that with this screwdriver you only need to loosen the screws and tighten them until they stop, so just use it like a regular screwdriver (Unscrew the screw completely, tighten it) we do not advise you, because it is not intended for this purpose.
Replacing the trunk lock on a VAZ-2113 2114 2115
The old mechanism has been removed, a new one needs to be installed. The process is the reverse of dismantling.
Attention! In order to save money, some Lada 2113 and 2114 owners advise disassembling the mechanism and replacing worn elements. Such repairs help temporarily.
The cylinder is replaced with the lock removed. You need to check the condition of the spring. If the element is weak, it needs to be replaced.
When installing a new element, you do not need to immediately tighten the bolts - the trunk will not close. It is recommended to adjust the position of the cover using the latches. The bolts are tightened slowly. This will allow you to make adjustments so that the lid closes tightly. You need to check the seals. When the elements wear out, the cover hits the body, creating vibrations.
The trunk lock of the Lada Samara family often fails. One simple modification will solve the problem. It is enough to install the product from Lada-Granta.
The process is as follows:
- Make a mount from a 40 x 40 mm corner.
- Install the cylinder plug on the lid.
- Connect the wires. “Power up” from the elements going to the wiper. One wire (white with a blue stripe) is connected to the lock drive, the other (yellow with a blue stripe) is connected to the limit switch.
- Install a new product, adjust it, make sure it works.
After these steps, we get a reliable and durable mechanism that will not open on its own and will not rattle.
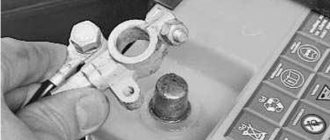
Before starting work, you need to disconnect the (-) terminal from the battery for safety.
Disconnecting the terminal from the battery
Door lock repair
The door locks are non-removable and cannot be repaired. If the locks are broken, replace them as an assembly. The designs of the front door locks of all cars of the LADA SAMARA-2 family and the rear door locks of the VAZ-2114 and VAZ-2115 cars are fundamentally the same. The main difference is that the front door outside handles have lock switch cylinders installed, so lock repairs are shown using the front doors as an example.
You will need a screwdriver.
2. Remove the two screws securing the locking gear motor to the inner door panel.
3. Remove the gearmotor from the window of the inner door panel and remove the rod from the gearmotor drive.
4. Disconnect the two wiring harness blocks and remove the door lock motor.
Note. The rear door lock motor is removed in the same way.
5. To remove the inner handle and lock drive rod, unscrew the nuts securing the window regulator mechanism to the door panel and move it to the side (see “Replacing the front door window regulator”).
7. Disconnect the outer handle rods and the lock switch from the inner lock.
8. Remove the two screws securing the door lock. When unscrewing, we recommend using an impact screwdriver, since sealant is applied to the threads of the screws.
9. Remove the outer lock...
10. ...and remove the internal lock from the door.
11. Remove the locking bracket from the lever pin and disconnect the inner handle rod from the inner lock lever.
12. Rotate the plastic holder and remove the end of the locking rod from the lever.
13. Unscrew the two nuts securing the outer lock handle.
14. Remove the outer lock handle with rods.
15. Remove the pin and remove the plastic rod end from the lock cylinder.
16. Remove the locking spring by removing its ends from the slots on the cylinder and the lock handle.
17. Insert the key into the lock cylinder and remove the cylinder from the handle.
18. Install the new lock in the reverse order of removal, having first lubricated all rubbing parts with grease. Check the ease of opening and the reliability of closing the door lock. Adjust the lock if necessary.
19. To adjust the lock, loosen the fastening screws and move the lock:
- a) outward if the door closes tightly;
- b) inside, if the door does not close tightly;
- c) down, if the door rises when closing.
After adjustment, tighten the screws. Use an impact driver to remove and tighten screws.
Helpful advice. If you need to remove the retainer, first trace its outline on the body pillar. This will help maintain the lock's alignment during installation.
Trunk lock repair
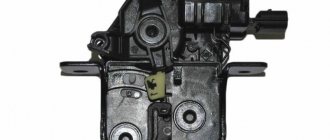
As a rule, the trunk lock on VAZ cars lasts longer than door locks, which is caused by fewer openings/closings in an equal period of time. But, due to complete wear and tear (or loss of the keys), it still has to be replaced. In most cases, the lock mechanism itself, as well as its body, remains fully operational - only the cylinder into which the keys are directly inserted wears out. It will then need to be replaced with a new one.
To do this you will need:
- crosshead screwdriver;
- slotted screwdriver;
- a set of keys.
The trunk lock cylinder of a VAZ 2114 is replaced as follows:
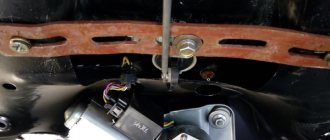
- Open the trunk.
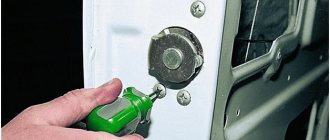
- Remove the plastic rivets (“hedgehogs”) holding the plastic socket around the lock by picking them up with a slotted screwdriver or a special extractor.
- Remove the panel.
- Unscrew the fasteners holding the lock.
- Remove the lock.
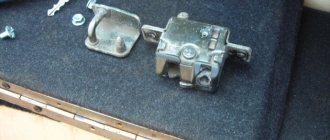
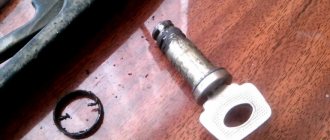
- Unscrew the fastening screws holding the cylinder in the lock and remove it.
- Install a new cylinder inside the lock.
Removing the rivets
Unscrew the fasteners
Reassembling the lock and installing it in place is performed in exactly the same order, but in reverse order.
New lock cylinders are sold with keys inserted into the keyhole. You should not remove them before the cylinder is installed inside the lock, since this threatens its individual elements falling out, which will be extremely difficult to install in place.
After the VAZ 2114 lock cylinder has been replaced and the lock itself has been installed in place, you should carefully inspect its counterpart, called the latch (the lock tongue goes behind it when the trunk is locked). In most cases, there is no need to replace the retainer because it has no moving parts and has a very long service life.
Replacement may only be necessary if a crack appears on the body of the clamp (it is made of silumin). The replacement process itself is simple and consists of unscrewing the old fastener and installing a new device.
Adjusting screws for the trunk lock of the VAZ 2114
The only thing you will need to pay attention to is the correct setting of the lock. To check its quality, you just need to close the trunk lid and see how it locks. If locking does not occur, it is too tight, or, on the contrary, a noticeable play is felt, then the lock is not adjusted.
To configure, you need:
- loosen a pair of fastening bolts of the clamp;
- close the trunk (at this moment the latch itself will adjust to the location of the lock tongue);
- open the trunk;
- tighten the retainer mounting bolts.
If after the adjustment procedure the trunk begins to lock even worse, then most likely the mating part of the locking element is skewed. It is enough to unscrew the fasteners, place it straight without moving the lock itself, tighten the bolts - and the trunk will be easy to lock.
The procedure for removing the outer door handle on a VAZ 2106
First, perform the following procedure: Removing the trim from the front door.
Next we need a head with an extension. The handle is secured from the inside with two nuts. First, unscrew its left side:
The second nut is in a more difficult to reach place, so you will have to gain access to it first. To do this, you need to unscrew the three bolts securing the door lock, as shown in the photo below:
Now from the inside we move the lock mechanism a little to the side so that we can put the head on the second nut securing the door handle:
After which, on the reverse (outer) side, the handle will be released, but will still be held on by the rod, which is attached to the lock cylinder.
To disconnect the door handle, you need to pull with medium force for up to three times until the rod comes off the hook of the cylinder:
That's all done, now the handle is disconnected from the VAZ 2106 door and is ready for replacement.
Installing the new one is done in reverse order. The price of a new such part is 170 rubles on average in all auto parts stores.
The process of installing a lock on a VAZ 2109
This is where the fun begins - either I’m lucky, or others have had less luck, but it turned out that the lock from Kalina fits perfectly onto the bracket, which is already screwed to the boat under the rear wiper motor. True, I had to bend the petals a little and drill holes (from the trunk side). I found a photo of Kalina's castle and showed the excess parts with a dotted line - cut them off using a grinder or a hacksaw.
I immediately felt the disadvantage of this bracket - the connection is a little flimsy, so the lock can move and, as a result, the trunk of the Nine will not close. To make the connection stronger, you need a major corner. During my search, I came across a plate with perforation. I made a corner out of it and cut a hole for the lock lever (which opens the trunk). In the photo you can see this corner. You install it on the lyada and attach a lock to it. The rigidity is sufficient, so the door will not open while moving.
Reasons for replacing the VAZ 2114 lock cylinder
- In the cold season, when you try to open a frozen lock, it turns out that it simply turns and does not open, and with excessive torque, the lock cylinder can come out of the handle socket along with the key. This problem is most often caused by the destruction of the locking ring and the falling out of the fixing post located in the plastic cap of the rod.
- Another variant of the problem may be the partial functionality of the lock cylinder. Over time, the internal pins of the lock and the teeth of the key wear out, then, when you try to turn the lock, the parts of the lock cling to each other and prevent it from turning. At first, this problem does not seem that serious, but over time, selecting the desired “position” of the key becomes irritating.
- The need to replace lock cylinders often arises when upgrading door handles to new domestic ones or to European handles.