Ignition adjustment with strobe light
Checking and adjusting the ignition timing is done while the engine is idling. The crankshaft speed should be between 820–900 rpm.
Checking the mark on the flywheel is carried out using the mark on the crankshaft pulley. If the marks match, it means that the ignition system was adjusted correctly.
Adjustment by marks is impossible without the device.
Adjusting the ignition by light bulb
There are ways to adjust without a strobe. To make adjustments using a light bulb, you will need a key to rotate the crankshaft and a standard 12-volt light bulb.
Setting the ignition timing by loosening the spark timing sensor.
The procedure for adjusting the ignition by light bulb
- Use a special wrench to turn the crankshaft until the marks match. If you do not have a crankshaft key, engage 4th gear and push the car until the marks match.
- Connect a 12-volt light bulb to the wire connecting the distributor and the ignition coil.
- Connect the light bulb to ground using the second wire.
- Connect the central wire to ground Lada 2109.
- Loosen the bolts on the distributor body and turn on the ignition - the light should light up.
- Rotate the body to the right until the light goes out.
- After the light goes out, smoothly turn the distributor to the left.
- Stop when the light comes on.
- Tighten the housing bolts.
The ignition control circuit based on the light bulb is ideal for carrying out the operation at home without additional costs for the device.
instructions and purpose
Let's first consider the general purpose, design and types of distributors:
- The distributor is part of the ignition system, and is designed to regulate, transmit and control the electrical signal to the distribution coil switch, igniting the spark along the spark plugs in the required accordance (in sequence with the ignition stroke)
- There are two types of ignition systems - non-contact and contact (of course, there are others, but they are not very common), accordingly, distributors are also used of two types
- friend They differ from each other only in design: the presence of contacts (in a contact system there is a breaker), a sensor distributor (in a contactless ignition sensor system there is a distributor)
- According to the main characteristics, both systems are almost identical
On VAZ-2109 cars, as well as 2108 models-2199, a distributor with a built-in Hall sensor, four spark, with built-in centrifugal (regulators and vacuum) ignition timing is standardly installed. You can see the main details in the photo above:
- 1 - sealing ring
- 2 - special
- 3 – coupling adjusting washers
- 4 - roller with a centrifugal regulator located on it
- 5 — support plate
- 6 – screen, protecting from dust
- 7 - the so-called “runner”
- 8 - Hall sensor itself
- 9 — lock washer
- 10 - thrust washer
- 11 — distributor, ignition housing
- 12 — vacuum corrector
Adjusting the ignition using the tachometer
To carry out this type of economical ignition adjustment of the Zhiguli 2109, two people will be needed. One should be in the interior of the Nine, the second should rotate the distributor.
Step-by-step adjustment using the tachometer
- Turn on the ignition and watch the tachometer needle.
- A second person must loosen the bolts securing the distributor and turn it.
- When you turn the key in the ignition, the tachometer needle sharply deviates and returns to zero.
- The distributor should remain in the position when the tachometer needle deviates.
- This method of adjusting the ignition timing requires patience, as it is very difficult to adjust the first time.
Ignition check
To check the adjustment of the VAZ 2109 ignition system, you need to drive out onto a flat road.
- Accelerate the car to 50 km/h.
- Engage 4th gear and press the gas pedal all the way.
The appearance of quiet and short detonation sounds means the ignition is set correctly.
Late ignition is diagnosed by the absence of sounds during acceleration. Early ignition - detonation sounds are very loud. In both cases, the ignition timing needs to be re-adjusted.
Many motorists who own a VAZ-21099 car have most likely encountered difficulties associated with the correct operation of the engine. A common problem is that turning the engine key starts the engine, but the engine does not respond correctly to idle ignition. Let's try to figure out the reason for this problem, which is most likely associated with an incorrectly set ignition.
How to check high-voltage wires of a VAZ 2110
how to check the high-voltage wires of the ignition system.
Diagnosis of misfires on VAZ cars.
High-voltage wires of engine 2112 (1.5i 16v) - check and replacement.
Ignition coil with wires VAZ 2110 BU.
High voltage wires 8kl. injector VAZ 2111 SLON.
procedure for connecting high-voltage wires VAZ 2110 injector Do it yourself.
AT 320N Wiring for VAZ 2110 (1.5i 16V).
Removal, installation and repair of Lada Granta ignition coils
How to install high-voltage wires correctly.
Checking and replacing spark plugs of the VAZ 2110 Lada.
High-voltage wire VAZ-2111 dv.1.5 SLON set.
ignition module 2112-3705010-02 -2110.
2111-3707080 SLON High-voltage wire VAZ-2110 SLON kit (packed)…
Spark plugs for VAZ 2110 8 valves.
How to check the high-voltage wires of a car?
VAZ 2110 (VAZ 2110) – Replacement of I/O ignition wires.
Diagram, procedure for connecting VAZ high-voltage wires.
The numbering of the wires is marked on white rings, and the qi numbers are cast on the module...
VAZ 2110 (VAZ 2110) – Replacement of I/O ignition wires.
Replacement of high-voltage wires and installation of the left rear view mirror, i.e...
Comment on Removing and disassembling the ignition sensor-distributor of the VAZ-2110.
High-voltage wire VAZ-2112 V16 silicone set, RF.
Basic technical concepts
The ignition system is a variety of interconnected instruments and devices that guarantee the appearance of an electrical discharge, which in turn ignites the mixture of fuel and air in the internal combustion engine system. This system plays a huge role in the vehicle’s technical equipment and electrical equipment.
We are not interested in the entire ignition system, but only in the moment the spark appears, which determines the correct operation of the entire system. This moment is called the ignition moment, because. determines the time for ignition of the working mixture in compressed form. Incorrectly set ignition timing entails many problems in the operation of the car. With the help of this article you will learn how to identify the problem, what it means and how to fix it.
VAZ-21099: under the hood
Description and modifications
As such, a “nine” engine does not exist in nature. At least, the AvtoVAZ plant did not produce it. All 2109 models were equipped with a figure-eight power unit and its modifications. Of course, in many documents you can find the VAZ 2109 engine, but this is deception or ignorance.
But in the technical documentation of the manufacturer you cannot find information about the 2109 engine, since such an engine does not exist. During the entire period of their production, all “nines” were equipped with engines with the following markings: VAZ-21081 (1.1 8V), VAZ-2108 (1.3 8V), VAZ-21083 (1.5 8V), VAZ-2111 -80 (1.5i 8V) and VAZ-11183-20 (1.6i 8V).
What are the dangers of ignition malfunctions?
Problematic engine starting, acrid smoke from the exhaust pipe and other troubles that can happen to your car are often a consequence of incorrectly set ignition timing, and not problems with the carburetor. Ignorance of this simple fact forces drivers to spend a long time futilely delving into the details of the car. However, if the spark does not appear at all, or the spark plugs flood, the fault must be looked for elsewhere.
VAZ-21099 with a carburetor engine requires precise adjustment of the ignition torque. This can be done without specialized equipment, but it is easier to use a strobe. This tool will greatly facilitate your job of setting the ignition timing, which will most likely need to be done more than once.
The problems described in this article can arise for many reasons, but it is easier to check the first failure that comes to mind - incorrectly set ignition angle. So, the most common problems with the engine system:
- too much detonation in the piston system. Characteristic signs: when you press the gas, a characteristic ringing sound is heard. This problem often occurs among inattentive motorists who do not pay proper attention to their car. The reason for early detonation is premature ignition, which threatens not only uncomfortable operation of the car, but also subsequent deformation of the piston rings. It should be noted that repairing the piston system is not the cheapest “pleasure”;
- When the engine starts, strong black smoke comes out of the exhaust pipe. This problem may also indicate that the ignition is too fast;
- engine power is significantly reduced; use of larger fuel volume compared to conventional displacement; the engine cannot quickly change operating mode, throttle response is reduced. All the problems described above are associated with the opposite problem - ignition too late. The reason is that the mixture does not burn completely at the highest point of the piston. This top point is also called dead. Thus, even when the piston moves in reverse, the mixture continues to burn. A second reason is also possible - the temperature of the exhaust pipe system is too high;
- If the problem is diagnosed when the gas pedal is pressed, then its most likely cause is too late ignition. In this case, the engine operates with significant interruptions, and when the gas is pressed, so-called “failures” are diagnosed, during which the engine does not work. This problem can cause uneven driving;
- An idling engine runs unevenly.
The operating order of the VAZ 2106 cylinders: diagram, photo, video instructions
Much depends on the operation of the cylinders, so this unit must always be in working condition. Especially when it comes to old VAZ 2106 cars. In this article you can find out what is the operating order of the VAZ 2106 cylinders and for what reasons they may not work.
Work distribution
It may be necessary if it is necessary to identify a malfunction in the operation of the motor. Such breakdowns consist of unstable engine operation, that is, its tripping. It is necessary to diagnose the unit in cases where the engine power is too low, and the internal combustion engine itself regularly trips.
It should be added that the internal combustion engine throttles not only when driving at speed, but also in neutral gear. In addition to tripping and reduced power, fuel consumption in the vehicle increases. This sign is initial. In practice, interruptions in the operation of the power unit are observed when the carburetor is incorrectly adjusted, the spark plugs are broken, or one of the cylinders fails. In addition, air may leak into one of the cylinders.
But in order to accurately identify the malfunction, you need to know the operation of the cylinders in the vehicle. In a VAZ 2106 car it is as follows: 1-3-4-2. Accordingly, the numbers directly indicate the numbers of the cylinders themselves. The number “1” on the distributor cap is marked on the first cylinder. If you look at its cover from the side of the wires leading to the spark plugs, the cylinder operating mode will be 1-3-4-2.
Adjusting the ignition yourself
To normalize engine operation and fix problems, you need to correctly set the ignition timing of your car. Only if these conditions are met can the engine operate correctly. To diagnose and correct errors in the ignition angle, you will need the following tools:
- strobe (desirable);
- tachometer. Most often, such a tool is built into the autotester, so there should be no problems with it;
- slotted screwdriver;
- wrench 10 (socket or open-end).
Having a strobe light will make all your work much easier, so it is better to purchase it for private use.
Before you start directly adjusting the ignition timing and angle, you need to do some preparatory work. First, place the key in the ignition and start the engine. Afterwards, you need to bring the system to a temperature of 90 degrees and increase the idle speed to 800 rpm (using a tachometer) using the fuel regulator knob on the carburetor body.
Hatch in the gearbox
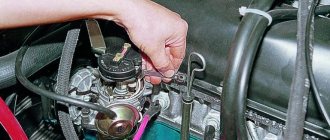
After the engine has warmed up, remove the silicone tube that supplies vacuum from the fitting. You will find the adjusting lever on the panel of the ignition torque distributor, otherwise called the distributor. Its base is attached to the carburetor. Place the free edge of the silicone tube close to your finger to find out if there is a vacuum. If there is one, then the finger will stick to the tube. Reduce the number of revolutions until the vacuum disappears.
Next you need to turn off the engine. The tube should be bent until the lumen completely disappears. Use a wrench to loosen the nuts securing the distributor. The picture shows the flywheel and crankcase hatch. On the gearbox housing there is the same hatch with the flywheel scale. Remove the plug and clean the inspection hatch with the scale from dirt. You will see special strips to help you determine the correct ignition timing. This is where we will focus our attention.
Take a slotted screwdriver and turn the flywheel until it reaches the long scale bar. Before installing the ignition, this long strip must be strictly opposite the triangular cutout on the scale. This position corresponds to the zero position of the ignition angle. With this arrangement, the first and fourth cylinders with pistons are at the extreme dead center.
If you have difficulty seeing the scale and you are not sure that this particular strip is the longest, check its location on the camshaft pulley. To do this, remove the timing belt cover. The desired mark will coincide with the mark on the back cover of his belt.
Now it's time to connect the strobe. To do this you need to follow a simple sequence of actions:
- connect the red wire to the positive on the coil;
- We throw a dark wire over an arbitrary system in the housing;
- We attach the mount to the wires on the fourth cylinder.
If you are not sure about this sequence of connecting the strobe, it is better to check the sequence of actions according to the instructions from the device.
Setting the ignition
Now that the preparations are complete, you should set the correct ignition timing angle for the VAZ-21099. This is easy to do using the step-by-step instructions below:
- start the engine. The number of revolutions should be minimal - no more than 800 rpm. Use a tachometer to check;
- the strobe beam should shine through the observation window on the hatch;
- The longest mark on the flywheel should be set at the zero mark (in degrees). Determine the position on the mark specific to your fuel.
You need to change the ignition angle from the zero position of the long line, i.e. from the center of the triangle towards the windshield of the car. To avoid mistakes, gradually turn the ignition distribution housing to the right. This movement increases the advance angle, while counterclockwise movement decreases it.
The exact direction of movement will be helped by the scale on the distributor with a plus and a minus drawn. It is very convenient to use for proper adjustment. It is worth keeping in mind that each division is equal to 8 degrees, so to avoid errors you need to adjust slowly. Once the desired position is achieved, disconnect the distributor and secure it in the desired position.
Checking the ignition system
To check the ignition module of a car with an eight-valve injection engine, you will need the following items:
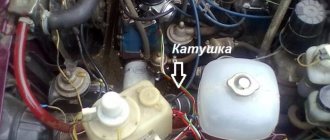
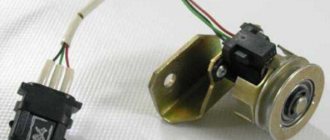
Ignition module with injection engine
- a computer with an injection engine diagnostic program installed on it;
- testing tool;
- wrench with screwdriver.
Do not rush to check the ignition module before testing the entire system. It should work correctly and properly, with all devices connected. If necessary, turn on the ground and ignition. After this, gasoline should begin flowing into the system. If the red indicator is on, diagnose problems on the VAZ-21099 on-board computer to which the laptop is connected.
After all preparations have been made, check the throttle valve. To do this, turn on the ignition and use a tester to determine the voltage value of the on-board computer sensor. There should be the following indicators: on-board system voltage - greater than or equal to 12 volts, sensor - at 0.5 volts, damper opening degree - up to 1 percent.
Press the gas pedal. The indicators should change - within 4.5 volts and from 90%, respectively. For better results, it is better to increase the throttle system indicator to one hundred percent. After all this, turn off the additional air supply regulator and achieve 50 percent opening. The last stage is to adjust the throttle system until it is completely closed.
Video - how to set the ignition on a VAZ 2109
overheating, detonation, shots into the muffler or carburetor - this is not a complete list of such malfunctions.
It should be borne in mind that similar symptoms occur with an incorrectly adjusted or faulty carburetor, faulty valve mechanism, etc.
Purpose of setting ignition timing
Set the required ignition timing at which the main characteristics of the car engine - power, throttle response, idle speed, fuel consumption - will be normal.
Tools for work
— Stroboscope (the simplest one, without a built-in tachometer, can be bought in a store for 200-300 rubles). A more advanced one, with a built-in tachometer, costs a little more.
— Tachometer (you can use the one built into the instrument panel, you can connect an external one (for example, an auto tester, a multimeter in tachometer mode), you can use your ear, if you have experience).
strobe and autotester
High voltage wires. Test
High voltage wires
Many car enthusiasts are interested in the question: “which high-voltage wires are better?” And few of them find the correct answer. In this article we will try to find out the answer to this question and find out the results of the high-voltage wire test.
One well-known auto magazine has already conducted a similar test, but this test is focused on carburetor cars. Do not forget that injection and carburetor engines have different requirements, for example, carburetor wires have a lot of radiation, which will interfere with the electrics of the injection engine. In this article we will test high-voltage ignition wires for injection engines, which are equipped in most of our cars.
Let us remember the Soviet-era GOST for high-voltage wires (GOST 14867-79). Here are the main points of the content of the standard:
Terms of Use:
- climatic version O according to GOST 15150-69;
- operating temperature from minus 60 to 110°C;
- The wire is resistant to oil, gasoline, ozone, mold, and does not propagate fire.
Let us immediately note that the conditions and situation in the world have changed greatly since 1979.
Reliability of wires according to the following criteria:
- Active resistance.
- Breakdown voltage (at least 40 kV according to GOST).
- Electromagnetic field level.
- Price.
The test involves complex and inaccessible equipment:
- multimeter MY68;
- universal breakdown installation UPU-1M;
- electromagnetic radiation level meter P3-31.
Our test involves high-voltage (HV) wires from the following companies:
- Slon.
- Ween.
- Cezar.
- Horse.
- Tesla.
- Finwhale.
Let's take a closer look at the candidates:
SLON
According to our information, SLON high-voltage wires have been installed from the factory on domestic cars for three years now. Sellers in auto parts stores also say the same. The resistance of wires 1 to 4 is: 4.24-4.74-5.19-7.60. They passed the breakdown test at 40 kV. The price for high-voltage SLON wires is approximately 480 rubles.
Ween
The country of origin is Belgium. They have resistance from cylinders 1 to 4: 6.17-6.57-7.52-9.89 kOhm. The breakdown occurred at around 35 kV. The price for Ween high-voltage wires is approximately 260 rubles.
Cezar
Country of origin - Russia. Resistance from cylinders 1 to 4 is: 3.10-3.53-4.23-5.34 kOhm. Passed a breakdown test at 40 kV. Estimated cost: 450 rubles.
Tesla
The country of origin is the Czech Republic. Tesla high-voltage wires have a resistance from cylinders 1 to 4 of 3.27-4.16-5.02-6.26 kOhm. Passed the breakdown test up to 50 kV. The cost of Tesla high-voltage wires is 450 rubles.
Horse
The country of origin is Russia. The resistance of the wires is 3.15-3.90-4.09-6.24 kOhm. The breakdown test passed up to 40 kV. The price for high-voltage Horse wires is approximately 360 rubles.
Finwhale
Country of origin: Germany. The resistance of wires of this brand is: 1.95-2.18-2.60-3.42 kOhm. The breakdown test has been passed (50 kV). The price for Finwhale high-voltage wires is 570 rubles.
Absolutely all the wires we examined are suitable for operation in Russian realities:
- all wires are silicone;
- soft;
- withstand temperature changes from -40 to +100 degrees Celsius;
- as for electromagnetic radiation, all wires are within the permissible limits;
Let's summarize a little and enter the data into the table. Based on the table, you can find out how much high-voltage wires cost and what characteristics they have.
Comparison table of high voltage wires
Do not forget that each engine is designed for certain wires, and not every wire will ensure its normal operation. Choose your GDP wisely!
Useful articles:
https://youtube.com/watch?v=K2nNmBjJOyo