VAZ-2114 ignition module and its features
The passenger car ignition module is specially designed to improve the starting of a car engine.
Since two high-voltage coils operate as the main components of the module, it is often called the “ignition coil”. Let's look at the structure of this part:
The main operating elements of the ignition module are high-voltage coils that distribute the igniting spark to the spark plugs. This is possible thanks to the following design:
The mechanism of operation of the ignition coil is as follows:
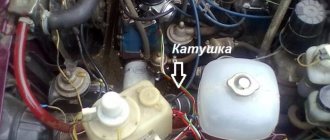
Even an inexperienced car enthusiast can find this part: just trace the path of one of the high-voltage wires - from the spark plug to the plastic case.
This housing houses the ignition module.
How to set the ignition yourself?
Precise ignition adjustment on the VAZ 2115 injector is performed using a special strobe light. If this is not possible, you can set the ignition on the VAZ by spark.
To do this, follow these steps:
- First of all, the engine is warmed up until it reaches operating temperature.
- The distributor does not need to be removed, but only relaxed.
- You need to remove the central wire from the distributor.
- The piston in the 1st cylinder must be at TDC (the marks are set differently on 8 and 16 valve engines).
- Now you need to hold the short-circuit wire with your left hand and turn on the ignition.
- Use your right hand to adjust the distributor counterclockwise, while keeping the high-voltage wires above the metal.
- Then similar actions are performed, turning the distributor clockwise until a spark appears.
- At this point, the alignment ends, and the distributor is fixed in its regular place.
With the ignition set correctly, the car will operate without interruption with optimal fuel consumption and maximum power.
How to diagnose the ignition coil on a VAZ-2114
As already mentioned, when the first signs of malfunctions appear in the VAZ-2114 ignition module, the vehicle owner should diagnose it. You can perform a similar procedure yourself at home using the following algorithm:
At home, all stages of the checks can be performed independently. The first stage is checking the spark plugs. It is carried out in the following sequence:
If the spark plugs are in good condition, you can proceed to the next stage of checking for faults in the ignition module.
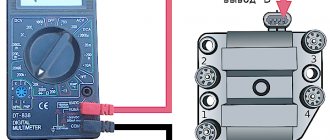
The second step is to check the crankshaft sensor. This test is carried out using a multimeter, thanks to which two characteristics are checked - voltage and resistance. To do this proceed as follows:
Otherwise, the faulty sensor will have to be replaced with a new one, because it also affects the operation of the VAZ-2114 ignition module. If after this there are still signs of coil malfunction, then you should proceed to the third stage of the test.
The third stage is checking the ignition coil itself. This part is checked as follows:
What to do if you don’t have a multimeter, but you need to check the electrical circuit? Experts recommend using a twelve-volt light bulb. To do this, one of the wires coming from it should be connected to the terminal, and the second wire should be shorted to the motor housing. If the control light flickers when the starter starts, then everything is in working order.
If the car owner has problems performing such diagnostics himself, he can always turn to qualified specialists at a service station.
Causes of ignition problems
As mentioned earlier, in order to set the ignition in the electronic system you will have to go into the “brains”, there you can also check the functionality of the sensors, so they greatly influence the operation of the system, regardless of the type of ignition.
On the electronic type, the main causes of failures are:
- Incorrect information transmitted from sensors to the ECU. If the connection to the brain and diagnostics showed strange data coming from one or more control devices, it is necessary to use a “substitution”. The easiest way is to find a car with known good sensors, install them and double-check the results. Here you need to understand that you do not need a new one, but a working sensor, because factory defects are not excluded even on a new mechanism.
- The incoming voltage - correct from a technical point of view is 5V, but if due to a violation of the mechanical integrity of the wires or another problem with the car’s electronics, this voltage changes, the sensor readings will also change after it. If this happens, the ECU begins to adjust engine operation based on incorrect data, which leads to incorrect operation of the entire mechanism as a whole. To check this breakdown, you will need a known-good system of wires leading to the sensor or a donor car into which you can install your sensor and test the system for functionality.
- Broken ECU - if the previous two options did not give a visible result, and installing your sensor and wiring in a working machine does not change its performance, only this option remains. You can try to reflash the “brain” of the car, but due to its low cost, it is better to immediately buy a new ECU and install it on the car.
Before moving on to the radical measures proposed in the third option, it is worth additionally checking the correct location of the labels. In cars with contactless ignition, this is the ignition installation of the VAZ 2114, and for cars with an electronic system, debugging is important to check the synchronization of the injection system with the gas distribution mechanism.
Ignition module (Ignition coil)
The ignition module is a complex electrical device designed to generate high voltage current (up to 30,000 V) and transmit it to the spark plugs. The connecting component between the ignition module and the spark plugs are high-voltage wires. It is worth noting that many car owners also call the ignition module the ignition coil, which is not entirely correct because the coil is part of the ignition module, but in this case it is not important.
Operating principle of the ignition module
The operating principle of the module corresponds to the operating principle of any ignition coil:
Signs of a malfunctioning ignition module (coil)
The main signs of a malfunctioning ignition coil are:
Where is the ignition module located?
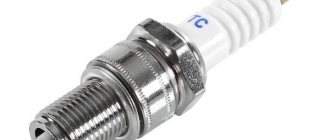
The ignition module is located in the engine compartment. The easiest way to find it is to find high voltage wires. One end of the high-voltage wires goes to the spark plugs, the other end of the wires goes to the ignition module.
Connection diagram of explosive wires to the ignition module
High-voltage wires must be connected to the module strictly in a certain order:
If you hold the module strictly in front of you, you need to connect it as follows:
But this pinout is typical when you hold the module in front of you. If you want to install high-voltage wires on a module already installed on the machine, then the pinout is slightly different, because the module is installed at an angle (diamond):
Ignition module diagram
Ignition module pinout.
How much does an ignition module cost?
The approximate cost of an ignition module in a store is from 700 to 1000 rubles.
How to check the ignition module (coil)?
To check the module, you need to measure the resistance between the terminals (1 and 4 cylinders; and between 2 and 3 cylinders). The resistance on the ohmmeter should be approximately 5.4 kOhm. For a more detailed description of verification steps, read the article: How to check the ignition module?
Ignition module errors
The following errors are associated with malfunctioning ignition module:
A common cause of this error can be both spark plugs and high-voltage wires - they need to be replaced (How to replace high-voltage wires? How to replace spark plugs?).
CarFrance.ru » Lada » 2114 » Engine and its systems » Checking the ignition coil on a VAZ-2114 with an 8-valve injection engine using a multimeter
Marks and direct adjustment
When the preparation is completed and the car is ready to work with it, you can begin to set the ignition marks of the VAZ 2114. The task of the procedure is to check the synchronism of the system (correlation of the camshaft, crankshaft and injection timing), with some nuances for the electronic system.
For electronic ignition systems, there is a small nuance - the need to check the distance from the master disk to the sensor. Normally, this distance should not exceed 0.7 mm, but should not be less than 0.5 mm. You can use a valve feeler gauge to check.
VAZ 2115 how to check the ignition module
We have already learned what the ignition module is and what are the signs of its malfunction (unstable idling, failures during acceleration, engine twinkling). In this article we will talk about how to check the ignition module with your own hands. From personal experience: on the Internet, while reading various forums on this topic, I came across a post that punched ones do not affect the ignition module in any way. In fact, faulty HV wires can lead to the fact that a spark, in search of the shortest direction, can be sent to an adjacent relay, which contributes to module burnout. Let's move on directly to checking the ignition module. In order to correctly and accurately check the ignition module, you need a device such as an oscilloscope.
But, as a rule, the average driver does not have anything like this, except for the usual warning light and tester, so our task is to use only these devices that are available to everyone. Before checking the module itself, we need to check the block of wires coming to it. To do this, first of all, disconnect the wire block, berm tester and connect one probe of the tester to the block on contact A, connect the other probe to engine ground.
Turn on the ignition and look at the tester readings: the voltage should be around 12V. If there is no voltage, then you need to check what goes to the ignition module. The next step is to take a 12V control light and connect it to contacts A and B. Turn on the starter and look: the light should blink, if it doesn’t blink, then there is an open circuit on contact A.
We perform this operation similarly with contact B. There are several ways to check the ignition module, and we will consider some of them. 1) PPPPP The first and easiest way to check a module is to replace the module with a known working one. Everything is simple here: take the module from the donor car and change it. But there are certain disadvantages here: - the donor car may not be available, buying a new module does not suit our task - the ignition module will not work for every car: of course! You say, from SAMAR it will do. But not everything is so simple: as a rule, the first Samaras with a 1.5 liter engine are equipped with an ignition module.
New Samaras with 1.5 and 1.6 liter engines are often equipped with ignition coils. Let me remind you that the ignition module consists of a switch and an ignition coil. In new Samaras, the switch is located in, so the module is eliminated as unnecessary, only the coil remains. Take this fact into account and look for a new donor. — you must make sure that the high-voltage wires are in good condition: Otherwise, there is a high probability that the ignition module will burn out. 2) PPPPP The next method is the method of moving the module.
To do this, we move the block of wires, knock and move the module itself. If, at the moment of our influence on the module, the operation of the engine changes noticeably, then the matter is most likely in poor contact. This malfunction is not catastrophic, so you can try to repair the module yourself. If the module cannot be repaired, it must be replaced ( ).
3) PPPPP To check we need a tester. Using a tester in ohmmeter mode, we measure the resistance at the paired high-voltage terminals of the ignition module 1 and 4 of the cylinder; and between cylinders 2 and 3. The resistance should be the same but vary around 5.4 kOhm. P Article from. https://vaz-2114-lada.ru.
We have already learned what the ignition module is and what are the signs of its malfunction (unstable idling, failures during acceleration,
We have already learned what the ignition module is and what are the signs of its malfunction (unstable idling, failures during acceleration,
We have already learned what the ignition module is and what are the signs of its malfunction (unstable idling, failures during acceleration,
The ignition module is a complex electrical device designed to generate high voltage current (up to 30,000 V) and transmit
The module will not fail due to a broken wire, 100%, if the module has not yet been replaced, then change it or carefully look at the wiring to it in particular
Search
The 2nd Samara was the first front-wheel drive car from VAZ with an injection system at the beginning. The first copies of the VAZ-2114 were still sold with an eight-pole engine and a contactless ignition system, and subsequent engines already had a 100% electrical system with the same 8 valves. Before installing the ignition, it is necessary to find out what system is installed on the engine, which we will do at the moment.
It is quite simple to calculate the type of ignition system on a VAZ-2114 - if a switch is installed, an analogue of a contact ignition ignition switch, this means that the system is contactless, but with a distributor-distributor. In this case, the ignition timing is set by turning the distributor to a certain degree. . The accuracy of the adjustment depends on the experience of the technician, as well as on the equipment used. However, such a system will allow you to flexibly and accurately adjust the ignition using a strobe light.
Most engines that were installed on the 2nd Samara and the tenth VAZ have a non-contact electric ignition system. There is no distributor, since the ignition timing is controlled automatically in real time and only with the help of the engine control system, electronics. The system does not require maintenance, and its diagram is shown in the photo below.
As can be seen from the diagram, which is implemented in eight-valve injectors, for the correct operation of the ignition system of the electric engine control unit, it is necessary to supply the appropriate information from the sensors. The main sensor of the system is the crankshaft position sensor . It is located on the left at the exit of the cylinder block next to the alternator drive pulley when looking at the end of the crankshaft.
Replacing the timing belt on the 8 cl engine VAZ 2108,2109,2110,2111,2113,2114,2115
Crankshaft position sensor
You may also like
The crankshaft pulley has a main gear drive, which generates electrical vibrations, and the sensor converts them into an impulse, this impulse is fed to the computer. The control unit, starting from the crankshaft position, sends a signal to the ignition module, which distributes the spark between the spark plugs.
In addition, the crankshaft position sensor sets the timing of fuel injection, so we will first monitor its condition.
Remove the time cover
Signal diagram from the crankshaft sensor: 1 - main disk of the crankshaft; 2 — crankshaft position sensor; 3 — crankshaft rotation angle; 4 - output signal of the crankshaft position sensor
Align the flywheel mark with the mark on the flywheel housing
We monitor the coincidence of the marks on the oil pump pulley and the outflow mark on the cylinder block
We check the coincidence of the marks on the camshaft drive pulley and the timing belt cover
If the three marks match, it means that the pistons of the first and fourth cylinders are at top dead center at that point. It is then that the gap between the teeth of the main disk should coincide with the boss on the cylinder block, and the 20th tooth from the gap should coincide with the crankshaft position sensor. This is when the sensor pulsates the engine control unit, indicating that the piston of the first cylinder is at top dead center of the compression stroke.
As can be seen from the diagram above, the ignition system consists of high and low voltage circuits. Because of this, there are a few things you need to know when checking your system.
How to check the ignition module of a VAZ 2115
The correct operation of the VAZ 2115 ignition module determines not only the normal start of the engine, but also the stability of its operation in all modes. To fully check the serviceability of this element of the ignition system, you will need simple laboratory equipment. How to check the ignition module of a VAZ 2115 - preliminary results can be achieved in “field” conditions.
How to check the ignition module of a VAZ 2115
This electrical device creates high (up to 30,000 V) voltage, which is then transmitted to the spark plugs.
Some car owners call this device a coil, although this is not entirely correct, since two coils are included in the module. The 1st coil is responsible for the operation of cylinders 1 and 4, the 2nd for the operation of cylinders 2 and 3. In addition, the module contains 2 switches. These elements are located inside one plastic case. It is not difficult to find this module under the hood of the car; high-voltage wires go to it.
Among the main signs of a malfunctioning ignition module are loss of power, dips during a sharp increase in speed, unstable idle speed, and inoperative cylinders (1 and 4 or 2 and 3). These problems can be caused by a malfunction of the ignition module if the DS, MAF and IAC sensors are working properly.
Checking the VAZ 2115 module
Before you start testing the device, you must make sure that the wire blocks connected to it are in good condition. For these purposes you will need a tester. You should disconnect the block, then touch the “A” contact with one of the probes of the device, and the second to ground. After this, turn on the ignition and look at the tester readings.
The voltage should be 12 V. If it is missing, it can be argued that the fuse is faulty. At the next stage of checking the block, you will need a test light, which should be connected between the “A” and “B” contacts. Ask your assistant to turn the starter, and the light should blink. Otherwise, the wire going to the “A” contact may have broken. The same should be done with the “B” contact.
The easiest way to check the functionality of the module is to replace it with a working one. However, there are also nuances here. Ignition modules were installed on the very first Samaras. On later modifications, an ignition coil was installed, but the switch was part of the ECU, and therefore there was no separate module. This must be taken into account if you are going to use a donor car.
Another option for checking the ignition module of a VAZ 2115 is to measure the resistance. To do this, you need to touch the tester probes to the module output where the high-voltage wires are connected. Between the contacts going to cylinders 1 and 4 or 2 and 3, the resistance value will be 5.4 kOhm.
If the resistance indicator is normal, but the malfunction remains the same, use the method of “shaking” the module: lightly knocking on the device with the engine running. With changes in its operation, one can judge that there is poor contact between the elements located inside the ignition module.
We told you how to check the ignition module of a VAZ 2115, but it’s better not to fool your head and drop by the nearest car service center!
Did you like the article? Share with friends on social networks:
This blog is already read by 4756 people. Read it too!
Checking the set ignition
To check the ignition on an 8-valve engine, an injector, you should prepare:
- Multimeter.
- Set of keys and screwdrivers.
- Pliers (necessarily with insulated handles).
Attention! Due to the lack of special equipment, the described method can only test the operation of the circuits. Diagnostics of the microprocessor part will not be available.
- When the ignition is turned off, check how tightly the high voltage wires are seated and what contact is in the module.
- Remove the connector from the module, connect a multimeter (monitoring mode should be low AC) to pins C and B, make sure there is voltage. Check the coil (2nd and 4th contacts).
- Check the functionality of high-voltage wires. Install a working spark plug in each cap in turn, attach one end to the block and crank the engine with the starter. The presence of a spark signals that everything is normal. Its absence on each wire means the module is faulty.
If you managed to set the ignition correctly on the VAZ model and this was confirmed by the test, but problems are still observed, you need to check the power system.
Ignition module VAZ 2115, VAZ 2114 description and its malfunctions
Welcome, friends, to the DIY car repair website. If you try to explain in simple words, the ignition module of the VAZ 2115, VAZ 2114, and other VAZ 2109 and 2110 models is an improved device for microprocessor systems that generate high voltage current and subsequently transmit it to the spark plugs.
Ignition module VAZ 2115
Its power comes from the vehicle's electrical system with a nominal voltage of 12 volts, the negative pole of which is attached directly to the body.
Getting ready to adjust the ignition
In order to correctly set the ignition timing of the VAZ 2114 and carry out debugging, you need to prepare. The method described below does not require acrobatic agility from the owner and is quite feasible both in the uncomfortable and cramped environment of a garage and if the car enthusiast has a tummy.
IMPORTANT! Thorough preparation always speeds up the process of technical work significantly, regardless of what exactly needs to be repaired.
Preparation for debugging ignition marks is carried out as follows:
- The car is placed on a flat surface and placed on the handbrake.
- The second step is to remove the front right wheel, which will subsequently allow you to gain access to the gas distribution mechanism itself, which will speed up the work, make it convenient and easy, for this: a. unscrew the fastenings of our wheel and place a wheel chock under the diagonally opposite wheel (rear left); b. We lift the car with a jack, twist the wheel mounts completely and remove it.
- Finally, we need to remove the timing belt splash guard (if there is one, of course). By the way, you can not remove it entirely, but just unscrew the two lower fasteners, then it can be moved away without damaging it.
VAZ 2115 ignition module, description and malfunctions
The module's task is to generate high-voltage pulses on the engine spark plugs. As a result of compression of the air-fuel mixture, one spark plug is supplied with a working spark, and the second spark is supplied with an idle spark (exhaust stroke).
The “working” spark plug is connected to the first and fourth cylinders of the engine, and the “idle” spark plug is connected to the second and third. Thanks to this connection, the resulting spark synchronously jumps through the cylinders of the car.
What the module consists of, or so to speak, the composition of the device - two electronic control units, two high-voltage transformers, four outputs for high-voltage wires and a small plastic case. The weight of the device is no more than 1.32 kg, dimensions 110x117x70 mm.
The module is connected to the spark plugs using high-voltage wires that supply sparks to the spark plugs.
To ensure high accuracy of ignition control, the controller uses information about the crankshaft rotation speed; about the load on the engine /air consumption/; about the temperature of the liquid that is used to cool the engine of your iron horse; about the position of the crankshaft and the presence of detonation.
If there is a malfunction, the device cannot be disassembled or repaired. Such a module must be replaced, which is easy to do on your own without involving specialists.
Possible malfunctions of the ignition module:
If such malfunctions are detected, you must first check the reliability of the connection of the high-voltage wires and the serviceability of the spark plugs.
With the engine running, the check must be carried out, observing safety precautions: either work with rubber gloves, or the handles of the pliers must be insulated.
If everything works fine, then the ignition module should be replaced. It is located under the hood of the car and its location is easy to find by thickened high-voltage wires.
You will need tools: socket wrench “10” /head/, wrenches “13” and “17”, hexagon.
The procedure for removing a faulty ignition module:
In order to install a new ignition module, you must first insert the high voltage wires, following the prompts on the module body.
On the terminals of the wires themselves there are also designations of the engine cylinder numbers. Then you should carry out the described steps strictly in reverse order. After starting the engine, you need to check that the ignition module is installed correctly.
Owners of VAZ 2109 - 2115 cars who cannot independently monitor the technical condition of their cars can, of course, be serviced at a service station, where they will be offered diagnostics and high-quality repairs of the car’s engine. Here, as they say, to each his own.
Source
Ignition switch and features of its replacement
ZZ plays an important role in the vehicle's SZ, both for an 8-cl and 16-cl engine. It is activated when the starter is working, thanks to it the lighting, turn signals, and power windows work.
Scheme ZZ VAZ 2115
Replacement or repair of the VAZ 2115 ignition switch may be required if:
- lost or broken keys;
- the lock was damaged during an attempted theft;
- the 3Z cylinder is faulty;
- The contact group does not work.
Ignition switch VAZ 2115
To replace you will need: a set of keys, a hammer, screwdrivers, a thin chisel.
The replacement procedure consists of the following steps:
- The car's power is turned off by disconnecting the negative terminal from the battery.
- We remove the steering wheel.
- Next you need to remove the steering column switches.
- Then you need to loosen the bolts securing the clamp that holds the ZZ on the steering column. If the heads are cut off, the bolts should be carefully knocked out using a hammer and a thin chisel.
- Now you need to disconnect the wiring harness.
- Next, you need to completely unscrew the bolts from the 3Z housing and you can remove it.
- A new device is installed in place of the old one.
- Assembly is carried out in reverse order.
After assembly, you should start the engine and check the operation of the switch (the author of the video is the MY LADA channel).
Ignition module VAZ 2115 - check, malfunctions and replacement
To begin with, I would like to note that the ignition module on the VAZ 2115 is a fundamentally new device that is more reliable than what was installed on earlier models of VAZ cars. The essence of the operation of this device is that it produces a high voltage electric current, which is subsequently transmitted to the spark plugs of the vehicle’s ignition system.
Operating principle of the ignition module
As mentioned earlier, the main task of the ignition module is that it generates a high level of voltage, which is subsequently transmitted to the spark plugs. The generated current undergoes a compression procedure, as a result of which a working spark is supplied to one of the spark plugs of the ignition system, and an “idle” spark is supplied to the second. To be more correct in statements, the working spark is supplied to the first and fourth spark plugs of the vehicle’s ignition system, and the “idle” spark is supplied to the second and third. Thanks to this high-voltage electric current supply system, the spark appears at the right stroke and on the right cylinder, which ensures stable operation of the system.
Video. Checking the ignition module of the VAZ 2115
Power to the VAZ 2115 ignition module is supplied directly from the vehicle’s on-board electrical network. The voltage supplied to the ignition module is twelve volts. At the same time, you should know that the negative wire of the ignition module is attached directly to the vehicle body. Design of the VAZ 2115 ignition module
The vehicle ignition module consists of a housing made of plastic, a pair of electronic control units, a pair of high-voltage current transformers, and four outputs for BB-type wires. Dimensions of the VAZ 2115 ignition module: one hundred ten by one hundred seventeen by seventy. The weight of the ignition module is one kilogram, three hundred and twenty grams.
Operating principle of the ignition module
The supply of electric current is carried out using wires of the BB type; the supply of electric current is controlled using a special controller, which makes decisions based on information that comes to it from various sensors of the vehicle. Also, the controller’s tasks include setting the sequence in which the ignition coil operates.
The ignition module can carry out its uninterrupted operation at temperatures from minus forty degrees to plus one hundred and thirty degrees Celsius.
What are the signs that indicate a faulty ignition module?
There are several typical signs that directly indicate problems with the ignition module:
1. The engine idle is floating. 2. Engine thrust periodically disappears for no reason. 3. The car picks up engine speed very slowly when accelerating. 4. The cylinders stop working in pairs.
Note that the same signs indicate a malfunction of the BB wires and spark plugs of the vehicle’s ignition system, so in the beginning, you should check them, and if everything is fine with them, then replace the ignition module.
Tools you will need:
To replace the ignition module on a VAZ 2115 car, you will need very few tools:
1. Open-end wrenches for seventeen and thirteen. 2. Ten socket wrench. 3. Hexagon.
Replacing the ignition module on a VAZ 2115 with your own hands
To independently replace the ignition module on a VAZ 2115, you should strictly adhere to a certain sequence of actions, which you can find below:
1. First, you must find the ignition module itself in the engine compartment. This can be done by following the high-voltage wires that come from the spark plugs of the ignition system.
2. Next, you must disconnect the negative cable from the battery.
3. Now, you need to remove the block to which the wires are connected from the ignition module.
4. Next, you should disconnect the high-voltage wires.
5. Now, you can unscrew the mounting bolts that secure the ignition module to the engine and remove it.
6. Then all you have to do is mount the new ignition module and assemble the entire structure in reverse order.
Source
Useful video
You can find interesting information by watching the additional video below: https://www.youtube.com/watch?v=pNyBny-_HoQ
On a car with contactless ignition, everything is even easier; you don’t have to remove the wheels, but you will need an assistant. It is necessary to find the compression stroke of the fourth cylinder. To do this, insert a rubber cone into the spark plug hole and turn the ratchet. Pushing out the cone will mean that the compression stroke has been found.
Having illuminated the spark plug hole, we align the longest mark of the cover with the mark of the pulley. We set the breaker to the appropriate clock and check the operation of the system according to the fourth point described above.
Ignition coil breakdown
The term breakdown of an ignition coil or spark plug tip means a breakdown in the weakest point of the housing or wire insulation due to a decrease in resistance, occurring in short periods of time. This is mechanical damage that leads to the appearance of cracks or melting. On the surface of the case, the breakdown site appears as black, burnt-out dots, longitudinal tracks or white cracks. Such spark piercing areas are especially dangerous in humid weather. This malfunction leads not only to failure of the mixture to ignite, but also to complete failure of the ignition module.
Often such places are not difficult to notice visually, but sometimes it is necessary to check the ignition coil, not with a multimeter or oscilloscope, but with a simple device made of two wires. When a damaged area is identified, the part is usually completely replaced, although sometimes it is possible to delay the replacement using electrical tape, sealant or epoxy glue.
What is ignition coil breakdown and its causes?
Let's take a brief look at what coil breakdown is, what it affects, and what it looks like visually. First of all, it should be recalled that the coil itself is a transformer that has two windings (primary and secondary), isolated from each other. The definition of breakdown is a physical phenomenon when, due to damage to the primary and/or secondary windings of the coil, part of the electrical energy falls not on the spark plug, but on the housing. This leads to the fact that the spark plug does not work at full power, and accordingly, the engine begins to “trouble” and its dynamics are lost.
Ignition coil device
There can be many reasons for the breakdown of the ignition coil - damage to the insulation of one or both windings, damage to the tip body, damage to its rubber seal (due to which water gets inside, through which electricity “sews”), the presence of dirt on the body (similar to water, current passes through it), damage (oxidation) of the electrode in the tip. However, most often the problem lies in the “wired” insulator, and therefore, to eliminate the problem, this place must be localized and insulated.
An interesting reason for the failure of ignition coil tips is the fact that when replacing a spark plug, in some cases, car owners, through carelessness or inexperience, can tear their waterproofing. This can lead to moisture getting under them and problems with engine operation. The opposite case is that when the car owner tightens the top nuts of the spark plug cups too tightly, there is a risk that engine oil from the engine will begin to penetrate into the plug housing. And this oil is harmful to the rubber from which the reel tips are made.
Also, the reason that spark breakdown occurs outside the cylinder is incorrectly set gaps on the spark plugs. This is especially true if the gap is increased. Naturally, the spark in this case has a detrimental effect on both the spark plug body and the rubber tip of the ignition coil.
Consequences of incorrectly setting timing marks
If the ignition is set incorrectly, the following negative aspects are possible:
- If the engine has 16 valves, then they become deformed or bent during operation, accumulating damage.
- The previous problem causes damage to the cylinder head.
- The guide bushings may also become unusable.
- Cracks may appear in other engine components.
Crack in the cylinder block
- The motor overheats.
- The engine piston mechanism can burn out.
- Oil residue may appear on the spark plugs.
Oil deposits on spark plugs
- The fuel mixture loses its ignition moment.
Note! If the engine has 8 valves, then the consequences are not so critical - traction disappears, the belt quickly wears out and breaks.
After repairs, the following factors most often indicate an incorrectly set ignition:
- The car accelerates worse.
- Frequent overheating of the motor.
- The craving became much worse.
Symptoms of a faulty ignition coil
Signs of a malfunction of the ignition coil are that the engine periodically “trips” (triggering is especially important in rainy weather, and when starting the engine “in cold weather”), “failures” occur when accelerating the car, when visually inspecting the coil, “paths” of electrical breakdown are observed, burning of contacts, signs of thermal overheating, the presence of a large amount of dirt and debris in the coil body and other, smaller faults. The most common cause of coil malfunction is a break in its primary or secondary windings. In some cases, their insulation is simply damaged. At the initial stage, the coil will work more or less normally, but over time the problems will worsen and the symptoms described above will appear to a greater extent.
There are several typical signs of an ignition coil breakdown. It’s worth mentioning right away that the malfunctions listed below can be caused by other reasons, so diagnostics should still be carried out comprehensively, including checking the condition of the ignition coils. Thus, symptoms of breakdown can be divided into two types - behavioral and visual. Behavioral ones include:
When dismantling the ignition coil if it malfunctions, you can observe visual signs that it has completely or partially failed. So, these include:
The main sign of a coil malfunction is the lack of ignition of the fuel mixture. However, this situation does not always arise, since in certain cases part of the electrical energy still goes to the candle, and not just to the body. In this case, it is necessary to conduct additional diagnostics.
Well, on modern cars, in the event of a breakdown of the ignition coil, the electronic engine control unit (ECU) will notify the driver about this by activating the Check Engine lamp on the dashboard (and a misfire diagnostic code). However, it can also light up due to other faults, so this requires additional diagnostics using software and hardware.
The symptoms of malfunction described above are relevant if the engine has individual ignition coils. If the design provides for the installation of one coil, common to all cylinders, then the engine will stall completely (this, in fact, is one of the reasons why several individual modules are installed on modern cars).
Setting valve timing by marks on VAZ 2113, VAZ 2114, VAZ 2115
Welcome! Valve timing - thanks to these phases, the engine operates synchronously and there are no malfunctions in its operation, but if the valve timing is disrupted, then either the piston will reach the top point at the wrong time when it should, or the valve will lag, and therefore it will be very pronounced engine operation with interruptions at idle, well, the engine will not really run, so to prevent this from happening, the valve timing should always be set according to the marks and the engine will thus work correctly and synchronously, by the way, when everything is set according to the marks (Camshaft , crankshaft), then you automatically have all the parts of the Gas Distribution Mechanism set to “TDC is the Top Dead Center” and to “BDC is the Bottom Dead Center”, for example, you set the crankshaft according to the marks, then the pistons of the first and fourth your cylinder will automatically rise to the very end and will be at TDC, and the pistons of the third and second cylinder will lower and will be at BDC, so that you can clearly see what it looks like from the side, look at the photo just below, in which those same pistons are located like we said it in this article (That is, some are in the NMT, while others occupy the top point). Note! To make this installation, you don’t need a lot of tools, of course, if everything is set correctly for you, if your phases are all out of whack (That is, the marks are not evenly aligned, for example, the mark on the camshaft matches, but not on the crankshaft), then you will need more tools, because the timing belt will have to be removed, in general, to carry out all the work, stock up on: Spanners, spanners, screwdrivers, as well as small screws, or instead of screws, thin drill bits can be taken, a wrench with spanner heads can also be stocked up, Well, that’s all, if you just need to set everything according to the marks, then you won’t even need screwdrivers with drills (This is if you remove the timing belt), ring wrenches and wrenches will be enough, by the way, you completely forgot, also stock up on sockets if you have them (You can use them instead of a socket wrench)!
How to check a coil for breakdown
You can check for breakdown of the ignition coil in one of 5 ways, but as a rule, the average car owner has the opportunity to use only three of them. The first is a visual inspection, because often the breakdown site is visible to the eye; the second is a check with a multimeter, and the third, and the most reliable quick method, if nothing is visually noticeable, is to use a simple ignition system tester (it’s easy to do it yourself).
Ignition system diagnostics
Recommendations for diagnosing the ignition system (spark plugs, wires, coils, module). Instructions on how to check the ignition units of a car with your own hands Read more
To check the operation of the ignition system, first of all, it makes sense to use a program to read errors from the ECU. Usually in such cases it shows errors from the groups P0300 and P0363, indicating misfire in one of the cylinders. However, please note that in this case, errors can be caused not only by faulty coils or spark plug tips. Therefore, in order to make sure that the fault is with one of them, it makes sense to move the problem unit to another cylinder, erase errors from the ECU memory and carry out diagnostics again.
If the problem is in the coil (we are talking about an individual coil), then the situation with errors will repeat, but indicating a different cylinder. True, when this is precisely a breakdown of the coil, and such that gaps appear, then you can already understand by the vibration of the engine, see with your eye a broken insulator track, or even hear a characteristic crackling sound with your ear. Sometimes at night, in addition to a crackling sound, you can also see a spark appearing.
Visual inspection
The next way to determine a breakdown of the ignition coil is to dismantle it and visually inspect it. As practice shows, on the coil body it is usually not difficult to find the very “path” of breakdown along which the spark “sews”. Or you should pay attention to chips, potholes, and geometry violations in the reel body that were not there before.
Measuring parameters
There are two mandatory methods for checking the condition of the ignition coil - checking for spark and checking the insulation resistance of both windings (low and high voltage). To measure the parameters, you will need a working spark plug and a multimeter with the ability to measure insulation resistance. But the most reliable way is to use a spark generation tester, only with a slight modification, so that you can move the conductor along the coil body and look for the weak point of the insulation that breaks through.
Homemade spark tester
The most interesting and reliable method for checking the breakdown of the ignition coil is to use a special homemade probe. It helps when the defect is not visible visually, checking the resistance of the windings did not reveal the problem, but there is no way to use an oscilloscope. To make a spark tester you will need:
The manufacturing process sequence consists of the following steps:
How to determine ignition coil breakdown with a spark tester
After a homemade tester has been made to find the location of the penetration, the procedure itself must be performed according to the following algorithm:
Finding a breakdown using a homemade tester
The verification method is simple and universal. With its help, you can not only find the place where the spark “sews” across the body, but also determine the general operating condition of the ignition coil itself.
This is done by adjusting the gap between the spark plug electrode and the wire on the syringe plunger. At the initial stage, a minimum gap is set with a value of about 1.2 mm and gradually increases. The value of the gap at which the spark disappears depends on the engine size, the type and condition of the ignition system and other factors. On average, for engines with a volume of about 2 liters or less, the distance at which the spark should disappear is about 12 mm, but this is conditional. In general, when checking all individual ignition coils, you can simply compare their operation with each other and identify the faulty element, if present.