Let's look at ways to adapt the throttle valve without special tools in garage conditions, tested on many car models - everyone is happy.
Good afternoon dear friends. We continue to deal with the throttle valve. Last time we learned how to independently check the throttle position sensor, today we will see how to independently adapt the throttle position sensor. Let's consider two methods, the first may not work on some cars, the second gives almost 100% results. Most car owners were able to solve throttle problems using these methods.
How to understand that the throttle needs “retraining”
The need for adaptation arises in the following cases:
- Unstable idle;
- High engine speeds at idle or very low on the verge of “about to stall”;
- When replacing the throttle or cleaning it;
- If an error is detected in the control unit;
- When replacing the ECU.
There were cases when, after a long period of inactivity or the onset of cold weather, the engine did not want to start or idle normally. That is, literally the first night of frost, and in the morning the car does not want to work normally. If you do not have special diagnostic equipment and software, you can carry out the adaptation yourself.
At a service station, this service will cost from 700 to 1000 rubles, depending on the make of the car.
Why should you pay money right away if you can try to “train” the throttle yourself?
Method number 1 – dancing with a tambourine, battery and ignition
Warm up the engine to operating temperature. Usually 80-90 degrees is enough and we turn off the engine.
Disconnect the battery and remove the terminal from it. This is necessary to reset the parameters in the control unit. In a simple way - reset the ECU to factory settings. This will allow the unit to retransmit the damper values in the closed position.
We wait five minutes. This is enough for the control unit to be completely de-energized. We connect the terminal to the battery. Don't forget to tighten it to make better contact.
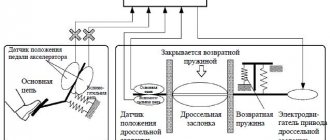
Turn on the ignition and wait 30-40 seconds without touching or pressing anything. At this time, you may hear a buzzing noise under the hood. This adapts the throttle, the motor moves the damper, determining its position and recording this data in the ECU. This is typical only for electrical and electromechanical remote sensing devices.
Turn off the ignition and wait 15 seconds. After this time, we turn on the ignition, wait until all the indicators on the dashboard go out and start the car. We check the engine at idle speed, the speed should be normal.
It may not work on cars: Audi with a 1.8 liter ADR engine, Opel Corsa, Octavia Tour 1.6 akl engine, 4th generation Golf, Audi A4 ADL B5 body. All cars have non-volatile memory, which cannot be reset by removing the terminal from the battery.
If you were unable to teach using this method, write your car model in the comments.
Method No. 2 – Dancing without a tambourine, but with a pedal and ignition
Throttle valve calibration can be divided into three stages:
- Training with the gas pedal released;
- With throttle fully closed;
- Air supply at idle.
First of all, warm up the car engine to operating temperature. We turn off the engine and wait 10 seconds.
Stage one
We make sure that the accelerator pedal is released and nothing is pressing on it. Turn on the ignition for 2 seconds and turn it off.
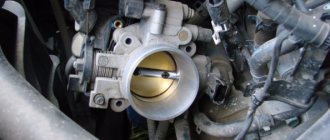
The throttle valve is a key element of the engine power system. It regulates the amount of air supplied to the cylinders, which, in turn, affects the idle speed and the number of revolutions. From time to time, the operating mode of this part changes, so it is necessary to adapt it. Moreover, you must first clean the damper, otherwise all efforts may be useless. Unfortunately, not every motorist knows how these procedures are carried out, although in fact they are not anything complicated.
Re: Throttle adaptation for TOYOTA COROLLA 2007, how to do it correctly
You just need to turn on the ignition for 90 seconds and then start the engine. In difficult cases, when the adaptation error remains, the following algorithm can help: The ignition is turned off. Disconnect the plug from the throttle valve connector. Turn on the ignition for 90 seconds. Start it up. Let him work a little. 20-30 seconds is enough. Turn off the ignition. Reconnect the throttle valve connector. Turn on the ignition for 90 seconds. Start it up. If this doesn’t help, then it’s not a problem with remote sensing, you need to look towards the computer.
Yes, there is another option to simply drive in different modes; it often happens that after flushing the throttle valve, the car is moping, the speed is wandering, etc.
Topic information
Users viewing this topic
This topic is viewed by: 1 (users: 0, guests: 1)
Source
Removing the throttle
The throttle mechanism must be removed before cleaning and training. This is quite easy to do on a Toyota Corolla E120 and E150. Since 2002, the manufacturer began installing 1.6-liter power units on all cars in the series, so the dismantling process is the same for them.
The order for the Corolla Fielder is somewhat different, since the station wagon appeared in 2000 as a kind of offshoot from the main series. Nevertheless, the difference is insignificant, and it lies only in the principle of operation of the throttle, which is mechanical, so there is no need to look for an electronic sensor.
On later models, starting with the 2008 Corolla, the systems were unified and all powerplants now feature electronic throttle.
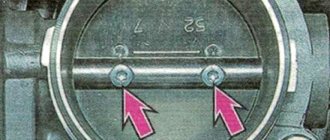
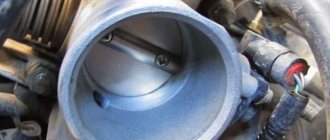
Under the hood, the engine is located openly, so finding the necessary elements is not difficult. Those drivers who are getting acquainted with the engine for the first time and do not know what this or that component looks like can see many photos on the Internet that show in detail all the external features of this or that part. The first step is to remove the air filter pipe, which is located on the left side of the power unit and on the right of the gas distribution mechanism. To disconnect the throttle itself, just unscrew the four bolts that secure the part to the timing belt. Now you can start cleaning the throttle body of the Toyota Corolla 150, which will be the same for the 120 models.
Necessary tool
To clean the throttle valve, you will need to remove the assembly from the power unit. To do this you will need to prepare the following tools and material:
- crosshead screwdriver;
- pliers;
- open-end and ring wrenches for 10, 12;
- socket heads for 10, 12 with ratchet and extension;
- drill with a diameter of 6 mm, drill;
- bolts size 5x20 – 3 pcs;
- brand of antifreeze used in the power unit, in an amount of 200 ml;
- idle air valve gasket (article 22215-7A680);
- throttle body cleaning fluid;
- WD-40.
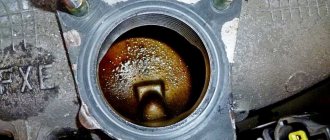
Cleaning the throttle valve
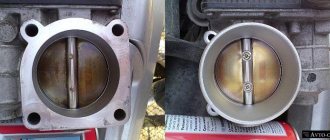
First of all, to clean the part you need to buy washing liquid for the carburetor. It costs about 200–300 rubles per can, so you don’t need to worry about the cost of the issue. In addition, you will need a dry cloth that should not leave any lint. So how do you clean your throttle body? Everything is very simple.
You need to spray the purchased liquid onto the part and gently wipe it with a rag. It is worth repeating the procedure several times until the dirt and deposits are completely removed.
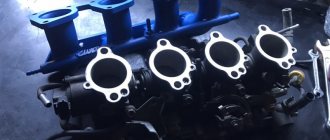
Many motorists ask the question: “We clean the intake manifold, but engine performance does not improve. What are we doing wrong? The fact is that this part does not need to be touched at all. Of course, extra flushing will not cause harm, but there is no need to waste time on it. The deposits formed in the collector are insignificant, so they do not interfere in any way.
How often should you clean your throttle body? It is impossible to answer this question with an exact number, since it is recommended to carry out this procedure every time the engine oil is changed. Some people do this twice a year, and others once every two years. After how long the lubricant is changed, the same time it needs to be changed.
Throttle valve adaptation
After the driver has successfully cleaned the part, you need to reassemble the entire mechanism in the reverse order, and then proceed to the main procedure.
Training should only take place if a number of preconditions are met. First, the power unit needs to be warmed up to operating temperature. Then you should turn off all electronics (headlights, DRLs, audio system, etc.). The car must be on a flat surface, since adaptation will require moving the gear lever to neutral.
After the car has been prepared, training should begin. First, you need to disconnect the battery terminal for 5 minutes. After waiting 5 minutes, you need to return it to its place. Next, the ignition is turned, but the engine itself does not need to be started. After all the indicators on the dashboard light up, you need to wait 30 seconds.
Leaving the ignition in place, you should again disconnect the terminal from the battery for the same time, then return it to its place, start the engine and wait 15 minutes.
As a result, the idle speed will be adjusted and the air supply will be normalized.
Adaptation of throttle control for TOYOTA COROLLA 2007, how to do it correctly
Hello forum users, can you tell me how to properly adapt the throttle, this option did not help
1. Disconnect the battery terminal for 5 minutes. 2. Reconnect the battery terminal. 3. Turn on the ignition (the indicators on the dashboard should light up), but do not start the car. 4. Wait approximately 30 seconds. 5. Without turning off the ignition, remove the battery terminal for 5 minutes. 6. Connect the battery terminal and start the car. 7. Without changing anything, wait about 15 minutes. Step by step the speed will drop to normal
Fuel system or dirty intake?
When mentioning a dirty intake, many drivers immediately begin to suspect the fuel injectors for all the troubles. It must be said that such a fear exists, but, alas, it is not always confirmed. Let's first look at the symptoms associated with a faulty fuel system and a dirty intake. So, if the fuel system in a car is faulty, the following problems may occur:
- difficult starting;
- “triple” of the engine, both at idle and while driving;
- significant reduction in traction;
- slow speed increase;
- the car may stall frequently;
- The “Check Engine” icon appears on the dashboard.
Not a small set of problems, is it? With a faulty fuel system, all of these problems can occur individually or all together. However, such malfunctions are typical not only in the case of a faulty fuel system, but in 70% of cases, if several of the symptoms listed above are present, the problem lies in a faulty fuel pump or fuel injectors. This problem is difficult to solve on your own, because this will require the help of a qualified specialist and diagnostics of the electronic control unit (ECU) using a special scanner.
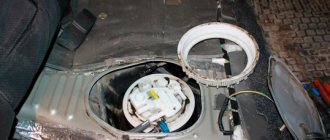
The problem with a dirty inlet is much easier to solve; for this you do not need to disassemble the fuel rail, etc., it will be enough to unscrew a few screws, disconnect the electrical wiring and remove several pipes. It is also worth noting that the problem of “dirty intake” is not displayed on the dashboard by the “Check Engine” indicator, but this only happens if the sensors (TPS and MAF) are working properly.
Let's look at the symptoms associated with a dirty intake:
- high idle speeds at the time of start-up, which do not fall below a certain level (usually the speeds do not fall below 1200-1500, less often - 900-1100);
- increased fuel consumption (can reach from 0.5 to 1.0 liters, depending on the condition of the engine);
- poor response to the gas pedal “the car stalls, does not drive at full power.”
Remember that if similar symptoms appear on your car, but the “Check Engine” warning light does not light up on the dashboard, and scanners do not detect errors during diagnostics, in 95% of cases the problem lies in a dirty throttle valve.
Adjustment (manual) KXX
Good afternoon, good night (underline as appropriate).
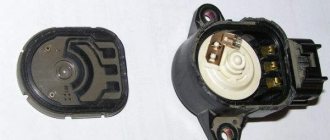
I decided to change the fuel filter, clean the BDZ, injectors and IAC. 1. Changed the filter. 1. I removed the BDZ, cleaned it of THREE different sealants and dirt. 2. I removed the sensor winding from the metal part of the IAC (I realized that I got too excited, cleaned it, and put it on the eye using the old traces. The sensor I have is the same as in the picture, modification from 04.1997. The cover of the sensor shaft is marked in red (I also managed to remove it). 3. I took off the intake manifold cover - for some reason there was a lot of oil there (the engine eats oil), I cleaned everything - is this normal? 4. I removed the fuel rail with injectors, cleaned the injectors, when installing rubber bands on them - it turned out that the rubber bands that go to the fuel rail are the same as old ones, and those in the manifold are much weaker than the old ones (very loosely put on the injector and manifold) is this normal? 5. After installing all the parts back, the car started up, rpm 1600, 2000, after five minutes of work it dropped to 1000. You need to teach the computer to adjust the valve XX with a jumper in the diagnostic connector!
Today I bought M5 hex bolts, tomorrow I will sharpen M4 bolts from them to replace the old ones (original bolts with slots for a PENTAL-sided screwdriver! They were not originally made to be dismountable). On old XX sensors the winding is slightly different; it has two screws for the cross. Mine, like the old sensor, has the ability to rotate the sensor winding at a certain angle by loosening the mounting screws.
Tell me how to correctly adjust the position of my sensor and train the computer. (Starting with a jumper and turning the sensor until the speed reaches XX (as indicated in the book - 580+/-50) without a tachometer is a little problematic, the price of the tachometer division on the tidy is 250 rpm.) Are there alternative methods?
Look in the book, after disconnecting the sensors from the remote control, the computer does not know their settings. Probably after this procedure he tests them in different modes and selects the optimal ones. In general, forced remote control training is carried out by closing a jumper in the diagnostic connector.
Intake malfunctions, what to do and what to do?
Typically, malfunctions associated with the throttle valve on the Toyota Corolla 150 occur at high mileage (over 100,000 - 120,000 km). However, there are cases when malfunctions of the throttle assembly occur at short distances (around 60,000 km), in which case the causes of these malfunctions may be:
- a defective part in the throttle assembly (TPS - throttle position sensor) - practically never occurs;
- the so-called “throwing” of the throttle assembly (from the cylinder head side) with exhaust gas products due to the crankcase ventilation system is a common problem;
- the use of a low-quality air filter or its contamination (due to non-compliance with maintenance) is rare.
If problems arise related to a malfunction of the throttle assembly, do not panic ahead of time, because these problems can be easily solved with your own hands; you just need a little time and tools. However, before starting to disassemble the throttle assembly, we first of all strongly recommend diagnosing the electronic control systems (either at a service center or independently using a scanner).
And we warn all those who dare to repair the throttle assembly with their own hands that our editors are not responsible for your actions! You perform all work at your own peril and risk!
The ways to solve problems are as follows:
- with all sensors in working order (TPS and MAF), the throttle assembly is removed from the car, then washed, after which it is installed back and adaptation/learning of the throttle valve is performed;
- if the TPS sensor is faulty, the throttle assembly should be replaced with a new one (since the TPS sensor is installed directly in the throttle body body);
- If the MAF sensor is faulty, it should be washed or replaced with a new one.
The functionality of the sensors can be checked using a scanner; if there are no errors, it can be additionally checked using a multimeter/oscilloscope. More detailed information about sensor indicators can be found in the vehicle manual.
- throttle assembly assembly (with TPS): used - from 3000 rubles, new - from 6500 rubles;
- Mass air flow sensor (MAF): used - from 1500 rubles, new - from 4500 rubles.