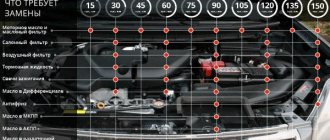
f2
The location of the lamps in the rear lamp of Lada Priora cars produced since 2013 with sedan and hatchback bodies: 1 - turn signal lamp;
2 — fog light lamp; 3 — reversing lamp; 4 - LED block responsible for side lights and brake signal. Location of lamps in the rear lamp of Lada Priora cars produced since 2013 with sedan and hatchback bodies: 1 - turn signal lamp; 2 — fog light lamp; 3 — reversing lamp; 4 - LED block responsible for side lights and brake signal
The location of the lamps in the rear lamp of Lada Priora cars produced since 2013 with sedan and hatchback bodies: 1 - turn signal lamp; 2 — fog light lamp; 3 — reversing lamp; 4 - LED block responsible for side lights and brake signal
Comments
Alexei:
Which lamp should I insert into the brake
light of Lada Priora 21/4 or 21/5?
Teddy Bear E:
Sandro, thank you for the video! Helped!
Maga Aliev:
handsome guy helped
Meirkhan Mihon:
thanks to the author
stason73rus:
But my brake lights on the Priora do not light up, but
the brake light on the rear window is on, the fuse is fine.
what could be the reason? Thanks in advance. marina korshikova:
Sandro, handsome, I watch your videos regularly, they help a lot. I’m just sorry for your viburnum, you did so many experiments on it.
Andrey M:
Thank you, this video was very useful today!
rc models:
sell me the speakers
Denis Denis:
Remove the headlight to change the light bulb!
Gray matter:
Is it possible to touch the light bulbs with your hands? or am I confusing something
Makarov Alexander:
on Kalina1 sedan also
f1
The location of the lamps in the rear lamp of a Lada Priora car produced before 2013 with a sedan body: 1 - reverse lamp;
2 — side light and brake signal lamp; 3 — turn signal lamp; 4 — fog light lamp Location of lamps in the rear light of a Lada Priora car produced before 2013 with a sedan body: 1 — reverse light lamp; 2 — side light and brake signal lamp; 3 — turn signal lamp; 4 — fog light lamp
The location of the lamps in the rear lamp of a Lada Priora car produced before 2013 with a sedan body: 1 - reverse lamp; 2 — side light and brake signal lamp; 3 — turn signal lamp; 4 — fog light lamp
The work of replacing lamps is shown on the left headlight of a Lada Priora car produced in 2013. On the right lamp we perform the same operations.
To replace the lamps in the rear light, simply unscrew the nuts that secure it and move the light away from the body without disconnecting the light's wiring block from the rear wiring harness block.
Video on this topic
how to remove the rear light on a Lada Priora
Lada Priora station wagon: replacing the tabs in the headlights
I'll show you how to change the light bulbs in the headlights of a Priora station wagon
.
Removing the Priora station wagon lamp
Removing the rear light of a Priora station wagon
VAZ 2171.
how to remove the rear light on a Lada Priora , Everything is done quite simply. We bend the upholstery on the side to be removed.
LED in Priora, replacing stock lamps in reversing headlight
LED reverse lamps P21W on led.
Lada Priora station wagon : replacing the tabs in the headlights
I'll show you how to change the light bulbs in the headlights of a Priora station wagon.
Installing LED rear lights on Priora
Online store EXELET.RU Tolyatti, st. Ofitserskaya 12V, office 206 Tel https://exelet.ru PRIORA on Drive2.
Replacing a flashlight on a Priora
Replacing the headlamp on a Priora.
How to change the brake light bulb in the rear lights of a Priora hatchback
Our group in contact SIMPLE OPINION https://vk.com/ProstoeMnenie Become a YouTube Partner https://youpartnerwsp.com/join?9658 In the video.
Replacing rear light bulbs on a Priora | How to change turn signal and brake light bulbs on a Priora
Replacement of turn signal lamps, side lights, brake lights, rear lights on a Priora. We take the Lada Priora from the burnt one.
Replacing rear light bulbs on a Priora
Details on how to change the brake light, tail light and turn signal lamps in the tail light of a Priora hatchback.
Replacing the brake light bulb, tail lights and turn signals on Priora Hatchback and Sedan
Video review of replacing light bulbs in the rear lights on a Lada Priora hatchback.
The design and arrangement of the rear lights on a Lada Priora car are such that if it is necessary to replace one of the failed bulbs, you have to remove the light completely. It is logical to first consider the procedure for removing the rear light using the example of a Priora in a hatchback or sedan.
DS4 4556555
Pressing the lamp, turn it all the way counterclockwise and remove the lamp from the socket.
Pressing the lamp, turn it all the way counterclockwise and remove the lamp from the socket.
Pressing the lamp, turn it all the way counterclockwise and remove the lamp from the socket.
We install the new PY21W lamp in the reverse order. In this case, two protrusions, located asymmetrically relative to the axis of the lamp, must fit into the corresponding grooves of the socket.
We carry out the operations for replacing the remaining lamps in the same way. In addition to the black “ground” wire, each lamp socket is connected to other wires of different colors. In order not to confuse the lamp sockets when installing them, the corresponding wire colors are indicated on the lamp body.
Layout of the restyled version
In the Priora, little has changed after restyling - small details invisible to the eye, the center console, the dashboard. The headlights have also changed - they have become quite a bit larger. The principle of their design has remained virtually unchanged, except that there is now one plug at the back to isolate the contacts.
The design of the headlamp unit has become more complex: now in place of the usual high beam lamp there is a light consumable, combined with daytime running lights, which switches between operating modes. PTF fog light bulb, everything is also mounted depending on the configuration.
DS4 45565557
For example, on the body of the light, next to the lamp socket socket, there is an inscription “orange”, corresponding to the orange wire of the lamp socket.
For example, on the body of the light, next to the lamp socket socket, there is an inscription “orange”, corresponding to the orange wire of the lamp socket.
For example, on the body of the light, next to the lamp socket socket, there is an inscription “orange”, corresponding to the orange wire of the lamp socket.
After replacing the lamp, install the rear light in the reverse order.
Changing the lamps in the rear light of Lada Priora
Removing and installing a rear light on a Priora
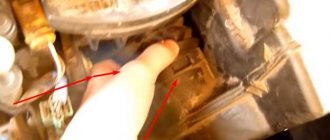
So, first of all, we open the trunk lid, and on the inside we find a special technological window with Velcro that needs to be opened. It is through this that you can get to the flashlight mounts.
It is worth noting that from the inside it is not mounted with bolts, but with special plastic screws that secure the lamp to the car body. There are three of them in total, of course, each of them must be unscrewed. After this, we move the lantern to the side from the outside, as is clearly shown in the photo below.
If it is necessary to replace the rear light, then each of the lamps should be pulled out of the light housing from its rear part. More on this below.
Replacing Priora high beam lamps
It all starts again with removing the battery - you can’t do without it now. The high beam lamp is located a little deeper and is not easy to get to. The sequence of actions when replacing a high beam lamp is as follows:
- We disconnect the rubber cover (it is larger than the one designed to protect the low beam lamp);
- Disconnect the block with wires;
- Unclench the spring clamp and disengage it from the reflector hooks. We release the light bulb.
- We remove the lamp socket from the headlight unit.
H4 car lamp tests
1. Which lamps are the brightest were determined by the Test Lab channel (June 2020). The rating is as follows:
- OSRAM Night Breaker
- Philips X-Treme Vision
- Philips Vision
- Philips Vision Plus
- Philips Longlife Ecovision
- OSRAM U37R
- Narva
- OSRAM Cool Blue
- GE 50440U
Out of the standings:
- MTF Argentum
- OSRAM Super Bright
2. Test of H4 automobile lamps “Behind the Wheel” in the laboratory and on the roads (March 2022):
| Zone III (measuring direction: 0°-0°), OK | Counter. point B50L (measurement direction: 34′ up, 3°26′ left), lx | Counter. point 75R (measurement direction: 34′ down, 1°09' to the right), lux | Counter. point 50R (measurement direction: 52′ down, 1043′ to the right), lux | Notes | |
| Standardized values, lux | 1,00 | <0,60 | >9,60 | >9,60 | |
| Standard Philips H4 lamps | 1,00 | 0,60 | 9,60 | 9,60 | the light is visually white |
| ClearLight X-Treme Vision H4 | 1,00 | 0,34 | 15,30 | 26,50 | the light is visually white |
| Narva Xenon White H4 | 0,64 | 0,22 | 8,00 | 12,40 | light visually blue |
| MTF Light Aurum H4 | 2,04 | 1,00 | 12,88 | 28,40 | the light is visually yellow |
| LED MAS H4 | 1,20 | 1,20 | 1,40 | 1,40 | no cut-off line |
| DLED H4, 270 lm | 0,40 | 0,40 | 0,40 | 0,40 | no cut-off line |
| DLED H4, 900 lm | 7,60 | 4,24 | 7,20 | 5,70 | no cut-off line |
What kind of base is in the Priora fogs ~ AUTOINTERLINE.RU
Societies › Lada Priora Club › Blog › Who installed xenon in fog lights
I'm thinking about installing xenon foglights on my Priorka. In this regard, several questions arose:
1. Who did it, tell me how (links to blog posts are welcome)
2. How much does this business cost?
3. What you need to buy
4. What tasks may arise during operation
5. How difficult is it to do all this and can a new person do it?
Thanks in advance for your help!
Comments 25
you buy h21 xenon in the store. costs about 2 thousand, not bad. take off the bumper. look for a place for the blocks, attach it. insert xenon into the fog lights. connect the wires and enjoy
Is it possible to install it so that the bumper does not need to be removed?
4. What obstacles may arise during operation?
Only one so far, the light bulb is burned out, I can’t buy a new one, I drive like one-eyed)
Replacing the light bulb in the fog light of LADA PRIORA Replacing the light bulb in the fog light of LADA PRIORA
Replacing the light bulb in the fog light of LADA PRIORA
Hi all! This video will talk about replacing the light bulb in the fog light on a LADA PRIORA
How to film...
Test of H11 LED lamps in PTF. Choose which is brighter LED or Halogen
Test of LED lamps h21 in PTF. Choose which is brighter LED or Halogen
Buy Led lamps CL6 H8,H9,h21...
There are no problems. You buy fog lights, auto lights are better, Bosch often sweat, they cost me 1700. You buy a set of xenon lights with an H11 base, our set costs 1700-2000. You buy wiring for connecting fog lights for 500 rubles, if you don’t know anything about electrics, then go to an electrician so that he can connect the wiring and remove the button. Install the fog lights yourself, remove the bumper, unscrew the plugs and screw the fog lights in their place. The ignition units can be screwed to the lower headlight mounting brackets. When connecting fogs, do not forget to connect the ground and do not confuse the polarity.
I think the base would be h21, maybe I don’t understand it naturally, but I had one on the Boche.
I think the base would be h21, maybe I don’t understand it naturally, but I had one on the Boche.
listen exactly, confused, N 11, N7 - in my head
There are no problems. You buy fog lights, auto lights are better, Bosch often sweat, they cost me 1700. You buy a set of xenon lights with an H11 base, our set costs 1700-2000. You buy wiring for connecting fog lights for 500 rubles, if you don’t know anything about electrics, then go to an electrician so that he can connect the wiring and remove the button. Install the fog lights yourself, remove the bumper, unscrew the plugs and screw the fog lights in their place. The ignition units can be screwed to the lower headlight mounting brackets. When connecting fogs, do not forget to connect the ground and do not confuse the polarity.
Thanks for the instructions)
I had a problem, the lamps did not fit into the socket, but Ratfil solved the problem. Now on bumps one lamp turns off, my fault is that the block is not fixed, otherwise everything is trivial there))))
There is nothing complicated, the main thing is that the arms grow from a suitable place))
Manufacturers of lamps for VAZ 2114
Since lamps with an H4 socket are used in headlights of many models from different manufacturers, all manufacturers of car lamps produce such lamps. Among them are the following companies:
- A world-famous Dutch company, known for its low prices and good quality products;
- A German company with a long history and rich technological experience;
- Narva. This is another manufacturer from Germany, known for the quality and durability of its products;
- Bosh. Another German company that does not need any special introduction;
- Company based in Hong Kong and Germany. Produces a wide range of reliable lighting equipment.
The above list can be continued for a long time. Today, a big name of a manufacturer is not a guarantee of high quality and reliability. There are a lot of fakes on the market, which are not only cheap, but also completely inconsistent with the original. Therefore, it is better to make a choice based not on the name, but on the characteristics of the light bulbs.