A failed cylinder head gasket is the reason for the immediate cessation of operation of the vehicle, otherwise the consequences for the engine can be disastrous. The defects discussed below can occur in both diesel and gasoline engines. What role does the cylinder head gasket play, and why is it so important to diagnose a breakdown in a timely manner?
What it is
The gasket is used to seal the contact point between the cylinder head and the block itself. Some people don't know the difference between valve cover and cylinder head gaskets. These are different parts, although they are located nearby.
What is a cylinder head gasket
The peculiarity of the seal is that it is capable of performing three important functions at once - sealing the gas distribution and oil systems, as well as the car’s engine cooling system. Therefore, the gasket must be strong enough and there are such high requirements for it.
Cylinder head gasket
Note! The cylinder head gasket must be changed for all types of engine repairs, since it is a one-time use item.
Functional purpose
It is important to understand here that gaskets are present on all modern internal combustion engines, including motors such as ZMZ 403 or YaMZ 238. Not always and not everyone is ready to change the element with their own hands. Some people find it easier to pay specialists. The replacement cost is not the most enormous, since the phenomenon associated with wear and damage to the gasket is quite common.
Classification
There are three types of seals, classified according to the material of manufacture. These are non-asbestos, asbestos and metal gaskets. Let us now consider each of the types separately.
Non-asbestos
Such seals are characterized by low shrinkage. In addition, non-asbestos material has high recoverability, which is important for specific conditions of use.
Non-asbestos gasket
Asbestos
The product has much in common with non-asbestos gaskets in terms of characteristics. Asbestos seals have high elasticity, heat resistance and elasticity. Such gaskets are often used when replacing.
Asbestos gasket
Metal
Metal seals are considered the most effective and high-quality type of cylinder head gaskets. When using them, the pressure is distributed evenly over the entire plane of the junction of the block and the cylinder head.
Metal cylinder head gasket
Articles on the topic
How to change spark plugs
Changing the automatic transmission oil
After replacing the cylinder head gasket, how important is broaching?
After replacing the seal, the driver’s first priority is to monitor the operation of the power unit. The engine must operate stably and without interruptions, and its temperature must not exceed permissible levels. It is advisable to carry out cylinder head pulling 20-30 km after replacing the asbestos material. The head is pulled much earlier if, after the work has been carried out, there is leakage of engine oil at the junction of the unit with the cylinder block during vehicle operation. For these purposes, they are armed with a torque wrench and do all the tightening work with the force recommended by the motor manufacturer.
Replacing a cylinder head gasket is not an easy job for a novice driver, but if you arm yourself with the appropriate equipment and enough free time, anyone can do the whole job on their own. Pay attention to the quality of the new cylinder head gasket, because the further trouble-free operation of the car depends on its properties. Even if there is no need to replace it, but it is planned to remove the cylinder head for any work, for preventive purposes, replace the seal with an original copy or an analogue from a reputable manufacturer.
In what cases is replacement necessary?
If we talk about the cylinder head gasket, it does not have a warranty period, since the service life of the part actually depends on several factors (driving habits, product manufacturer and engine condition). Therefore, the need for replacement may be indicated by symptoms identified by the driver during periodic checks or maintenance.
Signs of cylinder head gasket wear
There are many telltale signs of seal wear. Let's look at the most common of them:
- sudden overheating of the engine;
- decrease in coolant level in the system;
- the appearance of foam or emulsion on the oil dipstick;
- an increase in pressure in the cooling system lines (the pipes become too hard);
- traces of oil leakage at the junction of the block and cylinder head;
- antifreeze boiling after prolonged engine operation;
- problems with the operation of the stove (the operation of the heat exchanger is disrupted by escaping exhaust gases).
Signs of a broken cylinder head gasket
On a note! It is also necessary to change the cylinder head seal in cases where white smoke begins to come out of the engine compartment.
Montblanc Barracuda roof bike rack: review, owner reviews
- Antifreeze quickly leaves the cooling system, but there is no leak;
- the motor often overheats;
- the oil level in the crankcase rises;
- bubbles are visible in the expansion tank;
- white thick smoke from the exhaust;
- cylinders work intermittently;
- there is a rapid change in color of the coolant;
- the motor runs jerkily;
- the car accelerates poorly;
- fuel and oil consumption increases.
Symptoms appear separately or complexly, combining several symptoms at the same time. This is not a guarantee that you can get by with little damage by simply replacing the gasket. But you will definitely have to dismantle the head and carry out visual diagnostics.
Diagnostic features
Everything mentioned above is circumstantial evidence. But to confirm the diagnosis, detailed diagnostics are required. Below are sequential instructions.
- Start the engine and inspect it for smoke leaks. Particular attention should be paid to the gaps between the block and the cylinder head.
- Inspect the oil filler neck. If the seal breaks, reddish traces of the emulsion will be visible on the neck.
- Check to see if white smoke is coming from the muffler. The presence of white smoke from the exhaust system is usually indicated by a burned-out cylinder head gasket. The smoke is most often sweet.
- Place a balloon on the neck of the radiator. If the ball inflates while the engine is running, this indicates bubbling of the antifreeze and, accordingly, a violation of the integrity of the seal.
- Check engine compression. If the level is below normal, then the gasket probably needs to be changed.
Condom for checking cylinder head gasket
After diagnostics, you can easily determine whether the cuff needs to be replaced. Then everything is done according to the instructions.
Why does the cylinder head gasket wear out and how to check its condition?
Without exaggeration, the seal can be called the most important element of the cylinder head. There is no need to save money on replacing the gasket, because such attempts will ultimately result in serious engine damage. It is important to understand that this is a disposable material that requires replacement after any manipulation of the cylinder head. The following types of gaskets are known today:
- Non-asbestos – they are characterized by low collapse and high reproducibility
- Asbestos - reliable, plastic, able to withstand the high temperatures that prevail in the car system
- Metal ones are the most expensive type, but this makes them the most reliable. Many experts recommend installing them instead of conventional
It is almost impossible to visually assess the condition of the cylinder head gasket. To assess the ability of its further functioning, the factory and current fuel consumption for every 100 km are compared, and engine operation is diagnosed. Short trips in a car with a worn gasket can lead to serious consequences: the engine of a car with low mileage, but with an unsuitable cylinder head seal, in advanced cases, can only be revived through major repairs.
We note the following reasons for premature wear of the seal:
- Incorrect installation of elements during cylinder head assembly
- Prolonged overheating of the motor
- Operating a vehicle using low quality fuel
Engine overheating is the most common cause of gasket failure. An increase in the operating temperature of the power unit is observed during cooling system malfunctions and detonations. Even asbestos material cannot withstand critical temperatures, losing its strength, elasticity and many other important characteristics over time. The loss of its functional properties leads to blowing and complete destruction of the material.
How to replace a cylinder head gasket
The process of replacing the gasket can be divided into several stages: preparation, collecting the necessary tools for work and replacing the seal. Now let's look at each of these stages separately.
Replacing the cylinder head gasket
Preparation
The technology for replacing the gasket does not depend on the car model, with the exception of some features (tightening torque of the mounting bolts). But all information can be found in the instruction manual or on the Internet. It is advisable to clean all bolts before unscrewing so as not to damage the splines. Also, if necessary, they need to be treated with a special agent to make them easier to break.
Preparing to replace the cylinder head gasket
Note! All attachments must be removed before replacement. The cylinder head should also be removed
Tools for work
What is needed for the job, besides the cylinder head gasket itself? First of all, before starting repair work you should prepare:
- torque wrench;
- a clean rag;
- container for draining waste liquid;
- flat and Phillips screwdrivers;
- set of wrenches (socket and wrench).
Tools for replacing cylinder head gasket
You also need to prepare a set of new cylinder head bolts in case the old ones are too worn out. Once everything is at hand, you can start replacing.
Step-by-step instructions for replacing the cylinder head gasket
The instructions below describe in detail the process of replacing the cylinder head gasket. If this is followed, the complex and lengthy replacement process will be within the capabilities of even a beginner.
Step 1: Raise the hood and get your tools ready for the job. This is what the engine compartment looks like before disassembly.
Engine compartment before disassembly
Step 2: Remove the plastic protective cover and set it aside. You need a key for this.
Removing the protective cover
Step 3: Remove the timing belt and inspect it for integrity.
Removing the timing belt
Step 4. Drain the antifreeze into a prepared container. This could be a cut plastic bottle or canister. Make sure that liquid does not get on the car body.
Draining antifreeze into a special container
Step 5. Remove the cylinder head cover bolts.
Unscrewing the cylinder head cover bolts
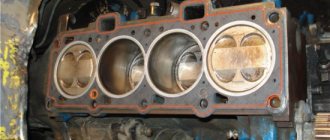
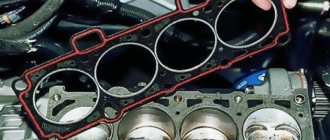
Step 6. As you can see in the photo, the gasket is worn out and requires replacement. Take it off.
Worn cylinder head gasket
Step 7. Remove the cylinder head and carefully place the part on a table or other flat surface.
Removing the cylinder head
Step 8. Thoroughly clean the seat of any remaining oil.
Cleaning the seat
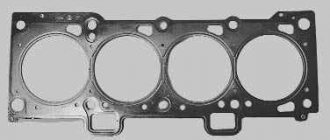
Step 9. After cleaning the surface, install a new gasket.
Installing a new cylinder head gasket
Step 10: Install the cylinder head using a torque wrench. You need to tighten it carefully, according to the manufacturer's recommendations.
Cylinder head installation
Step 11. Install the casing and all previously removed parts in reverse order.
Installing the protective cover
Replacement technology
Replacing the cylinder head gasket is a simple process, but quite labor-intensive, because it requires dismantling many connections in a certain sequence. Many people know how much a replacement costs at a service station and therefore prefer to do this work themselves.
Required tools:
Torque wrench
- torque wrench;
- a set of keys;
- set of socket heads;
- "Torx"
- screwdriver.
Socket head
Stages
For those who do not know how to change and select a cylinder head gasket, we will describe the entire process step by step. We will also tell you why it is important to follow the bolt tightening order.
This video shows how in a simple way you can check the tightness of the cylinder head system and the integrity of all systems.
- We de-energize the system by disconnecting the negative terminal of the battery.
- We set the piston of the 1st cylinder to TDC.
- Drain the coolant.
- We reduce the pressure in the system.
- Disconnect the muffler intake pipe from the manifold.
- Remove the cylinder head cover.
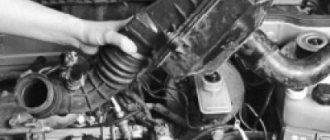
- Having disconnected the wires and loosened the clamps, remove the pipe with the air purifier housing.
- After unscrewing and loosening the nuts, move the bracket to the side.
- Disconnect the cooling system hoses.
- Disconnect the throttle linkage.
- Disconnect the wires from the oil sensor in the crankcase of the power unit.
- Disconnect other wires and connectors.
- Remove the cover and belt.
- We fix the toothed pulley of the shaft from possible rotation, and unscrew the bolt on which it is attached.
- Carefully remove the pulley from the shaft, making sure that the seal is not damaged.
- After unscrewing the bolts and nut, remove the cover located at the back.
- Remove the remaining hoses, pads and wires.
- According to the diagram, use a Torx wrench to loosen the 10 cylinder head bolts.
- Completely unscrew all the bolts.
- You need to remove it with washers.
- We dismantle the head.
- Now you can remove the cylinder head gasket.
- Immediately measure the bolts; if they are too stretched, it may be better to change them.
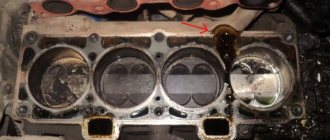
- Clean the surfaces that will come into contact with the gasket.
- Now you can install a new gasket. When installing, make sure that the hole through which the oil passes is located between the third and fourth cylinders.
- We install the cylinder head, and you need to make sure that the shafts are at top dead center.
- Tighten the bolts, observing the following diagram, otherwise there may be unpleasant consequences that will cancel out all the work as the tightness will be broken.
- Also respect the moment. It is individual for each car model.
- Install the removed hoses, tubes, pads and wires in the reverse order of removal.
- This completes the replacement.
Removing the pipe and air barrier
Unscrewing the clamps
Attenuation circuit
Bolt measurement
Installing a new
Tightening diagram
Be sure to observe and check while driving how the system works and functions and whether tightness is ensured and whether there are any negative signs.
Consequences of untimely replacement
It is undesirable to operate a car with a worn or burned out cylinder head gasket, as this can lead to serious consequences. For example, oil will get into the cooling system, causing its operation to be disrupted. The motor will not be able to cool as needed. The engine power may also decrease, it will begin to stall, and sometimes not start at all.
Late replacement of the cylinder head gasket
If antifreeze gets into the cooling system, the properties of the oil will change, which will lead to a decrease in the efficiency of lubrication of engine parts. In turn, this will lead to increased wear of rubbing parts. Driving a car with a damaged gasket will certainly lead to engine failure, the repair of which will cost much more than replacing the seal.
Signs and causes of malfunction
It is possible to give a 100% guarantee that the element has failed only upon dismantling and visual inspection. Usually, wear of the seal between the cylinder head and cylinder head will manifest itself in the form of symptoms, potentially indicating more serious problems.
In practice, replacement is performed on many machines. Mainly on cars that have been in use for a long time. Let me give you a few examples:
- VAZ 2106;
- VAZ 2107;
- Nissan Maxima;
- Opel Zafira;
- Chevrolet Niva;
- VAZ 2110;
- 2114;
- VAZ 2112;
- Daewoo Nexia;
- Renault Logan;
- Hover M4;
- Peugeot 406;
- Reno 19;
- BMW E39;
- UAZ Hunter, etc.
Moreover, wear and breakdown of the gasket are equally typical for engines with 8 valves and 16 valves. There is no fundamental difference in terms of the behavior of the BC gaskets between them.
However, the cost of a new part can vary significantly depending on the make, model of the car and the specific engine installed.
There are several reasons why the seal needs to be changed:
- there was oil in the cooling system;
- coolant has entered the oil system;
- antifreeze got inside the combustion chamber;
- Exhaust gases enter the cooling system.
This is all what can happen precisely when the seal between the two main structural elements of the engine is broken.
The symptoms are as follows:
What is a cylinder head
Device diagram
A car engine can be affected by a wide variety of external aggressive factors, both mechanical and chemical. To prevent this, the cylinder block is closed with a special cover. It is most often made of cast iron or a special aluminum alloy and has a very complex shape. After the casting process, this plate undergoes a special process that artificially ages it to relieve stress on the outside. The cylinder head has a rather complex technical design and consists of many small parts:
- cover, which provides protective functions against mechanical contamination; there is a small hole in the cover through which oil should be poured;
- gaskets with which the cover is attached to the block, sealing the attachment point;
- special chambers designed for combustion of incoming fuel;
- various holes for spark plugs and injectors.
Replacement parts
In various situations of improper operation of the vehicle or untimely maintenance, breakdowns may occur in the cylinder block, requiring lengthy and expensive repairs. When servicing your car yourself, the process of tightening the fasteners deserves special attention, since under-tightening or over-tightening can easily damage the cylinder head gasket.
Purpose
The function of the cylinder head gasket is to provide a tight seal between the cylinder block and the head. It works in difficult conditions: the engine temperature varies from positive hundreds of degrees in operating mode to negative tens in winter when parked. Aggressive technical fluids: oil and antifreeze attack its surface. It is not surprising that periodically there is a “breakdown” and it has to be changed.
Important nuances of the replacement procedure
I can’t say that the car owner himself won’t cope with this task. There are a number of clear examples where a motorist, after watching the video, changed the gasket himself and did everything no worse than the service station technicians.
But you should be prepared for the difficulties and duration of the operation. Having experience will only be beneficial, but lacking it can negatively affect the results.
Before replacement, several preparatory work is carried out. Namely:
- the car is de-energized;
- all antifreeze is drained;
- the timing belt or chain is removed;
- all internal combustion engine elements associated with the cylinder head are disconnected;
- The cover itself is removed.
I’ll say right away that there are no universal instructions. Each engine, even within identical cars of an identical year of manufacture, is accompanied by special instructions for replacing the gasket. You need to rely strictly on it, and nothing else.
Having removed the block head, the old sealing gasket is dismantled and checked for visual defects. If the integrity is truly broken, this is not yet a reason to rejoice and start replacing. There are various reasons why the gasket became deformed. First you need to determine why this happened, eliminate the provoking factor, and only then change the part.
It is important to carefully inspect the surfaces of the cylinder head and cylinder head with which they are adjacent to each other during assembly.
Even when the gasket turns out to be intact, and the reason for the leak is different, the old seal cannot be reused. The element has already lost its shape, and therefore a strictly new spare part of the appropriate size and dimensions is needed.
Also, as part of replacing the gasket, the mounting bolts are changed. They constantly work under load and are tightened under the influence of enormous force. As a result, during operation, the metal is pulled out and the fastening geometry is lost.
This is interesting: Support bearing - what is it
During reassembly, a specific tightening sequence is followed. Plus, the applied force is strictly dosed. In this case, you cannot do without a torque wrench. It is definitely included in any tool kit for a motorist, and is an integral part of those who prefer to repair and maintain their cars with their own hands.
Have you ever encountered a blown gasket? How did you fix this problem and were you able to cope with the replacement yourself?