The valve clearances on the Renault Logan 1.4, 1.6 (8 valves) engine are adjusted with the correct position of the piston at the top dead center (TDC) of the compression stroke of this cylinder..
There are no special marks by which you can accurately set this position on the engine. But you can get your bearings. There is nothing new compared to all internal combustion engines. The first cylinder is located from the flywheel.
TDC of the first cylinder
It is necessary to adjust the camshaft so that the piston of the first cylinder is at TDC. The camshaft cams must be positioned accordingly so that both valves are closed. This will be the moment of compression. That is, the cams should be positioned with their protrusions down; the rocker arms will be free and will not put pressure on the valves.
You can check the correct position by looking at the camshaft pulley. Mark F will be located approximately as in the photo.
More precisely, the piston is adjusted to TDC by touch using a screwdriver or a thin metal rod. If you insert a rod into the spark plug hole and turn the engine from back to front. The maximum output of the rod will be the required position of the piston at TDC. In this position, the valves of the first cylinder are adjusted.
Adjusting the clearances in the valve drive on Renault Logan 2
Work is performed only on a 1.6 8V (K7M) engine. On the 1.6 16V (K4M) engine, hydraulic compensators are installed in the valve drive, so adjustment of thermal clearances is not required. We check and adjust the valves on a cold engine (temperature 20-25 'C).
To complete the work, you will need a set of flat feeler gauges and a special key for adjusting the valves. When installing the cylinder head cover, the gasket must be replaced. If you don’t have a special wrench for adjustment, you can use a 3 mm open-end wrench, a small adjustable wrench, or just pliers.
1. Prepare the car for work and disconnect the wire terminal from the negative terminal of the battery. 2. Disconnect the wiring harness block and high-voltage wires from the ignition coil (see here). 3. Remove the air filter housing (see here).
4. Using a slotted screwdriver, we release the generator wiring harness from the holder at the front of the engine.
5. Using a TORX T30 wrench, unscrew bolt 1 securing the power steering tube. Having released wiring harness 2 from the groove in the boss of the cylinder head cover, we move it away from the cylinder head cover. We remove tube 3 of the canister purge valve from the groove and move the tube to the side.
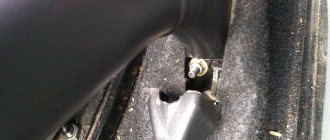
6. Disconnect the crankcase ventilation system hose from the cylinder head cover fitting.
7. Using an 8 mm socket wrench, unscrew the eight bolts securing the cover.
8. Remove the cylinder head cover without removing the ignition coil from it.
Checking the clearances in the valve drive is possible in different sequences. But in any case, the clearances are checked only with the valves closed (the camshaft cams should not press the rocker arms). In order not to accidentally make a mistake, it is more convenient to adjust the valves separately for each cylinder, starting from the first. Cylinder numbering starts from the gearbox side.
9. Using a 18 mm socket wrench with a ratchet (see here), turn the crankshaft to its original position corresponding to TDC of the compression stroke in the first cylinder.
When adjusting valves, special precision in setting the position of the crankshaft is not required. Therefore, you can navigate by the camshaft cams when the working surface of the rocker arm is opposite the cylindrical surface of the cam - the valve is closed.
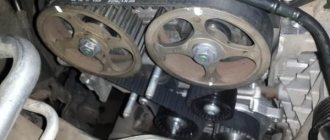
If you swing the rocker arm at the same time, you will feel a gap. When the cam tightens the rocker arm (or just starts to tighten), it will be impossible to swing the rocker arm. The initial position of the crankshaft to begin adjustment will be when the rocker arms of the valves of the first cylinder are not pressed by the cams. If it is difficult to navigate by the cams, then you can set the crankshaft to its original position using the mark on the camshaft timing pulley. To do this, you need to remove the upper timing belt cover and turn the crankshaft until the mark on the camshaft pulley moves to the upper position (see here).
There are four marks stamped on the crankshaft pulley. You can navigate by them by turning the crankshaft 180* from its original position. For convenience, it is necessary to mark mark 2 with a marker, corresponding to the initial position (TDC of the compression stroke in the first cylinder).
When mark 3 is opposite mark 1, the pistons of the second and third cylinders will be in the TDC position. The other two marks on the pulley correspond to a 90* rotation of the crankshaft.
10. Using a set of flat feeler gauges, check the gap in the intake valve drive of the first cylinder.
Valve adjustment Renault Logan
To adjust, you need to loosen the locking nuts of the adjusting screws on the rocker arms of the first cylinder.
Valve clearances Renault Logan 1.6
The intake valve 1-1.15 thick .
The exhaust valve has a gap of 0.25-0.3 mm.
It is convenient to turn the adjusting screw using pliers. After the dipstick is clamped between the adjusting screw by the upper neck of the valve. The lock nut is tightened. The adjusting screw is held in place by pliers.
What tool will you need?
To adjust the valves on Renault Logan, you must have the following components:
- valve cover gasket K7M, article number: 7701471719;
- probes 0.15 mm and 0.25 mm;
- a standard set of tools for car repair (it is advisable to have Torex bits);
- jack;
It is advisable to carry out all work in a warm box. The air temperature when adjusting the valves on a Renault Logan with a 1.6 engine (8 valves) should be at least 20 degrees Celsius. The motor must be “cold”.
The operating procedure of the Renault Logan engine.
That is, after adjusting the first cylinder
The third cylinder is being adjusted.
Then the fourth cylinder.
The second cylinder is adjusted last.
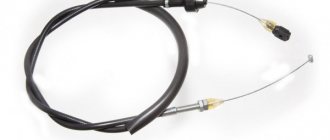
The most convenient way to turn the engine is by the wheel. with 5th gear engaged. To do this, the wheel must be suspended on a jack. In order for the engine to turn over easily, you need to unscrew all the spark plugs.
When changing adjustment from one cylinder to another. The crankshaft should rotate half of its 180 degree rotation. Simply put, the piston of the first cylinder will be at bottom dead center and the piston of the third will be at TDC at the moment of compression. The camshaft will rotate a quarter of its revolution. The camshaft cams of cylinder 3 will face down relative to the rocker shaft.
Then we turn the crankshaft to adjust the 4th cylinder. And the shaft is finally rotated to adjust cylinder 2.
The piston is brought more accurately to TDC using a metal rod or screwdriver. But it will be enough for the fists to turn down.
Useful tips
To make the process of adjusting Renault Logan valves simpler and more efficient, you should follow simple recommendations:
- After the cover is removed, you need to find a special mark made with enamel paint. This will help determine if the cylinder is in the proper position. If the mark is pointing up, the cylinder is at top dead center. You can move the mark to the desired position by rotating the hanging wheel.
- Every half revolution of the right wheel moves a certain cylinder to the desired position. When turning the wheel in the direction of travel of the car, the first, fourth, second and third cylinders are sequentially adjusted. The calculation starts from the flywheel side.
- You can make sure that the piston is in the right position by unscrewing the spark plug and testing it with an aluminum wire.
How long does it take to adjust Renault Logan valves?
Valve clearances on the Renault Logan 1.6 engine are adjusted according to the manufacturer’s recommendations at intervals of 100,000 km of the vehicle’s mileage. It is advisable to carry out this procedure no more than every 60,000 km. If gas is used as fuel, then adjustments are carried out at least every 30,000 km. This is due to the fact that the octane number of the gas is within 105 and the required compression ratio is 11:1. For 95 grade gasoline, the octane number is 83-86, the required compression ratio is 9:1. This indicates that the gas in the combustion chamber does not burn completely. Some of it remains to burn out in the valves and exhaust manifolds. This leads to an increase in combustion temperature. This weakens the structural properties of the materials used in seats and valves. Simply put, they wear out faster when using gas as fuel. Therefore, it is recommended to adjust the valves more frequently. On the question of whether it is profitable to use gas as fuel.
Renault 1.6 (K7M)
This gasoline engine has a long history. It was first installed back in 1995 on Renault Megane/Scenic. The progenitor of the model is the 1.4-liter K7J. The secret of success is the simplicity of the design. Cast iron block, aluminum head, 8 valves and no bells and whistles like a variable valve timing system. Voila, an unpretentious and reliable unit is ready.
The disadvantages of the engine, on which taxi drivers “wind up half a million” on the popular Logan and Sandero, include only increased fuel appetite and the problem of oil leakage through the crankshaft oil seal and valve cover gasket. But this does not prevent the K7M from being one of the best Renault engines in history.
Tuning the Renault K4M 16 valve engine.
Chip tuning
An ordinary engine chip, simultaneously with replacing the exhaust with a catless one, can slightly improve the performance of the engine, +\- 120 hp. It's quite possible to get it. This can be supplemented by installing drivetech 10 phase 270 shafts, a little wider than the standard, it will go a little more fun and give a little more hp. To move forward you need to come up with something else.
Compressor
Exactly like on the K7M or K7J, if you really want, you can attach an RK-23 compressor to the engine and inflate about 140-150 hp. The compression ratio of standard K4M is not too high, it can withstand 0.5 bar. There are no ready-made kits for this engine, but by contacting the manufacturer, they will assemble the required configuration for a specific car. To implement the project, you will need Volga injectors, direct-flow exhaust, phase 270-280 shafts, and to configure all this online you will need an Abit engine control unit.
ENGINE RATING: 4
Advantages and disadvantages of power units
Considerable experience in operating Renault cars with all three types of liquid-cooled engines allows us to draw up a fairly objective picture of their strengths and weaknesses, and in the two models K7J and K7M these characteristics are almost identical, and only the K4M engine has significant differences due to more modern technological solutions, and which one is better is up to the buyers to decide.
Advantages of K7J and K7M:
- low cost and simplicity of engine design;
- reliability: confirmed service life is more than 400 thousand km;
- versatility and maintainability;
- ease of maintenance;
- high torque;
- good “elasticity” of engines, equal to 1.83.
Disadvantages of K7J and K7M:
- relatively high fuel consumption;
- instability of speed when idling;
- the absence of hydraulic compensators in the design, as a result - the need for constant adjustment of the valves (after 20-30 thousand km);
- “bending” of valves when the timing belt suddenly breaks;
- increased “fluidity” of crankshaft oil seals;
- poor reliability of cooling system elements;
- noisy and prone to vibration.
The advantages of the K7M model over the K7J include only an increase in maximum power by 12% and maximum torque by 11%. But the 1.6 liter internal combustion engine also pays for these advantages with an increased appetite of 4.5%, so which is better is a moot point.
Advantages of K4M:
- reliability, practical service life exceeds 400 thousand km;
- compliance with Euro-4 environmental standards;
- increased power (102 hp);
- low noise and vibration resistance;
- more modern and reliable cooling system.
Compared to 8-valve engines, the K4M 16V is much quieter, vibration-free and has the same service life, but significantly more power and torque. Disadvantages of the K4M motor:
- expensive spare parts;
- “bending” of valves when the belt breaks;
- weak “elasticity” of the engine, equal to 1.53, as a result - problems with car acceleration when overtaking.
Thus, a detailed analysis of the technical characteristics of all three ICE samples, as well as practical experience in operating Renault Logan with these power plants, allows us to determine which engine is better. The more powerful 1.6 liter internal combustion engine with liquid cooling is still somewhat preferable to its “big brother” 1.
4 l. Power 75 l. With.
It’s simply not enough for comfortable driving of a loaded car, either on a country highway or during short “jogs” around the city. And in the debate between a 16V motor and an 8V motor, the first sample is the undisputed leader. The only characteristic in which 16V is inferior to its opponent is “elasticity”.
For other characteristics, 16V is better. Renault's liquid-cooled V16 engine is simply much more modern and gives the driver more options.
And now the easiest way
We set the camshaft mark simply up. We specially adjusted the old mark on the timing belt for clarity. The mark on the belt may not match due to the fact that the belt arms between the marks are different and with each revolution it will shift by two teeth. If it suffers, then after a certain number of revolutions all the marks will fall into place, but we don’t need this.
The circled icon will be needed if we are going the long way; more about it at the end of the article.
If the old mark on the belt and camshaft match, then the second one on the belt and crankshaft too.
If you have a newer Logan, the camshaft sprocket will look like this.
We mark the marks on the belt with a marker; if they are not preserved, we remember which camshaft. Loosen the tension roller nut and remove the belt along with the roller.
New timing kit.
The new timing belt has marks and direction of movement.
We apply the old belt to the new one and are amazed at how clearly all the marks match.
We put the new timing belt in place, aligning the marks on the belt with the marks on the camshaft and crankshaft. We tighten it with a roller using the usual VAZ device. We check the tension of the belt, turn the long branch with two fingers and if it can be turned more than ninety degrees, then tighten it again. That's all. You can put back everything that was removed earlier.
"8" and "16"
As I wrote above, this is considered a classic layout. Only the second option with “16” or 4 valves per cylinder is more productive, the power is approximately 15 - 20 hp. more.
How is this achieved? Essentially it's very simple:
The 8-valve unit has one camshaft, which combines both intake and exhaust. That is, both cams are on the same “rod”; if one opens the intake, then the second is in the opposite direction and does not seem to work. Then they change. There is a small chain and essentially one gear (or sprocket); phase shifters are used extremely rarely on such motors.
With the 16-valve version, everything is much more complicated, but more efficient. There are two camshafts here. Each shaft works for its own purpose - there is an “inlet” shaft (opens the intake valves) and there is an exhaust shaft (respectively, the exhaust valves). The forces are distributed evenly across two shafts, not just one. There is an opinion that here the valve itself is slightly smaller than that of the “opponent with one shaft” - it’s possible, but you need to compare specific engine models.
Often, hydraulic compensators are installed on these units, which automatically adjust the thermal gap (for an eight-valve engine, this is installed extremely rarely). That is, you need to adjust the valves.
Watch a useful video
As a result, due to the increased number of inlet and outlet openings, the air-fuel mixture enters faster and is removed faster, and there are no unnecessary mechanical losses. It should be noted that phase shifters are often installed on these options, which further increases efficiency. As a result, power increases by 15 - 20 hp.
Engine
Lada Priora has undergone changes several times, both externally and technically. The appearance, power plant and transmission changed.
Below is an example of engines that were installed on the VAZ 2170-72.
Engine 21116 (8 valves)
This engine was installed on the VAZ 2114 and Lada Kalina, and was later inherited by the Priora. The power of this internal combustion engine is 80 hp. with a volume of 1.6 liters, which is very small. Such an engine does not have good dynamics, and it is difficult for it to “drag” the body of the Priora.
Pros:
- Does not bend valves;
- Easy to maintain;
- Cheaper spare parts;
Minuses:
- Low power;
- Noisiness;
The installation of such an engine continued until 2022.
Engine 21126 (16 valves)
16 valve engine with more power and torque compared to 116. It is a modified model of the 124 engine. Its power is 98 hp. with a volume of 1.6 liters.
Pros:
- Great power;
- No noisy operation;
Minuses:
- Bend valves when the belt breaks;
- Expensive spare parts;
Engine 21127 (16 valves)
The modified 126 engine received the index 21127; the intake in this engine was changed, thereby increasing the power to 106 hp. with the same volume of 1.6 liters. They began to install a new cable gearbox for this engine.
Pros:
- High power;
- No noisy operation;
Minuses:
- Bend valves;
- Expensive spare parts;
Engine 21128 (16 valves)
This engine was specially designed for more powerful Lada cars with the “Super Auto” nameplate. The power of this engine has increased, as has its volume. The number of horsepower in the super car engine increased to 123, and the volume to 1.8 liters, which radically affected the dynamics of the car.
Pros:
Good dynamics and high power;
Minuses:
- Bend valves;
- More expensive spare parts;
Belt tension
Tension plays an important role in the proper operation of the engine and reduces the effect of wear on its condition. It’s worth knowing when to stop – too much or too little tension leads to interruptions and rapid damage. Let's carry out this setup step by step:
Turn the crankshaft counterclockwise by two camshaft teeth to tighten the belt. Check the tension. If everything is done correctly, then it will turn at a right angle between the pulleys, with a slight force of the fingers. Otherwise, loosen the fastening nut and turn the roller counterclockwise 10 degrees to loosen the tension. Adjust until tension is set to medium. Remember not to turn the crankshaft by the camshaft pulley to avoid engine damage.