Interior of Lada Largus
The interior of the car, as can be seen from the photo, is practically indistinguishable from the same Logan and is just as ascetic and unremarkable. In the arrangement of instruments and other elements, you can notice the same ergonomic errors that were characteristic of Logan. The set of instruments is laconic, the two-color screen of the course computer and instrument dials are surrounded by chrome trim. The information content of the devices is quite good. The steering wheel is large, mounted on three spokes and has the AvtoVAZ logo in the center.
The number of controls on the central panel is minimal. In the maximum configuration you can find a radio with AUX and USB connectors; in the initial and middle configurations there is a plastic plug instead of a radio. Nearby are the controls for ventilation and heating (air conditioning and stove). Between them there are also buttons for the electric windows of the front windows, the rear door lock, the heated rear window and the hazard warning lights.
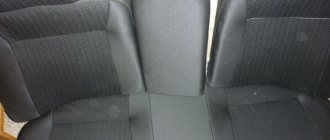
All upholstery is made of hard plastic and fabric, and the comfort provided by the seats is minimal. The front seats are quite flat, lateral support is minimal, but the range of adjustment is quite wide. In the luxury version, the driver's seat even has lumbar support and seat height adjustment.
There is also more than enough space for passengers in the second and third rows; the roof does not create an oppressive impression, however, climbing into the third row is not very convenient. However, the car was created to transport goods and passengers on a budget basis. It doesn’t have to be very comfortable, but it copes with its main tasks perfectly well. Despite the cheapness of the interior and upholstery, everything is made quite well and firmly; unnecessary noise or squeaks from poorly secured elements are not annoying, as in other similar cars of this class.
Where is this button
So, we present to your attention the most difficult to reach buttons in this car, some of which will be very difficult to find without instructions.
First of all, let's press the familiar horn button on the steering wheel. However, the machine is stubbornly silent, and in general, to be honest, nothing was pressed. There is no need to rush back to the dealer and scold him for the defective product that he, such a “scoundrel,” nevertheless slipped to us. The horn button is actually located on the steering column switch and, of course, this location is extremely inconvenient and unusual.
Let's go further, the button for heating the driver's seat turned out to be somewhere unknown, by the way, why it was there is also a mystery shrouded in darkness. And it is located next to the seat height adjustment lever between the chair and the door. Getting it will be problematic, especially in winter, if you are also wearing a jacket. Imagine the situation - winter, minus thirty outside, slippery road and speed around eighty. In such a situation, you can say goodbye to life, trying to find and press this ill-fated button by touch.
Largus was not offended by the presence of a power window on the front and rear doors. However, the window lift buttons were also not where we would like. Instead of installing them directly on the doors, the designers made a completely inexplicable layout. The front window lift control system is located on the front panel directly under the audio system and, while this is more or less convenient for the driver and front passenger, the rear passengers had a very hard time. For them, the window lift buttons were made between the front seats almost on the floor of the car.
Given the decent amount of space in the cabin, people sitting in the back seat will have to stretch hard for a breath of fresh air. It will also be difficult for the driver if he is alone in the car and needs to lower or raise the windows of the rear doors; not everyone will be able to twist his hand so skillfully and feel these same buttons. The rear window lock button is also not pleasing, since it was made directly under the handbrake lever and, if you suddenly reach for it, you can hit the lever, it’s good if your fingers remain intact.
The electric drive of side mirrors is an excellent and very useful thing, it is especially convenient to use it while driving, but not in the Lada Largus. The mirror adjustment button was also located under the handbrake lever and was extremely inconvenient to use.
To summarize, I would like to note that VAZ does not have as much experience in producing its own cars as its foreign competitors have. Initially, the Italian Fiat was copied, which in Russia was called Zhiguli, but now the French Renault has been used. So maybe we shouldn’t scold our people for what is not ours, and give the auto industry a chance to release something of its own?
LADA > Largus
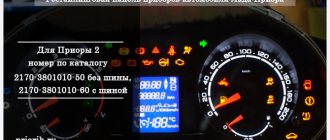
Complete set of instrument cluster with Itelma GPS navigation for Lada Priora
Vehicle instrument clusters are designed to process and display information about the functional and technical condition of components, assemblies, systems and vehicle movement parameters.
Promotion! Free delivery of instrument clusters by Russian Post - with 100% prepayment (except Vladivostok). Save up to 800 rubles on delivery costs, and especially on the postal surcharge for cash on delivery. More details."
As part of cars with navigation equipment, instrument clusters, in addition to the integrated GLONASS/GPS navigation receiver and a module for displaying navigation and cartographic information, have an on-board computer for processing and calculating information about the car and its systems.
A distinctive feature of the design of the instrument cluster is the original design with a display and a mini-USB connector, provided for updating software and mapping software.
Functionality:
- GPS-GLONASS navigator;
- Trip computer;
- Times and date;
- Average consumption;
- Instantaneous consumption;
- Travel time;
- Remaining fuel in the tank;
- Daily mileage, total;
- Voltmeter;
- Outside temperature;
- Engine temperature;
- Mileage on remaining fuel;
- Vehicle speed;
- Engine speed.
Note! This instrument cluster is installed ONLY on Lada Priora cars with a CAN bus from mid-2012 onwards. If your car does not have it, you can install the instrument cluster from Lada Kalina with some modifications, read more detailed information in the product description
Equipment:
- Instrument cluster;
- Understeering's shifter;
- Antenna.
The kit includes a complete set for installing the combination. There is no need to saw or drill anything, everything fits into the standard places without modifications.
Software: Navitel 5.0
Note! Below are the shipping methods available specifically for this product. Payment options may vary depending on the delivery method.
Detailed information can be found on the “Delivery and Payment” page.
Available payment methods:
Shipping throughout Russia. Delivery time is from 5 to 12 days. |
Available payment methods:
Shipping throughout Russia. Delivery time is from 2 to 5 days. More expensive than regular delivery by Russian Post, approximately 50%. Parcel weight up to 2.5 kg |
Available payment methods:
Shipping throughout Russia. Delivery time is from 3 to 7 days. More expensive than regular delivery by Russian Post, approximately 100%. |
Available payment methods:
Delivery is possible to any locality where there is a representative office of the transport company. Delivery time is from 2 to 10 days. Sending large parcels is approximately 50% more profitable than by Russian Post. |
Available payment methods:
Delivery time from 1 to 12 hours. |
Available payment methods:
Pickup times must coincide with store opening hours. |
Removing the interior lamp and replacing the lamp
Place the car in the workplace, apply the parking brake, and turn off the ignition. Raise the hood, disconnect the earth wire terminal from the battery.
Interior lighting
Open the front door of the car.
Lamp used for lampshade W5W
Cargo compartment lighting (for a van)
Use a flat screwdriver to remove lens 2.
Press lock 4 and remove the cargo compartment lamp from the car body upholstery.
Disconnect the wiring harness connector from the cargo compartment lamp and remove the interior lamp.
To replace the lamp, pull it towards you and remove it from the cargo compartment lamp housing.
For replacement, use only a certified W5W lamp
Install the lamp and interior lamp and cargo compartment lamp in the reverse order of removal.
Removing the glove compartment lamp
Release the lock 1, Figure 2, from its engagement and remove the lampshade 2, Figure 1, of the glove compartment lighting 1.
Disconnect connector 2, Figure 2, of the instrument panel wiring harness from the glove compartment lamp.
To replace the glove compartment lamp, you must remove it and replace the burnt-out lamp.
Install the lamp and glove box lighting in the reverse order of removal.
For replacement, use only a certified C5W lamp
Site navigation
I simply mark the front face black plastic with a simple soft pencil. To remove the hands, you need to carefully turn them counterclockwise and gently pull them towards you. We also put on the hands by rotating only counterclockwise and pressing lightly so that they sit in their place.
Usually you have to make several turns. We set the arrows according to the marks; it also usually doesn’t come out on the first turn. If it doesn’t work out the first time, we rotate it counterclockwise for another turn and so on until we set it. After installing the arrows, erase the pencil marks with a damp cotton swab or soft cloth.
How to remove the instrument panel on Renault Logan NEW
Removing the arrows Unscrew the 8 screws with a T10 screwdriver and remove the black plastic from the back and front. First of all, we will consider the procedure for removing the instrument panel, since very often repairs or tuning concern it, and in this case it simply does not make sense to completely remove the dashboard from the car.
By the way, you can read about tuning the Renault Logan instrument panel here.
Removing the instrument cluster from a Renault Logan The procedure for dismantling the instrument cluster is as follows: Put the car on the handbrake and disconnect the negative terminal from the battery. Using a screwdriver with a square bit, unscrew the screws securing the steering column casing. Overcoming the resistance of the latches, we remove the upper part of the steering column casing. After this, remove the bottom panel of the casing.
We unscrew the two screws that secure the decorative trim of the instrument panel; in the photo, the steering column switches, as well as the steering wheel, have been removed. By slightly pulling the lower part of the protective and decorative lining towards you, we release it from the latches and completely remove it. We unscrew the screws that secure the instrument panel to the dashboard seat.
Carefully remove the instrument panel and disconnect the connectors with wires from it. We install the instrument cluster in the reverse order.
Removing the Renault Logan instrument panel
We remove the dashboard from Renault Logan 1. We remove the steering wheel cover, as described above, when removing the instrument cluster.
On the back of the steering wheel, unscrew the airbag mounting screws. Carefully remove the airbag from the steering wheel. We hook up the airbag power cable clamp.
Raise the latch a little, and then disconnect the block with the cable from the airbag. Remove the airbag from the steering wheel. It should be noted that we do not unscrew the screw completely, leaving it on three turns of thread. With quite a lot of force we pull the steering wheel towards ourselves. Rocking it a little, we move it along the splines of the steering column shaft.
Completely unscrew the fastening screw and remove the steering wheel from the shaft.
When is pinout required (device chips) and how to do it
All car parts fail sooner or later. There are times when they need to not only be repaired, but replaced. The instrument panel may also break, causing it to be removed and a new one installed in its place. This work is easy to do with your own hands if you have at least the slightest knowledge of mechanics. If you are well versed in your Priora (sedan), then you need to perform the pinout in this way:
- First, the dial hands are removed using a regular knife.
- Next, the gasket in the speedometer is scraped out to replace the backlight.
- If there is no need to change the sensors, you can simply remove them and clean them.
Very often, motorists cover the panel with a special LED strip to achieve even lighting. You can also use CMD diodes, which can be easily fused into glass with a soldering iron. To do this, you need to disassemble the dial and solder diodes directly under the base of the hands.
If you understand the purpose of all the contacts, and also know the purpose of a particular connector on the panel, then you can easily do the pinout yourself. The main thing is to carry out everything strictly according to the instructions so that the connection is successful and the panel continues to function efficiently. If you know which is better to install a tidy: with a canbus or a regular one, then it’s better to ask professionals who understand this. If you have no experience in such work, and you do not understand the purpose of certain wires, then the technical service will help you improve the operation of the instrument panel. Of course, you will have to pay for this, but you will not waste your time, and the work will be done efficiently.
Lada Largus Fully stock. Name is Laura › Logbook › A story about how I filmed a torpedo.
Sooo! After Laura tried to kill us, namely freeze us, refusing to turn on the stove in the frosty winter, it was decided not to put off finding the problem. After reading Drive2, just some information on the Internet, I just wanted to remove the motor, because this simple method through the Kama Sutra solved the problem for many, but something inside me said that the motor was working and the problem was before it. Yes, and they changed it for me under warranty, and I can’t believe that 2 motors have the same malfunction in the form of a self-correcting defect, but I called everything before the motor three years ago, the resistor and control unit are normal. Taking the electrical circuit, I found an electric motor on it, which is connected through a kind of extension cord
which cannot be checked without removing the panel. The conclusion suggests itself: remove the panel. As soon as two events coincided, namely: it warmed up to an acceptable -2 and it was a day off, I went looking for a bad contact. Previously, I made 2 mistakes. The first - on Friday evening, after work, I headed to, where would you think? No, not to the bar, to the gym! The first time in half a year... But after the gym (second mistake), at night, to the bar... In general, on Saturday I could not only think, but also move, so I postponed the repairs to Sunday. On Sunday, the brain worked, but the muscles did not. Overcoming the pain all over my body, I still took my wife to work and when I returned I began to remove the panel.
There, in the depths, behind the radio, there is a self-tapping screw securing the torpedo to the body, down with it. Then it was the turn of the steering wheel, the removal of which begins with the removal of the airbag
There is a very convenient groove in the steering wheel that guides the screwdriver directly to the airbag retaining spring.
Then there was the turn of the steering column switches, everything is simple here, there is a bolt at the bottom that ensures fixation
And of course, you need to dismantle the instrument panel. To do this, tear off the visor, decorative trims to the left and right of the column, unscrew 2 screws and remove the inside of the visor, and then unscrew 4 screws
Having disconnected 2 pads, remove the instrument panel. Next, as it is written in the book, “Overcoming resistance” and having cut your finger, remove the side pillar trim, then
We unscrew the screw. The same one below, under the decorative plug. And two similar ones on the right. Let's go to the tunnel
One self-tapping screw at the end under the plug. With a shurik and a slight upward movement, we almost break a piece of the interior decoration, because there’s no need to forget about the handbrake. Next is the second part of the tunnel, which is attached with a nut... With a slight movement of the hand, we will convert Shurik into a low-power impact wrench. Whack! And they removed the nut. Next are two self-tapping screws in the cup holders and two on the sides (So that’s where there are 2 more left after assembly! I’ll have to tighten them today). Congratulations to my beloved self, the tunnel has been dismantled, by the way, don’t try to break out the upholstery of the gearshift knob, there is a lock on the “forward direction” side, so you need to press it and it will come out freely, and don’t forget to disconnect the cigarette lighter. By the way, having looked at the flimsy wiring of the cigarette lighter, I think I should plug something into it now.
Next, in the glove compartment, press the latch of the computer connector and push it there, behind the glove compartment.
Let's pull, let's pull! Horseradish was floating there, who will unscrew the headlight range control for you? Ivan Fedorovich Krusenstern? We pull the twister towards ourselves, two whimpers, and try number two. Let's pull, let's pull!
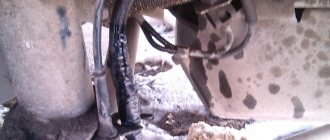
A torpedo in the trunk. It’s so good that you don’t have to leave the car to do this! Glory to the Largus trunk! Well, here it is:
If you look closely, you can see that the green wire even managed to burn out. And all because the contact stop inside the plug was torn off. I put on the negative terminal, screwed it around, the motor started working, beauty! I pressed it in, inserted it, everything works, tugged it, it sits securely. At the same time, I found an alarm unit so that I would know where to go next time, otherwise it began to rosin the brain, then yell out of nowhere, or something even worse. Well, that's where the fun ends. Disconnected the negative terminal. Swish, swish, swish and put everything back together in the reverse order, naturally mixing up several screws in places and now I don’t have it attached to the radio, but the steering column switches no longer play. And the spare parts, as always, remained, today by the way I remembered where they came from, I’ll get them in the evening. I didn’t remove the motor itself, because it doesn’t vibrate or glitch. And the ancient auto mechanic wisdom says “Does it work? Don't climb! That's all guys, it took two and a half hours to do everything. Clean roads to everyone and not a nail or a rod!
On-board computer functionality
On the right steering column switch of the Lada Largus there is a special button, through which the functions of the controller are controlled and its modes are switched.
The on-board computer is very convenient on the road, as it allows the driver to have up-to-date information about the main parameters of the trip.
Some of the information displayed on the device display includes the following:
- counter showing total mileage;
- mileage per trip;
- the value of the total fuel consumption, counted after the last reset of the counter;
- average flow level (also calculated after resetting the previous BC readings); the value begins to be calculated and displayed after the car has covered a distance of 400 m;
- range determined based on average fuel consumption readings; the value is also displayed on the display after 400 meters from the start of movement;
- average speed, which is determined by the device and is displayed on the screen after the fact that previously existing values have been reset to zero (the display is available after the car has covered a similar distance).
Note that the greater the distance the Lada Largus station wagon has “traveled” since the last reset of the values, the more accurate the readings regarding the power reserve, as well as the average fuel consumption and speed.
HE IS GOGA, HE IS GOSH
"Lada-Largus" is a copy of the "Dacia-Logan MCV", known in some European markets under the Renault brand. The localization of production at AVTOVAZ has so far affected only small things. The most noticeable parts are the radiator grille and the nameplates on the rear doors: they feature the branded boat and the familiar name LADA. The machine's components were borrowed from other Renault models - Logan, Symbol, Megan ( ZR, 2008, No. 2; 2010, No. 4; 2012, No. 3 ). They have been studied quite well by both car service mechanics and garage craftsmen. Nevertheless, let us recall the basic maintenance techniques and tell you about the differences.
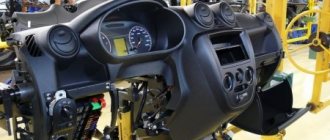
Largus dashboard
The Largus instrument panel consists of a frame and a decorative trim. The frame is made of steel; it holds all the wires and units of electrical equipment installed in the cabin. Steering elements are also attached to it. The frame part represents the power structure of the car; it is attached to the base of the body and the front pillars.
Decorative overlay is a molded part made of plastic. It is screwed on with frame screws. The interior heating and air conditioning system and steering wheel are mounted on the decorative panel. It is also equipped with control devices, linings and a storage bag.
Functionality on board the vehicle
The manufactured models of onboard vehicles for the Lada Granta have a wide information memory and are equipped with a monitor. This significant advantage is beneficial even for drivers with poor vision and women who are not very confident in the functioning of the car. In this regard, the on-board computer can help the car owner. He points to:
- travel time;
- fuel consumption at different speeds and driving rates, up to a liter;
- average speed levels and gasoline costs per trip;
- residual quantity in the fuel tank;
- speed when starting the car;
- speed when driving until the engine is completely warmed up;
- engine heating level to avoid overheating;
- various problems with Lada mechanisms;
- timely heating and drying of candles;
- temperature in the cabin and outside.
In addition to these functions, the on-board computer on the Lada Granta has volatile memory, a malfunction indicator, a supervisor (warning about unplanned vehicle movement, unswitched headlights and direction indicators) and afterburner. The latter resets the memory when switching to the gas pedal when accelerating the Lada to its original settings when using gasoline no lower than 95.
The standard on-board computer of the Lada Grant, namely the State X1 M (Multi-Set) model, is considered the highest priority on-board computer for the Lada family. Compact dimensions allow it to be built into the instrument panel in the recess of the button cover. If a car owner wants to buy a State on-board computer, then, in addition to the device, the kit will include instructions and wiring.
A diagnostic tester can provide a lot of information about the car's condition.
The on-board computer diagnostic tester is equipped with a plasma, digital tachometer and speedometer. Using the tester, it is easy to clarify the position of the throttle valve and the state of the electrical network on board, which will help prevent possible damage and fire to the vehicle's electrical wiring.
Heating system design
It cannot be said that the Renault Logan ventilation and heating system is a weak point, but such a malfunction, especially in the cold season, promises unpleasant consequences. The operating principle of the interior heating system does not differ significantly from the device in other cars. But if the rear window heating does not work, then this can also spell trouble.
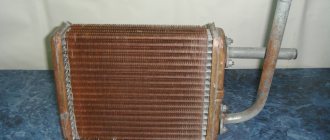
The heater radiator is connected directly to the cooling system, in which the coolant circulates (coolant, about replacing it here, about choosing a coolant here), which warms up within 95°C during engine operation. A special fan blows onto the hot radiator, which creates a strong air flow and directs it into the cabin through special air ducts. The quantity and speed of supply of heated air is regulated using a damper.
Signs of a malfunctioning stove
You should think about the upcoming repair and replacement of the stove motor if the following malfunctions are observed in its operation:
- An extraneous noise appeared when the stove was turned on.
- Warm air stopped flowing into the cabin.
- The speed of the incoming air flow has decreased.
- And of course, if the stove does not turn on at all. (However, in the event of such a malfunction, first of all analyze the condition of fuse F36, which is located inside the car. It is located in the green housing and is responsible for short-circuit protection of the heater system).
Learn more about the contents of the available screens
The first screen contains information about the Logan firmware version.
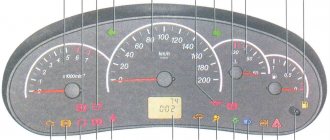
Indication on the Logan instrument panel
The second screen simultaneously displays all elements of the LCD display, and also shows the performance of each of them. If any malfunction occurs, the corresponding icon will not be displayed.
The third screen shows how much gasoline is in the tank, in liters. If only dashes are visible on it, it means that the car’s electrical wiring is faulty.
There is also one nuance here: this mode accurately shows the remaining amount of fuel only up to 50 liters; for larger values, the number 50 will still be displayed.
Manipulations to obtain information from BC Logan
The fourth screen is responsible for informing about the performance of sensors that regulate the coolant level and fuel level, and about instantaneous consumption (this function is only available if you have an on-board computer with firmware 6002). If there are no existing or stored faults, the display shows “- — — — -”. There are other designations:
- existing and stored faults of the sensor responsible for the coolant temperature appear on the display when the circuit is open in the form “- - -TO”, and in the event of a short circuit – “- - -TC”. These faults are not critical and can be ignored if the engine is sufficiently cooled;
- existing and recorded malfunctions of the sensor that determines the fuel level are presented on the screen in the form of “-JO- -” when the circuit is open, and “-JC- -” when there is a short circuit;
- existing and stored malfunctions of the information system regarding gasoline consumption in the absence of a signal notifying about instantaneous consumption are displayed on the display as “D- — — -”.
If there are several existing and stored faults, they are displayed in one line. To delete them from memory and leave the self-diagnosis mode, you should hold down the button located on the instrument panel for a few seconds.
If you have firmware 6002, a fifth screen is also available, showing fuel consumption when the engine is running in l/h. This mode allows you to find out the momentary consumption even when the car is standing still. If there is a fault such as “open circuit” or “short circuit”, “- — -” appears on the display.
Basic functions of the device
On-board vehicles for the Lada Granta have high information memory and a small monitor, except for the “State” model, which only has a digital display. This makes it easier for people with poor eyesight and those who are unfamiliar with the nuances of engine operation to monitor all the processes that accompany its stable operation. BC will help the car owner by pointing out the following parameters:
- total travel time;
- detailed fuel consumption at different speeds;
- average speed indicators and excessive fuel consumption;
- remaining fuel in the gas tank;
- speed of start of movement;
- engine temperature;
- malfunctions of components and mechanisms;
- temperature inside and outside the car;
- on-board network voltage;
- crankshaft rotation speed (engine speed).
The on-board computer has a volatile memory and the ability to control the anti-theft system - the Lada Granta immobilizer. The on-board vehicle has a built-in supervisor, a fault indicator, and a “afterburner” function - the ability to reset the memory after starting the engine.
Some on-board drivers can additionally control lighting, stove operation, clock, calendar and alarm clock, and automatic window closers. You can plan your trip route based on the BC readings. It also allows you to use various navigation installation options and can warn you about low fuel levels or exceeding the permissible speed limit.
Most devices allow you to independently diagnose the operation of different car systems. The device can read ECU error codes without using any equipment. The explanation is presented in the accompanying documentation for each device. Such functionality will allow you not only to save on a trip to a specialized center, but also to identify problems, preventing serious malfunctions from occurring.
Possible faults
If the car’s operation is disrupted, the dashboard warns about this, and quite often this is associated with the failure of such system elements as:
- Temperature sensor
- Speed sensor
- Circuit breakers
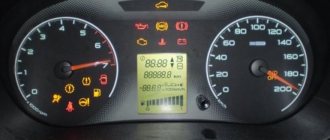
This problem can be solved by simply replacing these sensors. Particular attention should be paid to the indicator in the form of an engine, it is also called a check, it is responsible for the engine system, during the start of the power unit it should light up and immediately go out, if it continues to light, this warns that there is a malfunction in the engine system. If this indicator starts flashing, this may be due to an unstable spark supply, so it is advisable to reduce the speed. As you can see, the panel is quite informative, and if you know what each element is responsible for, you can quickly determine the cause of the malfunction, and to understand the designation, below is a list of icons with descriptions:
Diagnostics
At the first signs of a malfunction, it is important to carry out detailed diagnostics and identify the cause of the breakdown. If you suspect a heater fan failure, you must:
- Check the fuse and replace it if necessary.
- Check the power to the motor.
- If there is no power, then you need to check the power supply to the blower intensity regulator.
- If there is power to the regulator, but not to the fan, then you need to try setting the heater regulator to the last position. The rheostat may have failed, in which case the engine will only operate at the highest speed.
- Also, the lack of power to the motor is possible due to a broken wire or a short circuit in the wiring, the latter will be accompanied by a blown fuse.
ALONG THE MOTHER VOLGA
With these thoughts in mind, we drove out onto public roads. Yes, you don’t notice a lot when cutting circles around a high-speed oval. For example, how well do suspensions handle bumps of different sizes? The smoothness of the Largus is reminiscent of the related Logan and Sandero. Small road imperfections simply dissolve on the way from the wheels to the body, and large ones, which are scary to even look at, are conscientiously swallowed by the suspension, allowing you not to slow down. It’s comfortable, and the car responds adequately and quite promptly to the driver’s commands. If you expect the reactions of a sports car from a hard-working station wagon with a high center of gravity and energy-intensive suspension, stand in line for another car. Sensitive rolls and slight delays in steering movement are present, but in general the car behaves predictably, at least at the speeds allowed by our Road Rules.
Isn’t 105 “horses” enough for a car with a gross vehicle weight of under two tons? Those who expect acceleration, like during the take-off run of an airplane, go to the same line where lovers of refined handling stand: a budget car has never been endowed with excess power. I’ll tell the rest that with a half load (alas, it was not possible to fill all the seats), the efforts of the sixteen-valve engine are quite enough for dynamic overtaking. The elastic motor pulls out from any speed, and well-chosen gear ratios in the transmission also facilitate the intended maneuver. True, in order to spur the Largus, due to the closeness of the gear ratios in the box, you often have to jump down not one, but two steps at once. It’s unusual at first, but automaticity comes quickly. And along with it, the fuel gauge on the instrument panel quickly falls. Alas, short gears and mediocre aerodynamics do not contribute to a moderate appetite. With fairly economical driving on country roads, fuel consumption for different drivers ranged from 8.5 to 10 liters per 100 km.
“Largus” is the first car in which you don’t remember that it was made by AVTOVAZ. He is the first whose name is not ashamed to write in Latin. And for which I don’t mind paying my hard-earned money. However, most Russians look at it with distrust, because the most important question remains open - about reliability in operation. In recent years, many have been badly burned by buying models from the Volzhsky Automobile Plant, and, disappointed, went to competitors. Maybe Largus will be able to return them?
Mikhail RYABOV, presenter of the project “Cars on the BO platform”:
Largus station wagon review
This car can easily adapt to any of your needs.
LADA Largus ideally combines comfort, practicality and high payload.
The car looks very friendly: faceted lines of body panels, decisive wheel arches, original taillights, and a signature radiator grille. Strong, well-built, confident Largus clearly states: “You can rely on me!”
LADA Largus has a dynamic body design, a modern interior and a surprisingly spacious interior.
Largus is the only car of its class that provides truly comfortable seating for seven adult passengers.
Thanks to folding seats, LADA Largus can be easily transformed to suit any needs - from a tourist trip to the transportation of large cargo.
LADA Largus is adapted to Russian operating conditions, and the proven design and technology ensure the high quality of the vehicle.
Some cars are designed for speed records. Others - to dazzle everyone with a bright design.
And Largus is created for real life. He will go where there is no way for a sports car. And they will look at him with love. Because it is the working car that is truly beautiful.
- Small overhangs and a ground clearance of 170 mm (145 mm with the maximum permitted load) - we have a car with excellent cross-country ability for its class.
- The high-torque motor confidently accelerates the Largus at full load.
- Interior transformation: from a 7-seater station wagon to a 2-seater truck.
- The third row of seats can be removed (without tools) and stored in the garage.
- The maximum load on the rails is 80 kg.
- Convenient hinged tailgates are fixed in several positions.
- The engine compartment is protected by a powerful mudguard made of 2 mm steel.
- 15-inch wheel rims.
LADA Largus is an amazingly roomy and very comfortable car.
The wide driver's seat is equipped with height adjustment and lumbar support. Truly comfortable seats have been created for passengers in the third row: men above average height feel free here. Each of the three rows of seats is equipped with air ducts to warm the feet of passengers.
The car's chassis is tuned for comfort: a long wheelbase ensures a smooth ride, and the energy-intensive suspension copes well with different types of surfaces. The front subframe provides confident stability and controllability at any speed.
LADA Largus is European-quality. All systems - from pedals to door handles - work with minimal effort. Thanks to the careful selection of materials, high acoustic comfort is ensured - even with high mileage, there are no squeaks in the cabin.
Despite its European pedigree, LADA Largus is a car for our roads.
A reliable long-travel suspension that easily “swallows” bumps and potholes, high ground clearance and good geometric cross-country ability – these are confident arguments against surprises on roads and directions!
- All external body panels of LADA Largus are made of double-sided galvanized steel.
- The B0 platform on which Largus is built has proven itself well all over the world.
- Largus is entirely manufactured using RENAULT-NISSAN Alliance technologies.
- The basic design, originally created for Eastern Europe, was adapted for Russia: the suspension and brakes were strengthened, the thickness of the anti-gravel and the area where it was applied to the bottom was increased, and chip protection linings appeared on the wheel arches.
- LADA Largus has original engine control calibrations, which make the car fully adapted to Russian gasoline.
- The terms of the LADA Largus warranty are 3 years or 100 thousand kilometers.
Video - Dashboard on LADA GRANT
AVTOVAZ has patented the dashboard of a restyled version of its bestseller.
Let us remind you that the public premiere of the updated Lada Granta should take place as part of the Moscow International Motor Show. Apparently, Granta will have a redesigned instrument panel. This conclusion can be drawn based on the image published by the Federal Service for Intellectual Property (Rospatent) in the Industrial Designs bulletin for August.
The new “tidy” differs from its predecessor in the graphics of the tachometer and speedometer modified in the Lada Vesta style, as well as the monochrome screen of the on-board computer combined with the indicator panel.
Let us note that AVTOVAZ declassified the restyled Lada Granta sedan last month. The front part of the “refreshed” four-door is aligned with the brand’s current X-style, which debuted on the Vesta and Xray models. The model received new head optics, radiator grille and bumpers. Later, the Granta hatchback and liftback were filmed during advertising filming. Let us remind you that AVTOVAZ plans to combine the Granta and Kalina models into one family, abandoning the second name.
Choosing an on-board computer for the Lada Granta
As an alternative to the weak standard BC, car enthusiasts install multifunctional on-board monitors that will show not only the engine temperature, but also many other parameters. Today, manufacturers can offer three main devices suitable for the VAZ 2190-91: “Multitronics”, “Orion”, “State”.
"Multitronics"
The device is a universal one, since the manufacturer does not produce them exclusively for Grants. Judging by the documentation and instructions included with the device, installation of Multitronics is quite possible on earlier VAZ cars: first-generation Kalina and Priora. Finding a place to install the device is the concern of the car owner.
"Orion"
The computer of this brand is also universal and is used not only for Grants. The installation site may have to be modified independently.
This company produces on-board computers exclusively for domestically produced cars. The devices are not created for universal use, but specifically for each car model.
"Stat" is based in Togliatti and tests all its developments on AvtoVAZ cars. Installed instead of a plug for additional buttons. This device is modest in size, but has additional useful functions:
- spark plug warm-up mode – relevant in winter;
- “Tropic” mode, which allows you to independently set the desired temperature for the engine cooling fan to operate;
- diagnostics of system errors.
The “State” X1 M is inexpensive, which makes it noticeably superior to its competitors. But if you need a full-fledged on-board computer with a display and an intuitive interface, you should take a closer look at universal devices.
24_no_copyright
When replacing spark plugs on a K4M sixteen-valve engine, the main thing is not to drop the fasteners of the individual ignition coils: the bolt easily slides off the head and disappears into the abyss between the intake manifold and the valve cover. If you don’t catch it, it can later cause trouble by shorting out electrical circuits or rubbing holes in the plastic manifold. Therefore, it is better to use a magnetic head or, at worst, attach a powerful magnet to the extension cord. Such a useful household item can be obtained, for example, by gutting an unnecessary computer hard drive.
Problems when paying with bank cards
Sometimes difficulties may arise when paying with Visa/MasterCard bank cards. The most common of them:
- There is a restriction on the card for paying for online purchases
- A plastic card is not intended for making payments online.
- The plastic card is not activated for making payments online.
- There are not enough funds on the plastic card.
In order to solve these problems, you need to call or write to the technical support of the bank where you are served. Bank specialists will help you resolve them and make payments.
That's basically it. The entire process of paying for a book in PDF format on car repair on our website takes 1-2 minutes.
instrument panel stages
You can install the instrument panel on the dashboard in the reverse order. Afterwards, do not forget to unlock the driver's airbag. nothing In order not to forget, keep the instructions nearby:
nozzles Install the interior ventilation housing. Put the Largus instrument panel in place and connect the glove compartment harness to the wires. Tighten the screws of the upper windshield mounting near the glass. Place the instrument panel on the heater and tighten the screws. Fasten the screws in the radio behind the space. Screw in the lower fasteners. Install the headlight position and its handle on the corrector. Connect the device wires and install them in place. Place the visor. Install. devices radio and connect all the wires. decorative Place the trim on the central trim and snap it into place. wires Connect the cigarette lighter and put the cover on the floor tunnel in place. Tighten the screws at the front and back. Steering columns Place switches, airbag, steering wheel and steering system adjustments
Place the negative terminal on Important
battery! When installing, do not forget to tighten all the screws; the quality of your work determines whether “crickets” will appear in the interior. It is best to collect the bolts in a separate box so as not to lose them in the components.
- garage swap kit and their installation: 1UZ FE, 2JZ GE, 1GZ GTE
- What is the volume of the Mitsubishi ACX trunk, how to install a roof rack
- sale of Autobusiness used spare parts
- How to update Navitel maps for free
PRODUCT NUMBER ONE
You can probably handle replacing the air filter on both modifications. Considering that the cover is attached with self-tapping screws, we recommend that before installation you feel for the entry of the thread: after turning the fastener counterclockwise, catch the gap and only then turn it clockwise. This way it will be possible to preserve the thread, and therefore the body itself, for many years.
There is no fuel or cabin filter - a huge minus. If you can live carefree without the first, as the experience of using Logans shows, up to 200 thousand km, then sometimes you can’t do without the second on our dusty roads. “Garage workers” propose to embed a filter from a Nissan-Micra (or Renault-Modus) into the body of a standard heater, cutting through a window 150 × 38 mm ( ZR, 2008, No. 9 ). Most likely, this technology will also take root among official AVTOVAZ dealers. But why doesn't the plant improve the heating system?
dashboard box
Under the Larguse dashboard, important elements of the car are hidden in the panel. To repair them or change them, you need to remove It. It’s easy to make a dashboard yourself; it’s not necessary to involve specialists. Before you start, read the instructions and make sure everything is clear to you.
You will need:
- Phillips screwdriver;
- flat screwdriver;
- torx key t50;
- torx t20 key.
dismantling Stages of the Lada Largus instrument panel:
negative Remove the wire from the battery. Block the module with airbags. Remove the steering wheel. Disconnect under the steering wheel switch from the driver's airbag. all Disconnect the devices and set them aside. Pull out the mats and unscrew the lining of the floor tunnel. Remove the boot from the shift lever. Disconnect the wires to the cigarette lighter. Remove the linings from the side pillars of the body. The center trim trim is held on by spring clips. To remove it, carefully pry it off with a flat screwdriver
Be careful not to damage parts. Disconnect the central lock from the wire of the lock, alarm, heated windows, front power windows
Remove the audio system. There is a screw under the audio system head unit that holds the Largus decorative panel. Unscrew it. Unscrew the mounting screws of the heating unit and push the devices. Remove.
inside the headlight control knob. After this, unscrew the two bolts and push the regulator itself down. At the bottom left and right, fold back and find the decorative plugs for the screws securing the instrument panel. Unscrew these fasteners from the frame on Unscrew. body on the left and right side fastenings. levers Remove the steering wheel adjustments. Pull out the fastenings of the lower left trim panel. Remove the dashboard. In the glove box, disconnect the wiring harness.
Dismantling is easy and doesn't require a lot of tools. You can do this in 1-2 hours. carry out, The main thing is all actions sequentially and do not skip Installation.
Removing the dashboard from Renault Logan
We push the headlight beam direction control inside the instrument panel. Use a screwdriver to pry off the plug for the side mounting screw of the instrument panel. Similarly, unscrew the screw on the other side of the instrument panel. Overcoming the resistance of the plastic latches... ...press the edge of the right A-pillar upholstery... ...and remove the upholstery.
Similarly, remove the upholstery of the left front pillar.
Rocking it a little, we move it along the splines of the steering column shaft. Completely unscrew the fastening screw and remove the steering wheel from the shaft. We rotate the drum with the steering column switches at a certain angle until the protrusions of the drum are aligned with the technological grooves on the body itself.
We insert a small sharpened wooden wedge into the gap.
Loosen the screw that secures the connector. We do not completely unscrew this screw.
Removing the Renault Logan instrument panel
By slightly pressing the screw head along its axis, we pull out the connector from the steering column shaft. We disconnect the wire blocks and completely remove the connector assembly with the steering column switches.
We remove the instrument panel as described at the very beginning of our instructions. On the back of the tunnel lining we pry and remove the decorative plug.
Unscrew the screw securing the cladding at the back. We remove the rear part of the tunnel trim from the handbrake lever.
Refinement of the Granta liftback dashboard
The basic equipment of the dashboard of the Lada Grant “Norma”, “Standard” is quite simple and uninformative. The defect was promptly corrected by manufacturing a new panel sample. It is installed exclusively on the “Lux” modification. An alternative option outside the factory version is provided. In order to increase the information content, a new instrument layout and external design are used:
- the borders of the instruments are separated by a chrome insert;
- more space is allocated for a computer monitor;
- the owner can independently choose the color design of the backlight in order to reduce eye strain;
- basic (important) information is now displayed at the top of the display.
Information about the Lada Granta instrument panel software
- turn off the ignition;
- press and hold the mileage reset button in pause mode;
- activate the ignition;
- release the pressed button.
Information about the software version and hardware model will appear on the monitor. The data must be used when purchasing a new shield.