Adjusting the headlights on the VAZ-2114 is required at least once a year during maintenance, and is also required after replacing the lamps. Many owners ignore the recommendations and use optics that are not configured correctly and do not provide the proper direction of light at night. Adjusting the headlights does not take much time, so in poor lighting, do not delay this procedure. When working, you should take the advice of experts. In this case, you can adjust the light beam as accurately as possible.
Why is headlight adjustment important?
The main reason determining the need for the headlight adjustment procedure is their important role in ensuring road safety, especially in conditions of poor visibility.
Operating a vehicle in the dark or in difficult weather conditions (snowfall, heavy rain, fog, etc.) is extremely difficult and no driver can do without the help of external lighting devices, no matter how much solid practical driving experience he or she has. .
However, the positive effect expected from the operation of high or low beam headlights can not only be reduced to zero, but also lead to the following undesirable consequences, significantly limiting the driver’s ability to organize safe traffic:
- Incomplete illumination of the road surface.
- Obtaining a “light curtain” in front of a moving car.
- Creating an emergency situation due to blinding the driver of an oncoming vehicle.
And there is only one reason for all of the above problems - the wrong direction of the light beam formed by unregulated optical devices (headlights). Therefore, the only solution to the problem of “crooked” light is to adjust the headlights, the procedure for which we will consider using the example of one of the most popular domestic cars, the VAZ 2114.
Preparation
Finding a location is an important step. The site must meet the following requirements:
- to be level;
- be in a dark place without unnecessary glare from flashlights;
- the site must have a flat wall, gate, fence, garage door.
All of these factors affect the accuracy of the adjustments. High-precision adjustments can be achieved without special optical instruments only if all instructions are followed. The car is prepared as follows:
- Using a high-pressure washer, all dirt is washed off from the body and fender liners.
- The luggage compartment is cleared of all unnecessary items. If the spare wheel is missing, it must be replaced.
- The fuel tank is filled to the cut-off point.
- The tire pressure is checked and adjusted to the standard values of 2.0 or 2.1 bar.
- The optics are inspected for cracks, chips and defects on the surface of the glass and reflector.
You should also check the attachment of the headlights to the body. If free play is detected, the optics must be firmly tightened with standard bolts. A faulty part with cracks and other defects must be replaced, since broken glass refracts rays and blinds oncoming drivers.
To work you will need tools:
- rag;
- thick fabric or cardboard;
- cleaning composition for windows;
- felt-tip pen;
- roulette;
- construction level;
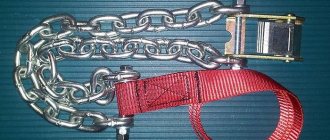
- a shoe or stick to support the wheel.
To independently adjust the light on a VAZ 2114, 2115, you do not need special tools. The built-in plastic thumbwheels on the back of the optics are easy to scroll with your fingers. To carry out work, you need to choose a warm day without precipitation or strong wind. Droplets on the optics cause refraction and will interfere with proper adjustment.
Preparatory work
In order for the work on adjusting the headlights on the VAZ-2114 to be done as correctly as possible, and the results to be only positive, the following conditions must be met:
- Make sure that the tire pressure is as specified in the technical documentation of the car, that is, 1.8-2 atmospheres on each wheel.
- The car must be loaded as much as possible, that is, with a filled tank, spare tire, tools, etc.
Creating the right conditions for regulation
Marking the wall for adjustment
If you have fulfilled all the above conditions, then you can proceed to the next step, namely finding a flat wall and a platform in front of it. A garage wall or any concrete fence is ideal for this.
When the wall and the area in front of it have been found, all that remains is to draw markings on it, thereby creating a homemade screen; for this work we will need ordinary chalk.
Step-by-step instruction
Adjusting the headlights of a VAZ 2114 or 2115 with your own hands is a simple procedure. With proper preparation of the car, you can achieve optimal results that will not differ from adjustments on an optical machine. Before setting the headlights, an auxiliary diagram is drawn. To do this you need:
- Install the VAZ 2114 at a distance of 5 meters from the wall. The measurement is made strictly from the headlight glass.
- The height of the lamp relative to the asphalt is measured with a tape measure.
- The value is marked on the wall with a horizontal line.
- A vertical stripe marks the center of the car.
- From the horizontal mark, an indentation is made downwards by 65 mm and a mark is made where the cut-off strip should be located.
- To identify the center of the beam, the transition points into daws are used.
- The centers of the jackdaws are marked on the wall with vertical lines, the distance between which should be 964 mm.
A schematic sketch is recommended by the manufacturer as the most accurate method for adjusting the optics. Headlight adjustment:
- Turn off the car engine.
- Turn on low beam.
- Set the headlight hydraulic adjustment lever to position 0.
- Open the hood.
- Cover one headlight with cardboard or a thick rag. This improves the visibility of the beam boundary.
- Using the built-in screws, adjust the direction of light first on one headlight, then on the other.
- Rock the car and check that the settings are correct again.
When performing work, the vehicle must be without passengers. You can put a load weighing 50-70 kilograms on the driver's seat, but this is not necessary. Installation on the handbrake often changes the position of the body relative to the road surface, so you should use a wheel support or a regular stick.
By adjusting each headlight separately, you can achieve the most accurate result of the beam position. Correctly configured VAZ optics will not blind oncoming traffic participants and provide high-quality illumination of the road surface.
Installation methods
There are several options to equip your car with a fog light system. The choice depends on your personal preferences and capabilities.
Way
Peculiarities
Buying a bumper with built-in PTF
Such bumpers are bought at a tuning studio, where everything will be connected and connected for you. The disadvantage of this option is the high cost
Buying a bumper from a VAZ 2115 and installing it yourself
To do this, you will have to buy a bumper from an older model, which has holes for fog lights. All that remains is to find a suitable set of PTFs and install them
Purchase of PTF and facing elements - glasses
Today this method is in greatest demand because it allows you to do the installation yourself for little money.
The standard PTF kit includes several elements:
- Headlights;
- Light bulbs;
- Switching relay;
- Set of wires;
- Connection diagram;
- Button to turn on/off PTF.
When choosing a set, pay attention to the fact that the headlights match the shape of the glasses, that is, the facing elements.
Standard kit
Today, for VAZ 2114 owners who want to install fog lights, it is recommended to choose rectangular kits from the Kirzhach company. It is used for factory installation of PTF on expensive versions of the model.
Xenon in PTF
Many car owners are thinking about installing xenon lamps in their fog lights. Is it good? Not really.
The thing is that when installing xenon in the PTF, focusing is disrupted. The operating principle of xenon is somewhat different compared to conventional Kirzhach type lamps.
Standard PTFs are designed for certain types of lamps, so they cannot cope with xenon. As a result, excessive reflection is observed in the reflector, rays are refracted, and the light is blurred. Where does this lead? To blind oncoming drivers.
The xenon option is not a practical or successful solution. Therefore, we recommend that you avoid it.
Another option is a combination of xenon and yellow fog lights. You will need H1 xenon bulbs, which are mounted in a bottle cap and only then placed in the headlight. This way the light beam has smoother boundaries, does not blind oncoming traffic, and better illuminates the roads in bad weather. Only after installing this combination lighting, be sure to make sure that your headlights really do not blind oncoming cars.
If oncoming cars stubbornly continue to shine their high beams on you, try adjusting the light beam. If this does not help, it is better to abandon xenon.
Setting the fog lights
Adjusting the fog lights involves several steps:
- vehicle preparation;
- drawing up a diagram;
- adjustment.
The preparatory steps are no different from the actions performed before adjusting the main headlights. The fog lights should be clean, the tires should be inflated, and the trunk should be empty. When setting up fog lights, you should use a special diagram that you create yourself. This requires:
- Place the car at a distance of 5-10 meters from the wall.
- Measure the height of the center of the headlight and mark it with a line on the diagram.
- Transfer the marks of the center of the car and the fog lamps to the wall.
- Draw a line 10-12 centimeters below the height mark of the fog lights.
To adjust the optics, you need to turn the screw until the beam reaches the level marked on the plan. If the headlight cannot be adjusted, you should clean the bolt head and inspect it for souring. You can use WD-40 aerosol to lubricate the parts. If the bolt rotates but the reflector remains in place, you will need to dismantle the fog lamp and check the integrity of the mechanism.
Peculiarities
Fortunately, on cars of this model, which is part of the Samara family, the process of adjusting the front light is very simple and free of any difficulties. Those car owners who have previously driven old cars will be able to appreciate this.
There it was necessary to turn the adjusting screw for a long time, adjusting the operation of the headlight. This took quite a lot of time and effort. In modern products of the Volzhsky Automobile Plant, it is much easier to adjust the lighting. To do this, first of all, you will need:
- working thread gloves (it will be a little dirty);
- a piece of ordinary school chalk;
- relatively flat wall.
Types of lights on the VAZ 2114
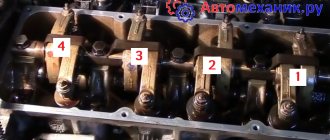
It is very easy to adjust the headlights on a VAZ with your own hands. The design allows adjustments to be made without removing additional plastic elements and the battery. The VAZ 2114 uses the following types of light sources:
- anti-fog;
- near;
- further.
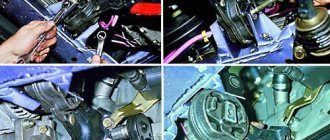
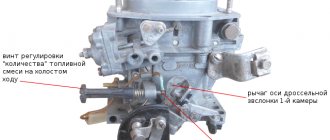
Adjustment of low and high beam is carried out using two built-in screws located in the main optics housing.
To adjust the fog lights, you do not need to remove the bumper. The screwdriver is placed in a special hole in which the bolt is located.
How to identify problems with optics
The need to adjust the light will be required in the following cases:
- lamps shine strongly up or down;
- the beam is shifted to one side;
- uneven brightness of headlights when inspecting the car;
- insufficient light intensity, a clear jackdaw is not visible;
- One of the headlights does not work.
The tuned optics of the VAZ 2114 or model 2115 cope perfectly with any weather conditions. To identify deficiencies, a visual inspection of the performance of the lamps should be carried out once a week, and adjustments should be made at least once a season.
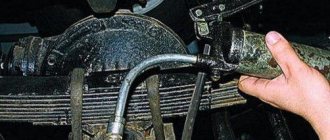
Depending on the condition of the car and its suspension, the load on the car, the correct installation of the headlights and the direction of the light flux may change. The headlights on the VAZ 2114 can be adjusted taking into account various factors; for this, a special device is used, which is called a hydraulic corrector. So, if the trunk of a car is loaded to capacity, then the front of the car rises and it is better to lower the beam of light. This way, the road will be conveniently illuminated, and not everything around the car. And oncoming drivers will not be blinded when adjusting the light output.
What do you need to know?
In order to adjust the headlights in the VAZ 2114 or, as motorists also like to call this model, “Samara-2” as competently as possible, it is first necessary to ensure that the following conditions are met:
- The tire pressure should be as required by the operating instructions for your car;
- the car must be in running order, that is, its fuel tank must be more than half full, or better yet, full, the car must have a spare tire and a set of tools;
- If you will be setting up alone, without an assistant, take with you a bag of something heavy that weighs the same as you (for example, a bag of potatoes).