Any owner of this car can carry out a full replacement of the rear brake pads on a Renault Logan. The condition of the brakes must be constantly monitored, so every motorist should know about the progress of such work. And at the next technical inspection, special attention should be paid to the condition of the brake system, because road safety directly depends on this.
And our article will tell you in detail how and when it is necessary to change the rear brake pads on a Renault Logan, as well as what will be necessary to replace them yourself.
How to prepare the car
To service the brakes, stop the car on a flat, horizontal surface.
Before starting work you need:
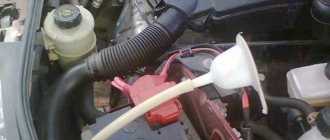
- Check the brake fluid level. If it is higher than normal (closer to the maximum mark), pump it out to the minimum level so that when installing “fresh” consumables (thicker and, accordingly, reducing the piston stroke in the working cylinder), the tank does not overfill.
- Loosen the wheel nuts (before jacking up the car). If you have a lift and a pneumatic impact wrench at hand, you can skip this step.
- Check the completeness of the consumables, the presence of the necessary tools, remove the decorative caps from the wheels (if any).
Installing wheel chocks
For work you will need a jack, a set of socket heads, a wrench, a powerful screwdriver, pliers, a wire brush, grease for the guides, rags and gloves.
Removing, replacing, installing the brake drum of the rear wheels of Renault Logan 2004-2020 petrol
Tools:
- Driver for socket attachment
- Knob attachment 30 mm
- Torque wrench
- Wheel key
- Jack
- Support posts
- Thin chisel
- Hammer
- Shoes (2 pcs.)
- Mounting blades (2 pcs.)
- Calipers
- File
Parts and consumables:
- Brake drum (2 pcs.)
- Hub nut (2 pcs.)
Notes:
The brake drum is replaced when it is damaged or severely worn.
Work is carried out on a raised rear part of the car, which is mounted on reliable supports. The parking brake must be turned off.
The maximum internal diameter of the brake drum should not exceed 204.45 millimeters (1.6 liter engine). For this car model with a 1.4 liter engine, the internal diameter of the brake drum should not be more than 181.25 millimeters.
1. Engage first gear.
2. Install wheel chocks under the front wheels.
3. Remove the decorative cap (if any) from the rear wheel.
Very carefully knock out the protective cap of the wheel hub. To do this, you can use a thin chisel and a hammer.
5. By removing the protective cap, we gain access to the wheel hub nut.
6. Loosen the hub nut and all wheel bolts.
Warning:
When loosening the wheel and hub nuts, the vehicle must be on the ground.
7. Use a jack to lift the rear of the car and place it on supports.
8. Completely unscrew all the mounting bolts and remove the wheel.
9. Make sure that the car is released. Completely unscrew the rear wheel hub nut.
Warning:
Do not reuse wheel nuts. After removing the nut, it must be replaced with a new one.
10. Remove the brake drum with the hub bearing.
Note:
The brake drum is made as one piece with the rear wheel bearing.
11. We measure the diameter of the brake drum. Replace it if the diameter does not meet the maximum permissible values.
Notes:
Brake drums are always replaced in pairs at once (on the two rear wheels).
There is no need to press the bearing out of the brake drum unless absolutely necessary (for example, to replace it), since the removed bearing will no longer be suitable for reuse.
12. Remove and check the second brake drum.
13. When installing an old brake drum, you need to use a file to remove the collar that formed on its working surface during operation.
14. Set the gap adjuster to its original position.
15. Using mounting blades, we bring the brake pads together.
16. Install the brake drum in the reverse order. The hub nut tightening torque should be 175 Nm.
Warning:
You cannot move the car with the wheel hub nuts loose, because... this will damage the bearing cage.
Currently reading: Renault Logan 2022: configurations and prices, photos in the new body, owner reviews
17. After assembly, it is necessary to establish the working gap between the brake pads and the drum. To do this, you need to press the brake pedal 10-15 times, all the way to the stop. When pressed, clicks of the regulator will be heard. Their cessation indicates that the working gap has been set.
18. Press in the protective cap of the hub nut.
19. Reinstall the wheel and decorative cap in the reverse order of removal.
20. Make sure that the wheel can rotate easily and freely.
Note:
A very light periodic touch of the brake pads to the drum is allowed.
How to replace pads yourself
We need to make sure that the handbrake is as loose as possible. Photo: s.drom.ru
- First, place the car on a flat surface. We fix the gear shift lever in first gear.
- Before jacking up the car, don’t forget to put anti-theft barriers on the front wheels. Each nut is loosened at the rear wheels.
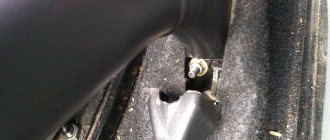
- We pry off the metal protective cap using a regular screwdriver. We remove it, and then loosen the locking nut, which secures the position of the wheel bearing and drum.
- The wheel and brake drum are removed after all the nuts have been loosened. And when one side of the device is removed. After dismantling, the drum is thoroughly cleaned of dirt and inspected for possible defects.
- After this, you need to remove the cup regulator along with the spring connected to it. The spring easily rotates 45 degrees if necessary. Pliers and a screwdriver will become indispensable assistants during the procedure. The support post is removed from the block in the next step.
- We use pliers to remove the spring that tightens the pads together. This is a long piece that is located on the top.
- Remove the pin.
- We remove the lower spring, due to which the pads are tightened.
- The last thing we do is get rid of the handbrake cable.
The next step will be dismantling the old pads. It is necessary to remove the bar that is used to adjust the gap and place it next to the tension spring.
Video instructions for replacing pads on Logan can be found in this video:
Installation of pads and spare parts after repair
Before installation, we will clean the pads. Most likely, they also need to be changed. To do this, remove the axial protection and remove grease and dirt using a cleaner. There is no need to lubricate the thread. Choose a lubricant that would protect against moisture. Then we apply a clamp to it. Since the caliper has already been serviced, you can start working on the pads. For Scenic 1 and 2 you need to do the following:
- Clean all threads and bolts with brushes. Install the brackets in their places, then tighten the bolts;
- The bolts on top should have some play. If this is not the case, we swap everything - a consequence of an error when assembling the bracket;
- We remove the pads and carefully inspect them.
Next we are installing the caliper and pads for Scenic 3. We put the caliper in the brake and put it on the hook from where we removed it. We place the pads close to the brake disc and attach the caliper to them on top.
Tighten the top bolt first, then move to the bottom
Important! Choose a middle key so as not to tear off the bolts
We put on the brake cable by hand very carefully and check all the work
The pads are set almost identically. The main thing is not to miss the verification steps after installation and installation.
- Without starting the engine, depress the brake;
- We check the parking brake at least 4-5 times;
- Then we manually scroll the cylinders. If they turn hard, it means the pads are pressed too tightly. To do this, remove the caliper and rotate the guide pins;
- If everything is back to normal, put the wheel back in place.
After this, you need to check the fluid level in the tank. Next, the second wheel awaits us. After all procedures, we fully check all the work done. For each stage model everything is the same:
- We start the car and check the brake pedal. You need to go both back and forth;
- We leave for 5 minutes in the city or surrounding area;
- For the first 200 km we do not press the brakes sharply.
If after checking the metal is not hot, everything is fine. If there were knocks or creaks - bad. Sometimes, when you hear the brake pads squeaking, you shouldn’t be alarmed. This is a normal phenomenon caused by friction of new material against old “proven” parts. It is best to change the entire set. It will be a little more expensive, but you won’t have to further disassemble the car at the first malfunction along the way.
When do you need to replace the pads?
Typically, this part is replaced when it becomes clear that the friction linings have worn out and when this interferes with normal vehicle control. 6 millimeters is the minimum thickness at which replacement is carried out. Measurements should not be taken by eye, but only using a caliper. The main thing is to measure along with the base.
In the case of the rear axle, all pads must be replaced; there are usually four of them. It is unacceptable to carry out the procedure only partially. Otherwise, driving safety is greatly reduced.
There is no data on how many kilometers the brake pads retain their appearance and functionality. But we can indicate the main factors influencing wear and its final value:
- Highways and their condition.
- The quality of the parts themselves.
- Driving style.
How to understand that the pads need to be replaced
Based on these signs, you can see a damaged part in any car, not just the Renault Logan brand. The critical thickness of the overlays is not the only parameter that matters. There are other signals that indicate a problem has occurred:
- On a slope of 20-25 degrees, the parking brake does not allow the car to maintain its position.
- The friction lining peels off from the base.
- Grooves, chips, and cracks appear on the surface of the brake drum.
- Cracks and squeaks appear when vehicles suddenly brake.
What tools do you need to replace?
Universal WD-40 is also useful when replacing brake pads. Photo: idolosol.com
To replace the pads, you will need to purchase:
- Reliable support for the vehicle.
- Calipers.
- Pliers.
- A screwdriver.
- Head for 30.
- Car mechanic's wrench.
Regular gasoline or a product labeled WD-40 will help clean the system of excess debris. To do this, they also take brushes made of a metal base, without which replacing the Renault Logan rear pads will be problematic.
Checking the condition of the brake pads
Renault Logan is equipped with rear drum brakes. The maintenance manual does not specify a specific time frame for replacing them, however, every 10-15 thousand kilometers it is necessary to check their condition. And if, upon inspection, it is determined that the thickness of the pads is 6 millimeters or less (including the base), then they should be replaced.
In addition, there are a number of other reasons, when they occur, replacing the pads becomes mandatory.
- Presence of cracks and chips on the drum base
- The appearance of a piercing grinding and squeaking sound from the pads when braking
- Detachment of linings from the base of the block.
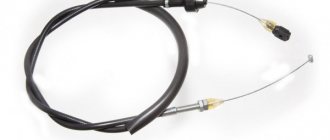
- The parking brake does not hold the car at an angle (the handbrake cable may need to be replaced).
Important!
When replacing brake pads on the rear drums, it is necessary to install all four friction linings on the axle; partial replacement is completely excluded.
What brake pads do Loganovody recommend?
Many companies have been certified for the use of brake pads, and Renault’s list is very large. However, over time, Renault Logan car enthusiasts have identified a list of clear favorites and outsiders. Thanks to this rating, you can easily make your choice and choose the best manufacturer.
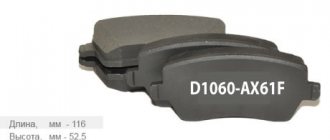
One of the brake pad articles (described below are the sizes used on Renault Logan)
Logan experts recommend:
- Mapco (Germany)
- Fenox (Belarus)
Rear pads from "dad"
- Ferodo (UK)
- Sangsin (South Korea)
- Delphi (France)
- Bosch (Germany)
Bosch brake pads
Loganovodov do not recommend:
- Markon (Russia)
- Finwhale (Switzerland)
Often, manufacturers of goods that do not meet the required quality package them in beautiful packaging with promising labels, which often do not correspond to reality. Therefore, it is worth learning from the mistakes of others and choosing only what has already proven itself.
Don't go wrong with your choice
The most reliable way is to come to the store with an old block
Please note that Renault Logan cars are equipped with three types of brake pads:
- Brake pads 180 mm. article 7701205758 (installed on cars manufactured in 2005) (most often Logan drivers take MapcO)
Mapco pads
- Pads 200 mm article number 6001551409 (designed for installation with Bosch brakes)
- Pads 200 mm article 7701203979 (installed on most cars)
Therefore, before making a purchase, you must find out your article number.
Brake discs get hot
The reasons for overheating of brake discs may be related to malfunctions of the brake system.
- The brake disc is warped. If the thickness is still within normal limits, you can groove the brake disc.
- Low quality brake pads (linings). Purchase pads only from trusted places.
- Wear of the brake disc and pads.
Overheating of disks can be determined independently by the color of the disk. At temperatures of 150–280 °C, the disk becomes yellow, at 300–450 °C, blue, and at 450–500 °C, black.
https://youtube.com/watch?v=XMyPmUjjhGk
We repair a Renault Logan car ourselves:
- Adjusting Renault Logan valves yourself
- Changing the oil in a Renault Logan engine yourself
How much will the replacement cost in a service station?
Each service division has its own price list. Usually this work is estimated at 500-1000 rubles. for replacing the rear brake pads. Depending on the degree of labor intensity of the event, prices may vary.
Regarding the pads themselves, we declare: the prices cannot unpleasantly surprise the buyer. The minimum price is about 500 rubles. per set. If you lean towards more expensive options, you can find a price of 2000 rubles. and more.
The nuances of inspecting elements in the brake assembly
1
We pay special attention to the condition of the drum. 203-204 mm – maximum parameters for the internal diameter on opposite sides of the working surface
If grooves or scuffs occur, we resort to urgent replacement of the part.
2. The outer cylinders also need additional inspection. Here you should move the edge of the boot from the cylinder body. If brake fluid is leaking, the part is defective and needs to be replaced. An assistant will be required to carry out the procedure for bleeding the brake system.
3. Let's move on to analyzing the condition of the brake hoses. The following should not appear on their surface:
- traces of leaks;
- hearths of mother-in-law;
- places of tears and abrasions of the outer shell.
If any of the listed criteria are present, then replace the hose immediately.
We begin installing the pads after completing the entire list of monitoring activities relating to each part of the brake mechanism. The installation process does not require any special skills.
Replacing the first type of brake mechanisms
- The first to be removed are the “soldiers” (a strut, a spring and a washer with a horizontal slot) that secure the brake pads to the brake shield;
- The “soldier” post passes through the brake shield into the hole in the block and a spring is put on it, which is fixed with a shaped washer with a slot;
- Removal is carried out by turning the shaped washer until its slot coincides with the flat body of the “soldier” stand;
- Now the pads are almost free and can be removed from the brake shield. To do this, pry up the lower part of the pads with the tip of a screwdriver, remove them from the lower stop of the pads onto the base of the shield and remove the pads as an assembly with the adjusting bar and springs;
- Now all that remains is for Loganavoda’s friends to give back only the handbrake cable, and this completes the removal of the Renault Logan rear pads;
- Before assembling new brake pads, you need to clean with a brush or rag and blow through all parts and components of the brake mechanism.
Where to find recommendations for choosing pads
There are many types of parts sold on the automotive spare parts market. The French concern itself, which produces cars, does not give clear and specific recommendations. It is best to rely on reviews that were left on specialized forums.
The purchase will be optimal if you take advantage of the experience gained from other drivers. And from a manufacturer you can trust. The main criterion for most remains the optimal balance between price and quality.
How much will it cost to replace it at a service station?
Each specialized center sets its own price level. The usual price level is from 500 to 1000 rubles per axle. But the numbers may change slightly up or down. It all depends on how complex the work is required.
As for the parts themselves, they also won’t cost too much. The minimum price for pads from an unknown manufacturer starts at 500 rubles. The most expensive versions can cost 2,000 rubles. All that remains is to choose what suits you in terms of quality.
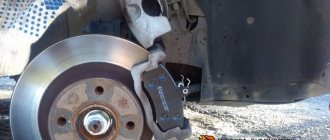
Inspecting the brake system on the wheel
We pay special attention to the condition of the brake drum. 204-203 millimeters - the maximum permissible readings for the internal diameter of this part
Otherwise, grooves and burrs appear. If such defects are already present during inspection, then the structure must be replaced. External cylinders also require additional analysis. We simply move the edge of the boot away from the body. If there is brake fluid on the surface, it means that there is definitely a malfunction in the unit. And a replacement is needed. Bleeding and removing brakes requires the involvement of a second person as an assistant. Finally, you can examine the brake hoses. And see if there are any cracks, smudges, abrasions or tears on them. If at least one of the defects is present, the part is immediately replaced with another.
Installation of new pads is carried out only after a thorough inspection of the entire system has been carried out. The installation itself does not require additional skills.
Signs of wear on Renault Logan pads
Wear sensors indicate that consumables need to be replaced. They are mechanical and electronic:
- Mechanical - just a short metal plate, which, when the thickness of the friction lining decreases, begins to rub the surface of the brake disc.
- Electronic - a pair of connectors, a wire, an electrical contact. After two-thirds of the friction layer is erased, the contact closes the circuit to the surface of the disc.
The signal for the need for replacement is a high, unpleasant whistle (creaking) in the area of the front wheels when braking. Another alarming sign is a burning yellow or red warning light on the instrument panel with the on-board computer message “check the pads”.
Products with electronic wear indicator
An objective indicator of the condition of the brakes is the thickness of the friction lining. The new part has a total height of 18 mm (for the front) and 4.5 mm (for the rear). Minimum acceptable values: 6 mm and 3.5 mm, respectively. If the lining has not yet been worn down to a minimum, but is already cracked, oily or worn at an angle, it will definitely have to be replaced (along with the others).
How to change rear pads: step-by-step instructions
Before starting work, you need to fully lower the handbrake lever. To clean stuck threads, you may need WD-40.
Renault Logan drum (rear) brake mechanism
Logan rear brake maintenance sequence:
- Loosen the wheel nuts, install a jack, and secure the wheels with “shoes” (stops). Raise the car.
- Remove the cap from the wheel hub nut, the wheel itself, and loosen the hub nut. Remove the brake drum. Clean the mechanism and inspect for defects.
- Remove the spring clips (turn their “cup” 45 degrees with a screwdriver, pull out the spring). Remove the garter springs. First the upper one, then the lower one, and then, after pulling out the pins, remove the handbrake cable and the “shoes” themselves, removing the adjustment bar from them.
- Replace the consumables by assembling the brake mechanism in reverse order. Carry out the same manipulations with the second wheel.
- After the car is removed from the jack, you need to activate the self-lifting mechanism by pressing the brake pedal several times ,
and also check the adjustment of the handbrake.
Wheel bearing tightening torques
How do you then replace the rear pads? Renault Logan is lowered from the jack. Finally, the hub nut is tightened. Experts recommend using a torque wrench. The nut on the Renault Logan rear wheel hub is tightened with a force from 180 to 210 Nm. In the absence of such a tool, you will have to expose everything by eye. So, the nut is tightened until there is a slight play on the wheel. The disc should “walk” a little if you shake it from side to side. Be careful: if you overtighten the nut, the wheel bearing may fly apart. Installing a new one will cost you 5 thousand rubles excluding labor.
How to replace the front ones
Installation of new front pads is carried out according to the following instructions.
- Secure the rear wheels with wheel chocks and jack up the front wheels.
- Remove the wheels and insert a screwdriver into the space between the caliper and pad, pressing the piston into the cylinder.
- Using a spanner wrench, unscrew the caliper clamp and lift its hinged part.
- Remove the pads from their guide and remove the retaining clips.
- Clean the pad seats from traces of corrosion.
- Apply grease to the surface of the guide and install new pads.
- Lower the caliper to its original place, tighten the fixing bolt and put on the wheel.
Required tool for replacement
To replace the rear brake pads yourself, you will need the following tools:
- Screwdriver
- Pliers
- Wrench and socket sets
- WD-40
- Jack and wheel chocks
- New pads
You can't go anywhere without WD-40! Rust converter may be required
Installation work must be carried out first on one wheel and then on the other
Please note that the included pads for the left and right wheels are different, do not confuse their elements during installation
detailed instructions
- First of all, you need to put the car on a flat surface, fix the gearshift lever in 1st gear and loosen the handbrake as much as possible.
- Before lifting the car on a jack, do not forget to place wheel chocks under the front wheels and loosen all the nuts on the rear wheels.
- Using a screwdriver, you need to pry up the protective metal cap and remove it, then loosen the nut securing the wheel bearing and drum using a “30” wrench.
- After lifting one of the sides and loosening all the nuts, remove the wheel and brake drum. After dismantling, it must be cleaned of dust and dirt.
- Next, you need to remove the cup adjuster and its spring (rotates 45 degrees). Pliers and a screwdriver work well for this procedure. Then remove the block support post from the hole.
- Then we use pliers to remove the spring that tightens the pads together (the long one is located on top).
- Remove (pin).
- Then remove the lower (tensioning pad) spring.
- And lastly, remove the handbrake cable.
- Next we dismantle the old pads.
- We remove the bar that regulates the gap (located next to the tension spring).
Inspection of the wheel brake system
Inspect the condition of the brake drum, the condition of the brake cylinder for leaks and biting
It is necessary to pay attention to the condition of the brake drum; the maximum permissible values of its internal diameter should not exceed the reading of 204.3 mm, or there are strong burrs and grooves on it. Then replacing the drum itself will also be a matter of course and mandatory.
We carry out an external inspection of the brake cylinders; to do this, just move the edge of the boot from the body
The presence of brake fluid on its surface will indicate that the unit is faulty (leaking) and requires replacement (an assistant will be required to dismantle and bleed the brakes). Additionally, we inspect the brake hoses for cracks, leaks, abrasions and tears. If any of the above are found, then they also need to be replaced.
When the entire brake system on the wheel has been inspected, it is necessary to install new pads. All installation is carried out in proportion to removal and does not require additional dexterity and skills.
Hooray! New pads finally installed. Putting it all back together
Exactly the same procedure must be performed on the second wheel.
Setting up the handbrake and checking the operation of the system
After the pads are installed and the car is removed from the jack, you need to make sure that the system is working, namely, that the gap between the pads and the brake drum is set. To do this, you need to press the brake pedal several times, as a result of which the automatic adjustment mechanism will work and characteristic clicks will be heard. After a short effort they will stop - this will indicate that the adjustment is complete.
Next, you should check the progress and condition of the parking brake; if necessary, it should be adjusted.
» alt=»»>
ADVICE!
In a complex of three or four times, you need to accelerate to 60-70 km/h and brake smoothly. It is these actions that will allow the pads to smoothly grind into the brake drums.
To summarize, we can confidently say that the procedure for replacing rear brake pads for Renault Logan is within the power of any motorist who likes to maintain his car on his own.
How to manually replace elements on the rear axle?
But if the car owner is more or less experienced, then replacing the rear brake pads is not such a difficult procedure for him, even if he does everything with his own hands, especially if he reads the video or printed instructions in advance.
- First, we install the car on a level area. Using the lever, we activate the first gear in the box.
- Before lifting the Renault Logan using a jack, do not forget to place anti-roll devices under the front wheels and loosen the tightening torques of the wheel rim fixing nuts.
- Remove the safety cap with a screwdriver. Loosen the tightening torque of the nut that secures the drum and wheel bearing.
- We dismantle the drum itself with our own hands and clean its surface from dirt and corrosion deposits. We inspect the entire area of the working area for wear and the presence of the previously mentioned defects.
- Next, we dismantle the cup regulator together with the spring element. Without fanatical effort, we turn the spring itself at an angle of 45 degrees (if the need arises). We use pliers in combination with a screwdriver.
- Next, remove the support post from the corresponding block.
- We remove the spring that serves to tighten the block. We use the same tools. The part is located in the upper area of the brake mechanism.
- Remove the pin.
- Remove the spring at the bottom of the assembly.
- The last step is to disconnect the handbrake activation cable.
We proceed to dismantling the used pads. Here you will need to remove the bar used to adjust the gap. It is located near the tension spring.
Which pads to choose
In order not to buy a fake, choosing among trusted manufacturers (FERODO, Delphi, Brembo, ATE, TRW), avoid frankly cheap options.
Renault Logan 2 cars are equipped with front disc brakes. Disc diameter 238 mm (or 259 mm), thickness – 12 mm. The most convenient way to select suitable spare parts is by the VIN code of the car.
New pads for the front brake Renault Logan
| Manufacturer | Original | Applicability (Logan modification) |
| Delphi LP885 Brembo P68008 | 7711130078 | I, II |
| Lucas/TRW GDB1465 | 7711130071 | I, II |
| Bosch 0986467720 FERODO FDB4615W | 7701207066 7701208265 | I, II |
Cars Renault Logan LS (1.4; 1.6), produced from the end of 2008 to 2015 (including transitional models of the 2009 first generation), Renault Logan II - are equipped with “drum” systems of 3 modifications at the rear.
| Manufacturer | Drum diameter | Original | Applicability (Logan modification) |
| Bendix TRW | 180 mm (180×42) | 7701205758 | I 2005 |
| DELPHI ATE Lucas/TRW | 200 mm (203×39) | 7701203979 7701210109 6001549703 | I, II |
| Bosch | 200 mm (203×39) | 6001551409 | I, II |
No need to save. It is better to take spare parts that cost above average. Friction linings come in “soft” and “hard” types. The service life of “soft” ones is less than that of “hard” ones, but they do not wear out the surface of the disks as much. Hard “carbon” linings can withstand high temperatures. They are designed for aggressive driving with frequent braking. They are placed on ventilated brake discs.
What's the result?
Taking into account the above information, it becomes clear that timely maintenance and high-quality repair work on replacing brake pads allows you to obtain maximum efficiency of the car’s braking system.
At the same time, it is important not only to change them on time, but also to select them correctly, since safety and comfort directly depend on their quality. Finally, we note that the condition of the pads must be constantly monitored, since critical wear of the friction linings will lead to the brakes deteriorating and the pads will begin to damage the brake discs and drums.
To prevent this from happening, the driver must pay attention to the main and indirect signs of wear (for example, squeaking or grinding brake pads), vibrations during braking, the car pulling away from straight-line motion, etc. If such signs appear, replacing the pads can often solve the existing problems.
How to recognize a malfunction?
Drum failure due to insufficient attention often manifests itself as failure of the brake system
For this reason, it is important to promptly replace failed parts.
Due to the fact that the rear brakes take on less load, it is not immediately possible to notice a decrease in their effectiveness. The difficulty lies in the fact that this process occurs gradually and is almost imperceptible to Logan owners. The easiest way to recognize a breakdown is to sharply press the brake. In such a situation, there will be a noticeable decrease in braking efficiency.
Pay special attention to the presence of leaks in the system. It is known that loss of tightness in any circuit leads to an increase in braking distance
The appearance of “softness” in the pedal indicates that air has entered the system.
A common problem with brakes on the rear wheels of Renault is misalignment of the linings, failure of struts or springs. As a result, extraneous sounds appear due to the mechanism touching the drum. At the same time, the risks of overheating of the brake unit, decreased rolling of the car, or increased “consumption” of brake fluid increase. If the shape of the drum has changed, this will cause pulsations or jerking. This problem can also cause tread wear.