The clutch in a car serves as the connector between the engine and transmission. This unit takes on all the load that occurs when changing gears. Accordingly, the part can rightfully be considered a consumable item, because car owners regularly face the need to replace it or schedule maintenance.
It is almost impossible to influence the degree of wear of this unit. Therefore, after the clutch has exhausted its service life, it must be replaced partially or completely (in case of serious malfunctions).
When is it necessary to change the unit?
The mechanism requires servicing in the following situations:
- The clutch "drives". Motor power drops.
- The unit slips or incomplete activation occurs.
- Clicking noises are heard when changing gears.
- The clutch disengages automatically.
- Vibration is noticed when the clutch pedal is pressed.
In each of the above cases, it is recommended to carry out partial maintenance or replace the unit in question.
Axle shaft seal VAZ 2107 number
Dear visitors of the “Cars” website! We will be very grateful for your comments on the video clip “Axle seal VAZ 2107 number”; registration is not required for this. We also ask you to let us know if you have any problems playing the video.
tormoza nado bylo pomyt benzinom i kistockoi :
There are a lot of similar videos, they are not interesting. I watched the video from Oleg, it was very interesting and I became interested in repairing the car myself:
Is there one seal or on both sides?
It’s obvious that this is not the first time you’ve changed the oil seal... but damn, was it really difficult to tap the mudguards and knock the snow off the arch? It’s not pleasant to sit in this melted puddle of shit and dig in the dirt... It’s better to hammer the oil seal into the seat with a pipe of the same diameter as it, otherwise it may not press evenly. I don’t know how, but I wipe the seat seat dry and lubricate it with sealant.
With this amount of oil, this wheel will not slow down all winter and all spring. During emergency braking on a winter surface without the clutch depressed, due to the non-braking of one wheel, it can spin through the differential so much that before you have time to react, it will turn 180 degrees, and depending on your luck.
very useful video, everything is accessible and clearly explained and shown
I unscrewed these 4 bolts, but the axle shaft cannot be removed
The brake drums are stuck, can you tell me how to remove them?
Doesn't look like butter. It looks like a brake. By the way, my oil seal cracked and everything was covered in oil. It slows down with oil, and how. The pads stick. The wheel blocked at the slightest braking, although I thoroughly wiped off all the oil with a rag from both the pads and the drum. I had to take it apart and wash it again. I came across some acetone soap.
Hello, can you show me how to replace the front oil seal on the third engine?
But it was impossible to remove the mess from the fender liner... everything flows straight onto your hands and onto the pads... I never do that... to pick around in the dirt...
but a rubber band is still needed, like a seal before putting the axle shaft back
They say that before you remove the axle shaft, you need to set the marks so that you can put it back exactly as it was, otherwise there will be vibration. Any opinions???
Thank you
Excellent video, but at the end, when tightening the wheel bolts... we pull all the way, I’ve already changed two axle shafts, it seems like I’m not strong, but the thread breaks right away. And I can’t even count how many bolts I’ve torn off in 10 years... I wish I had a Dino key a long time ago bought it So pull it carefully
after replacement, oil still continues to flow, everything was pressed in exactly, the assumption is that there is a gap in the cavity where the oil seal was pressed in. How to solve this problem? maybe someone knows
bit nado rovnomerno, inache budet tech , kak na video
Why didn’t I wash everything from oil there and put a drum in?
Handsome man. I'll go try it myself. In the service they want 1000 for work:
try hammering it in with a mallet, it’s better and easier, you can hit the top of a pointed mallet with a hammer. verified
Nuances of the work
Following all the recommendations from the automaker's manual does not guarantee that everything is done simply and quickly. Not every car owner has the opportunity to drive the car onto a pit or overpass. A lift is perfect for carrying out work, but not everyone has one either.
When you contact any service, the replacement will be made within a couple of hours, but for such a service you will need to pay a considerable amount. It may take a whole day to do the work yourself. Maybe more if you don't have experience in car repairs.
Most of the time is spent on disassembly and assembly. The operation to replace the node will take you no more than half an hour. Later in the article we will look at the process of replacing a clutch without a pit/lift.
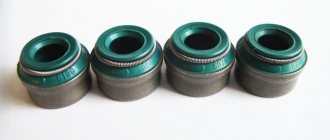
Eliminating oil leaks from under the valve covers
If leakage occurs due to a poor gasket, the defect can be eliminated quite simply - it is necessary to change the sealing material between the valve body and the cylinder head. The valve covers are also easy to change, but here the car owner may encounter another difficulty - on some foreign cars the part can be expensive. There is an alternative option - buy a used spare part at a dismantling station or through an advertisement.
When oil leaks due to poor crankcase ventilation, clogged passages should be cleaned. The ventilation system has a different design depending on the engine model; before you start cleaning, you should find out where these channels are located.
If oil is squeezed out from under the valve body due to a faulty piston group, this is the worst option. Here, cleaning the channels and replacing the gasket will not help; at a minimum, you will have to change the piston rings or carry out a major overhaul of the engine.
Before starting work
Almost every car owner is interested in the question: is it possible to perform a replacement without dismantling the gearbox?
You are unlikely to find a definite answer, but the procedure is quite feasible. First of all, find several large stumps up to 40 cm high, and also get a few additional bars. To prevent the car from simply falling during the work, take care to install a pair of regular wheels under the car.
Whether to remove the gearbox or not - you will have to answer this question specifically. Because if you act carelessly, the gearbox may simply fall to the ground, and lifting it from under the car will be very problematic.
Initially, disconnect the battery so that the machine's electrical system is de-energized. You can then proceed to the process shown in the following list:
- Remove the wheels and move them away from the car.
- Remove the steering ends and free the racks.
- Unscrew the ball joint mounting bolts.
- Remove the engine protection using the cable.
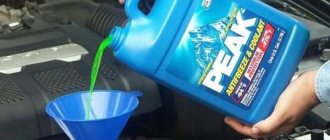
- The next step is to drain the oil from the box.
- Loosen the rocker nut and remove it.
- Unscrew the nuts on the two pillows.
- Place a jack or other support under the engine.
- Disable the reverse sensor.
- Disconnect the wires from the starter, unscrew the nuts and dismantle it.
- Unscrew the nuts on the flywheel guard and fork.
- In this step, remove the CV joint on the right side. The left side should not be dismantled.
- Unscrew the fixing bolts to the gearbox block.
- In the last step, unscrew the nuts that are located above the right CV joint.
Reasons for oil leakage from under the valve cover
It should be noted right away that motor oil cannot just appear outside the engine, and it can leak from under the valve covers for the following reasons:
- the gasket is torn or its material has become too hard (stiffened);
- the valve cover itself has defects - chips and cracks if it is made of aluminum, as well as a deformed surface adjacent to the cylinder head if the cover is made of steel;
- crankcase ventilation ducts are clogged;
- the cover is not tightly bolted to the cylinder head - the threads on the bolts are broken, in the very head of the block;
- the piston group is faulty - excess pressure is created inside the engine, and oil is squeezed out through all connections.
If the oil leaks a little, there is no particular problem, but it is unpleasant - the engine becomes oily, and dirt instantly forms on it. A significant leak becomes dangerous - if you do not add oil in time, the engine may knock, and then serious repairs will be necessary.
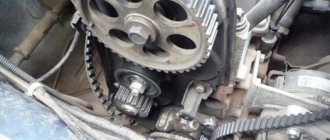
Leaks from under the valve covers also cause other troubles - oil getting on the timing belt can lead to disruption of the valve timing. If the belt jumps on the gear teeth, the valves will meet the pistons, and in this case, the engine will also have to be thoroughly repaired.
Clutch replacement
After the preparatory work has been completed, you can remove the box.
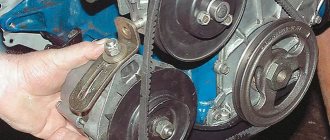
However, don't rush. To continue the process, take the two bolts from the upper arm. These elements have a thread suitable for our situation. Screw them in from above and you can begin to separate the units using a crowbar. This clutch replacement scheme is very labor-intensive. Remove the release bearing through the gap and unscrew the basket bolts. Compared to the instruction manual, the replacement process is slightly different. The new release bearing is installed in its place. Next, the disk is placed on the flywheel, and only then the basket is put on top.
The bolts need to be tightened approximately two turns. They should not be over-tightened. In the next step, with extreme care, begin to slide the input shaft onto the disc splines.
During the replacement process, pay attention to the petals of the basket. These elements have an insignificant operating life. Therefore, if necessary, they should also be replaced.
After carrying out operations to replace the clutch, reassemble the car in the reverse order. At this point we can consider that the repair is completed.
To summarize, we note that from the article you learned how to replace the clutch on a VAZ-2109 with your own hands. If you feel a lack of experience in car repairs, then the best way out of the situation is to contact a service station. In this case, you will save a lot of time, nerves and money.
The clutch is one of the main components in a vehicle, without which the operation of the machine is impossible. Therefore, replacing the VAZ 2109 clutch in the event of its breakdown is a mandatory procedure. In this article we will tell you how to repair and install the unit at home, which clutch is better to install and how much repairs cost on average at a domestic service station.
So, when does a clutch basket need repair?
It is necessary to change the node if the following symptoms occur:
- If, while driving, your vehicle suddenly begins to slip and the unit does not turn on completely. In particular, the engine will gain power, but the car cannot accelerate; as a rule, this problem is especially acute when driving uphill. In addition, you may hear an unpleasant odor in the cabin, and gasoline consumption will also increase significantly.
- If the clutch system (hereinafter referred to as SS) is driven, that is, it does not turn off completely. In particular, changing gears will become more difficult, and when the reverse gear is engaged, a sound appears, while the gearbox operates in normal mode.
- When the car starts moving, jerking will occur.
- In general, the SS is noisy, it rattles and makes some sounds when you press the accelerator.
- Another symptom indicating that the CC needs to be changed is the appearance of a knocking sound when the pedal is released.
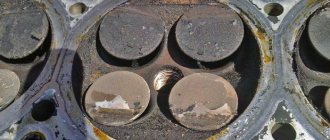
Oil leak due to bad piston group
When the engine is completely covered in oil stains, and cleaning the ventilation does not produce results, most likely the piston rings are broken or “seized.” In this situation, only repair will help, but first you need to determine whether the piston group is really to blame.
Signs of a faulty cylinder-piston group are as follows:
- the engine idles unstably and does not develop the required power;
- There is bluish smoke coming from the muffler pipe, it becomes more noticeable during throttle changes;
- smoke is also clearly visible if you remove the oil filler cap;
- Oil smudges appear not only in the valve cover area, but throughout the entire engine at the junctions of its parts.
In this case, repairs should begin by removing the cylinder head. If there is no wear or scoring in the cylinders, you can try changing the piston rings. If the cylinders are damaged, the engine must be removed and overhauled.
Signs and causes of clutch failure
The VAZ 2108, 2109, 21099 clutch consists of a basket, a pressure bearing, a drive and driven disk. The main signs of a clutch malfunction are clutch slipping and incomplete disengagement:
- When switching off is incomplete (the pedal is pressed), there is difficulty shifting gears with the engine running, noise and crackling noises when changing gears, and large free play of the clutch pedal.
- When the clutch “slips” (the pedal is released), a burning smell may be felt in the cabin from the burning of the clutch disc linings, the car’s dynamics will deteriorate, the engine may overheat, and fuel consumption will increase.
In addition to the clutch disc itself, the release bearing can also fail - it serves to smoothly engage and disengage the clutch. When the release bearing wears out to the limit, you can hear a characteristic squealing sound - this is a sure sign that the bearing needs to be replaced. The cause of clutch failure may also be a breakdown in its drive mechanism, for example, a break or jamming of the clutch drive cable, a breakdown of the lever system, a fluid leak from the hydraulic drive if the clutch is hydraulic, or other similar breakdowns in the drive.
By the way, when replacing the release bearing at a service station, they may advise you to also replace the clutch disc. Usually, if problems begin with the clutch, it is better to replace all these parts, because replacing the clutch is very difficult: you need to remove the gearbox. But if someone wants to save on this, then all clutch parts can be purchased separately.
To work you will need the following:
- wrenches 8, 10, 13, 17 mm;
- torque wrench, 8 mm socket;
- jack;
- container for draining oil;
- inspection hole or lift.
- flat screwdriver, hammer.
Eliminating oil leaks from under the valve covers of Daewoo Nexia
On 8-valve Daewoo Nexia engines, oil leakage is also a characteristic disease; this defect also appears on Opel Vectra A and Chevrolet Lanos with 1.5 or 1.6 l (8-cl.) engines. Mostly oil leaks from under aluminum caps, and replacing the gasket does not help in many cases.
The owners of Daewoo Nexia have found a way out of the situation - they need to purchase a plastic valve cover; these covers fit tightly to the camshaft housing and very rarely leak oil.
Replacing the clutch on a VAZ 2109/21099 without removing the gearbox
Replacing the VAZ 2109/21099 clutch without removing the gearbox is quite difficult. You will not find instructions or recommendations on this topic in the car's owner's manual. These recommendations are based on the experience of car enthusiasts who share their experience of replacing the clutch.
The main problem when replacing a clutch is that not every motorist has an overpass, a pit, and especially a lift, and it is necessary to make sure that the massive gearbox does not fall to the ground. But lifting it is problematic, since it is impossible to crawl under the car with it. All steps for removing the gearbox are almost the same as the instructions above, with the exception of some nuances:
- Purchase two bolts from the upper arm of the classic front suspension from the store. Their threads are exactly the same as those on the bolts that secure the box and the engine block together.
- Screw them in from above, only after that, with a small crowbar or screwdriver, we begin to disconnect the nodes. After moving away, the rear part of the box will rest on the transverse rod, and a gap of about 15 centimeters will form between the clutch housing and the flywheel.
- The release bearing is removed through the resulting gap and the bolts on the basket are unscrewed.
But the installation is slightly different from the process shown in the instructions:
- Place the new release valve in its place. Then a disk is installed on the flywheel and a basket on top of it.
- Just tighten the bolts a couple of turns, but do not overtighten!
- Carefully begin to slide the input shaft onto the splines in the disc.
- Then we move the box back and tighten the bolts on the basket. The basket fastening bolts are tightened only after the box is installed in its place.
- After this, you can install the gearbox and tighten the bolts on it.
How to check and replace a VAZ-2107 axle shaft
Measuring the axial free play of the axle shaft on a car
The axial free play of the axle shaft can be measured on a vehicle both with the wheel and brake drum removed and without them removed. In the first case, the measurement is more accurate.
rice. 1 |
For what:
– remove the caps from the rear wheels and loosen the bolts securing them;
– place stops under the front wheels and lift the rear axle;
– release the parking brake and set the gear shift lever to neutral;
– remove the wheels and brake drums;
– screw device 02.7834.9504 to the axle shaft;
– pass the indicator leg extension 1 through one of the two large holes of the axle shaft until it stops in the brake shield or oil deflector and secure the indicator;
– take measurements with an indicator, applying a force of about 49 N (5 kgf) to the axle flange in both directions, along the axis of the rear axle. Free play should not exceed 0.7 mm. Measure the free play of the axle shaft without removing the wheel and brake drum as described above, taking into account the following features:
– secure device 02.7834.9504 using one of the holes for the wheel bolts;
– pass the leg of the indicator extension through another hole for the wheel mounting bolt;
– the force applied to the wheel along the axis of the rear axle should be about 98 N (10 kgf), the free play of the axle shaft should be up to 0.7 mm.
Replacing the axle shaft and its cuff
We hang the rear of the car on tripods, remove the rear wheel and brake drum. Using a jack, we lift the disassembled edge of the rear axle beam so that after removing the axle shaft, the oil does not spill out.
| 1. Using a “17” socket, unscrew the four nuts through the holes in the axle shaft flange. | 2. Remove the elastic washers with tweezers. |
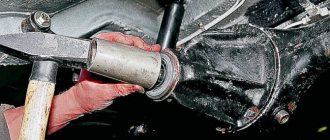
| 3. We attach an impact puller to the axle shaft flange and knock the axle shaft out of the beam. Instead of this device, you can use the removed wheel. We install it with the reverse side on two bolts and with a sharp movement pull out the axle shaft. | 4. The axle shaft is removed along with the oil deflector, mounting plate, bearing and locking ring. |
| 5. A rubber O-ring is installed between the beam flange and the brake shield. | 6. Using sliding pliers, remove the axle shaft cuff from its socket in the rear axle beam. |
| 7. Using light blows of a hammer on the socket head (a piece of pipe of suitable diameter), press in a new cuff. | In case of deformation of the axle shaft, large radial and axial clearances in the bearing, displacement of the locking ring, wear of the splines, the axle shaft must be replaced as an assembly. Replacing the bearing and snap ring alone is not recommended. Install the axle shaft in the reverse order of removal. Before installation, lubricate the working surfaces of the cuff with Litol-24 lubricant. |
Advice
For those who have not removed the bearings from the seat. In general, all bearings are pressed into place at the factory. In garage conditions, there is no press; in addition, equipment (beds, tables with stops, mandrels) is also needed. Therefore, to remove the bearing by blow, you need a very massive hammer. So that the blow is massive at a low speed of movement of the hammer. Even with a strong blow, the bearing cannot be removed with a light hammer - the blow will be elastic.
The drive seal is now clearly visible. To remove the oil seal, use a large flat screwdriver point-blank, tapping it diametrically in a circle.
Now be sure to inspect and clean the seat of the right drive oil seal with a rag. If it has holes or corrosion, in addition to cleaning, it is advisable to use a seating lubricant for the new oil seal.
Everything is ready for assembly. We press the axle shaft seal into the seat using a mandrel or head of suitable diameter.
Assembly is carried out in reverse order.
On all “classic” models (VAZ 2101-07), replacing the oil seals of the right and left drives occurs in the same way.