Replacing or repairing the Logan sedan bumper will not be difficult. You just need to remove this part correctly without damaging anything around it. On the body of many passenger cars, shields are installed under the bumper. Renault Logan also has them, and before removing the front bumper, you need to get rid of the shields. It would be better to drive the car itself into a pit - we are not considering other options.
The bumper is removed to install DRLs, install fog lights, or simply for repairs.
Down with the shields
Remove the shield installed on the left. It is mounted on self-tapping screws, as well as on two pistons (see photo).
Find five fasteners
For self-tapping screws you need a Torx T20 key. You will also need a flathead screwdriver. It’s better to do the work from a hole, but craftsmen remove the bumper from the curb; Logan’s ground clearance allows you to get to the fastenings without a lift.
The spacer screw is unscrewed from the middle (central) piston, but not completely, but by 2-3 turns. The piston is pulled down by the head of the screw, and nothing else is required. The second piston, located on the edge, is pressed out with a screwdriver (see photo).
Screwdriver – between the shield and the body
The simplest thing left is to unscrew three self-tapping screws. Take a Torx wrench and you'll be fine.
The right shield is removed in the same way as discussed. Let's move on to the question of how to remove the front bumper on a Renault Logan.
Dealing with the fender liner from the edge of the bumper
Near the bumper on each fender liner there are two self-tapping screws. A Torx T20 key will help solve the problem. And then the most difficult thing begins - you will need to bend the fender liner!
Bend point
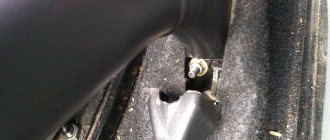
The idea is to place a “10” key in the upper corner of the bumper. This will be a socket wrench, and it is brought in from below. Next, unscrew the fastening screw.
For the left and right fender liner, all actions look the same.
Step-by-step instruction
1. First, you need to unscrew the fasteners from the bottom of the bumper.
Remove two clips (small and large) on the left and right.
To remove the small clip, use a flathead screwdriver to turn it counterclockwise about a quarter of a turn. Next, we pick out the central part with a spatula or a flat screwdriver, and then we pick it up at the base and take it out.
To remove the large clip, you just need to pick it up.
If you remove the clips, you will remove the bumper along with its protection. If you want to remove without protection, then unscrew three screws on the right and left.
2. Unscrew two screws securing the bumper to the fender liner on the right and left.
3. After unscrewing the screws securing the bumper to the fender liner, bend the liner and unscrew the bolt securing the bumper to the fender. We do this on the right and left.
4. Unscrew the three screws securing the bumper from the bottom center.
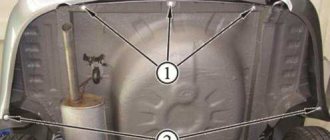
5. Open the hood and unscrew the four screws securing the bumper on the Renault Logan on the top bar.
6. We take hold of the grille and remove the bumper towards ourselves.
Attention, if you have PTF installed, then disconnect the power connector before removing the bumper. It is common to two PTFs and is located near the left wheel.
Video lesson
We dismantle the front bumper
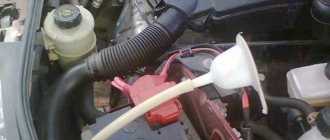
If the package includes PTF headlights, you need to turn them off (read more about replacing the lamp in PTF here)! There is only one connector used, and it is located above the left shield (which has been removed).
Headlights included in one plug
We disconnected the connector and then looked for the attachment points. In total there are 7 of them left.
Screws on the bumper
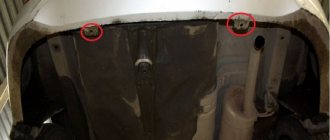
Taking the T30 key, unscrew the three screws from the bottom. They go “in one line” (see photo).
Seven attachment points
Then you can drive the car away from the pit and unscrew the screws on top. The same key is used (T30).
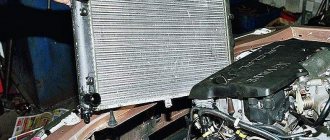
The part called “bumper” can be pulled towards you. At the same time, she is held by the bars of the grate.
We only pull behind bars
We looked at how to remove the front bumper on the first generation Renault Logan.
Related Renault Articles
Arriving home, I looked at all the places where I had missed silicone. Nowhere where mud had previously appeared after even a little rain was clean.
Yesterday it rained in Tula for more than half a day. Bend the fender liner and use a 10mm socket wrench to unscrew one bolt on each side.
With a little effort, we disengage the bumper from the fender guides, and then move on to the next side. The final phase of work on the bottom will be unscrewing three bolts in the central part of the body, for this we use a Torx key - T. Having opened the hood on your Renault Logan, you will see 4 more bolts securing the front buffer from its upper part.
We unscrew these 4 bolts with a Torx key T. After carrying out the above operations, grab the hard places of the part and boldly pull it towards you. Dismantling can be considered complete. If your Renault Logan has fog lights, before removing the bumper you need to disconnect the electrical connector on the left side behind the fender liner.
This work takes about ten minutes, and any Renault owner, even those without experience, can do it
Rear element The rear bumper also provides important protection for the Renault Logan, since most accidents also occur there.
Second generation of the model (since 2009)
Let's see what the bumper looks like in the second generation. It is shown assembled with the radiator grille.
Single node
The bumper and grille form a single unit. The number of attachment points is 11:
- 4 screws on top (see photo);
- 3 screws from the bottom;
- 2 self-tapping screws on the side edges at the bottom (fastening the fender liner);
- 2 screws in the corners.
The assembly assembly is removed in the same way as the bumper in the first generation. Use the instructions for “generation 1”.
Here we discuss how to remove the front bumper of Renault Logan 2. There is also generation “3”.
Preparing tools and accessories
To perform the operation, you will need a set of tools that every motorist has in the garage. When replacing the rear and front bumpers of Renault Logan, you will need:
- Flat head screwdriver.
- Open-end and socket wrenches “10”.
- Torx keys (T20-30) have a tip in the form of a six-pointed star.
To change a car body part, you will need to drive the vehicle to an inspection pit, or use a lift. Thanks to this, replacing the element will be more convenient.
Immediately before dismantling, you need to clean the bottom and fender liners. This procedure will prevent dirt from falling off during operation.
Removing the grille without removing the bumper
If you remove the front bumper of the new Renault Logan, the radiator grill will also be removed. But getting rid of the bars can be easier.
Car without a grille, but with a bumper
We will talk about the second generation of cars. Need a drill:
- Remove the chrome "saber". Along the edges under the “saber” there are rivets (aluminum). They must be bitten off with tongs;
The “saber” can be glued back
- Unscrew the 4 screws on top;
- Having folded the grille towards you, you need to drill out the rivet under the emblem;
- The lower edge of the grille is held on by rivet tongues (plastic). They bend by hand and are easily disengaged.
Use our method if you no longer need the old part.
How to diagnose the problem at an early stage?
In order to promptly determine the malfunction of the Renault drum and rear brake as a whole, you should contact a service station. Experienced specialists carry out a full range of activities to check drums at a special stand. In this case, the computer records the main parameters and provides results on the need to replace the part.
In normal operation, the problem is diagnosed by the appearance of brake fluid on the mechanism cylinder or by sharply pressing the brake (the road must be dry). The last test should be carried out 3-4 times. If the braking distance marks are even, then the brakes operate evenly.
To determine whether Renault drums need to be removed or not, check the condition of the working part and measure its diameter. So, if this parameter is more than 18.124 cm (for a 1.4-liter engine) or 20.445 cm (for a 1.6-liter engine), then the device requires replacement. In addition, the drum will have to be removed to install new pads, to check the brakes, or to adjust the system cylinders.
Self-recovery
Of course, it is easiest to repair an unpainted bumper. In addition, scratches on it are almost invisible, so basically only large defects such as cracks are eliminated. One way to restore a bumper is gluing. To do this, you will first need glue and sandpaper. You can purchase a repair kit that includes, in addition to these components, a hardener.
Most often, bumpers are glued with epoxy glue, but Renault Logan owners say that this substance does not interact well with the plastic of the bumper, so they recommend additionally reinforcing it with fiberglass in several layers.
Work begins by treating the damaged area with coarse sandpaper, after which it is degreased. Then, glass fiber fragments pre-impregnated with epoxy glue are placed on the crack, one on top of the other, taking breaks for the polymerization of each of them. In addition, each layer of material must be sanded with sandpaper after polymerization.
RENAULT LOGAN 2 NEW. Installing a mesh in the bumper. Removal and installation iaarus.ruT LOGAN II
Screw in the four bolts at the top without fully tightening them. Don’t be afraid to damage anything, everything is located far away. We don’t remove the jack from under the bumper.
Grab the edges of the part with a partner, and then carefully bring this part to the place of its installation
Then unscrew the bumper from the fender liner and unscrew another bolt securing it to the side of the body….
In some cases, when replacing this body element, Renault Logan owners, without being careful during the installation phase, risk damaging the paintwork. This work takes about ten minutes, and anyone, even an inexperienced Renault owner, can carry it out.
A simple and affordable bumper replacement for every driver makes it possible to maintain the aesthetic appearance of their car in proper condition without going to a car service center, and this saves both time and money. Removing this part on Renault Logan is carried out in a slightly different way and requires a certain tool.
The upper bumper mount will move slightly. Take a utility knife and cut out small rectangles and screw the bolts back in.
That's it, the jack can be removed. The bumper no longer sags, the gaps have become much better and the bumper now holds very tightly, there is no play.
Next, I took colorless silicone sealant and applied it under the headlights and between the fender and bumper. I degreased everything first with a degreaser.
bumper mounting bracket for Renault Logan/Sandero, bumper repair, spare parts overview
Remove excess with a wet, clean cloth. When I was driving from my parents on May 1, we got caught in a short but rather heavy rain on the way.