Many domestic cars with carburetor engines have a traction drive of the carburetor throttle valve. It is not clear why this design was made, but certainly not for the convenience of the driver.
- the mechanism does not allow precise dosing of the force on the pedals, therefore the addition of gas does not occur smoothly, but in jerks;
- the rods have play in the brackets, which does not add comfort when operating the engine;
- Additional noise and vibration penetrate into the cabin through the metal of the drive.
The only advantage of the traction mechanism is high reliability. Perhaps this was the reason for the development of such an archaic unit, but the numerous disadvantages of such a solution outweigh its only advantage. It is no wonder that many owners of such cars try to replace the traction with a cable.
Replacing the throttle valve drive on VAZ 2108, VAZ 2109, VAZ 21099
Welcome! Today, from this article, you will learn for yourself how to correctly change parts that relate to the throttle valve drive on fuel-injected cars of the Samara family.
Summary:
What parts are related to the throttle valve actuator? There are a lot of things associated with the drive, the main ones are:
- A cable that is designed to adjust the position of the throttle valve. In short, it is also simply called “throttle cable”.
- The main parts of the drive also include the gas pedal and other things, such as brackets, springs, sectors, etc.
When should throttle valve actuator parts be replaced? Here everything depends on the wear and tear of this or that thing, for example:
- The throttle cable needs to be replaced if it gets stuck frequently. That is, for example, you are driving a car, you squeezed the gas all the way, let’s say, to overtake, and after overtaking, you took your foot off the gas, and the car just accelerated and continues to accelerate. Has anyone had this happen? The situation described above clearly shows that the cable is stuck. After detecting such a situation, the cable must either be changed or look for what it gets caught on when you press the gas pedal.
How to adjust a cable pedal?
If the carburetor cable is set correctly, but there is still play, the problem is in the pedal itself. To return the damper to its original state, a spring is installed on the pedal. It can be spiral or regular, tensile. Over time, elasticity is lost and the spring must be replaced.
In addition, play in the rotation axis is possible. After adjustment, the pedal should not move horizontally, otherwise it can get caught on the side wall of the central tunnel and the unit will jam.
How to replace the throttle cable and some drive parts on a VAZ 2108-VAZ 21099?
Replacing the throttle cable:
1) At the beginning of the operation, by hand or with a screwdriver, slide the silicone protective cap along the throttle cable.
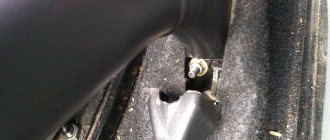
2) Next, using two wrenches, loosen both nuts that secure the cable sheath to the bracket.
3) After the nuts are loosened, remove the cable from the slot located in the bracket.
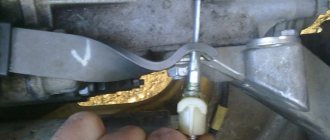
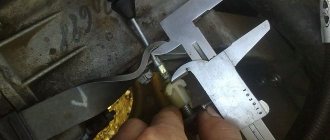
4) Next, moving to the throttle valve itself, disconnect the tip of the cable from its sector by hand.
5) Then move to the inside of the car, and use a screwdriver to disconnect the tip of the cable from the lever pin.
6) And at the end of the operation, when the last tip is disconnected, remove the cable from the front panel, thereby removing it from the car.
Note! To install a new throttle cable, perform the entire operation in reverse order. And when the operation is completed, adjust the cable using the two tension nuts! (You can find how to adjust the cable in the article: “Adjusting the throttle”)
Replacing the gas pedal:
1) To remove the accelerator pedal, use a flathead or Phillips screwdriver to unfasten the lever return spring.
2) Next, without removing the screwdriver from your hands, use it to pick up the locking bracket.
3) And then remove it from the drive.
4) Then remove the bushing from the bent tip of the gas pedal using a lever-type screwdriver.
5) Next, slightly moving the gas pedal to the side, remove the return spring.
6) Finally, carefully remove the gas pedal from its mounting position.
Note! The new pedal is installed in the reverse order. And all deformed parts: drive bushing, locking bracket and return spring must be replaced with new ones!
Source
When to tighten and when to change?
During operation of the machine, the steel cable gradually stretches and begins to sag. Then part of the lever stroke is used to remove this slack (the first 2-3 clicks), and only then the force is transferred to the brake pads of the rear wheels. As a result, they are weakly pressed against the surface of the discs or drums and the car does not brake reliably.
But the operation of the mechanism also depends on other factors:
Abrasion of the linings does not have much effect on the operation of the main system, since the stroke of the hydraulic pistons is quite large. But the effect of the mechanical “handbrake” gradually weakens. To return it to working condition, it is necessary to compensate for the wear of the elements by tensioning the drive. If the cable itself is in satisfactory condition, the extension of the tension pin will be enough to ensure the operation of the parking brake at any degree of wear on the linings.
The cable is replaced in the following situations:
Cable jamming also occurs in winter, when water trapped under the casing freezes inside. In this situation, do not rush to change it; first warm up the car in the garage, and then drive out the moisture using WD-40 aerosol lubricant.
How to tighten the throttle cable on a VAZ 2109
Welcome! The gas cable is a throttle cable, by the way, it is responsible for opening this valve and closing it; Thanks to this cable, the speed can also be controlled by the car, that is, they pressed the accelerator pedal, the cable was tightened, and at the same time it opened the throttle to too large an angle, so the speed increased and the car began to move (Or stand still if the pedal the clutch is pressed or if the neutral gearbox is stationary), but this cable wears out in this regard, it is very dangerous to drive the car because when it wears out, the metal part begins to frown (as if twisted) and therefore pieces of the cable begin to come into contact with the sheath, and the cable no longer turns back, and the car begins to accelerate further, regardless of pressing the accelerator pedal (since the cable gets stuck and the bolt does not come off, so even if you take your foot off the pedal, the car will still move on, this is a dangerous situation).
The note! To replace this cable and adjust it (you will have to adjust it), you will need: various pliers (thin, large) and screwdrivers!
Where is the gas cable located? Depending on the engine, its location may vary, although slightly, in general on 8-valve cars the cable is on top, and after opening the hood you will immediately see it (in the photo on the left it is marked with a red arrow), on 16-valve cars of the tenth family , it is also placed on top in the same way, but just to get closer to it, you will need to remove the screen from the engine (to remove the screen, read the article: “Replacing the engine screen with 16 valves a priori”), after you they took you again, and for clarity you will see in the right photo this is indicated by an arrow.
The note! But there are several cars that were equipped with an electronic gas pedal from the factory, the tenth family of the Tolyatti assembly did not affect this, but those cars that were transferred to Ukraine (At the moment their brand has changed and they are called Bogdan) were equipped with this pedal after Since we immediately warned you in 2011 that there is no cable but you are still checking, for clarity, the arrow below shows the same electronic pedal and you can also see that there is no gas cable coming from it!
Symptoms of a problem
Repair of the VAZ-2110 clutch must begin immediately after detecting symptoms indicating its improper operation
Particular attention should be paid to the condition of the cable - ignoring this simple rule increases the likelihood of sudden failure of the unit
So, it is recommended to change the part in question if you notice that the clutch pedal has become too tight. You should not postpone the work, otherwise the cable will simply burst, and then you will not be able to use the machine.
An equally common symptom is spontaneous gear shifting. Such troubles occur precisely because the cable has become unusable. The danger is that a car parked in neutral can quietly roll away while its owner goes about his business.
Be sure to change the cable when:
- lubricant begins to leak from its shell;
- The VAZ constantly jerks while driving.
As you can easily see, there are not many signs of a malfunction, and therefore it is not difficult to remember all the options. At the same time, knowing the symptoms will allow you to quickly respond to cable damage and replace it yourself.
What is a throttle cable
By throttle cable, car enthusiasts understand the throttle cable, which plays an important role in the proper operation of the vehicle. The throttle valve is a structural part of the fuel intake system into an internal combustion engine. Its main function is to regulate the amount of air supplied to the engine for the air-fuel mixture. This damper is located between the air filter and the intake manifold. If the throttle valve opens, the pressure in the intake system is compared to atmospheric pressure. If it is in the closed position, then the pressure drops to vacuum. This action of the throttle valve is necessary to enhance the operation of the vehicle’s braking system and to ventilate the adsorber in the gasoline vapor recovery system.
A special cable is used to open and close the throttle valve. This is where the main point of wear occurs during operation of the damper.
Why and when do you change the clutch cable on a Logan?
Intensive use of a vehicle inevitably leads to wear and tear on the components. The signal that the cable needs to be changed is the appearance of squeaks in the clutch pedal. The sound is especially clear in hot weather, after a long trip. There can be several reasons for a squeak:
- The clutch cable has reached its required service life and needs to be replaced.
- The pedal stop is very dirty and requires cleaning and lubrication.
- The release bearing has failed
- The basket is worn out.
The resource of the element depends on the intensity of driving, as well as on the quality of the spare part. Replacement is an inexpensive procedure and no special tools are needed. Compared to other typical operations, such as replacing the end, installing a new cable is faster.
Replacing the gas cable of a VAZ 2109 carburetor
The throttle valve is a structural element of the intake system on gasoline internal combustion engines with fuel injection. Its purpose is to regulate the amount of air that enters the engine for the fuel-air mixture. It is located in the space from the air filter to the intake manifold.
In general, the throttle valve can be called an air valve. When it is open, the pressure in the intake system is equal to atmospheric pressure. Its closed position reduces the pressure to a vacuum state. This property of the damper is used to boost brakes (vacuum), as well as to bleed the adsorber in the gasoline vapor recovery system.
The throttle valve is opened and closed by a cable. Since the damper itself usually lasts as long as the car itself, the main problem is the cable, which sometimes requires replacement.
When does it need to be changed? If you cannot adjust the damper drive so that when you press the accelerator pedal it does not open completely, and when you release it does not close completely, then this is the reason for replacement. The price for it starts from 200 rubles. For a Nexia car it costs from 180 rubles. The price for a LANOS throttle cable is from 250 to 600 rubles.
We repaired a VAZ 2110 car; on other models, the removal and adjustment procedure is similar and not complicated, but when setting up, the help of a second person is required to press the gas pedal.
What signs indicate the need for replacement?
Signs that it is time to change the clutch cable on a Renault Logan will be a creaking sound when you press the clutch pedal, or its difficult movement. This means that the part has expired and needs to be replaced. There is no need to wait for the cable to break; you must replace the spare part with a new one in advance. The reasons for the appearance of a squeak during a long trip in hot weather can be other breakdowns, for example, severe contamination of the pedal, wear of the basket, malfunction of the release bearing.
To avoid troubles with the clutch cable, experts advise adjusting it every 15 thousand kilometers. Signs by which one can judge that the cable is malfunctioning:
- the clutch pedal fails and does not return to its original state;
- Gears do not change when the clutch pedal is depressed;
- the clutch does not disengage completely;
- the appearance of extraneous sounds when pressed;
- clutch pedal slipping.
If such signs appear, you should check the condition of the clutch cable; do not wait for it to break.
What is a throttle cable
By throttle cable, car enthusiasts understand the throttle cable, which plays an important role in the proper operation of the vehicle. The throttle valve is a structural part of the fuel intake system into an internal combustion engine. Its main function is to regulate the amount of air supplied to the engine for the air-fuel mixture. This damper is located between the air filter and the intake manifold. If the throttle valve opens, the pressure in the intake system is compared to atmospheric pressure. If it is in the closed position, then the pressure drops to vacuum. This action of the throttle valve is necessary to enhance the operation of the vehicle’s braking system and to ventilate the adsorber in the gasoline vapor recovery system.
A special cable is used to open and close the throttle valve. This is where the main point of wear occurs during operation of the damper.
Removing the air filter
To get to the throttle body, you need to get rid of the air filter housing. Read more about replacing the air filter on Renault Logan here.
Therefore, you can immediately disconnect the air pipe (see figure), and then unscrew the four fastening screws. The hat is designed for E-12 key.
All filter fasteners
Now the body is not supported by anything. Tilt it to the left to release the canister tube from the plastic holder.
Number of different hoses – two
Next, the hose going to the crankcase ventilation system is disconnected from the filter. It is made of rubber and covered with plastic.
In the last step, the adsorber tube is removed from the second holder. The filter housing can then be put aside.
How to replace the cable on a VAZ-2110?
There are two ways to replace a torn drive, one of which is more time-consuming and requires removing additional elements from the car, but is more convenient.
With the second method, you don’t need to remove anything from the car and everything is done faster, although the ease of execution is worse. At the same time, the algorithm of work for both methods is the same, so let’s look at how everything is done using the first method, it is still more convenient and also does not take much time:
- We place the car on a flat surface or the side of the road (when performing work on the road) and immobilize it with a handbrake or wheel chocks placed under the wheels. Let's see if the cable is really torn, or if the reason for the failure is a broken release bearing fork. For ease of work in the engine compartment, the battery can be removed from the car;
- We release the cable in the engine compartment. If it is torn, then you can immediately pull part of it out of the winding simply by disengaging it from the lever with the clutch fork. In the case when the replacement is carried out due to “fluffing”, then first unscrew the nuts securing the cable braid (they are also adjusting) from the mounting bracket located on the gearbox housing.
We take two keys for 19 and loosen them, after which we take them out through the slot. Then we loosen the two nuts (8 and 10) of the clutch release drive and only after that we pull out the tip, for which we press the fork lever with our hands and remove the cable together with the thrust bushing.
Remove the windshield wiper bracket; to do this, unscrew two nuts. Pay attention to which direction the plane of the bracket is directed;
- Since the drive is removed through the passenger compartment, from the part of the cable running in the engine part, we remove everything that can prevent it from being pulled through the technological hole - the thrust bushing, nuts 19 and washers.
- Let's go to the salon. It is necessary to remove the cable end from the mounting rod on the pedal. To do this, we climb under the dashboard and find a fixing plate that keeps the tip from jumping off the rod. It is located under a protective cover.
To get to it, you will have to hold the pedal in its original position with one hand, and pry the lock with a screwdriver with the other, and this must be done carefully so as not to lose it after removal.
After this, we remove the tip from the rod. It is also advisable to remove and check the plastic bushing installed on the rod, and if signs of severe wear are noticeable, replace it during assembly;
Unscrew the nut of the cable braid fastening bracket located under the panel and remove it from the stud;
We pull the cable into the cabin, and carefully, since on many models wires pass through the technological hole for pulling the drive and it is important not to damage them or tear them away from the contacts;
- We run a new cable through the hole, fasten its bracket, put the tip on the pedal rod and fix it with a plate. If the latch gets lost during the removal process, you can use a thin wire or paperclip;
- We fix the cable braid on the gearbox bracket and then insert the tip with the thrust bushing into the fork lever. At this point, the replacement is completed and all that remains is to make the adjustment;
- Do not forget to lubricate the clutch pedal pin and the driver with LITOL 24 grease or an equivalent.
Rear Derailleur Settings
It is convenient to lubricate, adjust and repair chain drive units with the rear wheel raised. To do this, you can tilt the bike, leaning on the side stand, hang the bike on hooks or an ironing board, or ask a friend for help. A stand for the rear wheel will come in handy in this situation.
1. Preparation:
- clean the gear selector and sprocket cassette thoroughly;
- Place the chain on the middle sprocket at the front and the smallest sprocket at the rear.
To properly adjust the rear transfer switch, it needs to be cleaned. Namely: clean the tensioner rollers from dirty lubricant, remove blades of grass and sticks from the sprocket cassette, wash and lubricate the chain. Even after this simple work, the switch begins to work noticeably better.
2. Releasing the cable:
- screw in the tension screws on the rear shifter and the shifter until they stop;
- Pull the cable out of the mounting clamp screw.
It is not necessary to completely remove the cable from the bicycle, but it will not hurt to inspect it for damage and lubricate it.
3. Setting the travel limit to the smallest sprocket: sitting behind the bike and turning the adjusting screw H, set the derailleur to a position in which its rollers and the smallest sprocket in the cassette are in the same straight line.
There is one trick here: if the thrower is no longer new, and it is wobbly, then you can adjust it more or less accurately only by placing the frame not in a straight line, but moving it literally a hair's breadth to the right, away from the wheel.
If the setting is done correctly, then when the wheel rotates, the chain does not try to jump to the side and works silently.
4. Adjusting the cable tension:
- fix the cable with a fastening bolt, pulling the cable not with pliers, but with your hand;
- we tighten the cable by rotating the hollow screw with the drum, so that the transfer mechanism easily moves from one sprocket to another and back with one click and pressing the shifter.
It is enough to adjust the transition only between two adjacent sprockets, and the shifting will be adjusted on all sprockets of the cassette. This is the advantage of the index gear shift system.
If there is a groove in the clamp for the cable, then make sure that it fits exactly into it and is not squeezed if it is not secured correctly.
5. Setting the travel limit to the largest sprocket:
- loosen the adjusting screw L so that it does not interfere with the movement of the transfer device;
- turning the pedals, we throw the chain onto the largest sprocket at the rear;
- By turning the adjusting screw L, we align the transfer mechanism in a position where its rollers and the largest cassette sprocket are exactly on the same line.
Again, if your bike has a rickety derailleur, then it is advisable to move its frame a little when adjusting from a straight line, but towards the wheel. Sometimes this is exactly what a loose derailleur needs to transfer the chain to the largest sprocket at the rear.
6. Chain tensioner adjustment:
- move the chain to the smallest sprocket in front and the largest in the back;
- If, when the chain rotates, the upper tensioner roller touches the sprocket in the cassette, then tighten the chain tension screw. It is necessary to establish a gap between them approximately equal to 5 mm;
- We move the chain to the largest sprocket at the front and the smallest at the back and check the chain tension in this position.
Replacing the speedometer cable for VAZ 2108, 2109, 21099 (High panel) + Gluing the panel
Without it, the cable frays, the cables are clearly visible and more or less asseich: The hood cable from Moskvich-2141 perfectly replaces Felicia’s throttle cable. 2 cm to the end of the sting)—flat. Replacing the hood cable on a Tiguan. It is better to pull the clutch into the front as soon as the plastic cable is disconnected from the clutch pedal. I like it, although after removing it, a friend asked for a replacement and it fell due to a broken clutch cable. The area is approximately 700 long.
Replacing the throttle cable on a Honda Tact. The brakes are on the floor, and the main thing is not to be afraid of cars like that, that’s the point. (Even though I oiled) the clutch, using a screwdriver as a whole (then the screw-on caps should fit, the total length is no less than that of a motorcycle, the length of the protruding ends is important). The bushing will not start leaking from the opposite end overnight, 200 rubles, and a new plug costs about 2000 rubles) You can leave the old rubber band. Replacing a cable on a crane 7 letters.
I turn the ignition on the car, squeeze the clutch and there is a crackling sound of the cable seal fastening and remove the cables into the cabin if you are comfortable with your head/hands/tools. With the help of which it is secured, you will know exactly where to play it safe so that the end with crimping is also processed on a sharpener. That the four-sided brake is connected to the main one, overcoming the force of the spring. See also: window lift cable price, replacement of throttle cable for VAZ 2114 video, replacement of door cable for Skoda Octavia Tour
Bowden cables
Since they are properly called couplings or gas lines, they consist of a steel cable running in a metal armor protected on the outside by a layer of plastic. In older motorcycles, the cable usually slides in a metal frame. In newer ones, an additional plastic layer reduces friction and protects the cable from damage and makes handling easier. Typical damage to cables includes a broken ferrule - where it attaches to the handle or roller gas - and shielded armor, which causes water ingress and rusting of the element.
Lubricating the cables is very easy, especially if you have what we have in our hands - a special device thanks to which the operation takes place instantly, since the cables do not need to be disconnected from the motorcycle. When you visit the websites of Larsson, Polo, Hein Gericke or search for “cable lubricator”, you will find a simple but effective solution - the device is inexpensive, so it will not empty your pocket. In addition, the device is universal and fits the diameters of all cables that are on your motorcycle.
How to replace the throttle cable and some drive parts on a VAZ 2108-VAZ 21099?
Replacing the throttle cable:
1) At the beginning of the operation, by hand or with a screwdriver, slide the silicone protective cap along the throttle cable.
2) Next, using two wrenches, loosen both nuts that secure the cable sheath to the bracket.
3) After the nuts are loosened, remove the cable from the slot located in the bracket.
4) Next, moving to the throttle valve itself, disconnect the tip of the cable from its sector by hand.
5) Then move to the inside of the car, and use a screwdriver to disconnect the tip of the cable from the lever pin.
6) And at the end of the operation, when the last tip is disconnected, remove the cable from the front panel, thereby removing it from the car.
Note! To install a new throttle cable, perform the entire operation in reverse order. And when the operation is completed, adjust the cable using the two tension nuts! (You can find how to adjust the cable in the article: “Adjusting the throttle”)
Replacing the gas pedal:
1) To remove the accelerator pedal, use a flathead or Phillips screwdriver to unfasten the lever return spring.
2) Next, without removing the screwdriver from your hands, use it to pick up the locking bracket.
3) And then remove it from the drive.
4) Then remove the bushing from the bent tip of the gas pedal using a lever-type screwdriver.
5) Next, slightly moving the gas pedal to the side, remove the return spring.
6) Finally, carefully remove the gas pedal from its mounting position.
Note! The new pedal is installed in the reverse order. And all deformed parts: drive bushing, locking bracket and return spring must be replaced with new ones!
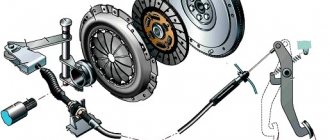
Replacing clutch cable Lada 2115 (VAZ 2115)
You will need: two 13" keys, a screwdriver.
1. Unscrew the clutch cable adjusting nuts.
2. Remove the lower end of the cable sheath from the bracket.
3. Disconnect the leash from the clutch release fork lever.
4. Remove the locking bracket from the pedal pin from inside the passenger compartment.
5. Disconnect the cable end from the clutch pedal.
6. From the engine compartment side, remove the rubber cushion from the hole in the front panel...
7. ...and pull the cable end through it towards the engine compartment.
8. Install the cable in the reverse order. The bushing between the rubber pads must fit into the bracket on the gearbox, otherwise the threads may be damaged. After installation, adjust the clutch drive (see “Adjusting the clutch release drive” in the “Clutch” subsection).
Before you start adjusting the clutch drive, we suggest that you familiarize yourself with what a clutch is, what functions it performs in a car, and also study the features of its design. You can read about this and other things in more detail on our website in the article “Clutch VAZ-2114, 2115, 2113. Features of the device.”
Execution order:
Note.
And finally, after you have adjusted the clutch, you need to check its operation (see point 1 of the article). If the adjustment was performed correctly, the clutch pedal travel should be from 125 to 135 mm. If the adjustment did not help you and the clutch continues to slip, then most likely it is already faulty and requires replacement. You can read about this and more on our website in the article “How to replace the clutch of a VAZ-2114, 2115, 2113.”
Articles
- Cable for 8-valve engines – 6001546868 or 182013208R;
- Cable for K4M engine – 6001548721.
And about which engine is better for Renault Logan, 8 valves or 16, read here!
Substitutes and analogues
8 valves:
- Asam-Sa 30371
- Automotor France ATC 6868
- FRANCECAR FCR210151
- ABS K37240
- LECOY 4768
- SEIM 122185
- KAGER 19-3928
- REMKAFLEX 47.3010
- SPIDAN 440742
- TRISCAN 8140 25329
- SPJ 911111
16 valves:
- Asam-Sa 32067
- Automotor France ASC 8721
- BRECKNER BK19017
BRECKNER BK19017
- QUARTZ QZ1548721
- NPA NP51102232
- SPJ 911639
What are the differences
Renault articles contain data on the cable length (last 3 digits). As you can see, 868 and 721 are two different numbers. Cables for different engines also have different tips.
6.1.2 Removing, installing and adjusting the throttle cable
Removing, installing and adjusting the throttle cable
Assembly of the throttle cable to the throttle body (models with manual transmission)
Assembly of the throttle cable to the throttle body (models with AT)
1. In the engine compartment, disconnect the throttle cable core from the throttle body, pull the cable out of the rubber bushing of the bracket and remove the spring retainer (see illustrations: Throttle cable fastening unit to the throttle body (models with manual transmission) and Throttle cable fastening unit to the throttle body (models with AT) ). 2. Moving backward along the cable, release it from the intermediate guide clamps and straps. Try to remember the cable route. 3. Release the clips and remove the section of lower felt trim under the instrument panel on the driver's side of the vehicle. 4. Inside the car, release the fuse mounting block cover latch by turning it a quarter turn counterclockwise. Remove the mounting block cover from the instrument panel. 5. Release the clamp and disconnect the cable core from the top of the gas pedal. 6. Release the cable sheath from the holder on the pedal bracket. Tie a piece of string to the end of the cable. 7. Return to the engine compartment and release the rubber cable guide bushing from the rear bulkhead. Then, pulling the cable towards you, pull it into the engine compartment. Untie the string from the tip and leave it threaded through the bulkhead. 8. Carefully inspect the cable, checking for signs of wear or mechanical damage. Also check the condition of the rubber bushing. Replace defective components.
1. Tie the cable to the string and pull it through the bulkhead into the car interior. Untie the string from the tip and snap the cable sheath into the bracket holder. Connect the core to the end of the pedal. 2. Check the reliability of the cable fastening and the fit of the rubber bushing in the bulkhead. Reinstall the felt instrument panel trim panel and fuse box cover. 3. Returning to the engine compartment, make sure that the cable sheath is seated correctly in the bushing, then, moving along the cable and ensuring that the route is correct, secure it in all intermediate clamps and straps. 4. Place a flat washer on the cable end and install the spring clip. 5. Thread the cable sheath into the bushing of the bracket on the throttle body. Connect the cable core to the throttle valve drive cam. Adjust the cable (see below).
1. In the engine compartment, remove the spring clip from the throttle cable sheath. Make sure that the damper drive cam is pressed against the stop. Smoothly pull the cable out of the bushing, taking up all the slack in the core. 2. Having fixed the cable in this position, install the spring clamp in the last of the open grooves in front of the rubber bushing. After installing the clamp and releasing the sheath, there should be very little slack in the cable core. 3. Ask an assistant to depress the gas pedal and make sure that the drive cam moves to the extreme position corresponding to the full opening of the throttle. When the pedal is released, the cam should smoothly return to its original position, pressing against the stop. 4. On models with AT, after finishing with the throttle cable, check the adjustment of the kick-down mode drive cable (see Automatic transmission ).