Hello my readers, thanks for stopping by! Enjoy reading! And so today I want to tell you, describe how the size indicator was made not deactivated. Having made the automatic on 2110 (there will be a report on this too), I stopped paying attention to the low beams being on, because there are fog lights in the role of DRLs. But sometimes, coming in the evening, in the twilight the dimensions remained clear. At dusk, when you are in a hurry, you don’t really look at the light. Staying with the lights on at night kills the battery. On the recording I found an article where the guys tied BSK to size. I decided to repeat it. I found a diode, soldered the wires and went to install it in the car.
The essence of the installation: BSK gives audible and intermittent beeps when the dimensions are not turned off. Nuances: BSK does not beep when the dimensions are active: when starting the car, when inserting the key into the ignition. But as soon as you turn off the car, take out the key, you'll hear size warning signs. Production: For those who are forgetful, and most importantly hasty and careless, this is a very useful review. Connection diagram: found here on DRIVE2 (I’ll post a photo if the author sees it - signature, thanks for the tip)
Installation process: I took out the BSK, watch 2110. I started looking for the wires from the cigarette lighter. Ambush: You can't get there. I moved them to the side, under the tunnel. I looked at the BSC and my watch. But the watch still has a backlight from its dimensions and there is no need to delve into tunnels. I connected it according to this diagram and secured it with electrical tape. I didn’t cut anything out, I stuck it into the watch blocks and the BSK.
Tested: It works, hooray! In case anyone needs the pinout of the connectors on the 2110 watch: four wires fit to the clock block (VAZ-2110): - white (size), - black ("ground"), - orange (constant power), - white with a red stripe ("power" ")
The first VAZ 2110 cars were produced with a conventional eight-valve carburetor engine.
Which wires go where on the VAZ 2110 instrument panel pinout
Let's be honest - the VAZ 2110 does not have the most beautiful “native” instrument panel, neither on the first cars nor on the “improved” ones.
Therefore, many owners of this model are trying to make it more modern and somehow decorate it (with LEDs, beautiful lights, etc.). But, before you decide on some kind of upgrade, it is necessary that you have before your eyes the pinout of the instrument panel for the VAZ 2110, otherwise you can simply get lost in a heap of wires, sensors and buttons. Moreover, it will be useful regardless of whether you completely change the panel, or simply make some additions to the dashboard of your VAZ 2110.
Starter connection diagram for VAZ 21110
1 - battery; 2 - generator; 3 - snack; 4 - ignition switch
Write a reply Cancel reply
This site uses Akismet to reduce spam. Find out how your comment data is processed.
Buy this site
The standard clock, which is located on the dashboard of VAZ 2110 - 2112 cars, has a fairly simple design, but still this part often fails and has to be replaced. Many owners quickly break the case out of the panel, break the watch itself, and in some cases manage to break parts of the panel. In this case, special care must be taken.
To remove the clock, or rather remove it from the dashboard, we will need two thin flat-blade screwdrivers, although everything can also be done with one:
You need to insert screwdrivers on the sides of the case and, as it were, lift the watch or from above, as shown in the photo:
Then pull them out of the recess slightly to gain access to the power cables and light bulb.
If you need to replace your watch, unplug it from the socket and simply insert a new one in its place. If you just need to change a light bulb because it's burned out, carefully twist the cap:
And then you can remove the light bulb by also turning it counterclockwise from the base:
We installed a new light bulb and now the backlight should work smoothly. Let's put the clock back in reverse order. The price of new VAZ 2110-2112 is about 450 rubles.
Connection knowledge
Before starting dismantling work, you need at least a conventional pinout on paper, otherwise it will be very difficult: you will need to “trace” every wire and every connection that is on the “path” from the devices to the power button.
In fact, the pinout of the VAZ 2110 dashboard is not so difficult to understand, but there are differences between cars produced in different years and at different factories. There is an old model, there is one with a mechanical odometer, and a new (Euro) model, so there are differences in the pinout of the instrument panel, depending on the type to which it belongs.
If the timing belt breaks
In those cars, when the camshaft freezes, the crankshaft continues to rotate with a strong blow to the pistons, bending and breaking the valves that were open at that moment. And this led to quite expensive repairs. In later engine models with a volume of already 1.5 liters, this no longer happens, thank the designers. But still the feeling is not pleasant. However, there is no need to panic. Of course, you can tow the car to a service station, pay the technicians and wait for the result. But if you have a little patience and skill in working with keys, you can do this repair yourself.
General diagram of devices
If you look from the back of the instrument panel, here it is in sequence - from top to left to right:
- Fuel level indicator;
- Combination of instrument lighting lamps;
- Right turn control;
- Left turn control;
- Tachometer;
- Next is the block, there are a lot of plugs in it;
- And the top part of the dashboard is completed by an antifreeze temperature indicator.
VAZ 2110 dashboard connection diagram
The lower part of the dashboard (also from left to right and from the back of the dashboard). The following part of the instruments is located here:
- high beam controller (bulb);
- alarm controller;
- brake fluid level control lamp;
- speedometer;
- CHECK ENGINE controller;
- battery charge control;
- parking brake controller;
- oil pressure controller;
- air damper controller in the carburetor;
- outdoor lighting controller.
White block
The connector number, wire color and the unit (assembly) to which it goes are located in the white block as follows:
- The first connector has a black wire. Its purpose is the body (mass);
- In the second - red-brown - this is a low-voltage supply from the electronic control unit - tachometer;
- The third, yellow one is also a tachometer, but this is a high-voltage supply from a coil;
- The fourth, red-blue is Const from the battery + 12V, going through the sixth fuse;
- The fifth, green-white - it is intended to indicate the coolant temperature;
- Sixth, green-yellow – for size fuse F1;
- The seventh connector does not have its own color and goes to the “choke”, the throttle valve;
- Eighth, red and white - CHECK ENGINE light;
- In the ninth and tenth there are 2 orange wires each, leading to 2 power fuses F19+12V;
- In the eleventh there are 2 blue-brown wires leading to the “BK” terminal of the parking brake;
- The twelfth, brown-white is the output “D” of the generator;
- Thirteenth, gray and blue – for the oil pressure sensor.
White block (X1) and Red block (X2) of the VAZ 2110 instrument panel
Red block
The number is the connector according to the account, followed by the color of the wire and an indication of the device to which it goes in the red block of the VAZ 2110:
- Blue and red go to the sensor showing the external temperature;
- Orange - power fuse F19+12V;
- Black, 2 wires – ground, body;
- White - light switch for all devices;
- Blue - right direction indicator;
- Blue and black - left turn signal;
- Blue with pink - TJ level;
- Brown – leading to the trip computer;
- Gray - speed indicator;
- Pink - Fuel gauge (terminal “T”);
- 2 black-green wires - high beam fuse (F3);
- Blue and white - emergency light switch;
- White - leading to the ignition switch (terminal 50).
Nuances of work
However, these pinout diagrams for the VAZ 2110 are, so to speak, basic, mostly the same, but there are also differences in color markings (especially by manufacturer). Therefore, you need to either use the instruction manual that came specifically with your car, or, armed with a marker and self-adhesive labels, “write everything out” in detail and not get confused when installing a new instrument panel.
Connecting wires to the VDO panel on a VAZ 2110
Connecting wires to the “Schetmash” panel in Kursk on a VAZ 2110
Connecting wires to the “AP” panel in Vladimir on a VAZ 2110
Connecting wires to the panel from the Kalina car to the VAZ 2110
During subsequent assembly, there will probably be a lot of devices that are not taken into account here, and, taking into account modern realities, many car owners plan to install them on the updated dashboard.
Methods for eliminating belt eating
Below are examples of eliminating the causes of belt wear and eliminating the causes of belt eating.
Fake belt
A poor-quality belt may be the culprit of the problem; in order to check this, you need to turn the belt over and try to start the engine; if the belt starts to slide in the other direction, then most likely the plane of the belt is uneven and has a cone shape, which leads to it slipping and being eaten. This problem is treated by replacing it with a new, higher quality belt.
Incorrect tension
The timing belt must be tensioned as recommended by the manufacturer. This information can be found in specialized books on VAZ car repairs or on the Internet. Over-tightening the belt places a load on the bearings and can cause wear on both the rollers and the pump.
crooked hairpin
As a result of the efforts when tightening the roller, it happens that the roller pin becomes slightly bent and, as a result, the roller tilts. This problem will lead to belt misalignment.
Thread damage
Damage to the threads, as well as bending the stud, can change the trajectory of the belt. This problem is solved by unscrewing the stud and running the threads with a sword. In the worst case, it is necessary to dismantle the cylinder head to bore or restore the threads.
Water pump
When the pump receives any damage or wear, no action other than replacing it can be taken. If the culprit is the pump, it must be replaced.
Pump misalignment
The problem is that when installing a new pump, most car enthusiasts often use sealant or do not clean the surface of the old gasket. All these points can affect the tightness of the water pump to the block body, which can affect the trajectory of the timing belt. You should thoroughly clean the surface on the cylinder block from the remains of the old gasket and do not use sealant; just install the gasket that comes with the pump.
Working on rollers
The rollers, like the pump, are subject to aging and wear, and in case of such problems, the rollers only need to be replaced; any other methods of correcting belt wear due to the rollers are impossible
Camshaft gear wear
The camshaft gear is made of soft metal, which can quickly wear out and wear out. Most often, the gear wears out already at a mileage close to 150 thousand. If this problem occurs, the gears must be replaced.
Crankshaft gear
Most often, the crankshaft gear wears to a cone and the belt begins to move outward, which leads to friction on the spacer washer between the gear and the accessory drive pulley. Because of this situation, the belt can squeak and howl, and in most cases of this situation, the belt eats up.
Connecting the trip computer
The mentioned diagram took into account only one, brown wire leading from the red block to the trip computer, but this is clearly not enough. Therefore, let's see how the pinout occurs here.
- The fuel consumption signal from the electronic control unit is indicated by a green wire;
- Orange leads to terminal “15” in the ignition switch;
- Red and white - to terminal “30” in the ignition switch;
- Black, which is common, goes to ground;
- The speed indicator corresponds to brown;
- The positive terminal of the fuel sensor is green and red;
- Responsible for lighting the dashboard white, it leads to the light control.
Make sure that the board is not damaged, on which, in fact, uninterrupted reading of information from your VAZ 2110 depends, and providing it to you through all those sensors and devices that you always see in front of you.
VAZ 2108 generator belt falls off
- To the beginning of the forum
- Forum Rules
- Old design
- FAQ
- Search
- Users
Look at the lower mounting legs of the generator. Maybe there are no bushings there or the holes are oval and the generator is warped.
Well, the easiest way is to try replacing the belt with another one and see what happens first. Was the old belt slipping? Maybe it’s the belt?
How can he slide? There are shoulders and a poly-V belt
How can he slide? There are shoulders and a poly-V belt
This means you didn’t completely put the belt on the pulleys. In principle, he cannot slide like that, even if he is at least three times crooked
Are the pulleys located in the same plane?
Is there any play in the bearings?
Zim
If you want it done well, do it yourself
Go to those unfortunate masters, let them fix it.
Go to those unfortunate masters, let them fix it.
Information on icons and features
You can not
start topics You
cannot
reply to messages You
cannot
edit your messages You
cannot
delete your messages You
cannot
vote in polls You
can
attach files You
can
download files
Source
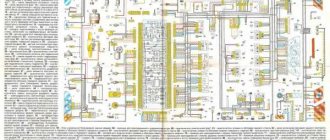
VAZ dashboard pinout
When repairing or replacing the dashboard (instrument panel) of VAZ cars with a more convenient and modern version of VDO, made with LEDs, you will need connection diagrams and pinouts of panel connectors. For this purpose, the editors of 2SHEMI.RU have prepared a complete collection of panel contact pinouts for all popular models of this car.
The main symbols that are found on the dashboard of absolutely any car of the VAZ family are: speedometer, fuel gauge, tachometer and sensors to indicate engine temperature.
The main 9 reasons why the timing belt eats
There are a huge number of reasons for belt slipping and wear, but there are also the main culprits of this problem, which are described below.
Poor quality belt
As you know, there are quite a lot of fakes for domestically produced cars, and it is very easy to run into a clandestinely manufactured timing belt. A fake belt may have an irregular shape, namely an oval center, or, on the contrary, any of the edges may be uneven, similar to a cone, which will lead to inevitable distortion of the belt and soon it will slide in different directions. Such problems occur due to incorrect or broken belt production technology.
Belt tension
Incorrect belt tension contributes to the rapid eating of the belt or its breakage, which can lead to dire consequences and expensive repairs of the internal combustion engine. It is necessary to tension the belt correctly, following the manufacturer's recommendations.
Roller bolt and stud
A stud and bolt are necessary to secure the timing belt tensioner and idler pulley. When they are skewed, the alignment of the mechanism elements is disrupted, as a result of which the belt begins to walk along the pulleys, which leads to its rapid wear.
Thread
The threads in the cylinder head or the block itself may be damaged, which will lead to inevitable misalignment of the pin or bolt securing the rollers. And as described above, the misalignment of this pin threatens to warp the belt and cause it to slide towards the misalignment.
water pump
The pump has a bearing in its design, which is subject to aging and over time can slightly tilt the water pump pulley, which will lead to the belt slipping and being eaten.
Incorrectly installed pump
When replacing the pump, it is possible that some of its mounting bolts will be looser, which, under the influence of belt tension, can lead to its distortion.
Roller wear
Timing rollers in new modifications of VAZ cars are made of plastic. This plastic, although super strong, is still susceptible to wear and over time can wear into a cone shape, which can cause the timing belt to slip.
Camshaft gear wear
With a mileage reaching 150 thousand km, wear on the camshaft gears is common. This problem occurs quite often after reaching this mileage.
Crankshaft gear wear
The most likely problem with a timing belt eating is the crankshaft gear. Under the influence of various dirt and sand, which gets under the belt and wears out the gear, which will inevitably lead to misalignment, eating and wear of the belt.
Pinout of the dashboard of VAZ2105, 2106, 2107
Old panel (with oil pressure gauge)
In addition to the presence of an oil pressure indicator, it is worth noting that this instrument panel does not have an air damper indicator lamp (choke), and the emergency oil pressure lamp is located next to the pressure indicator. Because of this, it contains lamps for low brake fluid levels and fog lamps.
White 6-terminal block X1:
- Gasoline level sensor
- Turn signal indicator lamp
- Battery charge sensor (voltmeter -)
- Gasoline level warning lamp
- Overall plus (+)
- Battery charge sensor (voltmeter +)
White 8 terminal block X2:
- Fog lamp warning lamp
- High beam warning lamp
- Dimensions indicator lamp
- Empty
- Battery charge indicator lamp
- Brake fluid level warning lamp
- Empty
- Parking brake warning lamp
Orange 6-terminal block X3:
- General minus (-)
- Tachometer VAZ
- Instrument lighting
- Oil pressure sensor
- Oil pressure warning lamp
- Coolant temperature sensor
New instrument panel (with econometer)
Here, everything is the other way around - there is no oil pressure indicator (instead there is an econometer), instead of a brake fluid level lamp there is a suction lamp (or an engine management system lamp on injectors), and instead of a fog lamp lamp there is an oil pressure lamp.
White 6-terminal block X1:
- Gasoline level sensor
- Turn signal indicator lamp
- Battery charge sensor (voltmeter -)
- Gasoline level warning lamp
- Overall plus (+)
- Battery charge sensor (voltmeter +)
White 8 terminal block X2:
- Dimensions indicator lamp
- High beam warning lamp
- Oil pressure warning lamp
- Empty, but there is a terminal in the wiring that goes to the brake fluid level sensor
- Battery charge indicator lamp
- Indicator lamp for the air damper (choke) or engine control unit for injectors
- Empty
- Parking brake warning lamp (handbrake)
Orange 6-terminal block X3:
- General minus (-)
- Tachometer (if this contact is empty, then the tachometer is on pin #4)
- Instrument lighting
- Empty, and if not empty - to the tachometer
- Empty
- Coolant temperature sensor
Second connection diagram option
Pinout of the dashboard VAZ2108, 2109, 21099
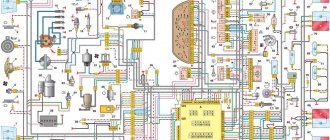
Connection diagram of the instrument cluster before 1996.
1 — relay-interrupter for the parking brake warning lamp; 2 — tachometer with voltage stabilizer; 3 — instrument cluster lighting lamp; 4 — temperature indicator; 5 — BSK control unit; 6 — fuel level indicator; 7 - resistor 50 Ohm, 5 W; 8 — “CHECK ENGINE” control lamp for the toxicity reduction system; 9 — control lamp for high beam headlights; 10 — side light indicator lamp; 11 — backup warning lamp; 12 - warning lamp for unfastened seat belts; 13 — control lamp for left direction indicators; 14 - resistor 470 Ohm, 0.25 W; 15 - electronic voltmeter; 16 — control lamp for right direction indicators; 17 — warning lamp for emergency oil pressure; 18 — fuel reserve warning lamp; 19 — control lamp for the carburetor air damper; 20 — “CHECK ENGINE” warning lamp for the fuel injection system; 21 - parking brake warning lamp.
Instrument cluster wiring diagram after 1996
1 — tachometer; 2 — instrument cluster lighting lamp; 3 — temperature indicator; 4 — BSK control unit; 5 — fuel level indicator; 6 — “CHECK ENGINE” warning lamp for the toxicity reduction system; 7 — control lamp for high beam headlights; 8 — side light indicator lamp; 9 — backup warning lamp; 10 - warning lamp for unfastened seat belts; 11 — control lamp for left direction indicators; 12 — battery charge indicator lamp; 13 — control lamp for right direction indicators; 14 — warning lamp for emergency oil pressure; 15 — fuel reserve warning lamp; 16 — control lamp for the carburetor air damper; 17 — “CHECK ENGINE” warning lamp for the fuel injection system; 18 — parking brake warning lamp; B1 - 91 kOhm resistor; B2 - resistor 50 Ohm, 5 W.
Pinout of the dashboard of VAZ2110, 2111, 2112
- fuel reserve warning lamp;
- dashboard lighting lamps;
- right repeater indicator lamp;
- left repeater indicator lamp;
- VAZ plug block;
- coolant temperature sensor;
- indicator lamp for external lighting;
- carburetor air damper warning lamp;
- oil pressure warning lamp;
- handbrake indicator lamp;
- battery charge indicator lamp;
- VAZ tachometer;
- indicator light “CHECK ENGINE”;
- speedometer dashboard;
- brake fluid level warning lamp;
- hazard warning lamp;
- high beam indicator lamp;
- fuel level indicator.
| White block (X1) | Red block (X2) | ||
| 1 | Housing (weight) | 1 | To terminal “W” of the fuel level indicator sensor |
| 2 | Tachometer (low voltage input from ECU) | 2 | Fuse F19 + 12V power supply |
| 3 | Tachometer (high voltage input from coil) | 3 | Housing (weight) |
| 4 | Const +12V from battery (via 6th fuse) | 4 | Instrument lighting switch |
| 5 | Coolant temperature sensor. | 5 | Turn signal RIGHT |
| 6 | Fuse F1 (side light) | 6 | Turn signal LEFT |
| 7 | Throttle valve (“choke”) | 7 | Brake fluid level |
| 8 | Check Engine Light | 8 | To the trip computer |
| 9 | Fuse F19 + 12V power supply | 9 | Speed sensor |
| 10 | Fuse F19 + 12V power supply | 10 | Terminal "T" fuel gauge |
| 11 | Parking brake, terminal “VK” | 11 | Fuse F3 (high beam) |
| 12 | Generator output "D" | 12 | Hazard switch |
| 13 | Oil pressure sensor | 13 | To terminal “50” of the ignition switch |
Instrument panels VAZ VDO (LED)
You can install a more beautiful and convenient panel with LED indicators, the so-called VDO panel. Here VDO is the panel manufacturer.
| Connecting VDO on a Kalina car | ||
| 1 | Pink-white | To electric power steering |
| 2 | Blue and white | To the hazard warning indicator |
| 3 | Gray-blue | To emergency oil pressure sensor |
| 4 | Brown blue | To the parking brake switch |
| 5 | Yellow-blue | To the immobilizer control unit |
| 6 | Black | To the airbag control unit |
| 7 | Yellow | To the outside light switch |
| 8 | Blue | To the right turn signal switch |
| 9 | Blue with black | To left turn signal switch |
| 10 | White-blue | TO ECU |
| 11 | . | To brake pad wear sensor |
| 12 | . | To seat belt sensor |
| 13 | Black | To the traction control control unit |
| 14 | Red-blue | "RESET" key on the steering column switch |
| 15 | Pink-blue | To brake fluid level sensor |
| 16 | Black | To ABS |
| 17 | Green | To the high beam switch |
| 18 | White | To the instrument cluster light control |
| 19 | Brown | Panel weight |
| 20 | White-red | Terminal "30" |
| 21 | Orange | Terminal "15" |
| 22 | Yellow-red | To fuel flow sensor |
| 23 | Orange-white | MK key "forward" |
| 24 | White black | MK key "back" |
| 25 | Black and white | Outside temperature sensor (-) |
| 26 | Yellow-green | Outside temperature sensor (+) |
| 27 | Pink | Fuel level sensor |
| 28 | Grey | Speed sensor |
| 29 | Green-white | Coolant temperature sensor |
| 30 | Brown-red | Tachometer (low voltage) |
| 31 | . | Official. Panel diagnostics. |
| 32 | Brown-white | Terminal “L” of the generator relay regulator |
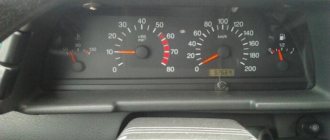
VAZ instrument panel indicators - explanation
- coolant temperature gauge.
- tachometer;
- left turn signal indicator lamp;
- right turn signal indicator lamp;
- speedometer;
- fuel level indicator;
- fuel reserve warning lamp;
- side light indicator lamp;
- service brake system warning lamp;
- high beam indicator lamp;
- reset button;
- mileage indicator;
- warning lamp for turning on the hazard warning lights;
- "check engine" warning light;
- time and temperature indicator;
- battery charge indicator lamp or battery lamp;
- parking brake warning lamp;
- oil pressure warning lamp;
- reserve.
VAZ dashboard indicators play an important role in informing the user about malfunctions. They help prevent errors in the system, so it is important to know which indicator means what. How does the panel work? If any problem occurs, the sensor immediately sends information to the panel, and the driver will see an orange signal light up.
The earlier version of the instrument panel had some other symbols, such as emergency oil pressure, handbrake engaged, Chek Engine light, and several others that indicate minor operating errors, but which are no longer used.
Repair or replacement of the VAZ dashboard
If on a car on the instrument panel none of the indicators installed on it work (speedometer, odometer, tachometer, fuel level and coolant temperature indicators), then the first thing the driver will have to do is check the integrity of fuse F3, which is located in the mounting block . If it has burned out, then before replacing it, you need to find the reason why it burned out, otherwise the newly installed new fuse will have the same fate as the previous one. Most often, fuses burn as a result of a short circuit.
Even if the fuse is intact, then do not be lazy to take it out and check the condition of the contacts. There are cases when the contacts oxidize, and the electrical circuit in this place is interrupted. After making sure that the fuse is intact, the next step is to check the ignition relay, which is located inside the car to the left of the steering column. It is attached to a pin upside down. In the block where this relay is inserted, you can try to short-circuit the power wires using a jumper. If the instrument panel comes to life, the ignition relay will have to be replaced.
If the ignition relay is working properly, there are only two possible reasons for the instrument panel not working: the ignition switch and the mounting block. Before installation on the VAZ-2109 car, the ignition relay and lock contacts often burned out and had to be cleaned by disconnecting the contact group from the lock itself. After changes were made to the principle of supplying voltage to the ignition switch, its contacts began to burn very rarely, but the likelihood of this phenomenon still remained. On the mounting block, in its board, tracks may burn out; in order to see this, the mounting block will have to be removed from the car.
In addition to the reasons listed above, which can lead to failure of the instrument panel, it is also necessary to check the reliability of the fastening of the ground wire. Most common problems:
- burnout of incandescent lamps or failure of the LED group;
- oxidation of connectors;
- electrical wiring fault;
- failure of the fuse box;
- damage to the common contact board;
- no weight on the body (minus) or damage to the dimensions system.
To find a fault, you must use diagnostic equipment, a tester or a voltmeter. If a breakdown is found, you can begin repairs.
Troubleshooting door switches
The fault in this case lies only with the owner of the car, who, due to inattention, was unable to notice the non-working door switches in time. After all, monitoring their operation in each machine is very clear and it is difficult not to notice a non-working condition.
But the solution to this problem today is quite simple - a sealed boot that completely covers the button and does not allow dust, dirt and moisture into this mechanism.
Before you start installing the boot, you need to pierce a cross-shaped notch on its underside where the end switch is attached. After this, you need to install a self-tapping screw in the button hole, then put on the boot and insert a screwdriver through the puncture and secure it to the body. This method surprises with its reliability, simplicity and accessibility.
Removing the car dashboard
- Using a Phillips screwdriver, remove the three screws that secure the center console;
- remove the cover, the protrusion located at the bottom, remove the protrusion from the bracket;
- Using a nozzle, unscrew the five screws located in the console on the right and remove the screen;
- Disconnect the terminal with the (-) sign from the battery. If there is a radio receiver, you need to remove it, remove the plug from the shield;
- Disconnect the wires coming from the cigarette lighter, remove the cartridge;
- Using a narrow screwdriver, remove the handle from the levers;
- pull the handle towards the heating and fan switch;
- unscrew the two screws above the panel and the two located under it using a screwdriver;
- unscrew the screw located behind the panel;
- Also unscrew the two self-tapping screws securing the cover;
- disconnect the harness and wire connectors. To avoid confusion when installing the panels, you should mark the order in which they are connected;
- unscrew the fastening bolts;
- unscrew the two self-tapping screws, those that secure the bottom bracket using an 8 key;
- unscrew the self-tapping screw securing the light guide and remove it;
- Also unscrew the screws securing the heating unit;
- remove lamp sockets;
- after removing the external parts, remove the decorative insert;
- unscrew all nuts with a 21 key;
- hydrocorrector, remove its lamp;
- Unscrew the screws that are attached to the cross member on the left.
- Finally, the panel itself is removed. The panel is assembled accordingly in the reverse order.
In general, the repair work is quite doable even with your own hands, but before starting dismantling work, you need at least a pinout mapped on paper, otherwise it will be difficult: you will need to “trace” every wire and every connection that is on the “path” from devices to the power button.
Source
Customer focus
On Saturday I encountered a car repair problem. What was needed was a lift and inspection of the steering rack. There are no vacancies at the service center where I serve, and there are none available for Sunday, so I had to look for the nearest ones. I called on one service day, they didn’t answer the phone, on the second the car mechanic had a day off until Monday, on the third they said come. I arrived and it looked like an ordinary car service plus a car wash. An important uncle foreman came out, asked what was needed, explained, he said that he would have to wait a little. Wait, I called you 20 minutes ago, described the problem, that I needed a lift to look at the steering rack, did you receive the call? Master - I’m the only one here who receives calls and records them, but there are a lot of calls, maybe I got it wrong. No, you told me that you were ready to receive you without any problems, so I came to you. Master, don’t worry, we’re already releasing the car, you can see for yourself that all the lifts are busy. Okay, I agreed, I’m sitting and waiting. Half an hour - silence, 45 minutes - the same, after almost an hour I approach the counter where the master is sitting - he’s not there. I go to the repair area and see that the lifts are all busy, as are the car mechanics. I ask one of them: which lift should be free soon? The car mechanic asked his colleagues, one answered that in at least a couple of hours, the rest were busy until the evening. I turned around and left, there’s still one question: why do this if you see a completely packed car service center?