May 15, 2015 Lada.Online 63 810 4
The standard lighting in the interior of Lada Granta, Lada Kalina or Lada Priora cars is dim. Even if you modify it, you still can’t see anything in the cabin from behind in the evening. The problem can be solved by installing an additional lamp for rear passengers, but this time we will show you how to make high-quality additional floor lighting.
Installation
You will need : four pieces of LED strip (you can buy it on AliExpress (see catalog)), additional wires.
We glue the LED strip to illuminate the driver's floor with double-sided tape onto the electronics unit. We attach the tapes for the front passenger with one end to the wiring harness (using electrical tape or a tie), and glue the other to the ventilation motor.
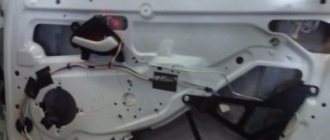
For rear passengers, the footwell lights are mounted under the seat. The most convenient way is to fix the LED strip directly on the upholstery material by making 2 holes with an awl into which we insert a plastic tie. We lay the wires next to the seat heating wires, wrapping them with black electrical tape.
An effective way to adjust the backlight
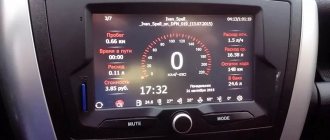
The problem with the first modifications of the Lada Vesta is insufficient lighting of the dashboard. In sunny weather, the driver cannot see the readings of sensors and instruments. Excessive distraction on the “visor” provoked accidents, crashes, and collisions with oncoming traffic.
In order to eliminate the defect, engineers developed and made publicly available on-board computer firmware with an increased brightness coefficient. However, the program code did not always work correctly, and malfunctions occurred from time to time.
Self-taught people worked together with the official VAZ developers and came up with a much better method - installing a 2-channel PWM controller.
The cost of a set of equipment is from 650 rubles in online catalogues, perhaps it will be cheaper in the car market. There is no catalog article, look for the production name: “KIT, PWM power regulator set, 12-50V 30A, 20kHz.”
Connection
Having connected all the floor lighting wires, we lay them along the windshield pillar to the ceiling lamp. The colors of the wires may vary depending on the model and configuration of the LADA vehicle, so we recommend determining the purpose of the contacts using a test lamp.
Lada Priora front lamp diagram:
- far left (red) - “mass”
- central (white) - +12V
- far right (black) - ground (door switches)
Diagram of the front lamp of Lada Granta (pre-style) and Lada Kalina:
- far left (black) - “mass”
- central (green) - ground (door switches)
- far right (red) - +12V
Diagram of the front lamp with ERA-GLONASS for Lada Granta FL:
- 11 and 14 - +12V appears after turning on the main relay (turning on the ignition, opening the doors). The power goes out 2-5 minutes after removing the ignition key.
- 15 - “mass”.
- 17 - “ground” (door limit switches), which appears for a while when the doors are opened.
Or we use useful contacts to connect the interior lighting to the ISO connector of the radio:
- A4 - +12V from battery ( yellow )
- A6 - +12V when the dimensions are turned on
- A7 - +12V after turning on the ignition
- A8 - “ground”
LED navigation light
The first in line to improve the interior lighting is the standard lampshade. To improve lighting, we need to replace the incandescent lamp with an LED one, or use LED panels.
Before starting work, to avoid a short circuit, be sure to disconnect the negative terminal of the battery!
Tools required: slotted screwdriver, soldering iron or solder paste, LED lamp or panel.
1.
Using a flat-blade screwdriver, pry up the housing of the interior lamp on the right side and remove it, disconnecting the power connector.
2.
Next, we take out the incandescent lamp and change it to an LED lamp, with a distance between the contacts from 39 to 42 mm.
Or we use LED boards, they are more efficient and durable than ready-made lamps. Power for the panels can be taken from the copper legs that are used to mount the lamp. You can place the boards as shown in the photo.
Due to the larger number of LEDs, the brightness of LED panels significantly exceeds the brightness of a conventional LED lamp, so this method of improving lighting is the most preferable. Additional light from the courtesy lamp allows you to illuminate a significant area of the vehicle exit area.
3.
After finishing the work, return the power plug to its place and snap the lighting lamp into the frame body.
Result
Let us remind you that in order to make the car interior more comfortable, you should approach the issue comprehensively. Please note that the standard panel backlight has been improved.
Keywords: half fret grant | interior lighting for Lada Granta | floor Lada Kalina | floor Lada Priora | interior lighting for Lada Kalina | interior lighting for Lada Priora | Lada Granta seats | Lada Kalina seats | Lada Priora seats | torpedo Lada Granta | torpedo Lada Kalina | Lada Priora torpedo
0 0 0 0 0 0
Share on social networks:
How to make interior light with your own hands, detailed instructions.
Many owners of a modern Lada are not satisfied with the lighting in the car's interior. In this regard, there is a need to modernize the lighting yourself. We'll tell you how to independently improve visibility in the vehicle interior.
Independent tuning of the Lada interior is quite common. Most vehicle owners strive to increase interior comfort and improve the appearance of the interior with their own hands. First of all, most car enthusiasts improve interior lighting. The desired result can be achieved by installing LED lighting for the Lada Granta interior. LED tuning is quite easy to do with your own hands, while significantly increasing the visibility of the interior and making the Granta’s interior more attractive.
Granta
The interior of this car needs drastic improvement immediately after purchase. At the same time, both large internal elements and small details deserve attention.
As in the cases described, it is important here to carry out all activities in a certain sequence:
- It is advisable to start interior changes with replacing the standard steering wheel.
It is better to purchase this element in the required configuration at a specialized store. This solution will be the simplest, since covering the steering wheel yourself is quite difficult and time-consuming. The new element is relatively easy to install. In addition, the finished cover is very easy to tighten with threads. It is also easy to remove if necessary. - The interior decoration of the Lada Granta model is not reliable or durable.
This applies primarily to the armrest, which fades and cracks when exposed to sunlight. In addition, objects inside it rattle while moving. Standard branded armrests require special fastenings, which are fixed with screws. Russian technologies leave much to be desired, so it is better to purchase such an imported interior element. - Due to the dim light, the lampshades cause many complaints from Granta owners. Here the problem can be solved radically by replacing the light source.
Thus, the highest quality improvement of the interior is possible only with a radical update of the upholstery. This is quite a labor-intensive task. For a simpler option, you can simply buy covers. Their selection on the market is simply huge.
Vesta
When operating Vesta, many drivers encounter such an unpleasant phenomenon as a noisy and dusty interior. Therefore, it is necessary to improve the interior for the driver and passengers inside this model by replacing door seals, improving sound insulation, and installing additional lighting.
Work must be carried out in the following sequence:
- First, you should install additional rubber seals in places where the greatest discomfort is felt. Here these are the ribs of the rear doors. Their surface must be thoroughly cleaned and degreased. To solve the problem, it is recommended to purchase an RKI-19 brand seal from a car store. This modification will significantly improve the tightness and reduce noise when driving. Discomfort when driving this car is caused by squeaks from the steering wheel and gear shift lever. To get rid of it, you can paste over these places with a special material, treat them with silicone or penetrating lubricant.
- The level of sound insulation can be increased by using sheets of foam placed under the sheathing. It is recommended to treat the outside of the bottom and wheel arches with bitumen mastic.
- It is advisable to improve the lighting of the rear seats by placing lamps on the edges above the rear doors or in the center. This must be done before installing the upholstery fasteners.
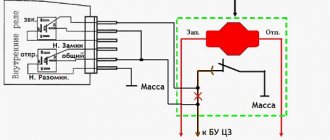
Finalization of the scheme
Work on modifying the door end elements can be delegated to service station specialists. In this case, the owner will be charged an installation fee. You can do everything yourself, then installing limit switches will require plumbing tools and a device for checking the electrical circuit:
- Tester.
- Soldering iron.
- Phillips screwdriver.
- The wire.
- Solder POS-40.
- Corrugated hose.
- Insulating tape.
- Limit switch.
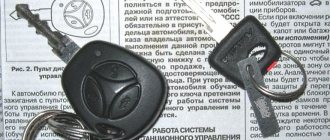
The owner must decide on a further plan of action based on the features of the layout of his Lada Granta car. It can activate the button in the threshold or the door lock contacts.
Both options involve parallel connection of unused elements to the working terminals of the door on the driver's side. The switches for opening the doorway of a Lada car are powered using a two-wire circuit. To simplify the choice, we will consider both options.