Print this article Font size 16
Initially, CV joints were positioned as elements with a very long service life. Manufacturers even assured that they could last as long as the car itself.
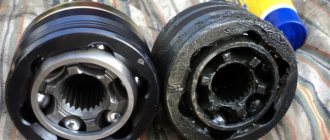
Photo of CV joint for VAZ 2114
But in reality, everything is not as colorful as it is described. A grenade has a life limit. What grenades, you ask. The grenade is the CV joint. People often use the concept of “grenade”. This can be explained very simply - the CV joint looks like a grenade. That's all. Therefore, do not be confused if you hear “grenade” when talking about CV joints. It is the same.
Location
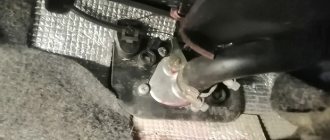
It will be impossible to replace the CV joint on a VAZ 2114 if you do not know where exactly these elements are located. Their location is easy to determine - on both sides of the front suspension at the bottom of the car. They are oblong elements and fit into the hub of each wheel.
CV joint location
That is, getting to the node is not difficult, but this will require certain conditions.
The most important thing is that the replacement procedure is not complicated, which allows you to do the work yourself. But let’s say right away that if you don’t have the time, desire, or are simply not confident in your own skills, it’s better to entrust the repair to specialists. You will spend extra money on this, but you will be sure of the result.
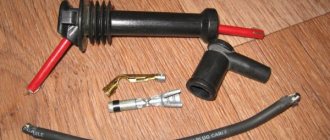
Necessary tool
If you decide to do the repairs yourself, you will need the following tools to disassemble the car:
- Open-end wrenches for 17, 19. But it is better to have a full set on hand;
- Set of heads and knobs;
- Wheelbrace and jack;
- Pliers;
- Screwdriver;
- Hammer;
- Rag and gloves.
Useful : How to replace the internal grenade on a VAZ 2114?
Also make sure you have a complete replacement kit: grenade, boot, CV joint grease and two clamps. For convenience, you can drive onto a pit or overpass, and for safety reasons, set the car to the parking brake and put supports under the wheels.
When replacement is required
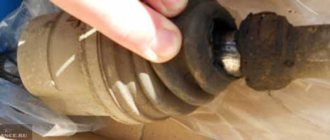
If while driving your car you hear noise coming from the front of the car, be sure to check the condition of the boot. Quite often, replacing the outer CV joint boot of a VAZ 2114 becomes a daily task for service center employees.
To check, just turn the wheels in any direction and look under it. If cracks or complete damage are detected on the boot, the outer CV joint of the VAZ 2114 will definitely need to be replaced.
The presence of damage indicates that dirt has gotten inside the element. Much or little of it is no longer so important. Contamination leads to disruption of the functionality of the device.
In such situations, when the CV joint is damaged, it is strongly not recommended to continue driving under your own power. This is dangerous for you, your car and other road users. Ignoring this recommendation entails even more expensive repairs, since by the time you get to the garage or car service center, you will damage a number of other components and elements of the car.
The importance of CV joints
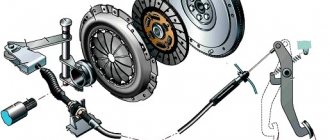
The internal hinge is larger than its brother, and therefore more expensive, since it plays a more important role. It transmits rotation to the shaft from the gear. It is also installed inside the gearbox housing. The maximum rotation angle of the internal grenade is 20 degrees.
The outer hinge serves to rotate the wheel hub, and therefore it has mounting splines. The external grenade does not have much free space, so it is inferior in size. Installed next to the wheel.
What to choose?
To replace the inner or outer CV joint on a VAZ 2114, a new element will be required. To be fair, we note that the most suitable and high-quality CV joints for the VAZ 2114 model are produced by the manufacturer, that is, AvtoVAZ.
But here comes the most important disappointment - they are not for sale. The only option is to go to a specialized VAZ official car service center. But from the point of view of financial costs, it is not the most reasonable decision.
In addition, there is now a fairly wide range of analogues on the market. Judging by the reviews of VAZ 2114 owners, special attention should be paid to CV joints produced by such companies as:
- Hola;
- GKN;
- Kraft.
Photo of GKN CV joint for VAZ 2114
Signs of failure of the outer grenade (CV joint).
There are two options here:
- signs that your grenade has already broken
- signs that the grenade will soon come out and break .
How to understand that a grenade will soon break.
Of course, the first sign of a malfunction of the external grenade is a crackling sound . If you hear a crackling noise while driving with the steering wheel turned, it is definitely a CV joint. The greater the angle of rotation of the wheel and the harder you press on the gas, the louder the clicks. Another sign that does not always appear is vibration on the steering wheel at speeds greater than 80 km/h. The vibration is only slightly similar to the vibration from an unbalanced wheel. It usually manifests itself as a slight twitching of the steering wheel.
How to understand that the outer CV joint has broken.
If the CV joint breaks, the car will stop moving. In any gear engaged, press the gas, the speed increases, but the car does not move.
How to understand that it is the outer CV joint that has broken, and not the internal one or the clutch in general (the first signs of failure are similar to the signs of a clutch failure)? First of all, start the car and put it in any gear. Next, open the hood and look in turn at each of the shafts going from the box to the wheels (one short, the other long). If any shaft is spinning, it means that the CV joint has broken on this side.
I recommend not just visually looking at the shaft, but touching it with some long, hard object, such as a stick. The main thing is that there is nothing on it that can wrap around the shaft !!! When you touch the shaft with a stick, if it is spinning, you will feel a slight vibration. This is usually done in the dark, because it is difficult to understand whether a cylindrical object is spinning, especially in the dark.
Replacement
Armed with new CV joints, also collect a set of necessary tools and materials. It will include:
- Set of heads;
- Spanners;
- Shoes;
- Dry rags;
- Grease for CV joints;
- Jack;
- Anthers.
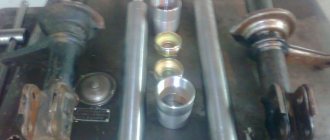
CV joint arrangement diagram
Now let's get down to work on replacing the CV joints:
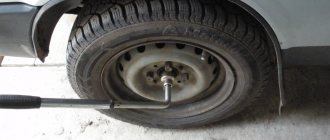
- Determine the location where the repairs will be carried out. This could be an overpass, a garage with an inspection hole, or a room with a car lift.
- Stop the engine and apply the handbrake. Use chocks to block the wheels.
- Using a wheel wrench, remove the wheel bolts.
- Raise the required part of the car with a jack.
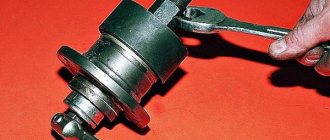
- Loosen the nut in the center of the CV joint. Keep an eye on the puck so you don't lose it. It is not included with the new CV joint.
- Armed with 13mm wrenches, unscrew the fasteners of the upper part of the ball joint. It is not necessary to perform a similar procedure with the lower part, since it will not interfere with the repair process.
- Using a pry bar, slightly rip the grooves off the support and move them aside.
- Knock the hub off the CV joint splines. To do this you will need a hammer and some kind of wooden stand.
- Remove the old damaged CV joint.
- Check for damage to the stem.
- Remove any remaining lubricant from the rod using a dry rag.
- Place a new grenade in the new location. This assembly should include a CV joint, boot, clamps, nuts, and retaining rings.
- When assembling the unit, do not forget to use high-quality lubricants. There shouldn’t be too much of it, but you shouldn’t feel too sorry either.
- Reassemble the parts in reverse order.
- By changing the CV joints, you can simultaneously check the condition of the brake pads. If they are in a sufficiently worn condition, it is advised to replace them at the same time. Anyway, you have already dismantled the knot.
- After completing the repair, check the car in action.
- It’s not uncommon for craftsmen without much experience to leave behind supposedly unnecessary parts after reassembly. Please note that everything that remains after assembly, and that is not the released elements that you replaced with new ones, has its place in the design of the car. Therefore, check where exactly these “extra” elements come from and install them in their rightful place.
How to install a new CV joint on a VAZ.
Be sure to follow this sequence for installing new parts:
- Small clamp.
- Grenade boot.
- Large clamp.
- Retaining ring.
- The CV joint itself.
First, we clean the drive shaft from dust, dirt and old grease. Most CV joints come with lubricant, a boot, two clamps and sometimes a new hub nut. If suddenly there is no lubricant in the kit, it is better to use graphite lubricant, and if it is not available, then simple lithol. First of all, we put on a small collar. Then the boot (it should go behind the limiting washer) and a large clamp. Then we put a retaining ring on the drive shaft. Now open the tube of lubricant and completely squeeze it into the grenade. Now it's time to put the CV joint on the drive. Because of the locking ring, it will be difficult to insert the drive into the grenade, so we take a hammer and lightly, trying not to damage the thread, press the grenade into place. Now you need to put the boot on the CV joint and tighten the clamps. Assembly occurs in reverse disassembly sequence, but there is one nuance! Do not overtighten the hub nut! This may cause the bearing to hum. The hub nut must be tightened with a force of 225.0–250.0 N*m. Of course, few people have a torque wrench. So, tighten the nut tightly, but not with all your might. In theory, a force of a maximum of 25 kg will need to be applied to a meter-long knob. But, the extension pipe will spring back under such force, so how can you describe it exactly? But obviously there is no need to jump with weight.
I hope I helped you. If you have any questions, ask them in the comments.
Removing the drive, boot and CV joint
To replace the outer CV joint, follow the following procedure:
- We place the car on the inspection hole and support it with wheel chocks.
- Using a 30mm socket, loosen the hub nut. If the nut does not break off, then you can extend the key with a pipe.
- Raise the car with a jack in the right place and remove the wheel.
- We unscrew the bolts securing the ball joint of the lower arm to the hub.
- We squeeze out the tie rod end with a puller.
- Unscrew the drive shaft nut completely.
- We pull out the hub by grasping the brake disc and pulling the shock absorber strut towards us.
To change the boot and hinge, you will have to climb into the inspection hole. To remove the CV joint, remove the clamps that hold the boot. Next, we get rid of the old boot, which is easier to do with a knife. Use a rag to remove grease from the hinge. Then you need to knock down the inner race, for which we lightly hit the attachment with a hammer, which must be rested against the end of the hinge. Next, we thoroughly clean the CV joint from dirt, sand, dust and grease.
Why do you need to change CV joints?
If you find defects in the boot, or it is dirty, you must replace it. Otherwise, as we have discussed more than once on the website provaz2114.ru, this element will break, and you will need to buy a new part. For the future: it is unlikely that it will be profitable for anyone to buy other spare parts when you can simply care for and control the old ones. However, if a breakdown does occur, you need to know that CV joints cost approximately from 1000 to 2500, and you will still have to change them. If the car becomes unusable, then when you turn the steering wheel, the hinges may fall apart into two parts. In this case, oil may leak out, and then you will no longer be able to continue your journey.
ball CV joint
Causes of failure
- Low amount of lubrication (wear of joints);
- Damage or contamination of the boot (rupture of the boot);
- Heavy loads.
- Bad roads with holes, bumps, uneven surfaces;
- Too aggressive behavior of the driver on the road, sudden movements;
Try to lubricate the hinges as often and as abundantly as possible, because for the most part it all starts with them.
Determining the malfunction of a specific CV joint
An unpleasant sound, in the form of a crunching sound at the outer joint, is heard when the steering wheel is turned sharply and pressure is applied to the gas.
If you are driving on a rough road full of potholes and hear a crunching sound, then you have problems with the inner joint.