I myself encountered such a problem when the stove in positions 1,2,3 did not blow at all, it only worked in position 4, the stove resistor is to blame for this. I went to the car market and bought it, it costs only 200 rubles, I replaced it and the stove became work as it should in all positions!
In order to replace the resistor you need to: 1) Disconnect the wire from the negative terminal of the battery. 2)Remove the right windshield frame trim. 3) Disconnect the block with wires from the resistor terminals 4) Remove the fastening screw... 5) and remove the non-working heater resistor. 6) put a new resistor in the same place!
Problems with the heater can be of various types. We will not list and analyze all of them, since we are only interested in those that are caused by the stove resistor on the Priora. By the way, this part is often called a rheostat.
It is easy to understand that the malfunction lies precisely in this mechanism. The stove begins to function only at one speed or one of the speeds has stopped functioning. If one of these situations occurs, you can immediately conclude that the rheostat has failed.
Replacing the heating gear motor on a Lada Priora
First of all, it should be said that replacing the gearmotor on a Priora with and without air conditioning is done in the same way, since the gearbox is located quite far from this device. It should also be noted that today there are several known ways to remove the gearmotor from a Priora. One of them involves removing only the trapezoid along with the wipers and expansion tank, the second allows you to get by with removing only the tank. But to use these methods, the driver must have extensive experience in self-repair, otherwise problems are inevitable. Therefore, the third method will be discussed below, with the complete removal of all necessary parts. Yes, it will take more time from the car owner, but it is almost impossible to break anything. Now it's time to decide on the tools. Here's what we need:
- new gear motor for Priora;
- 2 screwdrivers - flat and Phillips.
Sequence of work
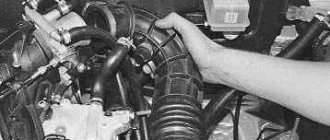
First you will need to perform a few simple preparatory steps. It is necessary to disconnect the throttle valve assembly and move it slightly to the side.
To get to the Priora gearbox, the sound insulation will have to be removed
Then use a Phillips screwdriver to unscrew the screws holding the sound-insulating material.
- There is a wiring harness next to the gearmotor. It is mounted on plastic holders that open manually. The tourniquet is pulled aside.
The wiring harness is mounted on two plastic holders that can be opened manually
The heater is held on by three screws. It only needs to be moved a few centimeters
You need very long fingers to reach the block on the damper sensor.
To open the spring lock, you will have to move it down a couple of centimeters
The gearmotor is held on by only three self-tapping screws, unscrewed with a Phillips screwdriver
The gearmotor, freed from the fasteners, is carefully removed from the niche
One mechanic I knew used a very original device to remove the gear motor - an ordinary one and a half liter plastic bottle. This bottle was cut obliquely so that it looked like a semicircular scoop. This thing was carefully slipped under the gear motor, and only after that the fastening screws were unscrewed. When I asked why such complications were needed, the answer was: so that the screws do not fall into the engine. Taking a closer look, I realized that this solution makes sense: if the unscrewing screw accidentally falls into the engine pan, it will be almost impossible to get it out of there.
Replacement: how to remove (change) the stove on a Priora with and without air conditioning
Replacing a stove completely is rarely done; components are mostly changed. Often the main reason for disassembling the heater on a Priora car is replacing the heater radiator. When it ceases to be airtight and no longer works as efficiently, it is necessary to begin repairs. In order to remove the heater on a Priora car without air conditioning, you will need a set of wrenches (socket and socket wrenches) and a Phillips screwdriver. As the system is disassembled, it is worth inspecting all parts and replacing worn ones. Perform the work according to the instructions:
- Remove the negative from the battery.
- Remove the lower windshield seals and engine sound insulation.
- Loosen the clamps that hold the pipes adjacent to the heater core, and then disconnect them. First place a basin under the pipes to drain the coolant. After the liquid has poured out, cover the pipes with a rag.
- Start wiring. Unclip the latch and disconnect the motor wires. Then de-energize the additional resistor.
- The wires that go to the damper drive motor are secured with a clamp. You need to bite it and then disconnect the wire.
- Next, we proceed to dismantling the heater itself. Take a “ten” socket wrench, remove three screws with it, and remove another screw with an “8” wrench.
- Next, move the wiring harness from the heater to the side (attached to a small bracket).
- Now, from the passenger compartment under the dashboard, unscrew the third nuts securing the brake pedal with the “13” key, and then move it to the side.
- Pull the block towards you.
- Install a new heater instead of the old one if necessary.
- When you are concerned that the heating is not blowing correctly - not in the required mode - you will have to check everything again during dismantling.
- To remove the heater on a car with air conditioning, follow these steps:
- Also remove the negative terminal, then the lower windshield seal, and the engine sound insulation.
- Unscrew the screws covering the heater radiator.
- Also carefully remove the pipes: the coolant must be drained into a prepared basin.
- Slowly and smoothly pull the radiator up until it comes out of the mounts.
- Install the new radiator in the reverse order.
Lada Priora has Panasonic or Halla air conditioners. They differ only in the fastening, so there will be no difficulties when replacing the heater radiator.
Replacing the radiator of the Priora stove
To work, you will need a standard set of tools, which includes socket wrenches 10 and 13, side cutters, a Phillips screwdriver, and a wrench 8. In both cases, you will have to disconnect the heating system hoses; the remaining coolant will pour out of them, so immediately place containers under the pipes heater Then the liquid can be returned to the system.
With air conditioning
- First of all, we need to remove the rubber seal of the windshield to gain access to the parts;
As you can see, dismantling the radiator in a Priora with air conditioning does not require draining the antifreeze. Coolant will only come out of the expansion tank and the heat exchanger itself. Removing the radiator in a VAZ 2170 with Panasonic air conditioning follows the same scheme, only a few fasteners may differ. Now you can replace your worn-out heater with a new one!
Without air conditioning
- Work begins by disconnecting the negative terminal of the battery. We remove the windshield trim along with the windshield wiper arms, as these elements will interfere with operation;
- The next step is to remove the coolant supply pipes to the engine injectors;
- The windshield trim is held in place by seven screws. Unscrew it to completely remove the element;
- Now we move on to the hood seal, in its center you will find a tightening screw - unscrew it;
- The engine noise insulation closes the passage to the heater system - pry up the plugs with a flat screwdriver and unscrew the plugs;
- We unscrew the screws and dismantle the sound insulation. Remove both covers;
Video instructions for replacing a leaking stove:
- Priora instrument panel: indicator designations, error interpretation
- Do-it-yourself PTF Priora installation
- Signs of malfunction, replacing the speed sensor on a Priora
Enter the text of the comment: the climate control does not work, not old, not new, the heater damper opens and closes all the way to the MMR, I change it every year in the spring, the damper does not close, I have to remove the MMR in the fall, everything is new on the computer, the regulator works
I unscrewed the 4 screws that hold the plastic plate near the heater radiator pipes, but for some reason it does not come out of the heater. Priora with Panasonic. I would be grateful if you could tell me.
Dismantling and replacing the heater on a Priora
Any car should provide its owner with comfort while driving. Otherwise, using a personal vehicle loses all meaning. A large share of responsibility for the comfort of the driver and passengers lies with the stove. If in summer you can do without using a heater, then in winter it becomes completely unbearable to travel in cold transport. So drivers are interested in how to remove the stove on a Priora in order to carry out maintenance, repairs, or even replace it with a new one. There is no point in turning to specialists to do this work, since everything is done according to a simple scheme.
Before changing the stove on a Priora, buy new heater elements using the catalog numbers:
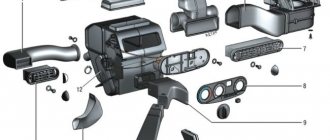
Priora heater 2111-8101012: 1 — heater inlet/outlet hoses 2170-8101200/208; 2 — additional resistor 2123-8118022; 3 — electric fan 2111-8118020; 4 — heater 2111-8101012; 5 — nut 1/07259/11; 6 - screw 1/51873/01
Priora heater parts: 1 - screw 1/76691/01; 2 — heater radiator 2110-8101060; 3 — left heater casing 2111-8101025; 4 — heater control damper 2110-8101538; 5 — right heater casing 2111-8101024; 6 — air duct housing 2111-8119124 intermediate; 7 — screw 1/76692/01; 8 — lower air intake housing 2111-8119026; 9 — bracket 2108-8101110; 10 — bracket 2111-8119102 right; 11 — screw 2114-5325388; 12 — air filter 2111-8122020; 13 — upper air intake housing 2111-8119025; 14 — filter cover 2111-8119116; 15 — screw 1/76702/01; 16 — screw 1/76691/01; 17 — additional resistor 2123-8118022; 18 — screw 2123-6302332; 19 — screw 2114-5325388; 20 — air supply pipe 2123-8118096; 21 — electric fan 2111-8118020 of the heater; 22 — bracket 2108-8101110; 23 — gear motor 2110-8127200 for the heater damper; 24 - screw 1/76691/01
By the way, do you know that the Lada Priora is also equipped with air conditioners (HALLA and Panasonic), so the process of replacing the Priora heater may be slightly different. For example, in order to replace the heater radiator on a Priora with HALLA air conditioning, it is not at all necessary to dismantle the heater assembly.
A car of this brand is equipped with a liquid-based stove, which is combined with the cooling system of the power unit. It includes:
- The heat exchange device is represented by a radiator, through which the external air entering the cabin is heated;
- A fan driven by an electric motor promotes air circulation in the cabin;
- Damper that regulates the flow of incoming cold air;
Dampers that regulate and distribute the flow of incoming warm air into the cabin.
The interior heating device in question is installed in the engine compartment of the car, so there is some work to be done to get to it.
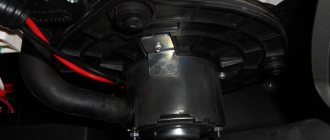
Heater assembly
1 — micromotor-reducer of the heater damper; 2 — heater control damper; 3 — additional heater fan resistor; 4 — blowing hose for the fan motor; 5 — heater fan; 6 — filter cover of the heating and ventilation system
The heater is installed in the engine compartment under the right windshield trim and is attached to the front panel. A filter is installed at the heater inlet to clean the air entering the heating and ventilation system.
Features of the Priora stove
The climate control of this car on some versions is designed for the installation of air conditioning. Therefore, the design of this device in this case is slightly different than that of the VAZ-2110 heater. This article discusses the standard heater option. Although they have a lot in common. The Priora stove (heater without air conditioning) includes the following large components:
- Stove body.
- Air duct system.
- Heater electronic control unit (ECU) with control console.
These are, so to speak, three basic nodes. All of them, except the ECU, are disassembled and consist of various subsystems. To be honest, the control unit can also be disassembled if desired. But you shouldn't do this. This is a delicate electronic device and can only be repaired by a specialist. But with the other two there are options.
Frame
After the control unit, the stove body is the most complex object. The fact is that it includes several elements:
- Housing consisting of two parts.
- Blower electric motor with fan.
- Small heating radiator with pipes.
- Variable resistor.
- Heater air damper.
- Micromotor gearbox, heater damper drive.
- Cabin filter.
All of the listed elements sometimes fail, and it is quite possible to replace them yourself, without resorting to the services of a specialist.
Location and access
As on the VAZ 2110 model and modifications, the heater is located outside the passenger compartment. It is located in the engine compartment. Right under the windshield. It is separated from the engine by a special fabric and cardboard partition. And the top is covered with a plastic double casing, which hides this compartment, in which, in addition to the heater, a brake vacuum and a windshield wiper drive are also installed.
To gain access to the Priora stove, these elements must be dismantled. Disconnect the cooling system hoses. Unscrew the 3 fastening nuts and remove the housing. This process is described many times and shown in the attached video. Therefore it is not worth repeating here.
Cabin filter
Most often, it is this part that fails or exhausts its resource. It simply gets clogged with dirt and dust. This is expressed in a decrease in the intensity of fan operation. Sometimes, it becomes so dirty that the heater fuse blows. The load on the electric motor increases so much that the fuse simply blows. The purifier is located at the air inlet into the heater. Near the right wing of the car. It is closed with a decorative plastic cover.
Electric stove motor
To remove and replace the electric motor of the stove, on a Priora without air conditioning, you have to completely dismantle the heater. Or at least push it forward a little. The fact is that this motor is located on top of the Priora stove and is located under the supporting part of the windshield.
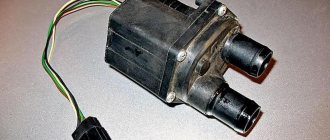
Heater resistor
This element serves as a kind of fan rotation speed switch. It has several resistance levels. Each step is speed. A faulty resistor is easy to determine. If none of the speeds except the maximum one work, then in 99 cases out of 100, it is the resistor. And only 1 switch, in the control unit.
New sample heater control unit (4 positions) 21703-8128020 for LADA PRIORA
New sample heater control unit (4 positions) 21703-8128020 for LADA PRIORA
Payment to Sberbank VISA card
The most convenient and profitable payment method for you. Payment can be made through the Sberbank Online system, through a payment terminal (Sberbank ATM), provided that you have a card from this bank. If you are not a client of this bank and you do not have a card, then you can top up your balance at any bank branch through an operator; they will accept cash payment and top up your balance. Commission from 0 to 1%
Payment to Alfa-Bank card
Payment via Tinkoff card
Payment to VTB card
Cash on delivery (payment upon receipt)
Payment for the order will be made at the post office upon receipt of the goods. For cash on delivery services, Russian Post takes an additional commission - approximately 4% of the cost of the order (parcel) upon receipt.
The postal commission based on the amount of “Cash on Delivery” for your parcel is described below, i.e. In addition to the delivery cost, the post office will also charge you a commission for .
Postal commission for cash on delivery service:
· up to 1,000 rub. inclusive - 80 rub. + 5% of the amount
· over 1,000 to 5,000 rubles. inclusive - 90 rub. + 4%
· over 5,000 rub. up to 20,000 rub. inclusive -190 rub. + 2%
· over 20,000 rub. up to 500,000 rub. inclusive - 290 rub. + 1.5%
Attention! Advance payment for delivery 100% (via Sberbank payment). This is included in our Cash on Delivery terms.
Check with the manager for additional information.
Yandex money.
This payment method involves issuing an invoice in the Yandex.Money system.
You will be able to pay from your Yandex.Money wallet. ATTENTION
! There are restrictions on the payment amount: anonymous wallet 15,000 rubles, registered wallet 60,000 rubles, identified wallet 250,000 rubles. After payment you will receive an electronic cash receipt.
Symptoms of a problem
The Lada 2170 model received a liquid heater, which is connected to the engine cooling system. The radiator is a heat exchange device; due to this component, the air entering the Priora’s cabin is heated. Coolant constantly circulates through the radiator; this part of the heater is subject to wear.
It is worth checking the radiator in the following cases:
- The stove stopped heating properly.
- The coolant level drops.
Once you disassemble part of the heater system, you will see a rusty and most likely leaking radiator. There may also be leaks in hoses, pipes and the junctions of these elements. You should check the heat exchanger of the stove only after you have made sure that there are no defects in the operation of the gearmotor and damper.
Location and purpose of the resistor
In order to successfully replace the Priora stove resistor, you need to know where this part is located. Experienced drivers who have encountered problems with their heating system more than once may smile when reading these lines. But for inexperienced car owners, this question is relevant.
You can find the rheostat under the frill if you have a car without air conditioning. In models with air conditioning, this mechanism has a slightly different appearance and is located in a different location. For example, in cars with Panasonic climate control equipment you can find the rheostat under the left wiper.
The functioning of the rheostat is to ensure the normal functioning of the heater speeds. It is characterized by electrical resistance, which determines the rate of conversion of electromagnetic energy into thermal energy. An additional resistor for the Priora heater, or an additional one, as well as a rheostat - this is all the same element, which we will simply call a resistor.
Operating principle of the stove
Heater control panel on Priora
The air conditioning system may stop blowing for various reasons. If the heater blows cold air, and the car is without air conditioning, the driver will have to disassemble and replace some elements. This could be a malfunctioning control regulator, fan, heater valve, or other heating system component. In any case, first, let's understand the principle of operation.
The warm air flow is forced onto the device's radiator thanks to the fan. The speed of the latter varies depending on the temperature inside the car. The ratio of warm and cold air flows is regulated thanks to the valve. The air flow enters directly into the car interior through a filter element designed to clean the air. In the cabin, the car owner already chooses how the airflow will be carried out by adjusting the position of the dampers on the center console.
The Priora heater control unit is the main structural part; it is its regulator that is controlled by the driver. The stove control unit, by adjusting and analyzing all the necessary parameters, adjusts the stove motor so that it regulates the speed of the fan, as well as the position of the air damper.
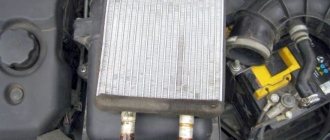
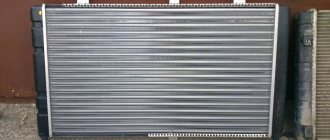
Heating device radiator
Priora heater control unit in Stavropol
- Electrics
- Automotive on-board computers
- Engine and interior heaters
- Automation units for pumps
Heater control unit 12v 1031, 1039, 1041, 1049С (1B18081100217)
Interior heater control unit 972504F100 PORTER2 PORTER2
VAZ Heater control unit VAZ-2170 (ZKS)
Elkar Control unit VAZ-21723,21703,21713 Priora (with rez-ra, after modern) Euro 3 (itelma)
Control unit LADA 21126-1411020-40 for LADA Priora
Elkar Control unit VAZ-2170 Priora (engine 1.6 l., 8 cl.) Euro 4 (itelma)
Elkar Windshield wiper control unit VAZ-2170 Priora Lux (Itelma)
Electrical package control unit
LADA Heater control unit VAZ-2170 new, euro panel (4 positions) (Autoelectronics)
Autoelectronics Heater control unit VAZ-2110-12 (Autoelectronics) 2111-8128020-01
SPB control unit
Heater control unit Amulet (A158112010)
Autoelectronics Heater control unit VAZ-2110-12 europanel (Autoelectronics)
Heater control unit 24v 1049a, 1051, 1061, 1069 (1B20081100218)
VAZ-2110 window control unit with 2 keys
Autoelectronics Heater control unit VAZ-2110-12 (auto) (Autoelectronics) 2111-8128020-02
Cold control unit mouth S 12V (TFFB 02110-00.00.00) up to
Heater motor regulator [control unit] Meyle 0148800016
Autoelectronics Heater control unit VAZ-1118 with air conditioning (2303.3854) (Autoelectronics)
Control unit for power windows and exterior mirrors LADA Priora (from 2013 onwards), 2 switches
FEBI Heater control unit MB W210
The control unit is heated. 31105 (2 times-3.5). But
VAZ Airbag control unit VAZ-2170
SBP control unit
Control unit for power windows and exterior mirrors LADA Priora (from 2013 onwards), 4 switches
Heater control unit 12v 1031, 1039, 1041, 1049С (1B18081100217)
Repair of heater resistor Lada Priora
If the stove fan does not work in one of the positions or only works in the fourth, and the fuse is in good condition, then you need to check the additional resistor. Before removing the resistor, be sure to disconnect the terminal from the battery. To avoid short circuits and failure of the vehicle's electrical equipment. Then disconnect the wiring harness from the resistor and remove the mounting screw.
In order to disassemble the resistor, you need to unscrew four bolts, and a board attached to the case will appear in front of you. Then unscrew the screws securing the board. It can be seen that 2 wires are soldered at the edges, and 3 in the center. A fuse is soldered onto two wires, and resistors are attached to three. For repairs everything needs to be desoldered. Then we determine what the reason is and what burned. We replace the faulty part with a new one and assemble it in the reverse order.
If after replacing or repairing the resistor the problem recurs after a short period of time, then you should pay attention to the interior heater fan motor itself. It may need preventative maintenance or a complete replacement with a new one.
On Lada Priora without air conditioning there is no resistor. The heater rheostat on it needs to be replaced.
As can be seen from the description, the work of replacing and repairing a resistor can be done without much effort and financial investment, but with the required soldering skills.
If you still have doubts about replacing and repairing the additional resistor yourself, contact a qualified specialist.
The Lada Priora stove only works in the max position - causes of the malfunction
I want to share my experience in repairing my Priora (with Panasonic air conditioning), or rather the stove in it. The point is this: the stove only works in the max position. In all others there is silence. There are several problems that lead to this. 1. In general, on Priors with Panasonic air conditioning there is a Rotation Speed Controller (RFV) for the fan. As a rule, it burns out, and the airflow button on the console starts blinking and the fan does not blow.
It is located under the plastic air intake on the driver's side. You need to remove the wipers, unscrew the air intake... it will be screwed on with two screws and there will be one chip going to it.
The problem is with him. Either replace it, but it costs about 2000 rubles, or repair it (I repaired it). 2. There may also be a bad contact in the chip. I didn't find the name of this connector, but the heater wires go through it. There may be a bad connection there.
How bad is the contact here? Either strip, solder, insulate... or re-solder the entire connector. 3. The switches on the console are acting up. It's either change or repair.
How to repair the heater mode switch in Lada Priora
Lada Priora is a product of the domestic automobile industry. This car has earned people's love for its low cost, good quality, and the availability of parts when repairs are needed. Despite good reviews from owners, the car is not without a number of shortcomings. For example, it happens that the Priora stove only works at speed 4. You can go to a service station to find out why the Priora stove switch is not working. But you can wait for your turn for several days, and the problem needs to be solved as quickly as possible.
The stove or heating system on the Lada Priora is almost no different from the same system of its predecessor, the “tens”. If you are familiar with the device of the tenth model, then you can easily figure out the heating system on the Priora. There may be several reasons why the temperature of the Priora stove is not regulated. Let's look at what these reasons are:
- incorrect operation of the thermostat;
- malfunctions in the cabin air temperature sensor system;
- dust getting into the radiator of the car heating system;
- breakdowns in the heating system control unit;
- malfunctions in the operation of the gearmotor or electric motor of the heating system.
Cooling system or motor?
Before you begin troubleshooting the heating of the furnace, it is necessary to eliminate the impact of breakdowns of the cooling system and engine. Only then can you begin to figure out why the stove mode switch on the Priora does not work. To do this, we check the antifreeze level and engine operation. First step: look into the expansion tank and determine the coolant level. Then turn on the engine and warm it up for a while. This will allow you to determine whether the thermostat is functioning correctly. Just touch the thick pipes leading to the radiator.
If you find that the top pipe is hot, this indicates that the device is functioning normally. A cold pipe is a sign that the thermostat is not working properly and you will need to replace it. This part is inexpensive, so replacement will be easy. A loose expansion tank cap is another reason why the engine remains cold. Because of this, the Priora stove switch may not work. Just replace this part.
The cooling system of Lada Priora is slightly different from the tenth model; it practically does not create an air lock. It can be caused by incomplete system insulation or antifreeze poured into an empty expansion tank. Solving the problem is not difficult. Remove the reservoir cap, stand on a hill with your front wheels and accelerate.
Repairing fan and radiator
Often the heater regulator on a Priora does not work due to the fact that a large amount of dust or other small dirt particles has entered the heat exchanger. Over time, contaminants get inside heating devices. This cannot but affect the performance of the entire system. Air masses do not warm up well.
You may note that the oven only works in position 4. In case of contamination, you can simply replace the entire radiator. You need to remove the device from the power unit side.
Do not forget to first drain the antifreeze from the cooling system, disconnect the windshield wipers and wires, dismantle the fan completely and remove the entire radiator by removing the pipes leading to it.
There is not only the problem that the Priora stove operates only at maximum, but also the complete absence of air jets from the heating system. The first step is to make sure that the radiator is working in principle. Place your hand and note whether any streams of air are blown out. Even cold air masses indicate that the system is operating. Otherwise, there is a possibility of fuse failure.
If the fuse stops, it means the furnace fan is broken. One possible reason for the fan not spinning could be small leaves or other small objects that have gotten into the fan. This will be confirmed by a hum. If necessary, you can remove the fan on the Lada Priora using the same procedure as on the tenth model. Replacing the fan will solve the problem.
A breakdown of the gearmotor on a Lada Priora can lead to the damper not operating, which will prevent hot air jets from entering the cabin. You can get to the gearmotor through the hood. If the problem is not with the damper, then most likely the stove is not working due to the contacts being oxidized. Simply clean them with sandpaper.
Is it all about the filter?
Often, replacing the filter can help solve the problem of weak air mass flows - when dirty, it becomes an obstacle to the passage of warm air. And then, even at high speed, the air flow can be too weak. You can also repair the heater rheostat (Priora with air conditioning) yourself. It is enough to replace the thermal fuse. This is precisely what a clogged filter affects. The thermal fuse overheats and fails; it only works at the maximum position.
If the Priora stove only works in position 4, then this may indicate that the rheostat has burned out. The same problem can lead to the heating system operating exclusively in the first position. Additional resistance causes the stove to work worse and slower. You will note that the Priora stove switch does not work.
Many passenger cars of the domestic automobile industry have a similar resistor block to the Lada Priora. You can get to the rheostat of the Priora stove through the housing on the left. You need to unscrew two screws to get to this block.
Temperature sensor and control unit
Switching may be difficult due to malfunctions in the temperature sensor located inside the car. You can find it in the lampshade on the ceiling of the cabin. The regulator changes the mode, transmitting data on the air temperature in the cabin to the gearbox. Depending on the temperature, the damper closes or opens. The serviceability of this element of the heating system affects the correct operation of the stove.
Heating a car depends on the operation of the entire heating control unit. It is in it that the distribution of air jets occurs, the strength of the direction of air flows to one or another part of the cabin is determined, and the temperature value is determined. It is better if the reason for the failure is the resistance of the Priora stove, since it is difficult to repair the unit. To make sure that the reason for the incorrect heating operation is in the unit, you need to remove your unit and replace it with one that is in working condition.
In cars with air conditioning, the speed controller often fails. In the event of a breakdown, the heating system does not work or turns on only in the maximum position. Such a breakdown occurs when the oven operates for a long time with the damper in the closed position. This is where overheating occurs.
Finding the cause of a malfunction of the stove in a Lada Priora car is not difficult if you understand the principles of operation of parts and components. The correct sequence of work will allow you to eliminate the breakdown in a short time.
Source: https://remam.ru/vozdsys/otremontirovat-pereklyuchatel-rezhimov-raboty-pechki-v-lade-priora.html
Instructions for replacing the stove radiator
If you need to change a heater resistor or heater radiator, it would be better to dismantle the system in any case.
To replace the device, follow these steps:
- The heating device itself is fixed with four or five nuts, depending on the configuration and year of manufacture of the car. There is nothing complicated about this, these nuts need to be unscrewed.
- The next step is the most difficult, you need to dismantle the system. The heater is removed from the engine compartment at a certain angle. It is advisable to have someone help you at this stage, since removing the device yourself can be problematic.
- When the device is removed, you will need to unscrew the three screws that directly secure the radiator itself.
- The element is simply removed from its installation location and replaced with a new one. Further assembly steps are carried out in reverse order.
Life hack: gear motor and other components of the Priora car heater
If the windshield of a Lada Priora car is fogged up and looks as if it was smeared with greasy hands after eating pirazhki - driver, beware, your heater is leaking! Maintaining normal temperature in the cabin at different times of the year is necessary in order to feel comfortable behind the wheel. In winter, the stove on the Priora saves you from freezing, which provides the heat a person needs. But you need to take care of it and prepare it for winter in the summer, because being left without heating in winter is not the greatest pleasure. The sore spots in the system that break down more often than others are the gear motor and the heater damper. Priora is a warm car - the original DAAZ is very good, it warms, and is warm in winter, because its radiator has the correct structure and fluid circulates inside. If you install the Chinese Luzar, you will freeze at -20 - I checked it personally. I put this luzar on, then took it off. The heater radiator is available for cars with and without air conditioning. The structure of the node is slightly different. The stove block of the Priora car is indicated below in the figure. As you can see, in addition to the block, the entire assembly consists of many spare parts. On the Priora, the stove has a conventional design - having taken the time to diagnose, you need to completely check the entire system in order to make an “investment” in the future - in winter you will need to look for a heated garage for repairs. If the Priora blows cold air or does not heat well, these are signs that something is wrong inside, and this malfunction needs to be sorted out.
Heating and air conditioning control
The operation of the heater and air conditioner is controlled from the control panel.
Turn on the heater and air conditioner. (Models with mechanical control) To turn on the heater, you must move the heater fan speed switch from the “O” position to any other position. To turn off the heater/air conditioner, move the heater fan speed switch to the “O” position. To turn on the air conditioner, you must press the “A/C” switch, and the indicator on the switch lights up. Note: The air conditioner does not operate if the outside temperature is around 0°C or lower. Only the heater will work.
(Models with automatic control) To turn on the heater, you must press the “AUTO” switch. In the “AUTO” mode, the fan rotation speed and air flow direction are automatically adjusted. To turn off the heater/air conditioner, press the “OFF” switch for the air conditioner and heater. If the air conditioner is not working, then to turn it on, press the air conditioner switch “A/C”, and the inscription “A/C” lights up on the display. Pressing the switch again turns on the “economy” operating mode. The “A/C ECON” indicator lights up on the display. Further pressing of the switch will turn off the air conditioner.
Note: The air conditioner does not operate if the outside temperature is around 0°C or lower. Only the heater will work.
The air flow direction switch is designed to change the blowing direction.
(Models with mechanical control) To change the airflow direction, move the switch (6) to the required position.
(Models with automatic control) To switch the blowing mode, press the “MODE” button. The selected airflow pattern is displayed on the display.
Press the required switch to enable the corresponding mode.
— In this position, the air flow is directed towards the head area.
- In this position, the air flow is directed towards the head and floor at the same time. In the extreme positions of the temperature regulator, a warmer air flow is directed towards the floor.
— In this position, the main air flow is directed towards the floor (a small air flow is directed towards the windshield and the front door glass).
— In this position, the main air flow is directed to the windshield and floor, a small flow is directed to the front door windows.
— In this position, the air flow is directed towards the windshield and front door windows (used in case of fogging of the windshield).
The flow force is controlled by the heater fan rotation speed switch. (Models with mechanical control) The switch has several fixed positions that differ in the strength of the air flow: “G” - operation at low speed, “4” - operation at high speed and two middle modes “2” and “3”.
(Models with automatic control) You can set the required air flow force by pressing the fan speed switch button, and the selected fan rotation speed is displayed on the display.
The air intake adjustment switch (ventilation/recirculation) allows air intake either from outside the vehicle or from the interior. Use the air recirculation mode when the air outside is polluted, that is, in tunnels and traffic jams, or if you want to quickly cool/heat the air inside the car. Note: If the recirculation mode is operated for a long period of time, the windows may fog up.
The temperature regulator is used to set the required air temperature in the car interior within the range from 18°C to 32°C. (Models with mechanical control) Adjustment is carried out by turning the switch (4) to the required position.
(Models with automatic control) You can set the required temperature using the regulator. Turning the knob to the right will increase the temperature, and turning it to the left will decrease. At the same time, the selected temperature is displayed on the display.
If the rear window fogs up, you must press the rear window/rear door window defroster switch. In this case, the ignition key must be set to the “ON” position.
The glass defroster is switched off by pressing the switch again.
Caution: When cleaning the inside of the rear window, be careful not to damage the defroster filaments.
(Models with automatic control) Operating mode switch and A/C switch. By pressing the button, the air conditioner operating mode is switched as follows: A/C -» A/C ECON -> OFF.
There are sensors located inside the car, the readings of which are used by the air conditioning system in automatic mode. The location of the sunlight sensor and the air temperature sensor in the car interior are shown in the figures. Note: Do not place any foreign objects on the sunlight sensor or cover the interior temperature sensor.
Replacing the heater radiator on a Priora with air conditioning
After some time, the manufacturer began to equip its cars with air conditioning (climate control), for example, HALLA or Panasonic (article: 21703-8101012). The design of the new Priora heater from a maintenance point of view turned out to be much more convenient. Now, to replace the stove, you do not need to dismantle the frill, windshield wipers, heater or vacuum brake booster.
It is only necessary to: remove the sound insulation of the engine shield, remove the engine air filter hose and the seal in the area of the heater radiator hoses. All! Drain the antifreeze and remove the radiator towards you, towards the engine.
Video instructions are attached:
Thus, replacing the radiator of a Priora stove depends not only on the type of heater, but also on the chosen method of replacing it. How did you remove the heater radiator on your car? Which method suits you best? Let us remind you that solutions to other problems with the stove can be found in this article.
Keywords: Lada Priora stove | air conditioner Lada Priora
7
2
Found an error? Select it and press Ctrl+Enter..
What should the digital dashboard on Lada Vesta look like?
What is the Lada Largus acceleration time to 100 km/h?
Photo of Lada Granta FL (updated sedan, hatchback, station wagon and liftback)
Lada Vesta maintenance schedule
Replacement steps
This task is not difficult, but painstaking and difficult for absolute beginners. To avoid any difficulties, you must strictly follow the work plan described below.
- Disconnecting the “−” terminal of the battery and the wire.
- Dismantling the frill.
- Disconnecting the block with wires from the connector on the additional rheostat.
- Removing the fasteners on the resistor using a Phillips screwdriver of the appropriate size.
- Removing a faulty mechanism on the heater.
- Installing a working mechanism according to the same scheme, but in reverse order.
Dismantling the frill
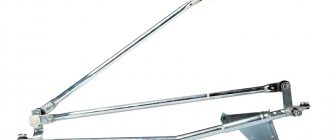
This process is listed as one of the stages of work to replace the stove on Priora. It will not be possible to bypass it, especially since the frill will have to be removed when solving many problems with the heater. Even a basic filter replacement will require dismantling the windshield trim, also called a frill. To implement this task, you will need a thirteenth head, a screwdriver with a flat and Phillips head, and a marker. Further work will proceed according to the following scenario:
- We remove the windshield wiper blades.
- Using a marker, we make marks on the windshield that will indicate the location of the blades.
- We take out the decorative caps, which you just need to pry off with a screwdriver.
- Using a socket, unscrew the fastening nuts from the brush lever.
- It is convenient to remove the washers using tweezers.
- We remove the lever and brush from the shaft.
- We open the hood to carry out dismantling work regarding the seal, which is located on the edge of the front panel upholstery.
- We unscrew the fastening on the facings, dashboard upholstery, wind window trim.
Our story can be completed here, because now you know where the heater resistor is located on a Priora, how to get to it and install a new part instead of the faulty one. Turning to specialists loses all meaning.
Clean oxidized wire contacts, radiators clogged with leaves, fluff and insects. Lubricate moving parts if required. How to solve this common problem quickly and at minimal cost is described in this article.
How to check the impeller for foreign objects
The first thing to do if the stove fan on a Priora is noisy is to check the impeller and casing. This can be done without disassembling the climate control system or removing the impeller. In this way, you can remove leaves, small branches, and foreign objects that have gotten into the heater.
The operation is performed through the air recirculation hole, which is located in the glove compartment (glove compartment). Checking and cleaning is done like this:
put your hand into the glove compartment and feel the movable flap;
feel the flap with your fingers and open it by pulling it towards you (the flap feels like a small plastic barrel to the touch);
Note: The lid is hinged and pressed against the housing by springs so it can be opened safely without breaking the mechanism.
Use your fingers to check the space near the impeller for foreign objects and remove them, if any;
pull out your hand (the lid will close under the influence of springs).
Purpose of the heating gear motor on the Lada Priora
A gearmotor is a device consisting of several plastic gears driven by a small electric motor. The main task of the gearmotor is to open and close the heater damper depending on the position of the regulator on the dashboard.
Geared motors on Priora are made only in plastic, non-separable housings
The plastic from which the gears are made deteriorates quite quickly. After which the driver is forced to change the gearbox. This device cannot be repaired, because, firstly, it is not possible to find spare parts for it, and secondly, it is not so easy to open the plastic housing of the gearbox without breaking it. So there is only one option left: replacement.
Gearmotor location
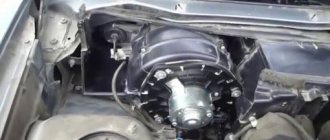
The gearmotor on the Lada Priora is located near the expansion tank, under the windshield.
The gearmotor on the Priora is located under the windshield near the expansion tank
It is built into a niche on the wall of the engine compartment and covered with a thick layer of sound-insulating material. This material will have to be removed, since otherwise it will not be possible to get to the gearmotor.
Priora electrical package control controller
Lada Priora (VAZ 2170) is one of the few domestically produced cars equipped with such a multifunctional device as an electrical package control controller. However, what is it and what controller is on the Priora?
The power package controller is a device that controls all of the vehicle's electrical functionality. Thus, this regulator is responsible for the operation of the turn signals, power windows, instrument panel lighting, side lights, fog lights, interior lighting, heated rear window, and reversing lights. Equipping a car with such a control unit makes it more practical in terms of using electronics.
The principle of operation of the stove - what it consists of on Priora, article numbers
For the VAZ-2170 restyling, two types of heaters were installed - with a Panasonic control controller or with an NSS control controller. The last type contains the following parts:
- air recirculation damper gearmotor (21700-8127300-10);
- Priora car heater fan (motor) (21700-8118020-10);
- air filter (21700-8122090-00);
- motor speed controller (2170-38127025-10);
- heating system damper motor (21700-8127200-10);
- heater radiator (21700-8101060-10);
- outlet hose (21700-8101208-00);
- outlet pipe (21700-8101200-10).
- recirculation valve (21700-811908-00);
- fan (stove motor) (21700-8118020-10; 21700-8118020-00);
- vacuum hoses with check valve (21700-8119100-00);
- solenoid valve (21700-8119130-00);
- air filter (21700-8122020-00);
- inlet pipe (21700-8101200-00);
- damper gear motor (21700-8127200-00);
- radiator temperature sensor (21700-8101250-00);
- radiator (21700-8101060-00);
- outlet hose (21700-810120800).
The pre-restyling car has a lot of parts from the “tens” - even the gearmotors are different. Much was inherited from the VAZ-2110, and the first cars before restyling were almost completely equipped with its heater. The assembled stove for the VAZ-2170 Priora pre-styling received catalog number 2111-8101012-10, a more updated version – 2170-81010-12. Price from 5500 rubles.
The device is as follows:
- air flow reducer (2170-81271-00);
- air temperature sensor (inside the car) (11186-81280-50);
- control unit (switches that are built into the central console to set operating modes) (21703-81880-20);
- resistor for setting the motor speed (2123-81180-22);
- heater motor (2111-81180-20);
- damper gear motor (2110-81272-00);
- air filter (2110-81220-20);
- radiator (2110-81010-60).
The heating radiator of the Priora car can operate in two modes: automatic and manual.
- The manual mode is performed when a person independently sets the desired temperature in the cabin on the control unit.
- The automatic mode operates almost constantly - the required and actual air temperature is checked and the control controller issues a command to change the damper angle, supply hot or cold air to bring the temperature to the set level.
When the driver adjusts the settings on the control unit, the resistor sends a signal with the necessary data to the motor. The fan can produce maximum power, although the resistor will not be used to its maximum. The same process with the direction of air - the driver sets it, and the gearmotor sets the desired position of the damper.
By its principle, the heating device “lies next to” the engine cooling system. When the driver turns it on, the heater tap opens, and hot coolant moves through the pipes, which passes through the radiator of the Priora car’s heater and returns back. This increases the distance over which the coolant circulates.
Therefore, turning on the heating is one of the ways to cool the engine. It will really become hot in the cabin, because all the heat will be directed there, and the engine will give off this heat more and more, the temperature of the coolant will drop.
VAZ-2110 the heater does not work, does not blow air at all, the speed controller does not work
One of the most problematic components in the design of the VAZ 2110 is the heating system. It claims to be complex and modern, but in reality it brings a lot of problems to its owners. To describe all the problems of a dozen heaters, it will take more than one hour, so today we will focus on the complete failure of the stove in operation and touch on the block of the automatic heater control system, SAUO, as mechanics call it in the army.
The stove doesn't blow at all, what's the problem?
If the heater fails, you can do the initial fault diagnosis yourself.
Unfortunately, the complex heater control system has not proven itself as a device that allows you to take the hassle off the driver and automatically maintain the set temperature. Instead, we got a lot of trouble and cold interiors in the frost. Let's go from simple to complex and first let's look at the problems with the electric heater motor. Everything is more or less simple here:
- Fuse. We turn on the stove, it doesn’t work. If we were lucky, the fuse had blown. Finding it is as easy as shelling pears, it is more difficult to find out the reason for its burnout. The 25-amp fuse F18 is located in the main mounting block; it also protects the circuit for the glove compartment lighting, heated rear window and is partially related to the cigarette lighter, so it is easy to diagnose its failure. And in order to find the short circuit that caused it to burn out, you will have to call all these circuits - the glove compartment light, the rear window heating, the headlight washer and the cigarette lighter.
Heater fuse location.
We check the contacts on the heater control unit and the electric motor.
Video about replacing the VAZ-2110 heater motor
Checking the automatic heater control system
The stove control system can also give out surprises. They consist in the fact that one of the speeds may not work, several, or only one, the most powerful, may work. At the same time, the SAUO block is not universal and is selected depending on the year of manufacture of the car:
One of the reasons for the failure of the stove may be the unit of the automatic heater control system.
- 2110-8128020-03 , price 2300 rubles, applies to the last ten years of production;
- 21102-8121020 , price 3100 rubles, installed on cars with air conditioning;
- 2110-8128020-02 , about 2 thousand, were put on the first ten years of production;
- 2110-8128020-01 , 1840 rubles, used on some cars until 2000.
Nevertheless, the design of all units is similar, only some parameters are different, and the signs of malfunction are similar for all.
The heater only blows at one speed
Without dismantling, you can diagnose a breakdown if the fan spins only at one speed or only in the third mode . The reason is the resistor, which is installed in the heater controller itself.
When the stove operates at only one speed, you should check the resistor.
Structurally, the switch is designed so that in the first two modes the electric motor is supplied with low voltage through a resistor, and in mode 3, bypassing the resistor. You can check this using a multimeter in resistance measurement mode.
The resistance of the first speed resistor is 0.23 Ohm , the second is 0.82 Ohm . If the spiral breaks or the contact tracks are worn, the multimeter will show infinity or a break.
Depending on the controller model, it may have three or four control positions, but the principle of operation is the same and understanding the connection diagram is not so difficult. Whatever the switch is, if speeds 1 and 2 are not working, you need to check the resistance on the switch slider . Thus, you can try to restore the heater control system or replace it with a new one as a last resort. Good luck to everyone in their search and warm cozy salons!
Heater resistor Lada Priora with and without air conditioning: replacement
This little trouble started two days ago. I'm getting ready to go home in the evening. I get into the car, turn on the music and drive off. But it was cool in the car at that moment, I decided to turn the heater on to first speed to make it warmer in the car, to drive in comfort and listen to music. But it was not there. I’m driving and feel no heat.
The first thing I thought was what nonsense, the cabin filter was clogged or something. Okay, there is a second position for the stove regulator. I turn on the second position and again nothing happens. This is an infection, I thought. I switch the stove to the third position, the same nonsense. No warmth for you, no sound of the stove for you... Well, I think the last fourth position of the stove remains, I’ll switch to it and oooooooh... that Boeing rumble. ...The noise is such that you remember the noise of a plane taking off...And this super-powerful vibration of the sound of the stove that echoed throughout the entire cabin. It feels like the whole car is about to fall apart...
In general, I turned off the stove and thoughts started racing... what and how...
When I arrived home, the first thing I did was go online to Drive... Look for a similar cause of such a breakdown... I found it literally right away and this small but unpleasant problem was hidden in the heater resistor, which is located under the frill on a Prior without air conditioning.
Today I went to the auto parts store and bought this same heater resistor. I changed it immediately without leaving the store. I replaced this resistor in literally five minutes. I unscrewed the three bolts on the frill and pulled out the frill. There is also this resistor that is attached with one bolt. I unscrewed the bolt, took out the old resistor, installed a new resistor and that’s it... Once I got into the car and turned on the heater at first speed, I immediately felt a flow of warm air... The heater came to life with a new resistor.
Price tag: 220 ₽ Mileage 62200 km