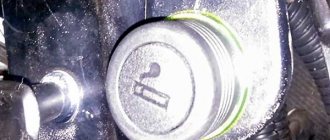
Good day! Many of the owners of car gadgets, such as those that operate from the cigarette lighter, have encountered the problem of the standard cigarette lighter of the VAZ 2110. Some gadgets are designed for a new type of cigarette lighter or Euro as some call it. What is the difference between the standard cigarette lighter and the VAZ 2110 cigarette lighter: the difference is in length and width, the standard cigarette lighter is narrower and longer - the euro is shorter but not much wider.
Let me return to the problem of gadgets that are designed for different cigarette lighters: from personal use, there is a cigarette lighter splitter for 3 ports (No. 1 in photo 2), it has a short connector, therefore it cannot be connected to a standard cigarette lighter since the positive contact is missing. Next, the charger for the navigator (No. 2 in photo 2) has a longer connector and fits perfectly in both the Euro and standard cigarette lighters. And the charger from the radar detector (No. 3 in photo 2) is designed for any cigarette lighter, but it fits better in the standard one; due to the shortness of the Euro cigarette lighter, it flies out, since the cable itself is twisted and has the property of a spring.
We take a utility knife and bore the hole for the new cigarette lighter about 1 millimeter in a circle for the new cigarette lighter. We connect the previously prepared wires to the cigarette lighter (which can be seen in photo 4), tie a rope protruding from the cigarette lighter socket to them, insert the backlight bezel into the socket, then the cigarette lighter itself, and pull the rope from the side where the legs are blown when the wires come out to the place we need We connect the sockets to the main power supply and rejoice. IMPORTANT NOT TO CONFUSE THE POLARITY RED IS “PLUS”, BLACK IS “MINUS”
I installed a Chevy Niva cigarette lighter in my car a long time ago. It’s just that half of my electronic devices, like a navigator, a phone charger, and a video recorder (before connecting it via a button) could not work. Due to the fact that they simply did not have enough size to connect, our standard cigarette lighter is too long, which is very stressful for new types of chargers. Since I made myself a cigarette lighter a long time ago, I couldn’t prepare a photo report =( But I bring to your attention the process itself.
And so, in order to install the Euro cigarette lighter.
We need to remove the old one to do this: 1. Before carrying out work, disconnect the wire from the negative terminal of the battery and have a screwdriver ready. After this, remove the interior floor tunnel lining. To do this, unscrew the fastening bolts and disconnect the left edge of the cladding. Do a similar procedure with the right side. This will give you access to the cigarette lighter from the inside.
2. Carefully remove the cigarette lighter socket, then push the connectors with the wires of the cigarette lighter itself and its backlight through the hole in the interior tunnel lining. Gently squeeze the lamp shield and remove it. At the same time, carefully ensure that its latches come out of the slots in the light guide, otherwise you will not be able to remove this part.
3.Pick up a screwdriver and use it to press the latch of the cigarette lighter socket. Disengage it from the light guide. After this, push the socket out of the cladding and remove the socket. To do this, pass the block with wires through the hole.
4.The last thing to remove from the cladding is the light guide. To do this, squeeze its latches and pull outward.
To install a new cigarette lighter, make the hole for the old cigarette lighter a little smaller.
But this is easy to fix - with a file, or a soldering iron, or a drill.
Before doing this, mark the new outline of the Euro cigarette lighter with a marker, attaching the rim of the new light guide. Pinout of contacts, new euro cigarette lighter:
Standard connectors are not suitable for connecting a new cigarette lighter, but you can easily buy new connectors with wires at any auto store to assemble the adapter. Three blocks are required for connection: 1. Standard block with wires for the VAZ2123 cigarette lighter
2.Standard block with wires for 2 wires VAZ 2105
3.Standard block with a wire for 1 wire VAZ 2105
Or you can not buy the pads from the VAZ 2105, but simply cut them off from the old cigarette lighter and use a twist or soldering iron and solder (solder) to the pads for the Niva Chevrolet.
Install everything in place in the Auto and enjoy the new bright cigarette lighter =) good luck on the road!
How to remove the cigarette lighter of a VAZ 2110? Replacing the cigarette lighter on a VAZ 2110 with your own hands
Car cigarette lighter . Perhaps, every car without exception has it, and if previously only smokers needed it, today the cigarette lighter is also a socket for charging mobile phones, power for a navigator, DVR, FM modulator, car compressor, refrigerator and other electronics.
As you understand, it is simply unrealistic for a modern motorist to live without such a useful thing from any side, so it is not surprising that on the Internet the question of how to remove the cigarette lighter or how to replace the cigarette lighter is so popular.
Today I will try to answer your questions, I will talk about how to check the cigarette lighter if it does not work, as well as how to remove and replace the cigarette lighter at home.
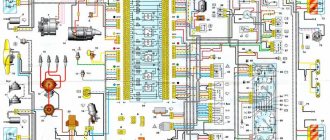
Cigarette lighters die most often from those who use it for other purposes, that is, they do not light a cigarette, but connect to it a bunch of different devices listed above that consume a lot of current. The electrical circuit of the cigarette lighter is quite simple and primitive; the cigarette lighter is connected to the battery directly through the mounting block. It is organized this way due to the fact that when the cigarette lighter is turned on, it consumes a large current. A similar picture with a car starter. it, as you know, is also powered directly from the battery for the same reason.
Check and replacement
Replacing the cigarette lighter in a VAZ 2110
- Turn on the ignition.
- Insert the cigarette lighter into the socket.
- Wait 10-15 seconds.
- Take it out.
Note: if it has not warmed up during this time, then it really does not work.
Replacing the cigarette lighter for VAZ 2110
Of course, you can go to a dealership to have it replaced by a qualified automotive technician, but you can also replace and install it yourself to save money. Replacement instructions:
- First you need to find a fuse (see VAZ 2110: how to replace fuses) that protects the cigarette lighter from spontaneous combustion. To easily remove it, you need to break the chain.
Note: Removing the fuse is important because if the wiring located at the top is tangled, it can cause damage to other electrical things in the car. The wiring will simply burn out and will need to be replaced. Before you begin replacing the fuse that protects against spontaneous combustion, you should read the machine's user manual.
- Now you have to remove the faulty device. To do this, you need to take a flat screwdriver and insert it into the slot (the cigarette is placed there). The screwdriver needs to be turned several times.
Note: this should be done extremely carefully so as not to tear out the socket, since in this case the other cigarette lighter is unlikely to function normally.
The process of replacing the cigarette lighter of a VAZ 2110
- If this method does not work, you will have to try to release the metal clips that hold it in place.
Note: these clamps are very easy to unfold, but there is no need to rush. It is better to do the work longer, but with better quality.
VAZ 2110 how to remove the cigarette lighter
- After removing it, you will have access to two wires with spade connectors. You need to remove both wires so that they are completely disconnected.
Note: if they are not turned off, they may short out and catch fire during operation.
- Now it will be much easier to replace this device. It is necessary to connect the spade-shaped connectors to the peaks located on the back of the device. You need to insert the black into black and white into white wires accordingly.
Note: otherwise the circuit will not be closed and the device will not work.
- After connecting the wires, you can install it in place by pushing it into the hole provided for this.
Note: Press it lightly and then twist it clockwise until it is secured by the two metal clips. He must be motionless.
- Now all that's left is to replace the fuse in the fuse box (if it doesn't work) or install the old one.
Note: this is a prerequisite, since without it a short circuit is possible.
How to check the cigarette lighter?
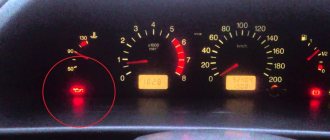
- When the cigarette lighter fails, it is customary to check the fuse first; it is located in the fuse block and is indicated by the inscription F18 or the corresponding pictogram. The maximum permissible current that a fuse can pass through itself is no more than 25 amperes.
- check the cigarette lighter in another way - try turning on the heater fan. You may ask, where is the connection? My answer is that the fact is that the fan and the cigarette lighter “hang” on the same fuse, so if the problem lies in the fuse. then the fan will not work. If your fan is functioning, then fuse F18 has absolutely nothing to do with it, and the fault most likely lies in the wiring that goes from the fuse block to the cigarette lighter. However, before you start removing the cigarette lighter, I advise you to check fuse F6; in rare cases, this fuse can affect the operation of the cigarette lighter. If it burns out the cigarette lighter may stop working.
Design and purpose of the VAZ 2107 cigarette lighter
In recent years, the functions of the cigarette lighter have expanded significantly. Therefore, the owner of 2107 must know the algorithm for diagnosing its malfunction and repairing it.
Main functions and operating principle of the cigarette lighter
The cigarette lighter of a modern car is a multifunctional device. In addition to its intended use, the following can be connected to its socket:
- phone, smartphone or tablet for charging;
- DVR;
- navigator;
- fan;
- compressor for inflating tires.
The VAZ 2107 cigarette lighter has performed many different functions in recent years
The cigarette lighter consists of a socket (socket) and a head (cartridge).
The cartridge is a metal body with a plastic handle in the form of a button. There is a metal rod in the center of the socket that acts as a positive contact. The negative contact in the cigarette lighter is the housing. To prevent short circuits, the body and the rod are separated from each other by a layer of insulator. The contacts are connected by a nichrome spiral, which is a heating element and is located inside the cartridge. When current is applied to the coil, it heats up to a high temperature. When the temperature reaches a certain value, the thermal relay is triggered and the current supply is stopped.
The cigarette lighter is located on the instrument panel in a convenient place for the driver. The nest is made in the form of an oblong metal body, which acts as a mass. The central contact is connected to the battery positive. In addition, a backlight lamp is built into the cigarette lighter housing, which turns on together with the external lighting.
The cigarette lighter consists of a socket and a cartridge with a heating element
To turn on the heating mode, you need to press on the cartridge and lock it in the pressed state. The cartridge is held in place by bimetallic plates. When pressed, the positive and negative contacts of the cartridge are connected to the corresponding contacts of the socket. As a result, the coil begins to heat up, continuing for 15–20 seconds until the desired temperature is reached. After this, the bimetallic plates diverge, releasing the cartridge, which, due to the internal spring, returns to its original position.
Causes of malfunctions of the VAZ 2107 cigarette lighter
The cigarette lighter of the VAZ 2107 quite often fails. This happens for various reasons.
Fuse blown
If the cigarette lighter is used as a power outlet to operate multiple high-power devices through a power strip, the cigarette lighter fuse, rated for a maximum current of 10 A, may blow. Due to the peculiarities of the VAZ 2107 electrical connection diagram, the clock and radio will stop working along with the cigarette lighter.
The VAZ 2107 cigarette lighter may stop working due to a blown fuse located in the mounting block
Unreliable contact
Sometimes the cigarette lighter contacts or connectors become oxidized and the device stops working. In such a situation, they must be cleaned by first disconnecting the negative terminal from the battery. The latter will eliminate the possibility of a short circuit. In addition, often the connector of the device connected to the cigarette lighter does not fit into the socket tightly enough. Such unreliable contact can lead to short circuits, melting of contacts and failure of the cigarette lighter. The contacts may also melt when installing a fuse of a higher rating (for example, 15 A). In such cases, you can try to clean and resolder the contacts. If this does not lead to a positive result, the cigarette lighter will need to be replaced with a new one. The cost of a new device for the VAZ 2107 is about 150 rubles.
Burnt out filament element
Sometimes the cigarette lighter coil burns out. In this case, the device is replaced with a new one.
The heating element is a nichrome spiral located inside the cartridge
Broken electrical wiring
The cigarette lighter may stop working due to pinching or chafing of the wires, followed by broken contacts. You can diagnose this situation using a multimeter by testing the wiring of the cigarette lighter connection circuit.
One of the reasons for the cigarette lighter failure may be a break in the electrical wiring.
After finding the damaged section of the wiring, it is replaced with a new one. Particular attention should be paid to the integrity of the wire insulation - this will reduce the likelihood of a short circuit and fire to a minimum.
Video: main malfunctions of the VAZ 2107 cigarette lighter
How to remove the cigarette lighter of a VAZ 2110? Replacing the cigarette lighter on a VAZ 2110 at home
- First, disconnect the negative from the battery.
- Next, we remove the covering of the floor tunnel in the cabin, for this we use a screwdriver, with its help we unscrew all the fastening bolts one by one, first on the right, and then on the left.
- Once you have free access to the cigarette lighter, remove its socket, and use a screwdriver to push the connectors with the cigarette lighter wires and the backlight through the hole in the trim.
- Next, we take out the light bulb screen, carefully squeeze the edges and take it out, while making sure that all the light bulb latches come out of the mounting slots.
- Using a screwdriver, you need to press the cigarette lighter latch, then remove it from the hook with the LED. And only now can you safely pull the cigarette lighter socket out of the lining.
- Next we repair the cigarette lighter or completely replace it.
- After replacement, check its operation. You must understand that in the case of a heated cigarette lighter coil, it should heat up in about 20-25 seconds, then an automatic rebound should occur with a characteristic click, after which you can light a cigarette. If this does not happen, adjustment will be required. The cigarette lighter is adjusted by bending or straightening the contacts on the cigarette lighter body.
We will be grateful if you share this article on social media. networks
What types of sockets and cigarette lighter connectors are there?
The car cigarette lighter appeared much earlier than the socket. The device was patented back in 1921, but its serial installation on cars began a few years later. In 1956, a simple automatic device was developed based on a bimetallic self-releasing gripper. In the same year, the dimensions of the PA socket were unified and specified in the SAE J563 standard, and they are still used today.
Despite the unification of dimensions, vehicles can be equipped with two standard sizes of PA:
- Socket A. The internal diameter of this socket is 20.91 mm, a deviation of 0.04 mm up or down is allowed. In such a cigarette lighter socket with alligator clips you can install a device whose body size is 20.805 mm with an error of 0.075 mm.
- Socket B. Its dimensions are slightly larger - 21.455 mm, an error of 0.045 mm is allowed. As for the PA itself, its diameter for installation in such a socket should be 21.18 mm. In this case, an error of 0.05 mm on the smaller side or 0.15 mm on the larger side is allowed.
Digital thermometer and voltmeter connected to PA socket
Device
The car cigarette lighter is connected to the battery through a mounting block. When the cigarette lighter starts working, a large current passes through it. If the cigarette lighter in a VAZ 2110 car does not work, then the problem may be in the electrical fuse.
The instructions for the car contain a wiring diagram where the required fuse is indicated under the F18 marking. It is located in the mounting block, on the front panel, to the left of the steering wheel. The marking is the same as in the diagram, that is, F18. The permissible current passing through the fuse should not exceed 25 amperes.
Fuses in the mounting block. F18 - cigarette lighter
Troubleshooting
If the VAZ 2110 cigarette lighter does not work, you can have your vehicle repaired. But fixing the damage yourself is much cheaper. Before correcting breakdowns, it is necessary to take into account that a part may need to be replaced.
You can easily check the viability of the fuse using the heating system fan, since it, together with the cigarette lighter, is connected to one fuse.
If the fan does not work, then the problem is a blown fuse and it needs to be replaced.
Required Tools
Before dismantling the cigarette lighter on a VAZ 2110, repairing it or installing a new device, or replacing a fuse, you will need to stock up on suitable devices. To work you will need:
- Phillips and standard screwdriver;
- protective gloves.
To fix a broken cigarette lighter or fuse, the following will be useful:
- multitester;
- blowtorch with solder;
- heat shrink tubes, electrical tape;
- wire cutters;
- needle file
Backlight
In addition, the cigarette lighter lamp may fail. We replace the backlight lamp in the following sequence:
- Disconnect the wire from the battery terminal;
- Then the lining should be removed;
- Squeeze the lamp screen so that its legs come out of the slots; Squeeze the lamp screen so that the legs come out of the light guide
- Then you will need to slightly unclench it and remove it with the cartridge; Unclamping the screen, remove the lamp socket
- Rotate the light bulb 90 degrees and remove it from the socket; Press down on the lamp, turn it 90 degrees and remove it from the socket
- Now you need to change the light bulb, put everything back in place in the reverse order of disassembly. We insert the lamp in the reverse order. When installing a socket with a lamp into the screen, the annular protrusion on the socket must fit into the slots of the screen
When performing repairs, use an A 12-4 light bulb for illumination.
Replacing the cigarette lighter
Replacement is carried out according to the following algorithm:
- Disconnect the wire from the battery terminal;
- Then the lining should be removed;
- Get the cartridge; We take out the cartridge
- Pass the blocks with all the wires through the opening in the cladding; We pass the blocks with wires through the floor lining
- Squeeze the screen so that its claws come out of the holes in the light guide and disconnect it; Squeeze the lamp screen so that the legs come out of the light guide
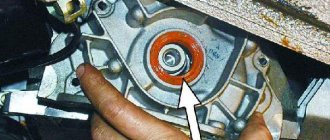
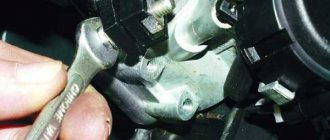
- Press the socket latch to disengage it from the light guide;
Using a screwdriver, press the latch of the cigarette lighter socket Latch of the cigarette lighter socket
- After this, push the nest out of the floor tunnel lining itself and remove it; Pushing the nest out of the cladding
- At the end, remove this socket by passing it through the opening with a block with wires; We take out the socket and thread the blocks with wires
- The coil actually heats up for 20 seconds. Having heated up and clicked, the cartridge must return to its place. And if this happens at a time other than twenty seconds, the cigarette lighter must be adjusted by bending or bending the contacts more; We adjust the contacts if the cigarette lighter does not return to its original position within the required time
- Next, you need to remove the light guide from the cladding; Squeeze the latches and remove the light guide from the cladding
- Upon completion of work, perform all procedures in the reverse order of disassembly. When reinstalling, the protrusion of the light guide should fit into the slot in the cladding
Repairing the cigarette lighter will not take you much time.
Order of Operations
Before removing the cigarette lighter of a VAZ 2110, 2111 or 2112, you need to de-energize the circuit; to do this, remove the negative terminal from the battery. Now you can start working directly:
- It is necessary to remove the plates on each side of the instrument tunnel; to do this, unscrew two bolts from each. On the right side, disconnect the backlight and cigarette lighter connector.
The housing of the unit is fixed to the casing of the instrument tunnel; it must be removed. The trim is located under the handbrake lever. It can be easily removed with a flat screwdriver.
- Also, using a flat-head screwdriver, you now need to pry and remove the housing from the gearbox shift lever.
- There is a screw under the cover; you need to unscrew it with a Phillips screwdriver.
- Now the driver and front passenger seats need to be moved back and the gearbox screws unscrewed. There are five of them.
- You need to remove the top cover of the instrument tunnel. Now the cigarette lighter is accessible. You can remove its cartridge. Then the screen is removed so that the tabs come out of the grooves on the light guide.
- Use a flat-head screwdriver to press the latch next to the cigarette lighter socket, so it is released from the light guide.
- Now you can remove the assembly along with all the elements.
- Then you need to tighten the latches on the light guide, so it is immediately disconnected from the assembly.
- If you need to change the LED itself, it can be easily removed by pressing the tabs on the housing. When installing a new device, make sure that the slot in the casing aligns with the protrusion on the housing.
- Now you can begin installing the new cigarette lighter. First, it is connected to the light guide, the following operations are performed in the reverse order.
To replace the cigarette lighter of a VAZ 2110, 2111, 2112 with your own hands without disassembling the tunnel, watch the video:
The standard cigarette lighter of the VAZ 2110, 2111, 2112 does not allow the use of all devices existing on the market, so owners often replace it with a European-style unit. How to do this, watch the video:
Additional cigarette lighter
Sometimes a motorist wants to connect several devices at once that are powered by the cigarette lighter. The easiest way to solve this problem is to use a tee. The location of the cigarette lighter in the VAZ 2110 is very inconvenient for this, so it is better to install a second one.
Modern devices are designed for a short socket, the so-called Euro standard, which is not typical for this model. Therefore, think carefully about your choice.
You can connect a second Euro cigarette lighter in parallel with the standard one or run a separate wire from the battery using a 15A fuse. If there are two cigarette lighters in the car, they are replaced using the same algorithm.
Rules for safe use of the cigarette lighter
The device requires some care. To avoid the need for an unscheduled cigarette lighter replacement, you should adhere to the following rules:
- It is prohibited to connect devices with a total power of more than 120 watts (compressors for inflating wheels, kettles) into the socket;
- It is prohibited to install a fuse designed for a current greater than 10 amperes or install paper clips or wires instead of a protective element;
- It is not allowed to close the contacts with a screwdriver or other metal objects;
- It is periodically necessary to carry out preventive work, cleaning the contact areas from plaque or oxides, and bending the fixing tendrils.
How does he work?
The cigarette lighter is connected to the battery using a mounting block. When the cigarette lighter is turned on, a strong current flows through it.
Actually, this current heats up the element or allows you to connect a volatile device. Many motorists use this connector to charge a mobile phone, connect a navigator, or a tablet.
But most often the cigarette lighter is used to connect a portable electric pump. It allows you to inflate tires on the road without physical effort when there is no ordinary household outlet nearby.
Light from ten
As you use and connect all kinds of gadgets, the cigarette lighter may eventually stop working. This is often caused by a failed fuse.
The instruction manual for the VAZ 2110 includes a wiring diagram. On it this same fuse is marked F18. You will find it in the mounting block to the left of the steering wheel on the front panel. Please note that no current of more than 25 Amps should pass through this fuse.
Splitter selection options
To allow the cigarette lighter socket to power more devices, you can use a power strip. But keep in mind that the PA itself is designed for a power of 12 volts, therefore, connecting several devices to it that will supply such voltage can lead to its burnout. Moreover, it is not the cigarette lighter plug that you dismantle before using the tee that will fail, but the assembly itself.
However, if you decide to take a chance and buy a splitter, you need to consider several nuances:
- The maximum load that the tee can support. If you plan to connect several devices to the device, then it is better to choose a splitter with the maximum allowable load.
- USB output current parameter. The tee can be equipped with a standard USB output for 500 miles of Ampere or an enhanced one, allowing operation at a load of 1 or 2 Amperes. Please note that you can charge mobile gadgets through traditional 500 Ampere USB outputs if it is in standby mode. But if you are watching a video on a smartphone or have a GPS navigator turned on, then this current will not be enough.
- The quality of the purchased device. Don't even look at cheap devices with flimsy bodies. You will not be able to examine the inside of the device to assess the quality of the circuit soldering, but you can draw a conclusion about the quality of the manufactured device by examining the splitter itself. Pay attention to the central plug - in higher quality tees it should be equipped with a safety element (the author of the video is the master12volt channel).
Troubleshooting
The easiest way to solve the problem of a faulty cigarette lighter is to take your car to a service station for repairs. But is it worth doing this if the work itself is not complicated, and the costs for the services of specialists can be significant?
Sometimes it's better to do everything yourself.
Now let's look at each of the presented breakdowns and replace the elements in more detail.
Replacing the fuse
Checking the functionality of the fuse is quite easy. To do this, you need to turn on the heating fan. If it doesn't work, then the cigarette lighter won't work either. This is because both devices are connected to the same fuse.
Replacement of an element is carried out as follows:
If the fan is working, it is obvious that the fuse is also intact. Therefore, there is no need to replace it.
Instead, look for the cause of the problem in the wiring that connects the mounting block and your cigarette lighter.
This requires a thorough check of the wires, contacts, that is, the entire circuit. There may be a short circuit or break somewhere.
Be sure to wear protective rubber gloves when checking the electrical circuit, since you may need to use metal tools during the diagnostic process.
The light bulb on a VAZ 2110 is also not a rare problem with a device malfunction. To replace it, you don’t need to have any special skills. Just carry out the work in a strict sequence of operations; for clarity, you can watch the training video.
- Disconnect the negative terminal from the battery located in the engine compartment of your car.
- Remove the lining.
- Squeeze the light bulb screen so that the arms can come out of the slot.
- Now the element unclenches a little, thereby removing it along with the cartridge.
- The light bulb is rotated 90 degrees and then removed from the socket.
- Arm yourself with a new bulb, insert it into the socket, and then follow the assembly procedure. It completely corresponds to the reverse dismantling sequence.
- To replace the backlight bulb in the cigarette lighter of a VAZ 2110, A 12-4 devices must be used.
Why it might not work
The device is a simple device consisting of a metal rod and a socket to which wires are connected, where it is inserted. Inside the VAZ 2105 cigarette lighter itself there is a thin nichrome spiral. By pressing the button, the driver puts the device into working condition, the contacts close, and current begins to pass through the thread, heating it. After 15-20 seconds, the temperature reaches its maximum, the thermal relay is activated, returning the cigarette lighter to its place. Due to age or improper use, the device may break. If the cigarette lighter on a VAZ 2105 does not work, you should check the following places.
- The appearance of plaque. If liquid gets onto the contact points of the cigarette lighter, rust can appear, and long periods of inactivity can lead to the formation of oxides. This will disrupt the normal operation of the contacts and may also cause a short circuit. It is necessary to periodically remove the cigarette lighter, and then inspect its contact points for oxides or foreign deposits. If necessary, you should arm yourself with sandpaper or a file, with which you can remove the rust, reaching the metal base.
- Loose connector. Some VAZ models are equipped with an old-style cigarette lighter with a long tip. The plugs of modern electrical appliances are not designed for such a socket and quickly loosen it, bending the fixing tendrils. To repair, you need to pull out the rod and then tighten the elements inside the cartridge. Before this, you should de-energize the circuit by disconnecting the terminal from the battery or pulling out the fuse.
- Faulty backlight lamp. There is a light around the nest, making it easier to find at night. Age may cause the cigarette lighter bulb to burn out. In this case, it is necessary to dismantle and replace the faulty element with a new part.
- Burnt cigarette lighter coil. Due to constant heating and cooling, the thread located inside the cigarette lighter simply burns out, breaking the circuit. You can try soldering the ends, but this idea is impractical - it is better to change the entire cigarette lighter.
- Faulty fuse. Each segment of the vehicle's electrical network is protected by a special element. It burns out when the current exceeds the maximum value, protecting the cable insulation from melting and the cigarette lighter wiring from burning out. The maximum permissible parameter for this section is 10 amperes. Repairing such a fault is simple - under the hood of the car there is a mounting block where you need to get to and change the part.
- Short circuit. If the cigarette lighter fuses start to burn one after another, this means that there is a short circuit running through the network. We turn off the engine, turn off the ignition, and then measure the battery voltage. Then turn on the ignition and take measurements again. A difference in readings of more than 0.5 volts indicates the presence of a “short”. We arm ourselves with a tester and look for a faulty cord that should be replaced.
- Broken cigarette lighter wiring. The VAZ 2105 is an old car, the wires of which may fray or solder joints may fall off. It is necessary to inspect the cables - no melted insulation, creases or breaks are allowed. It is worth ringing the cords with a tester, setting it to measure resistance. All soldering points must be restored using a blowtorch and tin, and broken wires must be replaced with intact ones.
Replacing the cigarette lighter
If all previous troubleshooting measures have not given a positive result, there is nothing left to do but completely remove and replace the old cigarette lighter with a new one.
Here we definitely recommend watching the video tutorial to understand all the details of the operation. The replacement process itself looks like this:
- Disconnect the negative terminal from the battery.
- Remove the lining.
- Remove the cartridge.
- An opening is formed in the cladding through which the block with wires is brought out.
- Squeeze the screen so that the tabs can come out of the light guide holes. Disconnect the element.
- Now you need to remove the device from the connection with the light guide. To do this, simply press the socket latches.
- Next, we remove the nest by pushing it out of the floor tunnel lining. This will allow you to remove the device.
- The next step is to remove the nest. To do this, it is passed through an opening with a block of wires.
- In normal condition, the coil should warm up for 20 seconds. After that, it clicks and the cartridge returns to its place. If this process takes more or less time, be sure to adjust the operation of the cigarette lighter.
- The adjustment is quite simple. You just need to bend or straighten the contacts further.
- Now you can remove the light guide from the lining.
- All you have to do is perform the reassembly procedure, this time using a new cigarette lighter. You already know how to remove it, so reinstalling it shouldn’t be a problem.
The replacement procedure does not take much time and does not require much effort. All this can easily be done with your own hands if you know the connection diagram, the location of the mounting block and basic safety precautions when working with electrical devices.