Most modern cars use disc brakes. The main working body is the caliper, which clamps the disc using pads. In order for this system to work with high efficiency, regular monitoring of its technical condition is necessary. To do this, you can contact our car service center for professional diagnostics and, if necessary, repair work.
In addition to prevention and repair, it is possible to order caliper repair kits for cars from the following manufacturers: VAZ, Opel, Ford, Audi, Renault, Peugeot, Citroen, Mazda, Mitsubishi, Volkswagen, BMW and others. But many car owners prefer to perform these procedures on their own. To repair a brake caliper yourself, there is no need for special conditions. All you need is a set of standard locksmith tools and a device with which you can reliably jack up the car.
Is it difficult to replace a brake caliper?
Replacing a brake caliper on most car models is a fairly simple repair. You can do this project at home using some common tools. However, especially if your car is equipped with ABS, you should take certain precautions. But don't worry. This guide will tell you how to approach this project at home and, if your car has a regular or ABS system, the steps that are important to a quality car repair.
Attention! The brake hose burst. I recommend reading it.
Introduction, important:
This topic is in no way an attempt to “attack” tuning firms in general and “Tuning Club” in particular. The main goal that I want to achieve with this message is to attract the attention of people who are thinking about tuning the brake system (and not only that!) and try to make them very clearly imagine all the possible consequences, which, as it turns out, are sometimes very unexpected.
So, a little history. Initially, I didn't really like the brakes on the Passat. Not the most informative pedal, rather sluggish braking (if you don’t press the pedal to the floor). I wanted to somehow correct the situation. I thought about it, consulted with the forum members and decided to start a small upgrade. I did not change the calipers and discs, but began the upgrade by replacing the brake hoses: instead of the standard ones, I installed reinforced ones. I bought reinforced hoses at the Tuning Club, which I was pleased to write about here: https://www.passatworld.ru/phpBB2/viewtopic.php?t=11717. This happened a little over a year ago - in March 2006.
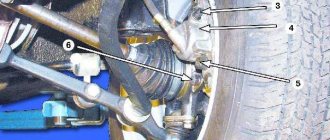
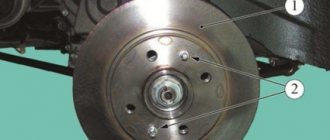
And yesterday, I was driving around Moscow calmly, not bothering anyone, and suddenly, when starting from a traffic light, a light flashed on my instrument panel and a message like “check the fuel level level” appeared. It blinked for a couple of seconds and went out. I didn’t have brake fluid with me. Having decided that the problem was most likely in the rear caliper washers, I was upset (after all, I changed these washers just a year ago!) and carefully drove on. It wasn't that far to the garage. However, the alarm about the decreasing fuel level was triggered more and more often, now even in turns. Having reached the garage and trying almost not to press the brake, I decided to see which side it was leaking from. I barely pressed the brake when I heard a characteristic “clunk” and the pedal sank to the floor without the proper resistance. I drove into the garage using the handbrake (it's an automatic transmission!). A characteristic puddle of brake fluid formed under the front left wheel. I took off the wheel and saw what I least expected to see until that day: the brake hose was hanging by itself, and its nut remained screwed to the caliper bracket.
Sorry, I didn’t have time for a camera at that moment. I took pictures later, when everything was fixed:
Here is the hose itself and its connector - this is exactly how, separately from each other, I found it in the car:
The same without protective heat shrink:
A year ago it looked like this:
Well, a few larger photos:
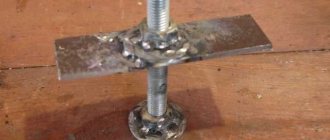
“Falled off” nut:
The tube that was clamped in it:
And this is what the nut looks like at the other end of the hose:
As you can see, corrosion has quite damaged the lower part of the connector.
Steps to Replace a Brake Caliper
- Find the brake caliper.
- Minimize brake fluid loss.
- Remove the old caliper.
- Install a new caliper.
- How to bleed a brake line.
- Strategies and tips for successful brake caliper replacement.
Each of these steps is described in detail below.
Tools you'll need
- Wrenches
- Screwdrivers
- Hammer
- Brake fluid
- Rags
- Wire.
About the reasons for caliper failure
This brake system component can break down due to improper maintenance or due to insufficient quality. The main reasons why caliper repair may be required are as follows:
- improper operation, which is associated with filling the guides with poor-quality lubricant - because of this, the boot swells and later “sours”;
- in the future, repair of the brake calipers may be necessary due to moisture getting on the guide, which leads to a breakthrough of the boot;
- Another reason is the piston itself, the body of which is also vulnerable to moisture getting inside;
- low-quality working fluid (brake) can corrode the piston from the inside if the concentration of water in it exceeds the norm.
How to find and replace a brake caliper
A caliper is a mechanical device in a car located on the wheel hub that presses the car's brake pads against the brake disc when the driver presses the brake pedal. In a car, they are often called brake calipers. The calipers can be either front or rear.
On fairly new vehicle models, check your vehicle's owner's manual before attempting any repairs.
When using ABS systems, take precautions to prevent air from entering the brake system. Some of these systems require special equipment to clean, and your dealer or store may be the only option for this procedure.
What will we find in the repair kit?
The repair of each car must be approached individually, since it may well be that different brands of cars will have slight differences in the structure of the calipers. Moreover, even on the same type of machine these components may differ. Such “non-standard” is provided for by repair kits sold for various brands of cars. So what is included in a typical rear and front caliper repair kit? Let's list it point by point:
- seals;
- guides;
- adjusting screws;
- adjustment devices;
- lubricants.
Caliper repair kit
Since the kits may be different, you should be guided by the technical characteristics of the cars and before going to the auto store, carefully read the parameters and part numbers that you will have to purchase.
How to minimize brake fluid loss
- Open the hood and use a rag to thoroughly clean the brake master cylinder. The master cylinder is attached to the booster, a drum-like component mounted on the driver's side called the brake booster.
- Unscrew the cap of the master cylinder reservoir and place a piece of clean plastic elastic sheet over the hole, I usually just put a thick bag and tighten it well with the lid, so that there is a vacuum in the reservoir and when removing the brake hose, the fluid does not flow onto the floor.
- Then place the cap on the top of the plastic sheet and tighten the cap. This will create a vacuum and help prevent significant fluid loss when the brake line is disconnected.
Repair of caliper guides
They are not difficult to detect - these are special bolts that are attached to the ears of the case. They need to be changed as soon as pockets of corrosion become noticeable. The repair process will look like this: unscrew the old guide and insert a new one in its place.
The main thing is not to forget about high-quality lubrication, and also check the condition and tightness of the anthers - there should be no cracks or tears on them.
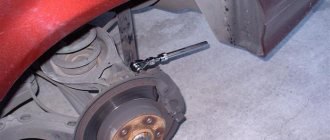
How to remove a brake caliper
- Engage the handbrake (unless you are replacing the rear caliper) and use two pieces of wood to place under the front or rear wheels (the side you won't be working on). This prevents the machine from moving while you are working on it.
- Loosen the mounting bolts on one or both front or rear wheels. NOTE. If you are not familiar with the caliper assembly, it is a good idea to remove both wheels so that you can use the other assembly as a guide when installing the new one.
- Raise both wheels using a jack.
- Place the vehicle on jack stands and finish removing the wheels.
- Place a small pan under the caliper to catch any brake fluid that may leak from the hose.
- Disconnect the handbrake cable if you are working in the rear. Consult your vehicle's repair manual if you need assistance.
- On some vehicles, you will need to remove the pad wear sensor, usually located on one of the brake pads. Carefully remove the sensor (WARNING, this sensor is fragile) using pliers. If necessary, consult the repair manual for your vehicle make and model.
- Locate the hose connected to the caliper (usually on the top, back side).
- Thoroughly clean the hose end, bolt and fitting on the caliper, using a rag and parts cleaner to prevent contamination of the brake system.
- Using a wrench or ratchet, extension and hex socket, loosen and tighten the hose tightly to prevent fluid loss. Avoid using a regular wrench to prevent the head of the bolt securing the hose from rounding.
- Then loosen and remove the caliper mounting bolts. Some have a mounting bolt at each lower end, allowing the caliper to be completely removed from the mounting bracket; other models use a bolt at one end that can be removed to rotate the caliper upward. Depending on your car model, you will need a set of bits, a hex wrench, or a regular wrench or socket and ratchet to remove the caliper mounting bolts or pins.
- After you remove the mounting bolts, carefully remove the caliper from the rotor or rotate it upward. NOTE. Some mounting bolts have a series of protrusions at the end. To do this, you need to squeeze these tabs using a pair of pliers while prying the bolt head on the other end to slide the bolt off the caliper.
- Note the position of any caliper fasteners that may need to be removed to install the replacement caliper (clamps, pad support, springs, spacers).
- Some pads are mounted on the caliper itself; others are mounted on a mounting bracket. If the pads are mounted on the caliper itself, you may have to pry the outer pad away using a screwdriver. The inner pad may be attached to the piston using a clamp that attaches to the back plate of the pad, so you will need to carefully remove the spacer from the caliper piston.
- Use a wire hanger to secure the caliper to a suitable hanger component to prevent it from hanging on the hose; otherwise you will damage the hose.
We recommend reading: Repair of diesel engines in passenger cars
Caliper after sandblasting
After sandblasting, the caliper already looks almost like new.
Aerosol paint is applied to hide minor defects and give a more presentable appearance. Naturally, the coating is high-temperature. After sandblasting, the caliper already looks almost like new. Aerosol paint is applied to hide minor defects and give a more presentable appearance. Naturally, the coating is high-temperature.
The last limitation when repairing a caliper is the integrity of its body. It is often damaged by inexperienced servicemen when installing/dismantling the unit. It is not economically feasible to restore the body and no one can vouch for the quality.
Calipers with a built-in handbrake mechanism are also restored, even if it is electric. In fact, both versions have similar problems. The electric version only adds problems with motor failure, and the drives turn sour the same way in both cases. You can find spare parts on the market: these are either individual elements or repair kits. At the same time, some automakers even produce original parts. The situation with motors is more complicated, but you can always find a good used option.
| There is also a common myth that it is impossible to restore calipers with a built-in handbrake mechanism, especially if it is electric. In fact, specialized services have long been proficient in this matter. Nature has the necessary spare parts and the repair technology has been developed. |
Restoring a caliper at some companies involves sandblasting it and applying spray paint to make it look like it just came off the assembly line. The price of the service is included in the total cost of repairs.
The service of painting calipers with powder paint is also common. Usually it is done simultaneously with the repair of components. After processing in a sandblasting chamber, paint is applied to the caliper. By agreement with the client, a layer of primer can be applied before this, then the coating will last longer, but the cost of the work will be higher. After applying the powder paint, the caliper is “baked” in an oven and then cooled indoors at room temperature. Next, the logo is glued on and the final coating is done with polymer varnish.
Some companies offer their remanufactured calipers. Moreover, they give them a decent two-year warranty. A rebuilt front single-piston caliper costs approximately 3,500–4,500 rubles, and a rear version with an integrated handbrake mechanism costs about 6,000 rubles. By the way, the last example in a new box for some models of budget cars costs as much as 40,000 rubles.
How to install a new brake caliper
- Clean the brake assembly with parts cleaner and remove any rust from the assembly, especially the parts on the mounting bracket that contact the caliper. This is very important for sliding supports, which provide recesses for sliding. Rust can cause the new one to hang and jam during operation. Use a wire brush or rotary brush and drill to remove rust from the surface of the wheel assembly and bracket.
- Before installing a new one, carefully read the instructions that came with it. Yours may come with a special lubricant already applied, or in a small package that needs to be applied. Be sure to use this lubricant following the manufacturer's instructions.
- Transfer the brake pads to the new brake caliper or prepare them for the mounting bracket, depending on your specific model. If possible, replace fasteners such as springs, clips, and anti-wheeze clips.
- The new caliper should have the piston fully retracted and ready to install. If not, you can use a C-clamp to slowly retract the piston into its hole while working on the front caliper. Place the clamp on the caliper and place the inner gasket on the piston. Turn the large clamp screw to push the inner spacer in to retract the piston. On rear calipers, you will likely need a special retractor tool, which you can get from your local auto parts store. If necessary, consult your vehicle's repair manual.
- On some models, it is necessary to apply a coat of high-temperature grease to the steering knuckle where it contacts the caliper.
- When everything is ready, install it in place. Add a coat of silicone grease to the mounting bolts (pins) and to the isolators (where the bolts need to be inserted) if you have a single piston caliper and the mounting bolts allow movement of the caliper. Next, install the caliper mounting bolts by hand and tighten the bolts to the manufacturer's recommended torque using a torque wrench. You can find the recommended torque in the repair manual (or aftermarket manual) for your specific vehicle make and model.
- Remove the bleeder screw using a wrench. Apply Teflon tape to the screw threads (about three turns) and reinstall the screw. First tighten the screw by hand, and then tighten the screw tightly with a linear wrench. Do not fully tighten the screw until you bleed the caliper later.
- When everything is ready, disconnect the brake hose from the old one and connect the hose to the new one. Tighten the bolt enough to prevent brake fluid from leaking.
- Use a rag to wipe up any liquid that you may have spilled while moving the brake hose.
- Remove the plastic sheet from the brake master cylinder.
- Remove air from the brake line. If you don't have a helper to help you bleed the brakes, you can do it yourself using a hand-held vacuum pump in about one minute. Otherwise, follow the steps in the next section.
Recommended reading: Brake lights do not light up
Do-it-yourself caliper bulkhead
To get acquainted with how the caliper works, you will first have to remove the spare part itself. This is done using a lift or jack. The caliper disassembly sequence is as follows:
- Having selected the lifting height, we fix the car.
- Using a wrench, unscrew the bolt in the bracket near the brake hose.
- When the hose is disconnected, the liquid will begin to flow out on its own. We temporarily fix the leak with a bolt of a suitable size.
- Next, remove the pads to make it easier to complete the next steps. One by one we unscrew each bolt in the system mounting.
- Move the stopper plates aside and carefully remove the caliper.
How to bleed the brake system
After replacing your brake caliper, this next procedure will help you remove air from the brake line, even if you are working with the ABS system.
However, if you believe there is air in the brake master cylinder or hydraulic control unit (HCU) and your vehicle has ABS, you may need to take your vehicle to the dealer or workshop and have them bleed the system. If necessary, consult your vehicle's repair manual.
- Without starting the engine, depress the brake pedal approximately five times at normal stopping pressure to remove any residual vacuum from the brake booster.
- Check the master cylinder reservoir. Add new fluid to bring the level to the MAX mark if necessary, and tighten the reservoir cap.
- Place one end of a piece of clear rubber hose onto the drain screw of the new caliper. The hose should fit snugly against the bleeder screw. You can find a clear hose at an auto supply store.
- Insert the other end of the clear hose into a plastic container and add a small amount of brake fluid to the container, large enough to submerge the end of the hose.
- Have a helper press the brake pedal five times and then hold the pedal firmly down.
- Next, loosen the bleeder screw about 1/4 or 1/2 turn, just enough to allow brake fluid to flow through the clear hose for about 2 seconds, and then tighten the bleeder screw again. Watch for air bubbles entering the brake fluid in the reservoir.
- Ask your assistant to release the brake pedal.
- Repeat steps 5 through 7 until you see no air bubbles draining into the brake fluid in the reservoir. When bleeding, be sure to keep the level above the MIN mark on the master cylinder reservoir.
- Correctly tighten the bleeder screw after bleeding the caliper or brake line.
- If necessary, add brake fluid to the master cylinder reservoir.
- Make sure the pedal feels firm and operates properly. Drive at a slow speed to make sure the brakes slow down and stop the car properly.
- Back in the garage, check the brake hose and bleeder screw on the new caliper for leaks. And continue checking for leaks over the next week.
We recommend reading: Choosing a charger and starter for your vehicle
You can remove air from your ABS system by bleeding the brake caliper and connecting line. To bleed the master cylinder, refer to your vehicle's repair manual.
Signs of trouble
A common symptom of brake problems is a decrease in braking efficiency.
This shows up:
- the car pulls to the side when braking - one of the calipers is faulty;
- an increase in pedal effort at the same deceleration intensity;
- shaking of the pedal during braking;
- increasing the free play of the pedal until a noticeable deceleration begins;
- jerking the car until it stops;
- jamming of the pads, the wheel does not release the brakes and the caliper gets very hot;
- brake fluid leaks;
- uneven wear of pads and discs.
After removing the wheel and checking the pedal, you may notice that the pads do not move smoothly enough, the pistons move jerkily, and may even make clicking sounds or squeaks.
You need to know: How a Vacuum Brake Booster works
This can be caused by either corrosion of the pistons or cylinders, or a violation of the geometry of the guides.
The reasons are almost always the penetration of moisture, leaching of lubricant, destruction of rubber parts and neglect of the timing of brake fluid replacement.
Tips and Strategies for a Successful Replacement
Whether this is your first time working on your car's braking system or you're already familiar with it, check out these tips. They will help you make a smoother repair job.
- When cleaning the brake assembly, use a parts cleaner.
- When disassembling the wheel brake assembly, keep the parts in order and use the opposite assembly as a reference if you forget how to put everything together, or better yet, capture everything on camera at the same time.
- Replace the pads and caliper if the thinnest side of the pad is as thick or thin as the backing plate.
- If you haven't replaced your hoses in the last 10 years, consider replacing them now. Old hoses begin to peel off from the inside, blocking proper flow of brake fluid and can cause the caliper to seize.
- Replace brake calipers in pairs (front or rear) if they have more than 200,000 kilometers. This will help maintain the quality of the braking system.
- If possible, install new fastening hardware - heat weakens fastening material after many miles of work and can cause the new caliper and pads to rattle or squeak.
- If your brake system configuration differs slightly from the configuration described here, refer to the repair manual for the specific make and model of your vehicle.
Replacing a brake caliper is not a routine repair unless there is excessive wear, damage to the bore or piston body, the brakes are not seating (in some cases), or there is a brake fluid leak. However, this project is not difficult and is often the best alternative for rebuilding a caliper. If all this seems very complicated to you, it is better to go to a car service station in your city, where auto repair specialists will provide you with a high-quality and quick replacement of calipers.
How do you like the article?
A little history
The first to create such a model of brakes (disc type) was Frederick Lanchester (Great Britain). It was in its design that a caliper was used that pressed the pads. However, technology at that time did not allow the creation of reliable disc brake systems.
Disc brakes were revived in aviation, and in the 50s they began to be installed on cars - first on sports models, and then on production ones. The first car with serial front disc brakes was the Chrysler Crown Imperial (in 1949).
The importance of this component is difficult to overestimate, because the brake disc and pads are passive components, while the caliper plays an active role. Due to this, the pads are pressed. Therefore, the brake caliper is the most important component.
If the brakes rattle
This type of brake has pressure springs or floating calipers.
They are responsible for securing the pads to the caliper body. The reason for their failure is metal fatigue or poor quality. As a result, they lose their elasticity and stop pressing the pads against the body. Because of this, the pads rattle at the slightest passage of irregularities and may come into uneven contact with the disc, which will lead to the appearance of a shoulder or grooves on it. Also in this case, the staples themselves may rattle.
What should you do when your brake calipers or pads rattle? If it is not possible to replace them, then you should try to loosen them with your own hands using pliers to make them more rigid. To do this, you need to pull them out of their seats, unclench them and insert them into place, after which they will stop rattling for a while.
Device
There will be a separate article about the caliper, but now I want to show on the “fingers” what moving parts there are that suffer first of all. This is a fairly simple device; it has only two working elements - guides and pistons.
They are the ones who are responsible for the whole “triumph”; if they fail, then the work is disrupted. However, the structure of the piston is now quite strong; physical leakage, when you break, say, a brake hose, is now a rare phenomenon. And therefore the caliper breaks due to souring of the pistons and guides, but more on that below.