You can leave your wife, your job, your homeland, but don’t you dare leave the clutch!
The clutch system is a fairly simple mechanism that not only serves as a transmission link between the engine and gearbox, but also removes excess load from both of these units. Of course, such work is not in vain for the clutch system itself, but that’s why it contains consumables, so that you can spend money on replacing them, and not on a global car repair.
The clutch system's job is to mechanically connect the engine to the manual transmission when needed, and disconnect them when it is necessary to change gears. In essence, the task of the clutch does not change, whether it is a clutch on a VAZ 2107 or a Lexus, only the technical details differ.
The design and principle of operation of the VAZ 2107 clutch
At its core, a clutch is a transmission link between the engine crankshaft and the input shaft of the gearbox. In this case, a simple press of the pedal separates these two units: the engine continues to operate without changing the optimal mode, and the driver can change gear to up, down or neutral.
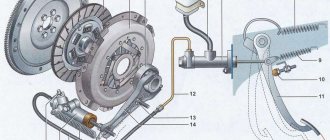
Clutch device VAZ 2107: 1 - flywheel; 2 — clutch driven disc; 3 — clutch basket; 4 — release bearing with clutch; 5 — hydraulic clutch reservoir; 6 - hose; 7 — master cylinder of the hydraulic clutch release; 8 — servo spring of the clutch pedal; 9 — clutch pedal return spring; 10 — clutch pedal travel limit screw; 11 — clutch pedal; 12 - pipeline; 13 — ball joint fork; 14 — clutch release fork; 15 — release spring for clutch release fork; 16 - hose; 17 — working cylinder of the hydraulic clutch release; 18 — clutch bleeder fitting
What would happen if the crankshaft and gearbox were connected directly? At a minimum, when stopping the car, you would have to turn off the engine and then start it again. Nowadays there are cars on the roads with a “Start-Stop” system, when instead of idling the engine simply turns off, but on the VAZ 2107 neither the battery, nor the starter, nor the engine itself are designed for such “extreme”. Changing gears while driving is also not the best option; the load on the gearbox will be too strong. And such jerks do not add “health” to the engine itself.
So, using the clutch you can:
- Transmit torque from the engine crankshaft to the transmission;
- Disconnect the engine and transmission, interrupting the transmission of rotation.
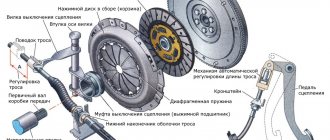
The clutch device on the VAZ 2107 is a classic clutch design, the simplest and most understandable:
- The engine crankshaft is rigidly connected to the flywheel, which rotates with it. The flywheel performs two functions: it maintains the moment of inertia so that the engine pistons do not freeze at a “dead point”, and serves as one of the elements of the clutch system;
- The driven (friction) disc is a transmission link between the flywheel and the pressure plate. It is installed on the input shaft of the gearbox and connects the clutch elements due to friction;
- The pressure (drive) disk is rigidly connected to the clutch basket. Its task is to tightly press the driven disk to the flywheel, then the torque will be transmitted to the driven disk and from it to the gearbox;
- The clutch basket consists of a casing and a system of leaf springs, which, when pressed, move the release plate back and separate it from the driven disk. When there is no pressure on the springs, they push the drive disc forward so that it presses the driven disc against the flywheel. The basket casing is rigidly connected to the flywheel and rotates with it;
- The release bearing is an essential element of the clutch system. When you press it, the leaf spring of the basket is pressed;
- The driver controls the clutch by pressing the pedal, from which the force is transmitted to the bearing through a system of rods and a hydraulic system.
As can be seen from the description, this is a “dry” (not in an oil bath) single-plate clutch, with a mechanical release bearing and a permanent connection (closed-loop system). Hydraulics are used to transmit the force that the driver applies to the pedal.
Clutch hydraulic drive device
Separately, it is necessary to say about the hydraulic drive. Thanks to it, it is possible to use the incompressibility of the liquid (maintaining a constant volume even under high pressure) and transmit force along a complex trajectory. There is no need to install complex rods and levers; hydraulics do their job perfectly.
Drive diagram VAZ 2107
The hydraulic drive system includes several elements:
- Clutch pedal;
- Master cylinder with expansion tank;
- Working cylinder with pusher;
- Pipeline and hose;
- Release fork.
Principle of operation:
- The force is transmitted from the pedal through the pusher to the master cylinder rod;
- The cylinder piston moves forward and pushes a portion of liquid into the pipeline leading to the working cylinder;
- The fluid presses on the piston of the working cylinder, combined with a pusher. The pusher comes forward and presses on the release fork;
- The fork moves the release bearing away from the clutch leaf spring.
Adjustment
Clutch adjustment on a VAZ 2107 is carried out by adjusting the clutch drive, or rather, the adjusting bolt, which is located at the end of the cable in the engine compartment. Incorrect adjustment causes the clutch to slip.
- The car is installed on an overpass or inspection hole.
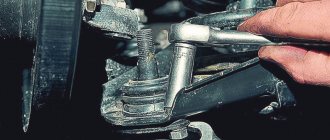
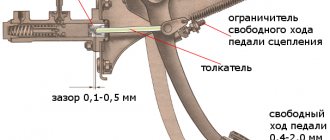
- In the cabin, the free play of the clutch pedal is checked and, if necessary, adjustments are made. To do this, use a 10mm wrench to loosen the locking nut of the pedal stop and set the required gap, approximately 0.4-2 mm.
- The pusher is cleaned of dirt and a penetrating lubricant is applied.
- The working cylinder is checked for free play of the pusher, on which the free play of the release bearing depends. To do this, push the clutch fork back by hand until it stops, while the free play of the pusher should be within 4-5 mm.
- Adjustment of the free play of the pusher is done with a 17 wrench, which will keep the adjusting nut from turning, and with a 13 wrench, loosen the tightening of the lock nut.
- The pusher is held with a key at 8, at the same time with a key at 17
- The adjusting nut is loosened and the required free play of the pusher is set, this is approximately 4-5 mm.
- The locknut is tightened by holding the pusher adjusting nut.
- Inside the car, the total free play of the clutch is checked, which should be approximately 25-30 mm. from the top position of the pedal to the start of switching on. If necessary, the entire operation is repeated several times until it is felt that the clutch is no longer slipping.
Basic faults
It should be noted right away that the driven disk and release bearing are consumables, the long service of which should not be counted on. The integrity of the flywheel is much more important; its price is much higher and replacement is more difficult.
The main clutch malfunctions on a VAZ:
- Difficulty changing gears;
- Clutch slips;
- Jerks during operation;
- Vibration during operation;
- Creaking and other extraneous sounds during operation;
- The clutch doesn't work.
Difficult gear shifting means that the clutch does not disengage completely, that is, the driven disc continues to turn when the pedal is pressed. There may be several reasons for this situation:
- There is a problem with the driven disk: it began to jam on the splines of the input shaft, or the fixing rivets began to come out of their seats and cling to the flywheel and pressure plate, or the damping springs failed;
- Problem with the release bearing: it is too far from the clutch basket, as a result it does not press it with enough force;
- Hydraulic problem: low fluid or air lock.
Once the cause has been found, you can solve the problem: replace the driven disk, troubleshoot the input shaft, install the release bearing at the required distance from the clutch basket, add hydraulic fluid and bleed the system.
Clutch slipping is the asynchronous movement of the flywheel and driven disk when the clutch is fully engaged (when the pedal is not pressed). Causes:
- Oil has got onto the working surface of the driven disk;
- The problem is with the release bearing: it fits against the clutch basket and presses on the spring;
- The clutch drive requires adjustment;
- The bypass channel in the master cylinder is clogged;
- The clutch pedal does not move back.
Depending on the problem, the solution will be appropriate: checking and replacing oil seals from which oil may leak, adjusting the clutch, repairing and cleaning the master cylinder.
Jerking and vibration when the clutch operates is a rather unpleasant sign. Possible causes of jerking when moving:
- The disc is jammed on the gearbox shaft splines. In this case, it cannot move freely along them, which means there will be no “soft docking” with the flywheel;
- Problem with the basket and drive disk. With prolonged use, the springs wear out and the drive disk becomes deformed;
- The driven disk is worn;
- The drive requires adjustment.
With such a problem, diagnostics is needed. In the best case, everything can be done by replacing the driven disk; in the worst case, the entire clutch will have to be changed.
If, when engaging or disengaging the clutch, you hear grinding, rattling, knocking and other sounds that should not be there, this may be a manifestation of the following problems:
- The bearings are jammed - pressure or drive shaft. This may be due to wear and tear over time or lack of lubrication. In this case, the sound appears when the clutch is engaged;
- There is a problem with the driven disk - the springs or splines connecting to the gearbox shaft are worn out. Knocking and rattling noises appear when you press the pedal;
- The clutch fork return spring does not work.
After diagnosis, broken parts must be replaced with new ones. If the problem is in the spline connection of the driven disk, it is necessary to check the condition of the gearbox shaft.
And finally, if you release the pedal and the clutch does not engage, the reason must be sought in the hydraulics:
- Airlock;
- Insufficient hydraulic fluid;
- The clutch cylinder seals are worn out.
The easiest way is to add fluid to the reservoir and bleed the clutch system. If the problem is not solved, it is necessary to dismantle the master and slave cylinders and replace the repair kits.
Why it stalls - reasons and their elimination
The clutch usually slips due to the following:
- There is no gap between the pressure bearing and the fifth basket;
- the clutch drive is not adjusted;
- oil gets on the discs;
Depending on the cause of this problem, the repair progress is determined. If the problem is with the diaphragm spring, it will have to be replaced with another one. When the friction linings wear out, the driven disk is replaced. When repairing/removing linings, the gaskets are checked. If they are in poor condition, they are also replaced with new ones. If oil gets on the driven disc, you will need to treat it with kerosene and clean it with fine sandpaper.
Disc oiling
Grease may get on any side of the flywheel and pressure plate due to an increased oil level in the gearbox housing or a leak in the rear crankshaft bearing. To solve the problem, diagnostics are performed and the cause of the leak is eliminated - the seals are replaced, then the spare parts are cleaned.
Read, it may come in handy: How to find what is creaking - insidious acoustics
The free stroke according to technical conditions is 30-35 mm, the full stroke is 140 mm. Any deviation from the norm is associated with a malfunction of the transmission and requires adjustment work. The parameter is checked using a ruler. To do this, determine the distance from the pedal to the center of the platform. The adjustment is made on a pit or lift using open-end wrenches 13 by 17 mm and 17 by 19 mm. We clean the adjusting rod and nuts with a brush and treat them with WD-40. Next, the lock nut is loosened, and by rotating the adjusting nut we change the gap. If the free play needs to be reduced, we lengthen the thrust; if it is increased, we shorten it. After completing the work, tighten the locknut.
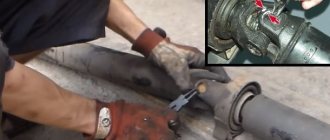
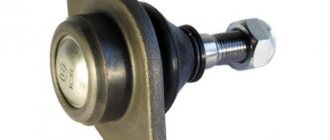
Damaged release clutch
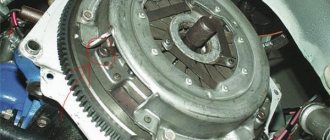
Replacing the clutch basket
Replacing the basket is done less frequently than replacing the driven disk. The basket needs to be changed if the drive disk overheats (then colored spots appear on it), breakage or wear of the diaphragm blades and springs. To access the clutch, you need to remove the gearbox.
Procedure:
- In the engine compartment, remove the “-” terminal from the battery and unscrew the starter bolts;
Removing the terminals from the battery - In the cabin, remove the gearshift knob;
Removing the gear knob - Remove the exhaust pipe from the hole;
Removing the exhaust pipe from the exhaust manifold - Unscrew the propeller shaft from the main gear, mark the connection points on the flanges;
Unscrew the driveshaft - Unscrew the cross member of the rear gearbox support;
Unscrew the gearbox cross member - Unscrew the gearbox mounting bolts (4 pieces);
- Disconnect the wire from the reverse gear sensor;
- Unscrew the speedometer cable;
Unscrew the speedometer cable - Unscrew the clutch slave cylinder;
- Pull the gearbox out until the shaft is completely out of the clutch and remove it. Removing the gearbox
When dismantling the clutch itself, you need to unscrew the basket bolts from the flywheel. To distribute the load evenly, the bolts are unscrewed 1-2 turns in turn. After removal, the basket must be inspected for wear of the disk, integrity of the springs, and diaphragm.
Complete disassembly with gearbox removal
The work must be done on a lift or in a pit. First of all, remove the battery
We continue disassembly by removing the rod from the gear shift lever. Then you will have to use a screwdriver to unscrew the screws securing the cover that covers the hole in the car body. This completes the manipulations inside the car dealership. What needs to be done next:
- Remove the exhaust pipe (exhaust system) and resonators;
- Then remove the starter from the flywheel housing and move it to the side;
- Disconnect the cardan from the rear axle and gearbox.
To be able to remove the box, remove the cross member of the rear engine mount and the speedometer drive cable. You also need to disconnect the hydraulic drive cylinder from the gearbox and move it to the side.
Next, you will need to remove the bolts that hold the clutch housing cover in place (key 10) and proceed to dismantling the box, and since it weighs a lot, it is worth putting a good support under it.
Read, it may come in handy: Replacing rear brake pads: which ones are better, how to open and install the spring, instructions with photos and videos
After this, use a socket wrench to unscrew the bolts from the flywheel housing. Now, in order to remove the box, you will have to carefully move it back, slowly removing the primary shaft from the hub of the clutch driven disc. This must be done carefully so as not to drop the box and injure yourself. That's it, the box is removed.
Video about disassembling the clutch using the example of a VAZ 2106, suitable for the “Seven”, a small difference only in the interior
Replacing the clutch disc
The driven disc is a consumable that must be worn out for the rest of the clutch to work properly. Problems with the driven disk are wear of the friction linings, damper springs, and splined connection to the gearbox shaft. When inspecting, you need to pay attention to the condition of the rivets (they should not protrude above the surface of the friction circle), the presence of cracks, rust in the center, and traces of oil. And an important sign of a problem will be a burning smell - the friction material is burning due to clutch slippage.
Experts recommend choosing the clutch basket and driven disc from the same manufacturer. It often happens that the friction material and, for example, the power of the basket springs are specially selected according to parameters to give the optimal effect. This is where many fans of a sporty driving style make a mistake when they install a three-leaf driven disc without replacing the remaining clutch elements.
Simultaneously with replacing the clutch, it is necessary to check the crankshaft oil seal. Servicemen often recommend changing it at the same time as the clutch disc, “so as not to have to get up twice.”
When installing the clutch on the flywheel, the driven disk is centered using a special mandrel, which is inserted into the flywheel bearing. After this, the basket is installed on the guide pins so that the mounting holes on it and the flywheel match. As with dismantling, the bolts are tightened one at a time, each one needing to be tightened 1-2 turns at a time. After this, the mandrel for centering the driven disk can be removed.
Lubricate the gearbox shaft before installation, then install the gearbox. Next, the sequence of actions is the reverse of removal.
Clutch selection
The manufacturer installed carburetor (2103 with a volume of 1.5 l) and injection (2106 with a volume of 1.6 l) engines on different VAZ 2107 models. Despite the external similarity, the clutch of these models has certain differences. The diameter of the basket pressure plate in both cases is 200 mm. But for the basket for 2103 the width of the pressure plate is 29 mm, and for 2106 it is 35 mm. Accordingly, the diameter of the driven disk for 2103 is 140 mm, and for 2106 - 130 mm.
Some car owners install a VAZ 2121 clutch on their VAZ 2107, which is noticeably stiffer and more reliable than the original one.
Clutches for the VAZ 2107 are produced by both domestic and foreign manufacturers
All VAZ models with rear wheel drive are suitable for clutch kits from classic cars of famous brands.
Table: clutch manufacturers for VAZ 2107
| A country | Manufacturer's brand | Advantages and disadvantages of clutch | Weight, kg | Price, rub |
| Germany | SACHS | Reinforced, so a little tough. Reviews are excellent | 4,982 | 2600 |
| France | VALEO | Great reviews, very popular | 4,322 | 2710 |
| Russia, Tolyatti | VAZInterService | Installed on the assembly line, good reviews | 4,200 | 1940 |
| Germany | LUK | There are dampers on the pressure and driven disks. Reviews are good | 5,503 | 2180 |
| Netherlands | HOLA | Noisy, short-lived, many negative reviews | 4,810 | 2060 |
| Germany | KRAFT | Soft, reliable. Reviews are good (many fakes) | 4, 684 | 1740 |
| Russia | TRIAL | Excessively hard. Reviews 50/50 | 4,790 | 1670 |
| Belarus | FENOX | Difficult, bad reviews | 6, 376 | 1910 |
| Türkiye | MAPA | Medium hardness, reviews 60/40 | 5,370 | 1640 |
| China | AUTOTECHNIK | Difficult, reviews are not very good | 7,196 | 2060 |
Replacing the master and slave cylinders
The master cylinder creates pressure in the hydraulic system, transmitting force from the pedal pusher to the working cylinder rod. It lasts a long time, and the repair kit often requires replacement, rather than the cylinder itself. The slave cylinder serves to transmit force to the clutch fork pusher. Hydraulic fluid from the master cylinder presses against the piston in the slave cylinder and operates the fork.
Their malfunctions are manifested by dips or tight movement of the clutch pedal, difficult operation of the gearbox (gears are switched with a crunching sound, vibration). Visually, a problem with the main or working cylinder can be seen by fluid leaks.
The clutch cylinder is replaced if the “mirror” of the cylinder or its other elements are damaged, which happens quite rarely. Replacement parts wear out much more often, and then you can simply install a new repair kit.
Replacing the master cylinder, video
The master cylinder is located next to the brake booster, below the brake reservoir. Its dismantling is done in the following order:
- Pump out the liquid from the cylinder expansion tank (with a rubber bulb or a syringe with a hose);
- When there is no liquid left in the expansion tank, remove it from the cylinder (disconnect the rubber fasteners);
- Unscrew the nut that secures the pipeline to the cylinder, hose pipeline to the side;
- Loosen the clamp that secures the hose to the cylinder and remove the hose;
- Unscrew the nuts that secure the cylinder, remove it, and pour out the remaining liquid.
After dismantling, you need to inspect the cylinder for wear of metal parts and rubber gaskets. If necessary, replace the repair kit or install a new cylinder. Installation is done in reverse order.
Replacing the working cylinder, video.
The slave cylinder is located next to the gearbox, on the clutch housing. It can be accessed both from below and from the engine compartment. Dismantling procedure:
- Loosen the nut that secures the hose to the cylinder. Do not remove the nut completely, do not disconnect the hose;
- Use pliers to remove the tension spring;
- Using pliers, straighten and remove the restrictive cotter pin from the pusher;
- Remove the bolts that secure the cylinder to the clutch housing;
- Remove the bracket that was attached to the cylinder with these bolts and to which the tension spring was attached;
- Remove the cylinder by sliding the pusher out of the hole in the clutch fork;
- Now you can completely unscrew the nut and remove the hose from the cylinder. As with the master cylinder, installation is done in the reverse order.
Often, problems with the drive are caused by low-quality hydraulic fluid. When working, pay attention to its color and consistency. Often wear products accumulate in the liquid and they begin to act as an abrasive.
Fault diagnosis
How do you understand that the clutch release bearing (hereinafter referred to as the clutch release bearing) has already reached the end of its service life and is time to change it? This question interests many VAZ 2107 car owners. And for good reason, because although this element can be called insignificant, a lot depends on it.
The service life of the clutch device on domestic cars depends not so much on the conditions of use of the car, but on its mileage. A car owner who likes to squeeze the gas all the way down and drive on the roads will need to change clutch elements more often than a driver who prefers a measured way of driving.
When the wear of the clutch elements reaches the point of no return, the device begins to slip if the engine picks up speed. If you regularly drive with such a clutch, then in the future, and maybe even on the next trip, the driven disk of the mechanism will overheat, which will not allow the driver to continue driving. And even get moving.
A failed UPS that has exhausted its service life
Help, I have a problem! About two weeks ago, the clutch pedal in my car (VAZ 2107) failed! At first I thought that the cable was “covered”. I thought about changing it, but then I saw that the cable was intact. I’ll even say more - the cable is in excellent condition. Then I decided to adjust the rod. Having done this, I was able to travel for about five more days. The pedal has failed again, can you tell me what to do?
And there are hundreds of such questions on the Internet. As you understand, we are gradually bringing the topic to signs of a faulty clutch system. What are the signs that it is time to replace the release bearing of the mechanism? There may be several of them:
- the clutch pedal falls to the floor, although the cable is fine;
- while driving, when pressing the clutch pedal, a slight grinding noise is heard;
- first gear does not engage, therefore, movement can only be started from second speed;
- While driving, some noise appeared, which disappeared when the clutch pedal was depressed.
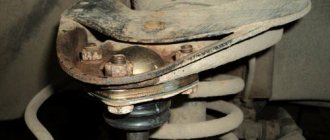
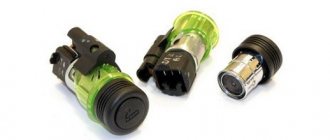
VPS at the installation site
If at least one sign of a malfunction appears in your car, then it’s time to change the VPS.
How to bleed the clutch of a VAZ 2107
To remove air locks from the system, after any repair you need to bleed the system. To do this correctly, you will have to work in the pit and with an assistant. The video below shows in detail how you can pump the clutch in several ways.
- Add fluid to the main cylinder expansion tank to the top (to the top edge) and close the plug;
- Place a small hose at one end onto the working cylinder fitting;
- Press the clutch pedal sharply 5 times at intervals of 3 seconds. After the last press, do not remove your foot from the pedal, do not release the pedal;
- Lower the second end of the hose into an empty container;
- Use a wrench to loosen the fitting so that liquid begins to drain through the hose;
- So much liquid should drain so that the expansion tank becomes almost empty.
- Tighten the fitting, release the clutch pedal;
- Add liquid to the top of the tank, tighten the cap and repeat pumping.
The task of pumping is to ensure that the liquid that drains from the fitting is without a single bubble. Then add fluid to the reservoir up to the mark.
Not all manipulations for servicing and repairing the VAZ 2107 clutch can be performed by the car owner with his own hands. However, for a skilled craftsman this work is quite possible when he has the equipment and the right tools. In the end, “classics” are not particularly difficult to repair.
When replacing a clutch, you need to pay attention to the quality of the parts. Now there are many brands that make spare parts suitable for VAZ, and it is better to choose initially high-quality brands. Then you won’t have to listen to what’s happening under the pedal every time.
When to adjust the clutch drive
The standard adjustment procedure is required as routine maintenance or emergency repairs. Usually the reason for performing the operation is such problems.
- Gear shift violation - positions are engaged with knocking, crackling or extraneous sounds.
- The clutch switch response threshold has been violated. A dip of 25 to 35 mm is considered optimal.
- Increased fuel consumption. If the mechanism is faulty, excess gasoline consumption can be up to 20% of the reference value.
- Knocking out positions. During acceleration of the vehicle, the gears “fly out”.
- Dissonance when revving the engine. When you press the gas pedal, the internal combustion engine spins up, and the car lags behind.
- Clutch lever failures, this also includes an increase or absence of operating play in the system.
- Early or late operation of the mechanism when the pedal is pressed.
Criteria: which clutch is better to install on a VAZ 2107 car of a classic design?
Based on the recommendations of experts and reviews from car enthusiasts, it is possible to draw up basic principles that must be taken into account when choosing parts for the gear shift control unit. In general terms, the picture resembles wheel alignment adjustment , when any useful recommendation greatly facilitates the process. In addition to the manufacturer's brand, when purchasing a driven disk, you should pay attention to the following factors:
- The plane of the friction linings must be uniform; during visual inspection, scuffs, cracks and chips are unacceptable.
- The presence of oil stains on the disc is strictly prohibited.
- Visually assess the quality of the rivet; the edge of each rivet must be the same; uneven riveting along the edges is unacceptable.
- The splines must be undamaged.
- Check that there is no play on the springs, dampers and linings. The presence of play indicates low-quality assembly of the unit.
How to replace?
If you have no idea what a VPS is or what a clutch disc looks like, then entrust bearing repair work to professionals. If you think that you can cope with this, then we suggest that you familiarize yourself with our car repair manual.
Which to choose?
Selecting an IPS is the first point that must be completed if you decide to replace an element.
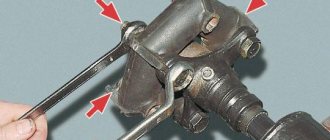
There is nothing difficult in choosing an element. Classic VAZ models (2010 - 2107) are equipped with a release bearing of the same type. Just buy the appropriate part at a car store or market, indicating the model of your vehicle. To make it more clear to you what the UPS looks like, you can look at it in the photo below.