There are actually many reasons for the malfunction. Firstly, the sensor itself, which indicates the oil pressure level, may fail, causing the light to indicate a problem. It is also possible that the oil pump itself or its parts are malfunctioning or not functioning correctly. To completely eliminate the problem in the event of parts failure, it is necessary to carry out special repairs to the oil pump.
How to replace an oil pump yourself
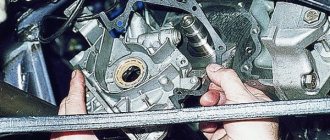
Having determined that the oil pump needs replacement or repair, it is necessary to remove the mechanism from the engine.
Tools for work
In order to dismantle the unit, you will need a standard motorist kit, consisting of the following list:
- keys to “10” and “13”;
- socket heads;
- extension cord;
- cardan joints.
How to remove the oil pump
If the work is carried out on an injection engine rather than a carburetor engine, then the crankshaft position sensor will need to be removed from the engine. Otherwise, dismantling the mechanism is performed in the same sequence:
- We de-energize the vehicle's on-board network by removing the “—” wire from the battery.
- We loosen the generator fasteners and remove the belt. One of the first procedures for dismantling the oil pump is to remove the generator belt
- Having prepared a clean container, drain the engine oil into it. Then we remove the engine protection and the sump itself. After draining the oil, dismantle the engine protection and the sump
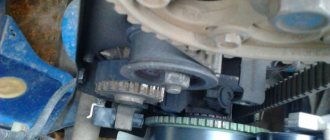
- Remove the camshaft belt. To remove the crankshaft pulley, you will need to remove the timing belt
- After removing the belt, the crankshaft and camshaft must not be rotated to avoid the valves hitting the pistons.
- We remove the crankshaft pulley, which will require unscrewing the bolt. One of the steps to dismantle the oil pump is to remove the crankshaft pulley
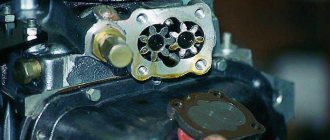
- We dismantle the oil receiver. To do this, unscrew 2 bolts on the main bearing cap and 1 bolt that secures the oil receiver to the oil pump itself. The oil receiver is attached to the main bearing cap with two bolts and one bolt to the oil pump
- To remove the pump, unscrew the six bolts. This must be done carefully so as not to lose the washers located underneath them. The pump is secured with six bolts, unscrew them
- After unscrewing all the fasteners, remove the oil pump directly. Having unscrewed all the fasteners, move the pump away from the main bearing cap and remove it from the engine
Video: dismantling the oil pump on a VAZ 2108/2109
Pump installation
To perform reassembly, follow these step-by-step instructions:
- Before installing the unit, the drive gear must be properly installed. Before installing the oil pump in place, the drive gear must be set in a certain position.
- The gear should line up with the corresponding flats on the crankshaft. The drive gear should line up with the flats on the crankshaft
- Before installing the mechanism, lubricate the working edge of the front crankshaft oil seal with engine oil. Before installing the pump, lubricate the working edge of the oil seal with engine oil
- After lubricating the sealing element and installing it, carefully install the oil pump on the crankshaft. Then the pump fasteners are screwed in. After lubricating the oil seal with engine oil and installing it in its seat, install the pump
- Install all remaining parts that were removed to replace the oil pump in the reverse order.
Dismantling
Removing the pump yourself is easy. Well, you are completely capable of doing your own repairs.
- De-energize the car by removing the negative terminal from the battery.
- Loosen the generator mounting bolts and remove the belt.
- Prepare a clean container by draining the oil from the crankcase into it. Next you will need to remove the engine protection and the oil pan.
- Remove the camshaft drive timing belt.
- Now that the belt is removed, do not, under any circumstances, turn the crankshaft and camshaft. The role of the oil pump in the design of the VAZ 2109 is difficult to overestimate. Replacing the engine oil and oil filter on a VAZ 2110. If it fails, the operation of the vehicle must stop completely. Otherwise, you will damage the valves by hitting them with the pistons.
- Remove the crankshaft pulley by using 2 flathead screwdrivers and pulling it off the shaft. If the key does not hold well in its seat, it is better to remove it too.
- Next in line for dismantling is the oil receiver. To remove it, you need to unscrew two fastening bolts located on the main bearing , as well as one fastening bolt connecting the oil receiver to the pump (oil).
- Remove the pump, held in place by 6 bolts.
- After unscrewing all the bolts, carefully move the oil pump away from the main bearing , then, with a measured soul, remove the oil pump.
Read:
Dismantling the device
Symptoms of a faulty oil pump
The first thing that will indicate problems with the oil pump is the oil pressure light coming on. In this case, the element indicates that there is a problem with the engine lubrication system. How serious they are is up to the car owner to find out.
In addition to checking the pressure, attention should be paid to oil consumption. If the pressure in the lubrication system of the power unit decreases, the vehicle should not be operated until the cause has been determined and repairs have been made.
The main symptoms of problems in the system are a light coming on or a knocking sound in the engine.
Actions to be taken in the event of a breakdown:
- stop and turn off the engine;
- wait a while for the oil to drain into the engine crankcase, then check its level using a dipstick. If the level is minimal, you need to top it up to normal;
- start the engine;
- If the oil pressure lamp continues to light and extraneous noise is still heard from the engine, this may indicate a possible problem with the oil pump.
One of the reasons why the oil pressure light comes on may be a low level of lubricant in the engine.
How to check the oil pump
To test the mechanism, it is not necessary to dismantle it. For diagnostic purposes, it is necessary to measure the pressure in the lubrication system and compare it with the readings that correspond to the norm for a particular car. Based on the results obtained, we can draw conclusions: is there any cause for concern or not. If it is necessary to replace the oil pump on a VAZ 2108/2109, it is recommended to use only original parts. This is explained by the fact that many people today produce components for cars in the domestic automobile industry. However, their quality leaves much to be desired.
When replacing the oil pump, it is recommended to purchase an original part to avoid problems due to poor workmanship
Checking the oil pump on the stand
If possible, you can check the performance of the oil pump on a special stand. The essence of such a test is to evaluate the performance and pressure generated by the device, as well as the pressure at which the pressure relief valve operates. When testing the pump using a stand, special oil with a temperature of +20 ˚С is used. For an oil pump for a VAZ 2108/2109 engine, the flow rate should be within 34 l/min, the back pressure should be 5 kg/cm². The pressure relief valve should open at a pressure of 5.5–7.5 kg/cm². If the valve is checked on the engine using a pressure gauge, which is installed instead of an oil pressure sensor, the valve must operate at a pressure of at least 4.5 kg/cm².
Disassembly and repair
Having completed the dismantling work, you can proceed in 2 ways:
- Replace the old pump with a new one;
- Repair the old oil pump .
Read:
Repair allows you to identify worn elements and replace them with new ones, which will restore functionality. If the breakdown is more serious than simple wear and tear of consumables, the optimal solution would be to completely replace the oil pump.
Where does withdrawal begin?
To disassemble the pump, follow the instructions.
- Divide the pump into two parts. To do this, we have already unscrewed 6 bolts securing the cover to the body and used a screwdriver to pry off this cover. Replacing the VAZ 2109 engine | lada. It came out of the pins on the body. So we remove the element and put it aside.
- Inside the pump there are driven and drive gears, which need to be removed and placed aside for now. Removal and installation of the oil pump from VAZ 2108, VAZ 2109, VAZ 21099 cars. Replacement"). Then we will check their condition.
- Next, the pressure reducing valve is removed. To do this, first unscrew the valve plug and remove the spring from the hole, and then the valve.
- In some cases, problems may arise with removing the valve. VAZ 2108 2109 21099; VAZ 2110, replacement of slip rings and bearings of the VAZ 2110 generator. If you are faced with such a situation, carefully tap the oil pump housing on a piece of wood or arm yourself with a wooden cone-shaped pin. It is inserted into the valve hole, the valve is hooked and removed.
- Having disassembled your oil pump
on the VAZ
2109 , thoroughly wash all its components using clean kerosene. VAZ 21099 - replacing the oil pump. Don't forget to wipe the parts dry afterwards. - Check the condition of the cover and body of your pump for mechanical defects, chips, cracks.
- Pay special attention to the landing spots of the gears, where there should be no signs of wear or other mechanical defects. If they are, the pump will have to be replaced.
Condition assessment
In many ways, the performance and maintainability of the old oil pump depends on the results of checking the characteristics of the cover and body of the device. It is necessary to take measurements of the gaps.
During the operation of the car, various situations arise in which the unit can be repaired or replaced. This need arises when the VAZ 2108/2109 oil pump breaks down. If you continue to operate a car with a broken mechanism, there is a high probability of engine failure. To save money, the unit can not only be replaced with your own hands, but also repaired.
Removal and installation
After unscrewing the bolts, you will face the most difficult task - removing the pump housing from the engine block. Sometimes this is not easy to do, since the metal surface inside may oxidize, which is why the part simply sticks to the motor. To carry out the work you will have to use a thin chisel or flat-head screwdriver.
If you decide to use the latter, then make sure that it is massive and does not bend with a weak blow.
On cars with a carburetor injection system, it may be necessary to remove the air filter housing, as it sometimes gets in the way. When you have freed up space, install the chisel on the pump housing. Do not get confused, because in this case the jacket of the engine block can easily be damaged. Using light but sharp blows, knock the pump body out of its seat. You can throw out the old pump, take a rag with acetone and clean the metal in the engine block.
Thoroughly clean it of any remnants of the old gasket and sealant so that in the future the new elements will fit into place as tightly as possible. Installation must be carried out in reverse order. Install a new gasket along with the coolant pump, lightly coated on both sides with sealant.
The pump produced by Pekar fits into place as tightly as possible; no effort is required. But if the fit is too tight, you can use a wooden hammer to tap the pump body into the engine block. This is how to properly replace a pump.
What to do if a breakdown occurs?
If such a malfunction occurs to you, then you need to perform the following manipulations:
Stop and turn off the engine. Wait until all the oil that is poured into the engine flows back into the sump. Check the level. If it is below normal, then you need to top it up. Start the engine. Pay attention to the control lamp - if it still lights up and extraneous noise appears, then this is clearly a breakdown of the oil pump.
In some cases, the oil receiver mesh may become clogged. To be fair, it is worth noting that the pump is a mechanism in which there is nothing to break - it is the body and two steel gears. They will be able to “survive” even a tenfold increase in loads and long-term operation without lubrication. But the oil receiver often gets clogged, and lubricant simply does not flow into the pump.
How to remove the timing belt?
Approximately every 60 thousand kilometers, the timing belt on VAZ 2108-21099 vehicles needs to be replaced. The pump is dismantled every 90 thousand, but it is better to change everything at once. Of course, you can travel more if you carry a spare set in the trunk. But is it worth carrying out repairs in the field if you can do it in the garage, without haste and the risk of bending the valves?
After all, not all engines are protected from the impacts that valves receive when the timing belt breaks. The whole point is that, after accelerating the car, you keep the engine speed high. When the belt breaks suddenly, the camshaft is set to a position in which all the valves fall down, that is, they open. But the crankshaft continues to rotate by inertia, moving the pistons.
And he moves them towards the lowered valves. The result is a severe blow, which at best will lead to bending of the valves. It may also happen that the piston bursts and cracks appear along the cylinder head. Because of this, repairs immediately become several times more expensive. To replace the timing belt on a VAZ 2108, you will need to prepare the car.
First of all, install it on a flat surface so that it can be easily approached from all sides. The right wheel will need to be removed and a good and reliable support placed under the car. It will not be difficult for you to get rid of the casing that covers the compartment with the gas distribution mechanism. It is secured with three bolts to the engine block. Underneath you will find a belt running along the crankshaft pulleys, pump pulley, camshaft pulley and tension pulley.
To dismantle the belt, you will need to unscrew the roller fastening nut with a 17 wrench. Using the same wrench, unscrew the generator mounting nut. Move it towards the engine, thereby weakening the generator drive. Next, unscrew the bolts securing the protection to the car body, remove the drive pulley for the VAZ 2108 generator belt. The rubber timing belt is easily removed from all pulleys and the tension roller.
The most common failures of the pressure reducing valve
As operating experience shows, a malfunction of the pressure reducing valve can manifest itself in the following:
1. Inability to maintain normal blood pressure. As a rule, this is caused by mechanical failures of the unit. The weakest element of the system is the spring.
During operation, it can stretch and open the valve even with a slight increase in pressure. As a result, oil does not reach many engine components, they wear out and fail.
The reasons for a spring malfunction are its wear due to long-term operation, installation of the wrong spring during a major overhaul (defective or excessively soft), and installation errors.
2. Problems with opening the valve when peak pressure is reached. During operation, the valve lumen may become clogged. As a result, the RKMN jams and does not open even at high pressure.
The result is the destruction of many important engine components and the need for major repairs. The main cause of the malfunction is untimely oil change.
It's easy to explain. Dirt particles are deposited on the surface and constantly increase the size of the growth. Poor flushing quality leads to the accumulation of various debris and chips in the channels.
Preparing to replace your pump
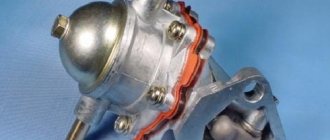
The design of a liquid pump is very similar to that of an oil pump, as it consists of similar elements. Initially, components manufactured by Pekar are installed. But if it is not possible to replace it with the same part, you can find analogues. However, not all of them will have the same characteristics as standard components.
Some have a shorter service life, others may have slightly different sizes, you will have to work with a file to install them in the seat. Try to select the analogue that will be as similar as possible to the standard one produced. The same requirements can be presented to other nodes. The fuel pump from the same manufacturer serves without fail for a long time.
Before replacing the pump, prepare wrenches for 10. You will need all types: cap, end and open-end. Some bolts are difficult to reach, so having different types of wrenches will help. Drain all liquid from the engine cooling system, allowing it to cool beforehand. Do not carry out such repairs immediately after turning off the engine. This risks boiling water getting on the skin and causing burns.
It's better to stock up on a small amount of automotive chemicals. These include sealant and thread locker. With their help, you will get rid of accidental leakage of the liquid pump of the VAZ 2108 car. When you remove the belt, you will have the opportunity to dismantle the pump.
To do this, use 10mm wrenches. With their help, you need to unscrew the three bolts that secure the Pekar pump housing to the engine block. It is not always possible to unscrew these bolts with ease. Sometimes dust mixed with antifreeze or oil accumulates near them. Therefore, before unscrewing, take five minutes to clear the repair area of any dirt.
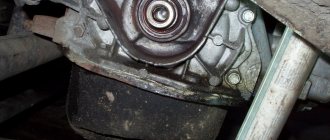
Where is the VAZ 2109 pump located?
An automobile pump consists of a metal cast body, which is made of aluminum or cast iron, a moving shaft, bearings and an impeller. The tightness of the unit is ensured by a special seal. Under the action of rotation of the impeller, pressure is created in the mechanism, pushing out the antifreeze, which does its useful work by heating up in the channels of the cooling system and cooling in the radiator to again enter the engine cooling jacket. This process is regulated by a special device - a thermostat.
The pump is located under the timing housing, slightly below the camshaft gear.
Removing the engine
The engine on a VAZ can be removed if you have the necessary tools. In addition, you need to have a special lifting device available that will help remove the engine from the compartment. You can, of course, do without it, but then you need additional workers. So, let's start:
- remove the hood;
- cover the front fenders of the car with soft blankets so as not to damage the paint when removing the engine;
- drain the radiator;
- disconnect all electrical wires from the distributor, as well as from the oil and temperature sensor and carburetor;
- remove the fuel supply hose;
- unscrew the exhaust manifold pipe (muffler);
- disconnect the battery terminals;
- remove the starter;
- the air filter housing is removed;
- disconnect the generator wires;
- unscrew the engine from the gearbox;
- use a screwdriver to loosen the clamps of the heater radiator pipes;
- remove the accelerator pedal linkage;
- remove the carburetor choke cable.
After carrying out the above work, you need to go down into the inspection hole or under the overpass:
- remove the clutch master cylinder;
- unscrew the gearbox;
- remove the protective casing;
- unscrew the engine bolts;
- We hook the engine with belts and lift it up.
At this stage, engine removal is complete. Let's move on to its analysis.
Reasons for the drop in oil pressure in VAZ cars
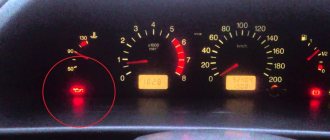
Instrument panel and oil pressure warning lamp
If the pressure drops, then, as mentioned above, a special light on the instrument panel begins to signal a problem. To begin with, it is recommended to check the entire circuit that is transmitted from the sensor to the warning lamp:
- take the wire from the sensor and lean it against the engine ground (if the circuit is in good order, the lamp will definitely go out);
- if everything is fine in the circuit, you need to remove the oil pressure sensor (if it is dry, then there is a problem, which you need to look for below).
And quite often it is the oil pump that causes the malfunction. The oil filter valve or some other element may be stuck in this part. By replacing a low-quality oil filter with a high-quality option, you can solve the problem. But if the pressure drops again, then you need to open the pan and check the oil receiver, and then the rubber sealing ring. If this does not help, you need to remove and disassemble the oil pump itself.
Replacing the water pump on VAZ 2108 and 2109
Even an inexperienced car enthusiast can repair and replace the pump on a VAZ 2108/09. You will need a standard set of tools - open-end and socket wrenches (10 and 17), screwdrivers, etc. If you plan to replace the pump, you should purchase a kit consisting of the pump assembly itself and a sealing gasket, and silicone sealant. In addition, for work you will need rags, acetone solvent and a canister of fresh antifreeze.
The repair kit for the water pump must contain a new gasket
As already noted, the pump is built into the bore of the engine cylinder block. The pump drive pulley is rotated by the timing belt. Therefore, to dismantle the pump, you must first remove the belt protective cover and the belt itself. But before this you need to perform a number of preparatory operations.
- The negative terminal of the battery is disconnected.
- The coolant is completely drained into a pre-prepared ten-liter container. In working condition, about 8 liters of antifreeze circulates in the cooling system of the VAZ 2108/09. If the fluid has been changed recently, it can be reused. It is prohibited to drain coolant onto the ground, as it is poisonous to plants and animals.
- The generator belt is removed. To do this, the fixing nut on the tension bar is loosened, and the generator is moved towards the engine. The belt sags and is easily removed.
- To ensure that the settings are not lost after removing the timing belt, the drive pulleys should be aligned to the marks. It is not difficult. The right front wheel is lifted with a jack. Then fifth gear is engaged. By slowly rotating the wheel, the mark on the camshaft pulley is aligned with the stationary mark on the engine.
- The timing belt tension roller becomes loose. To do this, the fastening screw is unscrewed and the roller is moved away from the belt gear.
After removing the belt, you can proceed directly to dismantling the pump. Using a 10mm wrench, unscrew the three mounting bolts and remove the pump. This is not always easy to do. The pump may “stick” to the landing site. In this case, you will need a chisel and a hammer, with the help of which the layer of old sealant in the socket is carefully torn off. After this, the pump can be easily removed.
The pump is secured with three bolts to the cylinder block body
It is impossible to completely remove the pump in the normal position of the car - the body gets in the way. You need to raise the motor slightly. To do this, the right side of the car is lifted on a jack - the engine is tilted.
If you have an assistant, you can do without hanging the body. One person forcefully pulls the motor in the direction opposite to the direction the pump exits the socket. Another person pulls out the pump at this time.
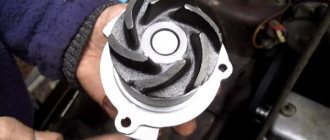
After removing the water pump, the impeller blades are inspected. They may break off or crack. This happens if the engine has been severely overheated, or the impeller is made of poor quality material. Small blade fragments usually fall out of the drain valve.
Chips on the impeller sharply reduce pump performance
To be completely sure that the cooling system is clean, it is recommended to flush it using the following algorithm.
- Remains of sealant, dust and debris are removed from the engine surface with a rag and solvent.
- The mounting bolts are cleaned of grease, rust and debris. Before installing the new pump, apply a thin layer of sealant to the threads.
- The gasket is lubricated with waterproof sealant and the new pump is carefully installed in place. Sometimes it may be necessary to press the pump using a wooden spacer.
- The bolts are tightened first by hand, then using wrenches. In this case, it is strictly forbidden to overtighten the threads - the pump housing may crack.
- Assembly is carried out in reverse order.
- Fresh (or previously drained) coolant is added.
- Air pockets are removed from the system.
- The engine starts and the cooling system is checked for leaks.
Professionals recommend replacing the tension roller along with the water pump. To check the serviceability of the roller, rotate it by hand. If the roller rotates with difficulty or a crunching sound is heard, it needs to be replaced.
It is generally accepted that the water pump should be changed every 90 thousand km of the car. However, this figure is conditional, depending on the operating conditions of the vehicle. Obviously, in the city cycle with constant traffic jams and limited speed, the cooling system will wear out faster than on the highway. Therefore, the need to replace the pump should be assessed based on its actual condition.
Features of the valve device
The operating principle of the system is simple. The main reacting body in this unit is the thrust bolt. It is he who puts pressure on the spring and presses the valve to the hole.
As soon as the pressure in the system increases and exceeds the permissible level, the oil overcomes the elasticity of the spring, squeezes out the valve and passes into a special compartment.
After the pressure normalizes, the spring returns the valve to its original state, and the engine operates normally.
The oil pump pressure reducing valve has a simple design:
- A small casing in which a special system of channels is provided (it is through them that the oil moves);
- a special valve that looks like a small piston or ball. Its task is to block the passage in a timely manner and prevent an increase in pressure in the engine;
- spring;
- a thrust bolt (sometimes a screw).
Note! What makes this system so special is its simplicity of execution, which ensures maximum reliability and operational efficiency.
The pressure reducing valve itself is produced in two versions - it can be located in the pump housing (built into it) or have the form of a separate mechanism.
As you can see, the system is well thought out. But even such high-quality devices sometimes fail. Let's look at the main valve malfunctions and how to eliminate them.
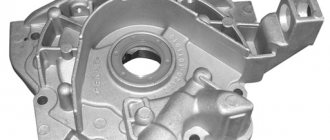
Design
Oil pump VAZ 2109
Today there are three types of pumps:
- 2-gear pumps, in which one gear is connected to a shaft, which starts working from the intermediate or camshaft of the VAZ. This pump is installed inside a sump located in the lower area of the cylinder block. Typically, the rotation speed of the element is ½ the rotation speed of the motor.
- A gerotor pump has a rotating small gear inside an outer gear. This pump is located in the lower area of the motor in the sump.
Old style oil pump
- The internal pump is often installed on the front cover of the engine. It begins to function from the crankshaft. Structurally, such a mechanism is similar to a gerotor mechanism, but in this situation it replaces the front damper of the engine. As a result, it is possible to generate higher oil flow with higher pressure.
Repair recommendations
If there are signs of a valve malfunction (for example, a pressure lamp on the dashboard lights up), you must promptly repair the problem.
To do this, remove and disassemble the oil pump. After opening you will see the pressure reducing valve and will be able to assess its condition.
If it's stuck, take it out, wash it in gasoline and don't forget to lubricate it. Similar flushing actions are done with the fuel pump.
Pay special attention to cleaning the valve channels and diagnosing the main elements. If the spring is faulty, it needs to be replaced.
Please note that the installation of a new oil pump (reducing valve) is required after each overhaul of the power unit.
In this case, you can avoid many problems with pressure surges or, conversely, lack of pressure. Once the repair is complete, be sure to check the system pressure to ensure the readings are accurate.
In the future, change the oil promptly, flush the engine and install a new filter at each replacement.
There are no small things in a car. Even the most insignificant at first glance node can play an important role in the overall “orchestra”.
This theory was once again confirmed by the pressure reducing valve, which requires special attention, timely diagnosis and repair. Good luck on the roads and of course no breakdowns.
Source
Malfunctions in the operation of the pressure reducing valve
The structure of the pressure reducing valve is quite simple, which ensures its reliability and reduces the likelihood of breakdown. However, sometimes this still happens. Most often this is due to wear and tear of the mechanism, so do not forget to regularly diagnose all components of the car, as well as promptly replace outdated parts.
There are two main types of mechanism failure.
- The valve creates insufficient pressure. Usually the cause of this problem lies in the spring. With prolonged use, it becomes less elastic and stretches. As a result, the valve remains slightly open all the time. Due to this, the pressure decreases, and the oil does not reach some engine components. Sometimes it happens that unprofessional craftsmen install a spring with insufficient elasticity during repairs. This has the same effect.
- Excessive pressure builds up in the valve. As a rule, the cause of this breakdown is the entry of debris into the mechanism or the use of old viscous oil.
How to determine that the pressure relief valve is broken?
It is impossible to determine at first glance that the valve is broken. It is necessary to carefully inspect other elements of the system and exclude the possibility of damage to other parts of the oil pump. In order to understand that there are malfunctions in it, you should look at the dashboard. Most car models have a sensor located there that indicates problems in the system. It is a warning light with a pictogram that lights up at high speeds.
If this happens, you should stop the car immediately, as further movement may lead to permanent engine damage. Turn it off and get out of the car. Next, you will need to take the following steps.
- Wear protective gloves. At the moment, the engine compartment of the car is hot, so you can easily get burned.
- There is no point in checking the oil level if you have just stopped. It will take time before it drains into the crankcase. At this time, you need to inspect the engine: look for fresh oil leaks or damage to the crankcase.
- If the problem is a broken crankcase, you will need to seal it. This can be done using available materials: an ordinary rag, a piece of rubber and even tape.
- Inspect the oil filter. Damage to its gasket can also cause a breakdown.
- If the above items are in order, you should check the oil level. This is done with a special probe with o and “maximum”. Ideally, the oil level should be between them. If there is a lack of lubricant, simply add it.
All further actions are carried out on the valve removed from the pumping system. Examine it carefully. Often the cause of breakdown is clogging of the mechanism. This usually happens to drivers who are too lazy to change the oil. Dirt accumulates on the surface of the valve or spring, which prevents normal operation. If you have recently carried out a major overhaul of your car, then there is a risk that the valve was not properly washed and there are particles of chips and other debris left in it.
For this reason, technicians often recommend replacing valves after major repairs. If you do not want to do this, make sure that the system is not clogged before using the vehicle.
There is an unusual way to check the functionality of this element. Take a small piece of cotton (or other breathable) fabric and place it on the fitting that is parallel to the lid. Now you need to take a sharp breath through the material. If you feel strong resistance, it means that the valve is working as it should: it blocks the air flow and passes it through a special hole. A working mechanism should not be easily blown through.
Table: diagnosis of low pressure in the oil pump, causes and remedy
| Guide to diagnosing hypotension | ||
| Malfunction | Cause | Remedy |
|
|
|
| Low oil pressure throughout the entire engine speed range | There is too little oil in the engine. The oil intake screen is dirty, the oil intake tube is broken | Add oil to the engine. Remove the oil sump, clean the mesh, if necessary, replace the tube. |
| Worn oil pump | Remove, check, replace if necessary | |
| Engine bearing wear | Repair the engine | |