A frozen windshield in winter is a big problem, since driving a car requires good visibility. Removing ice crust from glass takes a lot of time, which is critical in the morning. Expensive cars are equipped with built-in heated windshields, but what should owners of cheaper cars do? There are ways out and there are many of them.
Options for heating the front glass with your own hands:
- Installing heated windshield wipers
- Heating the wiper rest area
- Heating of washer fluid
- Purchasing new glass with built-in heating
- Purchasing a special heater-hairdryer installed on the panel
Installing heating on windshield wipers
Inside these wipers there is an element that is heated by current. Heat from the element is transferred to the rubber band and blade body, which helps melt the ice on the windshield in a short time. There are two types of heated wipers:
- Activated when plugged into the cigarette lighter
- Activated by pressing a button on the remote control that comes with them.
All two options are connected via the car's cigarette lighter. It’s just that in the first option, to turn off the heating, you need to disconnect the connector from the cigarette lighter, and in the second option, you can simply press the button on the remote control. All two options are mounted as follows.
Installation
It's easy to heat the brushes. The essence of the connection diagram: The wire is connected to the cigarette lighter and led out of the passenger compartment into the engine compartment to the brushes.
Advice. After installation, you should not place the wire near the motor or connector, as it will melt.
From the engine compartment, the wire is connected to the brush. It is fixed on the brush with special clamps that come with it.
Advantages: fast heating, relative ease of installation
Disadvantages: the cigarette lighter will be busy
Do-it-yourself modification
Attention! You perform all actions at your own peril and risk. The author is not responsible.
You will need : install an additional non-locking button in the car panel (or buy a block with five buttons), a relay with two groups of switching contacts, 1N4007 diodes and a transistor.
The control unit for the stove (heater) and air conditioner (SAUKU) does not need to be removed or disassembled. The signal about pressing the heating button is duplicated at the input of the central body electronics unit (CBKE or BCM, located under the glove compartment), at the contact of connector S1-14. We connect the non-locking button according to the diagram:
Description of the circuit: When the button is pressed, the low level at pin S1-14 activates the standard heating of the entire CBKE and at the same time the relay is activated due to the pickup by the transistor for a time determined by the capacitance of the capacitor. After 3-4 seconds, a low level appears at pin S1-34 and fixes the relay in the on state for the time specified in the CBKE (6 minutes). The relay turns off the heated mirrors and rear window, leaving only the windshield.
As a result , when you press the additional button, the indicator of the standard button lights up and only the heated windshield turns on. After 6 minutes it turns off on its own.
The operation of the circuit in the video:
Now it becomes possible to connect only the heated windshield to an additional alarm channel.
Heated windshield wiper rest area
Heating of the wiper area is carried out by gluing a special film into which heating elements are built. These elements are powered from the vehicle's network. The heating tape is applied to the windshield on the passenger compartment side.
The entire windshield is not heated by this method, but the most important part of it for viewing is heated, so this method is good.
Installation
To apply a heating film with heating elements to the windshield wiper rest zone, you will either have to remove the dashboard or remove the glass. The second option is simpler and cheaper if you contact a specialized service.
Heating elements are glued to the removed glass, as shown in the photo. It is important to leave a distance of 2 cm from the edges of the glass, since the sealant will lie there.
It is best to power this electric heating with a wire with a cross section of 1.5 mm.
The simplest option for connecting the defroster: in parallel with the button for turning on the heated rear window. This means that when the rear window heating is turned on, the front window heating will also work.
Now you need to find the plus of the network. It can be used from any electrical option of the car, for example, from heated mirrors. You need any wire where there is a voltage greater than or equal to 12 volts. This wire is connected through the switch and relay.
It is important when installing the heating not to damage the filament. Because in order to repair the heating threads, you will have to remove the glass or dashboard again.
Advice. You should not turn on the windshield heating in an unheated cabin if the outside temperature is less than -15 degrees. Due to large temperature changes, the glass may crack.
Advantages: high heat transfer, speed
Disadvantages: difficult to install
Possible malfunctions and their symptoms
If the heated rear window does not work, then car enthusiasts usually find out about it when it starts to sweat or a coating forms on it. When you turn on the heater function, you can wait for a very long time, in the end there will be no results or the glass will be partially heated. You don’t need to be a great specialist here to understand that the device requires repair.
Depending on the connection diagram, the car's windshield or rear window defroster may turn on either with or without the ignition on, but usually still works when it is on. Depending on the vehicle, the windshield or threads installed on the adhesive on the rear window may only operate after the engine is started. This allows you to prevent accelerated battery discharge (the author of the video is BortJournal Renault Megan).
It should also be noted that the device can operate at a current of 10 to 25 amperes, it all depends on the specific car.
So, if the rear window heating does not work, then there may be several types of faults:
- The system does not turn on. If the lamp located on the button does not light up when the system is turned on, most likely the problem lies either in the button or in the fuse. If the lamp is on, but the threads attached to the glue do not heat up, you need to check the relay. In some cases, the problem lies in the connectors connecting the device to the vehicle's electrical circuit, so you need to check these elements as well. Diagnostics are carried out in accordance with the service documentation for the car.
- If the rear or windshield fogs up slowly, especially during winter cold, then the essence of the problem may lie in poor contact of one of the connectors; this needs to be checked. As a result, the resistance of the contacts will increase, and the voltage will be less powerful; accordingly, the threads attached to the glue , will take longer to warm up. In order to check this, you need to use a multimeter and measure the voltage at the terminals of the device. If there are differences in the readings obtained, they should be no more than one volt. Otherwise, the heated rear window of the car will need to be restored.
- Horizontal traces of fogging remain on the car glass - another type of malfunction. One of the most common problems in this case is the breakage of filaments in certain places. Usually, such a breakdown can be checked and identified without special instruments, just by eye, since at the point of the break the auto glass will not be thawed or fogged up. It should be noted that even with a slight mechanical impact, the tracks are destroyed, so when cleaning auto glass you must carefully use a scraper. If you carry large cargo, make sure that it does not rest against the rear window.
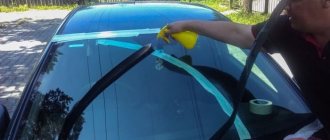
Heating of washer fluid
This type of heating not only helps to melt the layer on the glass in winter, but also to wash away dirt in summer, since warm water washes better than cold water. There are two ways to heat the washer fluid:
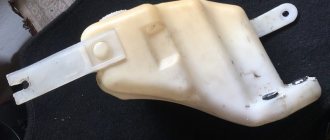
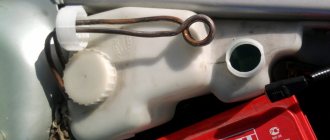
- Heating the washer barrel
- Heated washer nozzles
Keg heating
The washer is heated using special plates with a thermostat. You can purchase them at any radio electronics store.
Just like heating the brushes and windshield, these plates are connected via a 12 Volt wire. For example, you can take the wire from the heated mirrors. Since these elements have a built-in thermostat, they are able to turn off when the temperature reaches above 50 degrees.
It is not difficult to fix the plates on the barrel, since they are self-adhesive.
Advice. When using this method, it is better to insulate the washer barrel itself so that it retains heat better. This is done by covering it with three layers of foil.
Heating of injectors
The heating of the nozzles washing the windshield is carried out due to the built-in resistance inside them. Under the influence of current, this resistance heats up and transfers heat to the washer fluid.
You can either buy such nozzles or make them yourself. The second option is preferable, since the first is expensive. You can buy ordinary cheap injectors and install a heating element in them. This element is a 300 ohm resistor, which can be purchased at a radio electronics store for 20 rubles. You will need 4 pieces.
Assembling homemade heating
To make heated wipers, you need to understand how factory-made products are designed. The design is as follows: a film heating element is glued to the metal strip that serves as the base of the brush, whose contacts are brought out approximately in the middle (where the mount with a lock is located). The heater is covered on top with a rubber windshield wiper. Hence the conclusion: it is necessary to make the same flat elements and integrate them into standard brushes.
For work you will need the following materials:
- MGTF brand wire - 0.03 mm 2 in an amount of about 10 m for the heater;
- the same, brand MGShV or PV-3 (0.12 mm 2) for connection;
- heat shrink tube for sealing soldering;
- aluminum foil.
Note. The resistance of the heating wire for one wiper must be at least 5 ohms. This will give a thermal power of about 35 W at a circuit current of 2.5 A.
To make a heating element with your own hands, the first thing you need to do is remove and disassemble the wipers. The goal is to accurately measure the length and width of the future film heater, guided by the dimensions of the metal base. Then proceed like this:
- Drive 2 nails into the board at a distance equal to the length of the brush base.
- Cut a piece of resistance wire (indicated above) and wind it between the nails so that the ends are centered.
- Secure the resulting train with tape, remove it from the nails and wrap it in foil.
- Solder the ends of the MGTF heating wire to the PV-3 connecting cable. Place an insulating heat-shrink tube over the joint and heat it with a lighter.
When finished, place the homemade heater inside the brush, pressing it with an elastic band and a plastic retainer. Further assembly and connection to the vehicle on-board network is carried out according to the algorithm described in the previous section. Advice. During operation, use homemade heating for a short time so as not to discharge the battery. Turn it on for 3-5 minutes, enough to defrost the glass.
Purchasing a new heated front window
The option is good if your car is equipped with a heated front window. You can simply purchase such glass and install it instead of the old one. This item will be original and of high quality.
If such equipment is not available, you can purchase Chinese non-original heated glass. This option is already a lottery, because it is not a fact that this frontal approach will work well.
Do not forget that this glass will have to be installed either independently or at a service center. It’s best to do it yourself, because purchasing new heated glass is an expensive purchase (the cost of such glass starts from 10,000 rubles).
Advantages: when buying the original, the highest quality option.
Disadvantages: high cost, risk of low-quality products when buying non-original ones.
Purchasing special additional airflow
This is the cheapest and worst performing method. Many advertisements for these devices on the Internet and on TV say otherwise, but you shouldn’t believe them. The problem with such a windshield heater is that the heat will not spread evenly, but at a certain point. These heating fans themselves are low-power, so you will have to wait a long time for them to melt the glass. However, such additional airflow is very easy to install: just install it on the dashboard and plug it into the cigarette lighter. Additional electric blowing is good only if you warm up the car engine for a long time (you can also warm up the windshield at the same time).
Advantages: Easy installation, low cost
Disadvantages: Long warm-up time, uneven heating plane
Key combination
Attention!
The method only works on Lada Vesta.
To turn on the heated windshield without maximum windshield blowing, turn on the “Defrost MAX” mode (button No. 24), and then simultaneously press buttons No. 24 and No. 21. As a result, the windshield heating will work, and the climate system fan will remain running at the same speed.
The procedure is also shown in the video:
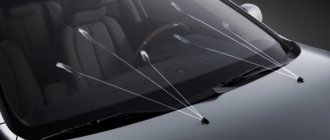
First, how does classic heating work?
As we know, car glass, especially the windshield and rear glass, consists of two layers, between them there is an adhesive composition usually similar to a film. This is done so that the glass does not shatter into small fragments during an accident, but simply “crumples.”
In the usual version, there is nothing else inside, but in the heated glass on the middle film, small wiring of the heating element is installed, so small that they simply cannot be seen from a distance of half a meter (that is, they do not interfere with driving at all). As you probably guessed, an electric current is applied to them, they heat up and help defrost the entire glass. Very comfortably. But this is not implemented on all brands and models.
Therefore, the question arises, is it possible to install it yourself? It turns out that it is possible, there are several solutions to this issue.
Installation of various heating elements
If you want to install a heated windshield on your car with your own hands in the plane of the windshield wipers, it is not necessary to completely remove the windshield from the car. You just need to purchase warming tapes from a car dealership and stick them on the inside of the glass opposite the original position of the wipers. The leads for the heating connection wires can be routed under the plastic elements of the interior, so they will not spoil the overall appearance of the interior. Powering this windshield heating from the cigarette lighter would be the best option, since it can simply be removed in the summer.
Any heated glass
Yes, you heard right, this is the simplest and most effective way. The fact is that now many companies that make non-original spare parts have long been stamping glass with threads for almost any model, as a rule, these are Chinese companies.
In addition to purchasing and installing, you will need to install wiring and make a switch. But I think this is not a problem, many people use the heated rear window. That is, when turned on, both sides, front and rear, are heated at once. Of course, this is not cheap; for an ordinary foreign car of class “B” or “C” , it can reach up to 10,000 rubles. And if you install the original (this also happens - for example, on higher-level trim levels there are heating), then the price can reach up to 30,000 rubles and this does not take into account the work and electrical wiring! But we don’t care about winter! It is also beneficial in autumn weather, when the steles sweat.
How to properly warm up the car interior in winter
Motorists warm up their car not only because they are concerned about the performance of the engine and transmission, but also to warm up the interior in winter. Few people want to sit in a frozen car, especially when there is no heated garage and it has been sitting outside all night in the cold.
Sitting on cold seats is dangerous to your health. What if you have a large family and need to take your children to kindergarten or school? The question of how to warm up a car interior in a short period of time in winter becomes very relevant.
There are 2 ways to heat the car interior: the use of a standard heating system provided by the automaker (heater, climate control), and the use of additional equipment and systems.
The catch is that when buying a car, drivers often don’t look at the owner’s manual, so they simply have no idea how to properly work with the car’s heater. And with the onset of winter, you need to know this. You can often see cracks at the bottom of the windshield. Incorrect use of the stove usually leads to this.
How does a car heating system work?
It takes approximately 25-30 minutes for the engine to warm up to operating temperature, and because of this you have to drive the car when the car interior has not yet warmed up. What is this connected with? The fluid from the cooling system passes through the radiator, which is why the 2 systems are so closely connected to each other.
When the heater is turned on, air passes through the heater core and warms up. In a warmed form, it enters the salon. And if the engine has not had time to warm up, therefore the coolant is also cold, then the process of heating the car interior is delayed for a certain period of time.
How to warm up the car interior in winter without spending a lot of time on it, read on.
Strip heaters
However, if you put your hand on your heart, not all cars have such “lobovukov”, some cannot be found, even Chinese ones, for example, no matter how much I looked (for my Chevrolet AVEO ) I still couldn’t find it! Therefore, you need to be content with little.
By small, I mean heating the wiper area; if it is powerful enough, it contributes to the rapid thawing of the entire stele. So how to implement this?
Adhesive strips have been on the market for a long time, often transparent, but often not. We just glue them to the bottom near the panel, hide the wiring under the plastic, and again connect it to the rear heating.
Thus, the lower part, which is always covered in ice (snow), will quickly thaw, and then the rest of the canvas will be “finished off” by the car’s heater. Personally, I myself have seen this design many times, it works very effectively. It is also gratifying that our Russian manufacturers also produce, the strip does not take very much power - approximately 14 - 20 W, depending on the thickness and length. You can install it yourself, there is nothing complicated here, just glue it in the desired area and connect it.
The cost of a strip 350 mm long and 50 mm thick is 450 rubles, if the length is 550, the price is 600 rubles. I won’t give a link to the office, but our domestic manufacturer goes by the abbreviation “NSCHS”. Just type in the search - “ heated wiper zone NShchS”, dozens of sites will come up where you can order.
Windshield defroster
I don’t even know whether to write about this or not! I just feel like tomatoes are going to fly at me, but it’s worth mentioning. Nowadays there are simply heaps of all kinds of electric heaters, which supposedly can not only melt the windshield, but also warm up the interior of the car! I wrote about these here .
But in essence, the effect from them is modest, no, I won’t say that there is none at all, but in order for such a fan to melt glass even at minus 10 degrees, you need at least 40 - 50 minutes of work! And then it will be one zone, on the right or left, and not completely glass. It also cannot cope with heating the entire cabin - its power is about 300 W, and it does not work efficiently; warm air comes out, not hot. Therefore, I do not recommend it to you as the main “defrost” for the windshield, but as an auxiliary one, why not! I saw one of these truckers in his legs, and he says it helps a lot! Although it is noisy like a child.
Personally, I myself am thinking about stirring up something, but my choice will most likely fall on transparent strips - heated wiper zones; I can’t buy heated glass for my model.
Now let's watch a short video on the topic.
I’ll finish here, read our AUTOBLOG.
( 9 votes, average: 4.22 out of 5)
Similar news
Snorkel what is it? What are the difficulties in installing your own .
Dry fog for cars (treatment). What it is? And for what?
Restoring the leather on the steering wheel or how to paint it. Details + vi.
Add a comment Cancel reply
Comments
Good day everyone, I decided to write my review of the 2010 Toyota Avensis. Just want…
TOP articles for the month
I have many different articles and videos on various gearboxes, for example here...
I already have an article on the website about choosing memory cards (you can see it here), it’s very...
In the article - is it possible to open windows when the air conditioner is running (you can read it here), I was asked...
It’s a rare owner of an “old” foreign car, as well as a follower of the domestic auto industry, who is not familiar with a special winter tool (scraper and brush) designed to make it easier to clean the windshield from ice and snow. Equipping a car with a stove that provides highly efficient airflow and heating of windshield washer nozzles can significantly simplify this unpleasant process, but it requires significant fuel consumption and time.
But how can you quickly warm up a windshield when the heating efficiency is minimal and the outside temperature is quite low? Modern manufacturers of automobile glass offer a new product - a windshield heater. The following, quite convincing, factors speak in favor of the use of this device:
- reducing the heating time of car glass;
- high-quality removal of ice and snow from the glass surface;
- minimizing the risk of damage to the surface of car glass (scuffs, scratches) that is inevitable when performing mechanical cleaning using a scraper.
Thus, it is quite logical to say that a windshield heater is an effective means of high-quality preparation for safe participation in road traffic.
Placing a heating element on the bottom of the standard windshield can partially solve the icing problem. But this element can only be turned on if the temperature inside the car is above minus 15 degrees. Otherwise the glass will crack. The optimal solution is to install heating elements at the bottom of the glass and a fan heater.
Tips for safely transporting a child in a car
Let's look at a few simple tips that will help keep your child as safe as possible while transporting him in the car. Despite the fact that they are quite simple to observe, many parents often forget about them or do not pay due attention to them:
- The child must always be fastened with a seat belt. Even after reaching the age of 12 years. The same rule applies to adults, because they are the ones who set an example for children to behave on the road and instill the necessary safety skills;
- If the design of the car does not provide for the use of belts or other built-in safety systems, then a child may be transported in it without a child seat or other special restraint devices. But it is worth remembering that this is not safe in any case;
- When transporting a child, be sure to lock the door locks and power windows. Otherwise, the baby may accidentally press the buttons while playing. And unlocked doors can easily open on their own on sharp turns;
- In 2022, drivers may not be afraid to use child car seats when transporting minors, which are secured using the ISOFIX system, which does not require the use of standard seat belts. Previously, this could easily result in a large fine;
- Under no circumstances should you feed your baby on the road. This can cause serious stomach or respiratory problems. As a last resort, you can always stop for a while and eat in a calm environment;
- The vehicle interior must be clean and free during transportation. It is prohibited to transport large cargo in the car with a child. Sometimes even personal belongings can harm a child during an accident if they are not properly secured with seat belts;
- Don’t forget to take all the necessary medical supplies with you when traveling with your child. We are talking not only about a standard car first aid kit, but also about a wide variety of ointments, tablets and medical instruments that may be needed in case of unforeseen situations;
- According to new rules in 2022, the use of child seats and infant carriers is required only in cars and trucks. A number of clauses were removed from the traffic rules that obligated drivers to use child restraint seats for transporting children on mopeds, motorcycles, tractors and other non-standard vehicles;
- Never leave a child alone in a car, even for a short time. Otherwise, he may become very frightened, which will have a bad effect on his mental health. Not to mention the cases of road accidents involving stationary vehicles.
Installing a heating element on glass
Remove the front panel to expose the bottom of the glass. Clean the surface of the glass from dust and degrease. Glue one or two strips of heating element (depending on their size) to the glass opposite the wiper blades, following the instructions in the heater installation instructions. Connect the wires through which power will be supplied to the contacts of the elements. Connect the relay, fuse and power button, then connect the entire circuit to the vehicle's on-board network. If you don't know where exactly to get the voltage, contact an auto electrician. This will cost many times less than restoring a car after inept intervention.
Heated windshield wipers
The wiper area can also be equipped with another type of heating - this is heating of the elements themselves. With this option, they will clean themselves and help melt the snow. The control unit for the heating elements and the power supply must be connected to the vehicle's on-board electrical system or connected to the windshield heating from the cigarette lighter. This connection method is very convenient, since if the device fails, you do not need to tinker with the car’s wiring, but simply pull out the plug from the standard socket.
Heated elements are installed instead of the standard kit. Electrical wires from them can be routed through technological holes in the body. Then a wiper control unit is installed in the car interior under the dashboard, but it is better to place the power supply in the engine compartment. When installing wipers in the electrical circuit, it is important to install a safety element to avoid a possible short circuit.
Time relay
During severe frosts, it is necessary to turn on the fan heater first and only after 1-2 minutes the glass heaters.
This will prevent cracks from appearing. Therefore, it is necessary to use a time relay that will automatically regulate the order in which the heaters are turned on depending on the temperature in the cabin. Most car alarms with an autostart function support connecting a temperature sensor and installing an additional program. If you don't know how to do this, contact an auto electrician. If your alarm does not support this mode of operation, contact an auto electrician to assemble and connect a time relay. Components for such a relay can be purchased at any store that sells radio components.
Heated car glass
The main, or rather the only, distinctive feature of such a windshield is the presence of special filaments built into its thickness. The uniqueness of this development lies in the fact that the grid of filaments is practically invisible from the inside of the glass, that is, it does not interfere with the driver’s concentration and does not affect the degree of traffic safety. The correct operation of these threads, which are essentially heating elements, is ensured and coordinated by a special control unit of electromagnetic relays.
The modern market of automotive supplies and accessories offers a fairly wide range of not only ready-made heated windshields, but also universal kits that can, for example, provide effective heating of the windshield of a Kalina or any other domestic car. The main condition for the effective functioning of this equipment is a sufficient level of performance of the standard battery, since it is the only source of power for it (the equipment). That is, heating the windshield of a Priora, which has a “weak” battery that is not capable of providing additional load, will be unreliable.
Pros and cons of this heating
Like any device, heating the windshield in the windshield wiper parking area and around the entire perimeter has its advantages and disadvantages. Having compared these characteristics, motorists themselves have the right to decide whether to install them on their cars or not.
Advantages: the time it takes to prepare a vehicle before leaving is significantly reduced (snow, ice - all this disappears in a few minutes), excellent visual control of what is happening on public roads, the glass does not fog up on the inside and does not form frost even when idle.
Disadvantages: at first, the filaments are noticeable and distracting, sometimes you can’t get used to them. If the car’s battery is not fresh, it will discharge when the car is parked for a long time, so you need to watch and remember to turn off the heater unit.
Windshield heater design (built-in)
Currently, manufacturers offer two types of heated car windows:
Products whose heating zone is located in the area of the vehicle's windshield wipers.
Products whose heating zone occupies almost the entire area.
The offers of modern manufacturers are quite diverse and differ not only in the richness of configuration options, but also in a wide range of technical characteristics.
The system design usually consists of:
Two electromechanical type relays (capable of withstanding current up to 40 Amperes).