Payment for goods and downloading of the book in electronic form (PDF format) is made on the website.
To do this, you need to find the book you are interested in and click on the “Buy” button. The price of the book is indicated on the button.
For convenience, the price on the website for residents of Russia, Belarus and Kazakhstan is presented in rubles.
For residents of Ukraine in hryvnias, and for all other countries - dollars.
After clicking on the “BUY” button, a payment window will open where you can select a payment system with which you can pay for the selected book using any bank card (Visa, MasterCard, MIR, etc.)
When you click on the “Pay by bank card” button, the Portmone payment system will open, which is the easiest way to make a payment.
In addition, the website offers four payment systems for payment:
- Yandex (payment from any bank cards, Yandex Money account, QIWI Wallet, terminals, etc.);
- Portmone (payment from any bank cards, Portmone account);
- PayPal (payment from any bank cards, PayPal account);
- WebMoney (payment from any bank cards, payment from WebMoney wallets).
Payment via Yandex Cashier
After selecting payment via Yandex, the Yandex Cashier payment system will launch, where you need to select a convenient payment method (bank card, QIWI, Yandex Money account, etc.)
After specifying payment details and confirming payment, payment for the goods will occur.
If you have a bank card in a currency other than the ruble, then the money will be debited from the card at the rate of the Central Bank of Russia at the time of the purchase.
This payment method is optimal for residents of Russia, Kazakhstan and Belarus.
Official website of the Yandex Kassa payment system https://kassa.yandex.ru
Replacing steering shaft bearings VAZ 2110 1996
1. Disconnect the wire from the “–” terminal of the battery.
2. Remove the steering wheel (see subsection 5.3.1).
3. Loosen the bolt securing the base of the steering column switches and slide the base towards you.
4. Disconnect the wire from the oil pressure sensor.
5. Disconnect the two connectors with the horn wires from the contacts on the base and remove the base of the steering column switches.
6. Insert the key into the ignition switch and turn it to position I to unlock the steering shaft.
7. Disconnect the ignition switch wire block from the wiring harness. If the ignition switch wires are connected to the wiring harness with a clamp, cut or loosen the clamp.
8. The steering column is secured with bolts with break-away heads (the same as the ignition switch). If new bolts with breakaway heads are not available, you can replace them with regular M6 bolts 20 mm long.
9. Unscrew two nuts and two bolts with break-away heads, remove spring and special washers. If the bolt heads are stripped, the bolts must be drilled out or removed using a screwdriver and hammer.
10. Remove the steering column from the studs, slide it towards you and lower it down. Then remove the bolt securing the propeller shaft to the steering shaft.
11. Remove the bolt and remove the column assembly, while removing the thrust bushing from the shaft. 12. Press the steering shaft along with the bearing out of the pipe. It is recommended to press the shaft towards the steering wheel mounting.
13. Remove the front (steering wheel side) bearing from the shaft.
14. Replace the steering shaft if the splines or threads are worn or damaged.
15. Using light hammer blows and a drift, press the rear bearing out of the steering bracket pipe.
16. Before installing the bearings, check that they rotate easily and without jamming. The plastic bearing bushings must not be damaged.
17. Press the rear bearing all the way into the pipe collar using a suitable mandrel, applying force only to the outer race of the bearing. The bearing is mounted on a plastic bushing, which has a wide flange on one side. When installing the bearing, it is the wide flange of the bushing that must be directed outward.
18. Slide the front bearing onto the shaft with the wide flange of the bearing bushing facing the end of the shaft.
19. Insert the shaft into the pipe. In this case, the rear end of the shaft should enter the rear bearing.
20. Press the front bearing all the way into the pipe collar using a suitable mandrel, applying force only to the outer race of the bearing.
21. Install the steering column in the reverse order of removal. Install the thrust bushing on the shaft with the side with the larger diameter.
22. Install special washers for the bracket fastening bolts with their protruding part a in the opposite direction from the bolt head.
23. When installing the base of the steering column switches, before tightening the bolt securing it, adjust the position of the base on the steering column. To do this, install the lower casing and move the base so that the screw holes in the casing and the base match. After this, carefully remove the casing and tighten the base bolt. Install the steering wheel in the reverse order of removal.
Payment via Portmone
After selecting payment through Portmone, the payment system will launch, where you need to select the payment method: bank card or Portmone account.
The price in the Portmone payment system is converted into dollars at the exchange rate of the Central Bank of the country where you are located.
If you have a bank card in a currency other than the dollar, then the money will be debited from the card at the rate of the Central Bank of your country at the time of the purchase.
After specifying payment details and confirming payment, payment for the goods will occur.
Official website of the Portmone payment system https://www.portmone.com
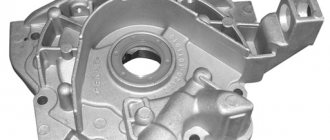
Short slats
In addition to the helical rack, with the release of the Kalina conveyor, so-called shortened racks began to appear on sale and in services.
The full rotation of the wheels is 3.1 revolutions . This gives a sharper steering feel, control is more precise and a little more informative. This rack also has a small disadvantage - the force on the steering wheel increases somewhat.
- The catalog number of the short rack for the VAZ-2110 is 11183-3400010-10 (11183-3400010-12) , the number of the gear rack itself is 11183-3401068-00 (11183-3401068-01) .
Shortened rail "Kalina Sport".
Catalog number on the rack body.
Steering gear 11183-3400010-10.
Payment via PayPal
After selecting payment via PayPal, the PayPal payment system will launch, where you need to select the payment method: bank card or PayPal account.
If you already have a PayPal account, then you need to log into it and make a payment.
If you do not have a PayPal account and you want to pay using a bank card via PayPal, you need to click on the “Create an Account” button - shown with an arrow in the picture.
PayPal will then prompt you to select your country and provide your credit card information.
After specifying the information required to make the payment, you must click on the “Pay Now” button.
Official website of the PayPal payment system https://www.paypal.com
Replacement and repair of main parts
When a malfunction is detected, you need to collect all the necessary parts and tools for the VAZ 2110. You will definitely need sets of screwdrivers and wrenches. It is also necessary to check the availability of socket heads, pliers, a metal brush and a special puller that is used to service the device. If it is not there, then a small crowbar or hammer will do as an alternative.
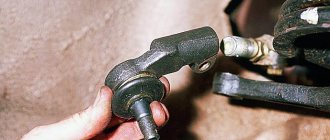
How to change tips and rods
Replacing tips and rods is as follows:
- The first step is to jack up the VAZ 2110 and remove the front wheel;
- The area where the rack tip attaches to the steering knuckle must be thoroughly cleaned, and then the nut must be treated with WD-40;
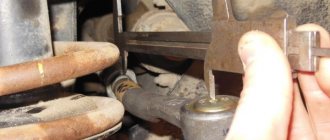
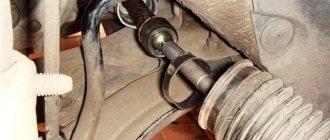
- Next, you need to remove the cotter pin securing the connection; for this you will need pliers;
Remove the wire fixing nut by pulling one end with pliers - After this, you need to remove the finger using a special puller, after unscrewing the nut;
- Once the pin is removed, the tips can be unscrewed and removed. They must be checked for defects and replaced if necessary;
Removing the finger - Having removed the tips, you should bend the plate at the bolt to get to the rod;
- The next step is to unscrew the rod bolt;
- Done, now the rod and its ends can be dismantled. Replacement is carried out in reverse order. After installing new parts, you need to check the steering wheel without completely assembling the entire steering mechanism. If everything works, the steering wheel does not move tightly and does not wobble, then assembly can be carried out.
Payment via WebMoney
After selecting payment via WebMoney, the payment system will launch, where you need to select the payment method: bank card or WebMoney wallet.
If you already have a WebMoney wallet, then you need to log into it and make a payment.
If you do not have a WebMoney wallet and you want to pay in another way, you need to select any of the methods that WebMoney offers and make the payment
After specifying payment details and confirming payment, payment for the goods will occur.
Official website of the WebMoney payment system https://www.webmoney.ru/
Step-by-step replacement of the steering column
Having decided to replace the steering column on a VAZ-2106 yourself, you need to stock up on free time and patience, and experts recommend performing this step in stages:
- The steering shaft, which is clamped in the column, should be carefully removed.
- Using a size 30 wrench and a long wrench, you should try to rip off the connecting nut that secures the steering column. It is not always possible to remove the fasteners the first time, but since this stage is mandatory, you have to return to it several times.
- The three fasteners that connect the column to the car body are unscrewed. It is most convenient to use a so-called ratchet for this process, since the bolts are not so easy to get to with a regular wrench.
- After unscrewing all the fasteners, you need to free the column from the tie rod splines, which continue to hold the assembly. To do this, you should pry the structure with a pry bar and try to knock it down with sharp jerks.
- After dismantling the unit, it is necessary to check the condition of the boot and oil seal; if even minor damage is detected during a visual inspection, these components must be replaced. By installing a new boot, the life of the bearing and shaft will be extended, and the new oil seal will not allow automotive lubricant to leak out of the steering column.
If all components are installed correctly, the car owner will replace the failed elements with high-quality and reliable ones, and the steering column will have a long service life.
To simplify the assembly process, experts recommend putting all the removed elements from the car in strict sequence, so that when assembling the structure, you don’t confuse anything and repeat the whole process again.
As you can easily see, the process of replacing the steering column of a VAZ-2106 is not that complicated, so every car owner can do it if he has the strength and patience and, of course, does all the work step by step. But if difficulties still arise when replacing a car element, it’s time to use the hint, which at a convenient time can be found in the video instructions on the Internet resource. The educational video lesson is conducted by qualified specialists who understand the intricacies of car repair and present their visitors with extremely effective and most necessary advice on the topic of interest to them.
Downloading a book
After successfully completing the payment (by any method) and returning to the KrutilVertel store from the payment system website, you will be taken to the successful payment page:
On this page you need to indicate your e-mail, where access to download the book will be sent.
If you are already registered on our website, then simply follow the link to your personal account.
The book you purchased will be in your personal account, from where you can always download it.
Please note that after making the payment, you need to return back from the payment system website to the KrutilVertel website.
If for some reason you did not return back to the site and closed the payment system tab with a message about the successful completion of the payment, please let us know - we will send you a letter indicating access to download the book.
Causes of malfunctions and diagnostics
Failure of rubber-metal joints can be determined by a number of signs:
- Steering wheel play. The steering wheel turns with greater effort, and its free play also increases.
- Alarming sounds that appear every time you turn the steering wheel.
- Difficulty controlling the car in turns.
- Uneven wear on the right and left front tires.
It is better to start inspecting the steering tips on the left side of the car. To do this, turn the steering wheel to the right all the way. It’s best if the car is standing on an overpass - it’s more convenient to inspect the part.
The first thing to check is the condition of the steering tip boot. If there is even the slightest crack on it, then the hinge must be replaced without question. Otherwise, dust that gets inside through it will simply make normal car control in corners impossible.
To examine the condition of the ball joints in more detail, place the car on a jack, lifting the left side so that the left front wheel rotates freely, and check the tip play. If a part is loose, this also indicates that it needs to be changed.
Problems when paying with bank cards
Sometimes difficulties may arise when paying with Visa/MasterCard bank cards. The most common of them:
- There is a restriction on the card for paying for online purchases
- A plastic card is not intended for making payments online.
- The plastic card is not activated for making payments online.
- There are not enough funds on the plastic card.
In order to solve these problems, you need to call or write to the technical support of the bank where you are served. Bank specialists will help you resolve them and make payments.
That's basically it. The entire process of paying for a book in PDF format on car repair on our website takes 1-2 minutes.
If you still have any questions, you can ask them using the feedback form, or write us an email at [email protected] .
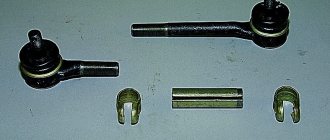
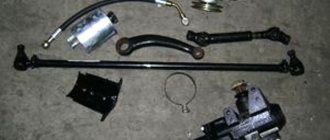
Old style VAZ 2110 steering rods
Good day everyone! The steering ends died, so I decided to change all the rod assemblies. A year ago, a mechanic I knew told me to install tie rods from a VAZ 2110, because there the adjusting rod is screwed into the rod itself and the tip, and is secured with two bolts.
Therefore, adjusting the toe on the 10th is easier and more accurate than on the original ones with 2 locknuts. And they are adjustable from below, and you don’t even have to open the hood.
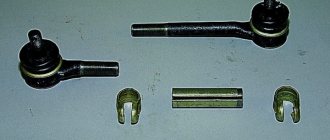
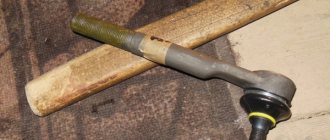
But there is one trick - we need internal rods from an old-style VAZ 2110 that fit on the “eight” rack. See photo for differences:
There were no problems during installation. I didn’t remove the rail, so it was difficult to push the rods into the boot, but I’ve already gotten the hang of it. After installation, I immediately went to the wheel alignment, although I measured the length from the old rods, the alignment was still out of order. Everything was adjusted at the wheel alignment, quickly and easily. And the tips were installed by Kalinovsky. If everything is installed correctly, then nothing will be affected. Some photos after a week of use:
In 1995, the Volzhsky Automobile Plant began producing a new model of the four-door sedan VAZ-2110. This model was initially created on the basis of the G8, but a large number of changes made distinguished this car into a separate class, which later served as the progenitor of several models of VAZ small cars.
The range of currently used spare parts is significantly influenced by design features and innovations introduced in a given car brand. The VAZ-2110 uses an electronic engine control system and for the first time introduced an on-board computer, which in this case acts as a diagnostic unit. Such innovations led to a significant increase in the number of sensors used in cars, the quality of which left much to be desired. Until now, the problem of failure of the VAZ-2110 diagnostic system is quite acute. A positive aspect of introducing innovations in car design is the use of galvanized metal, which increased the service life of body parts. The needs for these types of parts directly depend on the regional location of the vehicle and increase when moving to the northern regions.
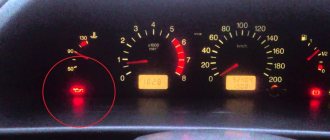
Checking the oil level in the steering column on a VAZ 2101-VAZ 2107
Welcome! Steering column - thanks to it, both front wheels of a rear-wheel drive car of the “Classic” family are turned. In order for the steering wheel to rotate well and with little effort, the steering column is constantly lubricated with oil located inside it. But like any other oil, the oil inside the steering column disappears over time, and therefore its level must be constantly monitored and topped up whenever possible. You can find out how to check the oil level below.
Note! To check the oil level in the steering column, you will need to take: “8” wrenches, and also, just in case, take with you a funnel, clean oil and a brush or just a rag!
Where is the steering column located? Most likely, you have already seen where the steering column is installed, and more than once, because it is located in almost the most visible place, namely in the engine compartment of the car, on the left side (Indicated by a red arrow), and just above the steering column is the main brake cylinder on the photo indicated by the blue arrow.
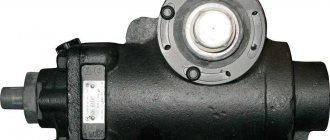
How does the steering mechanism work?
Steering
injury-proof, with a height-adjustable (tilt-angle) steering column, and a rack-and-pinion steering mechanism.
Steering gear
assembled with steering rods, it is attached in the engine compartment to the front panel of the body on two brackets using brackets 2 (Fig. 1). The mechanism is secured with nuts on welded bolts through rubber pads (supports) 3.
A drive gear is installed in the steering gear housing 5, which meshes with the rack.
The steering shaft consists of an upper 14 and an intermediate 10 shaft, connected to each other by a cardan joint. The intermediate shaft is connected to the drive gear by a flange through an elastic coupling. The upper shaft is installed in the bracket pipe 21 on two ball bearings with elastic bushings on the inner ring.
Fig1. Steering parts: 1 – inner tie rod ends; 2 – steering gear mounting bracket; 3 – steering gear support; 4 – spacer ring; 5 – steering mechanism; 6 – sealing gasket; 7 – thrust plate of the seal; 8 – seal; 9 – lower flange of the elastic coupling; 10 – intermediate steering shaft; 11 – coupling bolt; 12 – spacer sleeve; 13 – facing casing (upper part); 14 – upper steering shaft; 15 – steering wheel; 16 – signal switch cover; 17 – adjusting sleeve; 18 – steering column position adjustment lever; 19 – retaining ring; 20 – facing casing (lower part); 21 – steering shaft mounting bracket; 22 – steering shaft bearing; 23 – adjusting rod; 24 – outer tie rod end; 25 – spring ring; 26 – protective cap; 27 – sealing ring
At each vehicle maintenance check the condition of the protective cover, the protective caps of the 26 linkage joints and the tightness of their fit. They must be replaced if there are cracks, ruptures or other defects that impair their tightness.
Make sure that the steering wheel spoke is horizontal when the vehicle's wheels are straight. Otherwise, determine the cause of the problem and correct it.
Turn the steering wheel from lock to lock and check visually and audibly:
- reliability of fastening of the steering mechanism and steering wheel;
- is there any play in the rubber-metal joints, in the steering rod joints, as well as in the rivet and spline joints of the elastic coupling of the steering shaft;
-reliability of tightening and locking the bolts securing the rods to the rack and the nuts of the ball joint pins;
- are there any jams or obstacles that prevent the steering wheel from turning?
If knocking or binding is detected, disconnect the tie rods from the swing arms of the telescopic suspension struts and recheck. After confirming that the knocking and sticking noise is coming from the steering, remove the steering gear from the vehicle for repair.
The maximum permissible gap between the stop and the nut is 0.2 mm. If necessary, replace worn parts and adjust the gap between the stop and the nut.