A car spoiler - not all people like it, some people want to remove it and close the holes where it was attached with ordinary plugs, but some people really like this thing and when it becomes deformed, they go and immediately buy a new one, but just how to remove the old one and Not everyone knows how to install a new spoiler in its place, which is why we wrote this article in which we explained in detail the process of replacing this unit.
Note! In order to replace the spoiler with a new one, you will need to stock up on: A wrench of approximately “8” and approximately “10”, a screwdriver, and it is also recommended to stock up on gloves because the spoiler is still dirty and when removing it you can get your hands dirty on it, but if this is not important to you, then in this case you don’t have to use gloves!
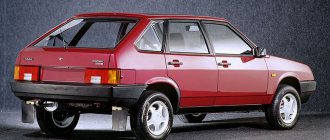
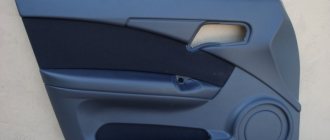
What does a car look like with and without a spoiler?
This question is asked by many car enthusiasts, because it is not clear how the fourteenth car will look, for example, without a spoiler or if a spoiler is installed on it. For a clear example, we took two different cars, but they are almost the same color and have an almost standard look, but only on one The car has a spoiler installed, but the other one does not, so it’s up to you to decide what will be best for your car!
How to install a spoiler on 2114, following technology
To improve the aerodynamic performance and appearance of the car, and save fuel, special devices are used - spoilers.
There are, of course, car enthusiasts who are indifferent to them. However, many car owners are interested in the question of how to install a spoiler on a 2114, because it was not included in the package, and for some it needs to be repaired or reinstalled. Removal: 1) At the very beginning of the operation, open the trunk of the car and then take a screwdriver in your hands and use it to pry off about 10 pistons that secure the trunk lid trim and after prying, remove the lid from the door as shown in the small picture just below:
2) Then, along the entire trunk lid, find two nuts (One of the nuts is shown in the photo below) that secure the pressure plates (One of the plates is indicated by an arrow) and then completely unscrew both nuts and, after unscrewing, remove the pressure plates that are secured with these same nuts.
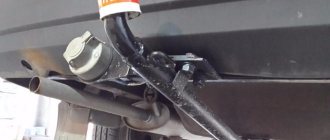
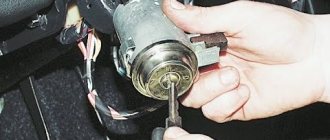
3) After the nuts that secure the plates are unscrewed, take a wrench in your hands and use it to completely unscrew the nut that secures the trunk lock (This nut is indicated by an arrow) and under this nut you will find a wire that goes to ground, so thanks to this When braking, the wire turns on an additional brake light, which is located in the spoiler, you will need to remove this wire from the stud and then either tighten the nut back (This is the case if you are no longer going to install a new spoiler) or simply leave the nut loose and When installing a new spoiler, put the wire that will go from it to this very stud and then tighten the whole thing with a nut.
Note! In all cases when you work with electronics, it is recommended to de-energize the battery to prevent a short circuit from water getting on the wiring, for example, so before you start unscrewing this nut, we recommend that you remove the negative terminal from the battery! (For information on how to remove the terminal, see the article: “Replacing the battery,” point 1)
4) Now look for the positive wire thanks to which the brake light works when braking, which is built into the rear spoiler, so the positive wire is made in the form of a block of wires, so when you find the block of wires and the connector with which it is connected together, grab them with both hands and disconnect from each other.
5) And at the end of the operation, using a wrench and a socket head, or using just a wrench or a spanner, completely unscrew the two outermost side bolts as shown in the figure below, which secure the spoiler in the side part, and after they are turned out, remove the clamping brackets that will secure these bolts (Removing the clamping bracket in the photo below is shown using the example of the left bolt, that is, in the main photo the bolt is unscrewed, and the small photo shows how the bolt is removed together with the clamping bracket).
Installation: The new spoiler is installed in its place in the reverse order of removal; when installing, be sure to put on all the wires and connect the connector and wire block together, otherwise the brake light will not work when braking.
Note! When installing a new spoiler, we recommend that you lubricate with some anti-corrosion substance, for example with Movili or with anti-corrosion Primer, all those parts where the spoiler will fit when you install it in place.
Dismantling
The removal process is very simple, and anyone who is interested in how to remove a spoiler on a VAZ 2114 will receive comprehensive answers to all questions.
- Open the trunk.
- Using a screwdriver, pry out the pistons for fastening the trunk trim.
Removing the Sheathing Fastener
- Remove the door cover.
- Locate the two nuts that secure the clamping plates to the trunk.
Removing the pressure plates
- After unscrewing both nuts, remove the pressure plates.
- Unscrew the nut securing the trunk lock.
- Remove the brake light wire from the stud under the trunk lock nut.
Removing the ground wire from under the lock nut
- If you do not install the element back, tighten the nut.
- If you are installing a new spoiler, tighten the nut slightly. When installing, place the wire on the stud and tighten the nut.
It is recommended to disconnect the battery from power to avoid short circuit. To do this, simply remove the negative terminal from the battery.
- Locate the positive wire to the brake light. It looks like a block of wires. Having found the block and the connection connector, use both hands to separate them from each other.
Disabling the pad
- Remove the two outer side bolts that secure the spoiler to the side.
- Remove the clamping brackets securing these bolts.
Removing the Brackets
- If you decide to remove the element from the car, you need to weld the technological holes or put plugs on them and mount an additional brake light.
What does it look like?
Large spoilers affect the aerodynamic performance of the car. Thanks to these devices, the car is able to reach high speeds while driving and consume fuel more economically. Motorists often use rear and front spoilers.
The choice depends on the driver's preference and expected result. It is necessary to pay attention to the material from which this part is made. Often, car enthusiasts install a decorative rear spoiler, which only helps to change the appearance, but does not affect the speed and other parameters of the car in any way.
Tuning VAZ 2114
To properly fix the spoiler, it is recommended to adhere to the following sequence of work:
- The length and width of the trunk are measured.
- Make marks with a marker in those places where there will be a fastening connection between the device and the car body.
- After drilling the holes, remove the chips and paint the edges to avoid rust in the future.
- Install the brackets into the hole and secure the fixture using nuts and bolts.
- If using a decorative option, it is perfectly acceptable to use an adhesive instead of drilling.
Features of this tuning
The brake light in the spoiler has a number of advantages:
- It's stylish, that's why they buy spoilers. Without a spoiler, the VAZ looks like a simple classic car, even a kind of retro, but with a spoiler it looks quite original.
- The spoiler best conveys the stop signal, and you can come up with any animation that attracts attention, but you need to be careful with this.
- The spoiler has a low price, and almost every driver can install it independently.
- The spoiler is installed once for many years, so it is beautiful and profitable.
- The brake light on the spoiler is more visible, so even from a road safety standpoint, the spoiler wins.
Spoiler installation steps
In order for the installation of the part to be successful, it is necessary to act according to a clearly drawn up plan.
- If you purchased an unpainted part, it must be painted in the body color before installation. Doing this yourself is very problematic; it is recommended to turn to professionals.
- When the spoiler has acquired the desired color, you can mark the place for its attachment. To do this, attach the part to the vehicle body in the place where it will be mounted. Make sure that all marks are even and parallel. If you are sure of the accuracy, then mark the locations of the mounting holes. The appearance of the entire structure will depend on how accurately you do everything.
- If your “fourteenth” does not have holes for the spoiler (this happens in some trim levels), then you will have to make them yourself. To do this, use a small diameter drill. When you are sure that the holes are drilled correctly, you can take a drill of the required size. At this stage it is very important to act slowly, measuring all sizes. It will be difficult to redo bad work. When drilling holes, make sure that the tool is perpendicular to the trunk. This will allow you to control the size of the holes. Iron shavings are generated during operation. Get rid of it with compressed air or using a vacuum cleaner. The main thing is not to use your hands, as you can not only get hurt, but also damage the paintwork of the car. To prevent the holes from corroding, treat them with a special compound.
- Now you can attach the wing to the VAZ. Usually the spoiler comes with all the necessary elements for fixation. If you don't have them, then learn that you will need polypropylene washers, bolts and plugs. The washers are placed under the holes, and only then the spoiler is mounted on the bolts.
- The last stage is the installation of decorative plugs.
The spoiler is installed (see photo). A few more tips:
- to secure the part as securely as possible, use hex nuts;
- if there are no washers in the kit, you can use a leather or rubber gasket;
- If you do not want to drill holes in the body of your vehicle, you can use special glue. It will completely replace the bolts, although it will take 2 days to dry.
Return to contents
Best deals
front bumper VAZ 2115 milky way 606
Catalog number: 2115-2803012-606
Standard price:
3500.00 rub. Your price
Price For registered:
3250.00 rub.
Front bumper Datsun On-Do ice (C03G)
Catalog number: 626515PA0D-C03G
Standard price:
5180.00 rub. Your price
Price For registered:
4810.00 rub.
front bumper LADA 2170 Priora Robin Hood 391
Catalog number: 2170-2803012-391
Standard price:
3400.00 rub. Your price
Price For registered:
3200.00 rub.
Front bumper Hyundai Solaris (2010-2014) color Black pearl MZH Phantom Black
Catalog number: 86511-1R000-MZH
Standard price:
3000.00 rub. Your price
Price For registered:
2900.00 rub.
hood VAZ 2110 amulet 371
Catalog number: 2110-8402010-371
Standard price:
11250.00 rub. Your price
Price For registered:
10800.00 rub.
front left fender VAZ 2110 regatta 412
Catalog number: 2110-8403015-412
Standard price:
2900.00 rub. Your price
Price For registered:
2800.00 rub.
Withdrawal procedure
- Remove the trunk door trim.
- Disconnect the wires of the additional brake light.
It is possible that on cars of early years of production you will have to unscrew the nut securing the ground wire of the additional brake signal from the stud securing the trunk door lock.
3. Using a 10mm socket wrench, tighten the 2 spoiler mounting nuts on the right.
4. We also unscrew the 2 nuts on the left.
5. Remove the spoiler from the car.
On cars of early years of production, the spoiler was attached differently. On them, in the door cavity there were only 2 fastening nuts. From the sides, the spoiler was held on the trunk door using 2 pressure plates. Therefore, to remove the spoiler, you first need to unscrew the plates and then the 2 nuts in the door cavity.
6. Install the spoiler on the car in the reverse order.
How to replace a spoiler on a VAZ 2113, VAZ 2114?
1) At the very beginning of the operation, open the trunk of the car and then take a screwdriver in your hands and use it to pry off about 10 pistons that secure the trunk lid trim and after prying, remove the lid from the door as shown in the small picture just below:
2) Then, along the entire trunk lid, find two nuts (One of the nuts is shown in the photo below) that secure the pressure plates (One of the plates is indicated by an arrow) and then completely unscrew both nuts and, after unscrewing, remove the pressure plates that are secured with these same nuts.
3) After the nuts that secure the plates are unscrewed, take a wrench in your hands and use it to completely unscrew the nut that secures the trunk lock (This nut is indicated by an arrow) and under this nut you will find a wire that goes to ground, so thanks to this When braking, the wire turns on an additional brake light, which is located in the spoiler, you will need to remove this wire from the stud and then either tighten the nut back (This is the case if you are no longer going to install a new spoiler) or simply leave the nut loose and When installing a new spoiler, put the wire that will go from it to this very stud and then tighten the whole thing with a nut.
Useful video
Published January 25, 2018
Welcome! A car spoiler - not all people like it, some people want to remove it and close the holes where it was attached with ordinary plugs, but some people really like this thing and when it becomes deformed, they go and immediately buy a new one, but just how to remove the old one and Not everyone knows how to install a new spoiler in its place, which is why we wrote this article in which we explained in detail the process of replacing this unit.
Note! In order to replace the spoiler with a new one, you will need to stock up on: A wrench of approximately “8” and approximately “10”, a screwdriver, and it is also recommended to stock up on gloves because the spoiler is still dirty and when removing it you can get your hands dirty on it, but if this is not important to you, then in this case you don’t have to use gloves!
What does a car look like with and without a spoiler? This question is asked by many car enthusiasts, because it is not clear how the fourteenth car will look, for example, without a spoiler or if a spoiler is installed on it. For a clear example, we took two different cars, but they are almost the same color and have an almost standard look, but only on one The car has a spoiler installed, but the other one does not, so it’s up to you to decide what will be best for your car!
Repair of spoiler VAZ 2114
Removing rust
The rusted areas are cleaned with sandpaper, treated with a rust converter, washed and painted.
During repairs, special plugs are installed in the technological openings of the trunk. Sometimes these holes are simply temporarily sealed with regular tape.
Repair work
Do-it-yourself spoiler repair is often accompanied by filling its interior with polyurethane foam. This is done to give the structure additional rigidity and strength. Before filling with foam, the spoiler is wrapped with cling film and tape to protect it from swelling.
To maintain the possibility of replacing the brake light and wires, the wires are passed through the corrugation and then the internal cavity is filled with foam. In the areas of attachment to the trunk, cones are cut out of the foam into which bolts are inserted. Then the cones are filled with epoxy or buried with superglue.
Since the plastic is the thinnest at the points where it is attached to the body, the spoiler protrusions for fastening are often reinforced by filling them with epoxy resin, and long bolts with washers and nuts are used as fasteners. In this case, a strong trapezoidal base is obtained in which the mounting bolts are located.
After the bolts are placed in the spoiler protrusions, they are filled with plastic shavings dissolved in acetone with added superglue for additional strength. Sometimes the bolts are buried with molten plastic. The plastic is melted with a lighter directly above the bolt.
Then, according to the instructions, prepare the epoxy resin for pouring, mixing it with the hardener. There are options for filling through a syringe; in this case, an additional technological hole is drilled. Epoxy is poured into the additional hole, and plugs are placed on the bolts and secured with superglue.
Epoxy resin gets very hot when interacting with the hardener. If you protected the spoiler from contamination by wrapping it in cling film, the film may melt to its body. It is necessary to provide for the possibility of ventilation of overheated areas.
Sometimes, for strengthening, the entire internal cavity is filled with epoxy resin, and not just vulnerable fastening points. After pouring, the protruding excess is cut off and sanded.
If areas at the fastening points are broken, a suitable piece of plastic is attached to the bolts on the sides to the remaining plastic on the bolts.
Repair stages briefly:
Preparatory work
We clean the fifth door and spoiler from dust and dirt.
Assembling the repair kit:
- polyurethane foam;
- glue-sealant (superglue);
- latex gloves;
- epoxy resin;
- syringe;
- rust converter;
- sandpaper;
- a set of keys, screwdrivers, ratchets and drills;
- corrugation for brake light cable;
- bolts M6*60;
- washers;
- nuts;
- new spoiler.
Repair of spoiler VAZ 2114
- rust in places where it is attached to the trunk;
- an attempt to open the trunk using the spoiler as a lever;
- Damage or tearing out of fastenings to the trunk.
Removing rust
The rusted areas are cleaned with sandpaper, treated with a rust converter, washed and painted.
During repairs, special plugs are installed in the technological openings of the trunk. Sometimes these holes are simply temporarily sealed with regular tape.
Interior improvement
Changes in the interior of the VAZ 2114 are no less varied than improvements in the appearance of the car. Here everything is subject to tuning: from the rear-view mirror and gear knob to sound insulation and the steering wheel.
The simplest tuning performed at home or in the garage are:
- installing an armrest;
- replacing the rear view mirror;
- installation of attachments for mobile phones;
- decorations.
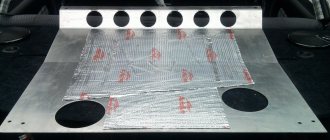
Do-it-yourself comprehensive tuning of the VAZ 2115 interior requires time and money. Everything is removed from the interior: from the seats to the instrument panel. After this, the surfaces are glued with vibration-proof sheets. This ensures silence in the cabin.
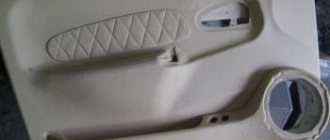
The next stage is the trim of the doors and the entire interior. You can cover the inside of the car with anything: from fabric and leatherette to leather-suede. After the trim, the audio system and instrument panel are installed. The dashboard can be either regular or replaced with a more pleasant-looking panel.
After the instrumentation, seats are placed in the cabin. Any suitable size can be installed.
As part of tuning, you can install a sports steering wheel on your car, but such changes may raise questions among traffic police officers.
As an additional improvement to the visual component of the VAZ 2115 car, you can use LED lighting for the underbody, trunk and interior.
Chassis
Improving the chassis of a car will not change its appearance in any way, but will significantly improve its dynamic properties and behavior on the road. It is divided into 2 types:
The first improves the driving characteristics of the car, allowing it to move quickly along city streets, the second reduces fuel consumption. The main systems subject to tuning are the engine and chassis.
Suspension
Tuning the VAZ 2114 suspension includes both calibration of the entire system, wheel alignment of the car, and modernization of individual parts:
- replacing springs;
- shock absorber tuning;
- installation of anti-roll bar.
These details will increase driving comfort and also improve the car’s behavior on the road: the car will rock less and will not roll during sharp turns.
Engine
Tuning a VAZ 2113, 2114 or 2115 engine is a rather complicated, but feasible undertaking. To slightly increase the power of the machine you need:
- reflashing the control unit;
- increasing the cylinder diameter by boring.
To achieve a more significant effect, it is necessary to change the cylinder block that distributes the gas. Taken together, these changes are considered safe; they will help increase engine power by up to a third.
Among the more effective, but risky methods is installing a turbine and replacing the crankshaft with a new one, with an increased piston stroke. This will reduce the operating time of the car, but can lead to its rapid breakdown.
Body
The simplest tuning of the body of a VAZ 2114 car is painting the body in unusual colors or using stickers. The game of contrasts will make the car catchy and noticeable while driving. When repainting, it is important to coordinate the actions with the traffic police, because the color of the car is listed in the documentation.
An interesting detail of the car modification are the air intakes. Changing the appearance of the hood and roof will not improve the driving performance of the car, but will make its appearance even more unusual.
A rarer, catchier option is “lambo doors”. Car doors that open upward will not go unnoticed. The operation is quite difficult, the main thing is not to forget about adjusting the gaps.
Optics
After repainting, tuning the headlights will help make the car look unusual, and sometimes improve driving comfort at night. You can paint the lamps yourself, install LEDs and lenses in them. For those who don’t want to bother, there are factory headlight options for the VAZ 2113-15 that differ from the standard ones.
What to pay attention to
The brake light in the bumper must perform its function as correctly as a regular VAZ-2114 brake light. This kind of tuning can attract attention with its unusual animation. Drivers and other road users may pay more attention to this animation than to the actions of the driver himself in terms of actual braking on the highway. Therefore, not everyone has time to immediately assess the situation and may confuse turning with braking. In this case, a traffic accident may occur.
When you press the brake pedal, all the brake light bulbs should light up at the same time in order to attract the attention of the driver behind as much as possible, and only then you can turn on the necessary animation for visual display. Basically, for drivers, the brake light performs a completely different function.
If the driver makes a turn, he must first slow down before turning in the direction he wants, after which the brake light comes on. For safety, it is recommended to turn on 2 animations at once for at least 2 seconds, so that other drivers understand that the car will first slow down and only then turn. Many people act differently: first they turn on the turn signal, then they brake, so it is not always clear that the driver will brake or turn, because the flashing turn signal is difficult to see on the LEDs, although it is on.
Running turn lights can look more impressive if the animation speeds up towards the end of its action. This gives great elegance to the spoiler, but also adds attention to other road users. With such turn signals, it is clear that the driver is already turning in the right direction and has already finished braking.
As a rule, all these subtleties decorate a car on the road, but many drivers believe that these “things” are a threat to traffic and can lead to a traffic accident.