Today I would like to share my personal experience with minor modifications to the dashboard.
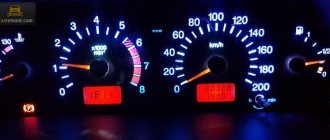
I think many owners of nines of the VAZ family are familiar with the problem of insufficient brightness of the standard instrument panel lighting. Personally, the panel in my car also spoiled my nerves by constantly losing contact in the flexible backlight board.
The modification method is quite simple and requires a minimum of investment.
So, what was required for modification: 1. 1/4 meter of LED strip (in my case it is SMD3528); 2. two pieces of wire 10 - 15 cm long (preferably multi-colored); 3. soldering iron (and the ability to work with it); 4. a small amount of any glue (PVA and silicate are not advisable); 5. skill and patience:)
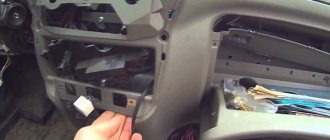
First of all, we dismantle the panel. On top it has a lampshade, into which standard lighting bulbs are inserted, connected by a flexible board. The flexible board, in turn, is screwed with two screws to the board on the back side. We take out the light bulbs and leave them until better times, take out the flexible board, having first unscrewed the contact screws, and throw it in the trash.
The lampshade itself is point-fused to the panel body. We carefully pry it away from the body, trying not to break it, we will need it later. There is a diffuser glass under the lampshade; we leave it in place, otherwise only part of the panel will be illuminated.
We take the LED strip and solder the + and - wires to it. Glue the tape in the center of the lampshade on the inside. Glue it right in the center! Otherwise, the illumination will be uneven at the top and bottom of the panel. The tape has a self-adhesive base, but personally, to be safe, I added a couple more drops of superglue. We take the wires out through one of the holes from the former standard light bulbs. It would be a good idea to seal the remaining holes with something to prevent dust from getting inside the lampshade. I just covered them with regular electrical tape.
We return the lampshade to its place and glue it with glue. I used “liquid nails” - drop by drop onto the former fasteners. You can use a glue gun.
Next, we solder the wires to the board (do not confuse plus and minus - THIS IS IMPORTANT, unlike standard lamps). The negative is on the same track where the wire from the negative terminal of the tachometer is soldered. You can, of course, fasten the wires to the tracks with standard screws, but here you need to take into account two points: firstly, the connection is not as reliable as with soldering, and secondly, they burst when tightened (they were too weak, or there is strength - no need for brains :).
Replacing Light Bulbs in the Dashboard of a VAZ 2109 ~ VESKO-TRANS.RU
Replacing light bulbs in the dashboard of a VAZ 2109 Currently, I notice that all new foreign cars have only LED light sources instead of conventional incandescent lamps in the rear lights as brake lights, side lights, and turn indicators. As it turns out, this is no coincidence. According to research, using LED brake lights instead of conventional incandescent lamps gives the driver behind the vehicle additional moments to maneuver or make emergency braking. During this time, a car moving at a speed of 100 km/h travels 5-6 m. The fact is that an incandescent lamp takes about 0.3 seconds to achieve full brightness, while an LED lights up almost instantly, in about 70 nanoseconds I think the order of these numbers says a lot. Also, LEDs are better than incandescent lamps in terms of specific light output per watt of power and service life. Thus, the time between failures for LEDs is approaching 100,000 hours versus approximately 2000 for incandescent lamps.
Also, incandescent lamps usually fail not because the filament burns out, but because of exposure to strong vibrations, especially given the quality of our roads.
They are completely immune to this kind of influence, which gives them a serious advantage when used in cars. Next, we will consider the types of lamps used in the VAZ 2109 car, and what LED lamps suitable for replacing them exist. AKG 12-60/55 (60/55 W) These are halogen lamps, they have two spirals of low and high beam, H4 base. Installed in car headlights.
Although LED analogues exist, when installed, the headlight light will not satisfy existing requirements (a beam of light of a given shape is not formed), the headlights will shine anywhere and can blind oncoming drivers, so they should not be used.
Lamps with a colored bulb (blue, yellow) change the color of the beam, and under certain conditions, for example in rainy weather, visibility deteriorates. A 12-21-3 (21 W) The most common type of lamps in front-wheel drive VAZs.
How to replace the dashboard lights of a VAZ 2109
This video shows the removal and installation of a VAZ
21093i,
replacing
dashboard
bulbs
.
VAZ 2109 Replacing backlight bulbs in the instrument panel
If one or more light bulbs
in the instrument panel have stopped functioning, it is necessary to check the integrity... Installed in brake lights, turn signals, rear fog lights, reversing lights. For replacement, there are various LED lamps based on SMD LEDs. A 12-10 (10 W) Used in rear dimensions. As a replacement, you can try lamps with a suitable base on SMD LEDs. A 12-4-1 (4 W) Used in headlights as, as well as for...
To replace them, there are many LED lamps, with different numbers of LEDs.
There are even LEDs, the color of which is almost indistinguishable from incandescent lamps. When choosing an analogue, you must ensure that the LED lamp fits in its standard place. A 12-1. 2 (1 W) This lamp is used for buttons on the instrument panel. To replace them, there are many LED analogues of various colors. It is better to choose analogues with one SMD LED (larger area and brightness of the glow). You can find out more about this modification of the instrument panel backlight. AS 12-5-1 (5 W) These lamps are installed in the lampshade and rear license plate lights. There are many LED analogues to replace them. To increase brightness, you can install a lamp with 6-9 LEDs in the interior.
To illuminate the number, any with suitable dimensions and sufficient (but not excessive) brightness. A 12-5-2 (5 W) Used in turn signal repeaters, as well as in a portable lamp. For turn signals, you can find LED lamps with a similar base.
A 12-5 (5 W) Used as a lamp for lighting the engine compartment. This is its only use in the VAZ 2109. Any LED lamp with an appropriate base is suitable for replacement. AMN 12-3-1 (3 W) Used only for illuminating the cigarette lighter socket. Any LED bulb with the appropriate base will be suitable for replacement. Lamps in fog lights P If your VAZ 2109 is equipped, then they have halogen lamps with a power of 55 W. There are LED analogues for them too, but you can’t get the same brightness as from halogens. However, they can only be used as...
Why doesn't it light up?
- First, remove the cover of the mounting block and make sure that the fuse is intact. The fuse markings are located on the inner surface of the cover. You should look for fuse F16 or F5, depending on the year of manufacture of your VAZ 2109.
- If the fuse is intact, be sure to check whether the contacts of the fuse you are looking for have not oxidized. It is not uncommon for shields to fail due to broken contact.
- Check if there is power to the dashboard. To do this, you will need a warning light and the ignition on. Disconnect connector X4 in the mounting block and check for voltage at pin 3. The disadvantage of the VAZ 2109 design is that when it rains, the mounting block immediately becomes wet. This causes oxidation of the contacts in the pads, which causes the electrics to stop working. Sometimes not only the contact is oxidized, but also the board of the Nine mounting block.
If none of the above actions yielded results, you will have to be disappointed. After all, now you need to remove the dashboard and check the condition of the wiring, contacts, and negative connections. Here it is better to trust a professional electrician or set aside a whole day to troubleshoot problems yourself. There is no need to rush here.
Replacing the Dashboard Lights of a VAZ 2109 ~ AUTOTEXNIKA.RU
Repair of a high panel VAZ 2109 So, you have a need to remove the instrument cluster on a VAZ car with a recently appeared high panel.
First, we disconnect the negative cable from the battery. Replacing the ignition switch of a VAZ 2109 - YouTube. Replacing lamps in the dashboard Styling the interior lighting of the VAZ 2110, replacing light bulbs. Replacing the steering rack on a VAZ 2109 - LuxVAZ. Next, we also disconnect the speedometer cable from the corresponding drive located on the gearbox.
Now you can remove the switch that regulates the outdoor lighting by prying it up with a screwdriver. And you can now disconnect the connector from the switch and push it straight into the trim
dashboard. Well, in order to replace the lamp that illuminates the switch, you need to squeeze using a screwdriver
antenna from the socket.— Continue, removing both the socket and the lamp from the switch. — We remove the lamp from the socket. — We pry it with a screwdriver and take out the emergency light switch. After disconnecting the connector from the switch, you need to push it deep into the trim
instrument roompanels. Now you will need a Phillips screwdriver. With its help you will unscrew a pair of fastening screws of the instrument console trim panels
. Replacing a light bulb in a panel of light bulbs in a panel in the dashboard. Well, we remove the trim. Now we turn to the cigarette lighter, removing the heating element, and also remove the ashtray directly from the socket.
Now let’s look around: if you are the happy owner of a receiver in your car, don’t hesitate to remove it to remove the box from the vacated slot.
To dismantle instruments, you can use two methods: 1. You can remove from the dashboard
shield. 2. Or remove the panel trim along with the shield.
How to replace the dashboard lights of a VAZ 2109
This video shows the removal and installation of a VAZ
21093i,
replacing dashboard bulbs.
VAZ 2109 replacing backlight bulbs in the instrument panel
If one or more light bulbs
in the instrument panel have stopped functioning, it is necessary to check the integrity. SO, LET'S REMOVE THE INSTRUMENT
PANEL PANEL . There are two ways to dismantle the instrument cluster: remove the panel panel or remove the panel
assembly with the panel.
We remove panel panel.
—Again, using
a screwdriver,
you need to press out 2 spring brackets.
All this is done through the radio socket. - Using the same screwdriver, you need to press out the plastic antennae (two) directly to the dashboard . - We lift the panel, after which you will have to press out the remaining third fastening bracket. - Now we disconnect the connectors from the cigarette lighter, as well as all forms its illumination, after which you need to remove the dashboard panel.—
We attach plastic antennae, as well as spring brackets, to the dashboard trim.—
When dismantling the trim together with the shield on both sides of the panel
, you need to remove the side nozzles of the ventilation system.— Take a Phillips screwdriver to unscrew one self-tapping screw on each side from the side fastening of the cover. — Now you need to unscrew 1 self-tapping screw of the main fastening from the cover, again through the radio socket. After pressing out the antennae of the lower fastening of the shield (lower), you need to remove the cover together with the shield. To replace the lamp illuminating the switch, it is necessary to remove the socket together with the lamp from inside the shield, turning it in the holder.
Well, to replace the backlight lamp for the cigarette lighter, squeeze the antennae of the cartridge holder and remove it from the device.
— Squeeze the “petals” of the cigarette lighter... — Pull it out, and then remove it from the dashboard trim
.—Using a Phillips screwdriver, you need to unscrew both screws directly to
the panel. —Now move the combination away from the dashboard
. Your next action will be to unscrew such an element as the cable union nut on the speedometer.
That is, of course, if you have a car with a carburetor engine. Our task is to disconnect the cable from the speedometer, first unscrewing the nut (cap nut). Well, you can now remove the speedometer drive cable. It comes out through the space in the front panel
. Disconnect the connectors. Replacing light bulbs in the dashboard -. Replacing rear struts (shock absorbers) on VAZ 2110, 2112, 2114, Kalina, Granta, Priora, 2109 and 2108 - Duration: 18:27. And remove the instrument cluster.
And to replace the lamps, you need to turn the socket back clockwise and remove the instrument cluster from it.
Well, assembling and installing the instrument cluster must be done in the reverse order. If you have a Peugeot car, then you will be interested in visiting the Peugeot 207 car owners club. Here you will receive the most important and interesting information on the repair, maintenance and operation of the car. Car news and reviews, new products from the global car market.
Popular faults
If we talk about the dashboard of VAZ 2109 cars, then they are characterized by certain problems. We will tell you about them, and also tell you how to act correctly in a given situation.
| Fault type | Your actions |
| Gasoline level and temperature indicator does not work | In most percent of cases, this situation occurs due to breakdown of devices, sensors of these devices, or an open circuit of the power supply. Therefore, first check the circuit for continuity, make sure that the fuses have not blown. If this is not the case, check whether the gas level and temperature sensors are working. Only if none of the actions allowed you to get rid of the breakdown, you can begin to replace the devices themselves. No options, the problem lies in them |
| When the fuel tank is full, the arrow points to zero | If you have worked on the fuel level sensor, the fault most likely lies with you. When manipulating this device, the float limiter is often knocked down. Either the limiter is installed incorrectly or adjusted, causing the resistor winding to end. To resolve the problem, remove the sensor and then adjust the limiter again |
| The fuel gauge needle regularly jumps and ends up at zero | Here, most likely, the resistor has weak contact with the current collector. Another possible option is that there is a break in the resistor. To resolve this situation, we recommend replacing the hot level sensor with a new measuring device |
| The fuel level lamp is constantly on | If this lamp is constantly on, there is probably a short circuit in the fuel level sensor supply wiring to ground. Another option is that the sensor’s flexible bus is shorted to the fuel intake pipe. You will have to disassemble the device to align the bus and get rid of the resulting short circuit |
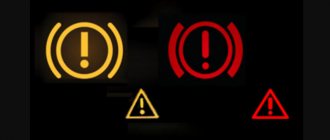
| Indicator lamps do not work on the dashboard | There is a high probability that the light bulbs have simply burned out, or they are poorly held in their seats due to loose contact. Replace the bulbs, but first try tightening the contacts. Traces of oxidation may be detected. When cleaned, the light bulbs can work normally again. Also, do not exclude the possibility of wiring breakage or oxidation of the tips of the supply wiring. Try going over the wires with a tester, cleaning the contacts if necessary. |
| The speedometer does not work, the flexible shaft is noisy | In such a situation, you will have to change the speedometer drive cable or replace the entire speedometer assembly. But before you bother so much, check that the fastening nuts of the tips are tightened correctly and properly. The flexible shaft may make noise during operation due to deformation or violation of the permissible bending of the shell of less than 10 centimeters during installation |
The instrument panel of the VAZ 2109 is not so complicated that you cannot figure it out on your own. But in the absence of experience, it is better to entrust the repair to specialists, or to enlist the support of a partner who understands this matter.
Didn't find the information you are looking for? on our forum.
LED instrument panel lighting
In this article, we’ll look at how to improve the appearance of the instrument panel by changing the brightness and color of the backlight of the instrument scales and buttons at your discretion, since in terms of these parameters the standard instrument panel of the VAZ 2109 does not suit all owners of these cars. To do this, we will install instead of conventional light bulbs incandescent LEDs used in instrument panel lighting. They have a brighter glow and come in different colors that you can choose according to your preference. Standard colors are white, red, green, blue, and purple is also found. Please note that to illuminate the buttons, LEDs with a regular base like a light bulb are used, and to illuminate the instrument cluster, you need to install such an LED in a special socket; soldering will be required. But you can also purchase a ready-made LED already mounted in the socket. LED for illuminating the instrument panel (left) and buttons (right) In addition, there are LEDs on sale that have a point glow, when the light of the diode is narrowly directed only in one direction (forward), and LEDs , having a diffused glow, which is achieved by a special shape of the LED lens. Which one you prefer, choose for yourself. So let's get started.
Illumination of the heater (stove) control console
Remove the plastic handles for the heater damper control levers. Remove the glass of the stove control unit by picking it up with a knife. We make a reflector out of foil and fix it under the glass of the VAZ 2109 heater control unit. If it is not made, the console backlight will be concentrated only in the place where the backlight LED is installed next to the heater fan speed control knob, and will decrease towards the opposite area, which does not look very good attractive. Then unscrew the lower part of the center console (the beard), remove the socket with the backlight lamp for the heater control unit and change the lamp to an LED. We put everything back together in reverse order.
It should be noted that simply replacing the backlight lamp with an LED one, despite all the tricks, will not achieve completely uniform illumination of the heater control panel. Although this is still better than the standard backlight.
To finalize the illumination of this unit, it is best to stick a 10 cm long LED strip to the bottom, solder 2 wires (plus and minus) to its contacts, and connect the wires to the backlight lamp socket of this unit. Just act carefully, do not leave uninsulated sections of wires to avoid a short circuit! LED strip for illuminating the heater control panel Now the heater control panel illumination glows brightly and evenly over the entire area. Moreover, this illumination is noticeable both day and night. Illumination using an LED strip This is what the illumination looks like during the day. However, if in the daytime everything is fine with the illumination, then when it got dark I realized that the brightness of such illumination is excessive for me, and it would be nice to have it a little less bright.
You can, of course, adjust the brightness of the entire instrument panel illumination using the corresponding regulator to the left of the steering wheel, but the brightness of the remaining instrument panel illumination lamps suited me, so I did it differently.
We take a black marker and paint over the coating above the LEDs (my LED strip is insulated) to the desired level of light transmission - and the problem of excess brightness is solved. The photo above shows a version of the backlight already modified in this way. You can also cover the LED strip with a piece of tint film, the effect will be the same.
Illuminated buttons on the instrument panel
The procedure is extremely simple: remove the button from the panel by prying it with a screwdriver (carefully), disassemble it, take out the light bulb installed in it, install an LED of the color you like in it, remove the light filter and put everything back together. This is what the result of the modification looks like: the buttons and instrument cluster glow with bright white light. And this is what the white backlight looks like during the day: You don’t have to remove the light filter from the button, but on the contrary, by selecting a light filter, create the appropriate brightness and color of the button glow. On my car, the rear window heating button is illuminated in orange, and the foglight buttons glow turquoise. The turquoise color is the result of a white LED shining through a green filter. The illumination of the hazard warning button is made red in a foreign style. LED illumination of the instrument cluster. We will need 3 LEDs in a socket, double-sided tape and foil. Remove the instrument panel shield (visor). For dismantling instructions, see any VAZ 2109 repair manual. Remove the instrument cluster. Unscrew the speedometer cable and disconnect all the plugs. At the top of the instrument cluster there are 3 backlight bulbs.
They illuminate instrument scales through a green filter. You can remove this filter, or leave it as you like. I would like to note that the light of a white diode through a green filter is quite interesting, try it yourself.
We replace the light bulbs with LEDs (preferably with a diffuser lens); for better light dispersion, we make a reflector from foil, secured with double-sided tape. Reassemble the instrument panel in reverse order. IMPORTANT! LEDs have polarity, so if after installation the diode does not light up, you need to change the polarity of its power supply by simply turning the LED over. Taking advantage of the situation, you can glue all the plastic joints of the panel with double-sided tape, there will be fewer squeaks.
Video “Instructions for replacing the speedometer cable on a VAZ 2109”
How to repair the speedometer on a “nine” if it stops working - visual instructions for replacing the cable at home are given in the video below (the author of the video is Vladimir Edwin).
To improve the lighting, you need to install LEDs instead of conventional incandescent light bulbs. Their glow is much brighter, in addition, you can choose the color of the backlight at your discretion: blue, green, red or white. These are the main colors, but if you look, you can also find purple LEDs.
These effects are achieved using a focusing lens configuration. A more uniform backlight is suitable for illuminating the scale on the instrument panel, and a brighter light is suitable for the button icon. Every driver should take into account the features of design changes when improving his car.
Instrument lighting VAZ 2109 low panel | Tricks of Life
This is why the colors turned out not quite natural. But live it really looks very, very cool.
Expert opinion
It-Technology, Electrical power and electronics specialist
Ask questions to the “Specialist for modernization of energy generation systems”
Installing LED backlighting of buttons on a VAZ 2108, VAZ 2109, VAZ 21099 To tune the backlight on a VAZ 2109, the lighting sources must be replaced after removal; it is advisable to use diode bulbs, and if necessary, the scale itself can be modified. Ask, I'm in touch!
The instrument panel lighting of the VAZ 2109 does not work
I recently bought a car (used). I haven’t had a chance to drive at night, but yesterday I took a ride. I discovered that the instrument lights do not work. The first thought was that the fuse had blown, but, judging by the description, there were several circuits on it. So the rest are fine. Maybe the light bulb has burned out? Is she there alone or not? Maybe the contact has fallen off? Remove the torpedo? Or look under the hood? Tell the kettle
VAZ-2109 panel: do-it-yourself modernization
The VAZ 2109 panel is made of a special energy-absorbing material. It consists of an overlay and, in fact, the panel itself. It is made of plastic. Its thickness is 3 mm. The overlay is essentially reinforced with a special metal frame. It has a reliable energy-absorbing layer made of polyurethane foam. On the outside it is lined with a special decorative film. Low and high panels of the VAZ 2109, as well as a “European panel” can be installed on the car. The high panel of the VAZ 2109, like the low one, has certain features that should be taken into account when installing them.
The installation method and the high panel are almost identical, since the mounting points, as well as the connections of the air ducts of the automobile ventilation and heating system, are the same.
The differences concern only the wiring harness connections. (The diagram of the VAZ 2109 instrument panel is shown in the photo below; follow the link to read even more about it).
How to do easy tuning of the VAZ-2109 dashboard with your own hands
During the modernization of the interior of the domestic “nine”, tuning its “tidy” becomes a truly indispensable element. Beautiful modifications can be done with your own hands. To do this, you will need to make a new dial on a computer using special design programs and printing the picture on a printer. However, first you need to clearly think through the appearance of the dials for the car tachometer and speedometer, as well as for all the sensors that remain. Once the dials are printed, they need to be laminated, and then you can begin to remove the instrument panel. To properly dismantle it, you must first remove the steering wheel pads, and also mark the steering position relative to the shaft. Then carefully unscrew the fastening nut.
Next, you can remove the steering wheel and unscrew the screws that are located in the area of the car lower casing. After this, you will have to disassemble the steering column. When the instrument panel is removed, you should unscrew the arrows from the old speedometer and tachometer. Subsequently, they will be attached to the updated dials.
When tuning a VAZ 2109 with your own hands, you can also repaint the dials and hands in bright colors. Regular spray paint cans are suitable for this. At the same time, it is better to make the dial a rich black color. You can make it matte using special means. In this case, the arrows need to be painted in bright pink or original red-burgundy tones. After the painted plates of the machine dial have dried, they are equipped with an old or pre-prepared scale and removed hands. In a situation where the owner wants to modernize the instrument panel in a more modern way, he should also use a special (original, as in the video) backlight. You can add an original touch using a fluorescent marker, but more on that below.
Beautiful modifications to the VAZ 2109 panel
Every driver of a domestic car wants to make the instrument panel of his VAZ-2109 as bright and original as possible. Here is one of the options for how beautifully you can modify this element of the machine. You will need a soldering iron. Next you need to buy numbers and a scale panel. It is important that they are translucent from the inside. You should also purchase an ultraviolet lamp. It is powered by 12 volts. Therefore, nothing needs to be changed.
You will also need a fluorescent marker or paint. It will change color if exposed to ultraviolet light. This technique is often used in modern nightclubs. You will also need ordinary light bulbs with sockets, like those in the “tidy”. There is no need to change the LEDs; they will remain in place. Everything you need is there, you can get started.
First you need to remove the plastic, then the dashboard. Also, don't forget about the black plastic that surrounds the glass. We disassemble the standard insert, as well as the arrows. Most often, there are no holes in the new insert. Therefore, you will have to do them. For the arrows, the holes will be needed wider than in the standard trim. Otherwise, the arrows will start to stick. Next, you need to dismantle the backlight that is installed. The work should be done carefully so that the plastic is not damaged. We take out the board with the light bulbs. We install a neon light bulb instead of the usual ones, and stick a plastic protection on top. It used to have factory bulbs screwed in. Don't forget about the control unit for the new neon light bulb. You should always be careful not to confuse the polarity. If this happens, nothing will shine. Next you need to screw in the instrument lighting bulbs. This should be done in parallel to the neon lamp. We lay the wiring from the inside; first, for this you need to make holes in the partitions.
Let's check if everything is correct. The light bulbs inside should be adjusted. Next we put on the overlay and seal it. After these steps, all we have to do is paint the hands with a purchased fluorescent marker or paint. It is advisable to repeat painting after 10 minutes. After this, the arrows can be installed in their place. This completes the tuning.
Check the work, otherwise you will have to disassemble everything. If there are no problems, you can assemble everything in strictly reverse order. After such tuning, the interior of the VAZ 2109 will be equipped with a colorful panel like good foreign cars. If desired, you can use fluorescent paint to paint the dashboard trim in the place where the needle reaches its limit. It looks very nice.
How to change the backlight of the VAZ 2109 panel
During a trip, an experienced driver carefully looks not only at the road, but also at the dashboard. This is necessary to monitor the corresponding readings of the sensors that are responsible for the operation of the vehicle. It should be noted that its illumination should not tire or strain the eyes. The manufacturer equipped new cars with pale green or yellow illumination. It has a certain effect on the eyes - after a certain period of time they get tired. In this situation, it is better to replace the factory instrument lighting. For such tuning you will need a set of diodes, a soldering iron, screwdrivers with attachments, gloves, and iron pliers. Then we need to choose the color of the backlight. There are many possible options, it all depends on your imagination.
However, as always in any work, this process has its own nuances. It is recommended to install a soft white backlight if you use the car every day or for long trips. It will not tire your eyes. However, if you rarely use the car, then it is better to install light bulbs of a different, most varied color. Now let's start the installation.
First you need to completely remove the dashboard and disassemble the dashboard. To do this, unscrew the screws holding the dashboard to the body. You can find out their number by studying the car's operating instructions. It is possible that it is possible to remove the panel if you disconnect only the trim and release the steering column all the way down. Then we need to unscrew the bolts that are located at the bottom of the trim. Using a screwdriver and a flat socket, pry up the instrument cluster and remove it. You should be especially careful because you can accidentally damage the glass. After that, unscrew the bolts on the back side. We disconnect the glass, and then the plastic gasket. You do not need to touch the arrows, you should work carefully, because you can accidentally touch them or knock them down. If this happens, you will have to set them again and, what is even more difficult, adjust the sensors. When examining the back of the light bulb, you can see the location of all lighting fixtures, including LEDs.
We outline them with a marker and unsolder them from the microcircuit. We check new light elements with an adapter or battery. It is better to use LEDs because they will consume a small amount of energy and also have a long service life.
Then you need to inspect the metal antennae of the diodes so that they are intact. Otherwise the diode will not light up. We insert both antennae of the diode into the hole in the microcircuit that remains after soldering the previous light bulbs. We solder the antennae on the back of the circuit. We mount the remaining diodes in the same way. Reassembly must be done in reverse order. After starting the car, turn on the low beam. Thus, we check how the installed LEDs function.
Tuning the instrument panel: illuminated scales from the inside
In the previous article on the topic of tuning the backlight of the VAZ 2109 dashboard, the option of LED backlighting without serious intervention in the tidy was considered. There we simply replaced the backlights with LEDs, so although there is an effect, over time you want more. The expectation for more comes down to the fact that on the next generations of Samar devices and on foreign cars, the instrument dials are illuminated from the inside, and it looks as if the numbers and instrument scales themselves are glowing. The instrument panels of the VAZ 2109 and VAZ 2108 are illuminated by lamps that emit their light onto the dials from the outside, from the pointer side, while the brightness and detail of such illumination is low.
Let's try to illuminate the instrument panel from the inside, like on foreign cars, using the tall panel of the VAZ 2109 as an example. It should be noted that tuned instruments from specialized companies are quite expensive, so you can save a lot of money by modifying the instrument panel yourself.
To do this, we need a light-transmitting overlay on the instrument panel, like this one:
We remove it from the car and disassemble the instrument panel, remove the instrument arrows and remove the old trim. In order for the illumination light to fall on the overlay from the inside, we make cutouts on the surface under the overlay. This can be done using a heated knife or soldering iron.
Now let's do the lighting itself. It will be organized on the basis of an LED strip. We use tape, which is cut into pieces of three diodes. To make the glow uniform, we make a reflector from ordinary foil.