If the generator charge lamp (in the form of a battery icon) on the instrument panel does not go out after starting the engine, the headlights are not bright enough, the interior heater motor and windshield wiper blades are working slowly - it’s time to check the condition of the generator. To fully diagnose it, you will need a test lamp and a voltage source or a voltmeter and ohmmeter.
Replacing the charging relay
Usually, even factory generators on Kalina serve for quite a long time and do not require replacement, of course, unless you come across a car with a factory defect of this device.
If this electrical equipment unit fails, it will have to be replaced. Although this is not difficult to do, it will take at least an hour, especially if this is your first time doing this procedure.
So, we will need the following tools:
- Open-end or ring wrenches for 8, 13 and 19
- Small and large ratchets and heads for 8, 13 and 19 for more convenient and faster work
- Wrench with extension
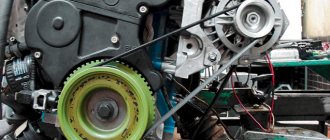
So, let's proceed to a very detailed description of all the types of work that need to be performed. First of all, we need to loosen and release the belt tensioner and then remove it. So be sure to check out this Alternator Belt Replacement Guide first. After this, you can proceed directly to removing the device from the car.
Before carrying out any repairs related to electrical equipment, be sure to disconnect the battery by removing the negative terminal from it.
Now almost everything is ready and you can safely remove this device from the engine compartment, turning it slightly from side to side, finding the most convenient position for its removal.
To replace the generator on the Lada Kalina, we purchase a new one and install it in the reverse order of removal, putting all the bushings in place in the same places as they were. The price of a new generator ranges from 4000-5000 rubles, so you will have to fork out a little.
Lada Kalina is a well-known and popular car among Russians. As you use it, car parts break down. One of the serious breakdowns is the malfunction of the generator. If there are a large number of failed elements of this system, the device is completely replaced. You can buy a generator for Kalina in Russia at a price of 2000-7000 rubles.
What is this?
A generator is a device that transforms mechanical energy into electrical energy. Lada Kalina cars are equipped with a three-phase alternating current generating device. Thanks to this equipment, all electrical appliances function: radio, wipers, lighting elements, starter.
The following signs indicate that it is time to buy a new generator:
- The battery is undercharged and completely discharged ahead of schedule.
- The brightness of the headlights decreases.
- You can hear grinding and whistling noises when the machine is running.
The cause of failure of an electric current-generating device may be:
- Loose belt.
- Charging relay faulty.
- Brush wear.
- Short circuit or break in the stator or rotor winding.
- Breakdown of the diode bridge.
Sometimes the current-generating device can be repaired. But if there are a large number of failed elements, it is easier to replace them with a working device.
At different sales points they offer to buy a generator for Kalina at different prices. The price is formed depending on the following points:
- The novelty of the unit.
- Operating parameters (power, current).
- Company manufacturer.
- Place of purchase.
- Year of manufacture of the car.
- Kudos to the seller.
Types of generators
Based on current strength, generating devices for Kalina are available in the following types:
- 85 A.
- 90 A.
- 100 A.
- 115 A.
- 120 A.
- 135 A.
The higher the performance characteristics of the device, the higher the price is set for it.
There are new units:
- New.
- Used.
New devices naturally cost more.
Generators for Kalina are produced by different manufacturers. So, you can buy a device from the company:
- ISKRA (Slovenia).
- LKD (China).
- BATE (Belarus).
- Eldix (Bulgaria).
- StartVOLT.
- KZATE.
- Pramo.
- Bosch.
Products from Eldix, Bosch, and BATE are more valued. Products from the Chinese company LKD are cheaper.
You can purchase a generator at the place of purchase:
- At the car market.
- In a specialty store.
- According to an advertisement in the newspaper of people who own Lada Kalina.
- In the online store.
The most expensive units are sold in specialized stores, the cheapest - in the car market and through advertisements.
Approximate prices
In Russia, you can buy a generating device for a Kalina car for approximately the following price:
- In the car market - for 4,000-5,000 rubles.
- In a specialized store - for 5,000-6,000 rubles.
- On the Internet - for 3,500-5,500 rubles.
- According to an advertisement in newspapers - for 3,500-4,000 rubles.
Price depending on the newness of the device:
- New – from 3,800 to 7,000 rubles.
- Used - about 2,000-3,000 rubles.
Cost depending on current strength:
- 85 A – from 3800 rubles.
- 90 A – 4000.
- 100 A – from 4500 rubles.
- 110 A – 5000.
- 115 A – from 5500 rubles.
- 135 A – 6300 rubles.
Who to buy from?
If you need a new generator for your Lada Kalina car, then the motorist has four options where you can purchase it:
- Visit the car market.
- Search for the unit among the advertisements of ordinary owners of the Kalina brand car, placed in a newspaper or on the Internet.
- Go to the website of an online store selling spare parts for cars.
- Visit a store that sells spare parts for Kalina.
It is important to choose reliable suppliers who have all the documents to engage in sales activities. The most economical option would be to buy a used generator at a car dismantling point or as advertised by Kalina car owners. But there is no guarantee that the device will work for a long time.
For the domestic small car Lada Kalina with an 8-valve and 16-valve engine, the manufacturer has provided the possibility of installing two variations of generator sets: “5132.3771” and “9402.3701-06” (as an analogue). The factory unit is a three-phase electrical device operating on alternating current. The design of this generator contains a rectifier module and a regulator of the generated voltage.
If we touch on the quality of the generators used by AvtoVAZ, then you can find a wide variety of opinions on the Internet. The design of the unit is not complicated, so if it breaks, you can fix it yourself. And in this article we will talk about how to remove the generator.
The operation of the Lada Kalina generator unit is based on the following principle: an alternating current is induced in the stator winding, which is subsequently transformed into direct current through a rectifier module located on the body of the unit. The generator cover is also equipped with an electronic voltage regulator and a brush holder. The rotor of the device receives torque from the crankshaft pulley. The transmission link is a poly V-belt.
The basic characteristics of the generator set include the following parameters:
- maximum generated current – 85-90 Amperes;
- operating range of on-board voltage – 14.4-15.1 Volts;
- rotation ratio of the motor and rotor – 1:2.4;
- right-hand direction of rotation.
The housing of the unit is held together by pins that tighten the stator with the covers. The mounting sockets of the indicated covers contain bearings, which ensure the ability of the rotor to rotate.
The rear bearing is installed inside the cover with a minimum gap. The front element is equipped with the ability to slide along the surface of the rotor shaft. It is fixed inside the front cover with a slight interference fit, and a pressure plate covers it from the outside.
The back of the device is protected by a plastic casing.
Let's move on to the switching diagram of the generator with the on-board network. The connection diagram is very simple. After turning on the ignition, power begins to flow to the voltage regulator through the battery discharge lamp circuit. When the motor starts, the excitation winding is supplied with supply voltage from three diodes mounted in the rectifier unit.
Using the indicated signal lamp, the generator unit can be checked. If the device is working properly, the lamp lights up when the ignition is on. It goes out when the engine starts.
When this phenomenon is not observed and the lamp continues to shine, the generator set should be diagnosed for the presence of malfunctions.
In some cases, replacement is required, and many are interested in how to remove the generator?
The rectifier units present in the designs of generator sets of the AvtoVAZ model range have received a considerable number of negative reviews during operation. This statement is also true for the Lada Kalina we are considering.
These modules can break down even after a mileage of 10 thousand km, which requires repair or replacement of the device. It has also been revealed in practice that the cause of most malfunctions is the generator set bracket. However, bearings can also fail prematurely.
It is gratifying that the owners are able to cope with such a problem on their own.
To repair the generator module, it will require preliminary disassembly. For this purpose, we “grab” the tips of the stator cables with a screwdriver and slightly pull them out of the springs present in the diode bridge. Next, you need to unscrew the bolts holding the bridge itself. In addition, unscrew the connecting bolt.
Why does colored (for example, white) smoke come from the exhaust pipe?
Color in this case speaks volumes. For example, blue (from blue to dark shade) means that oil has entered the engine cylinder. This process is often accompanied by increased fuel consumption. Often blue color indicates failure of elements of the cylindrical and piston groups
When diagnosing, it is important to inspect the areas in direct contact with the cylinder. In addition, you need to check the side surfaces and recesses of the piston rings
The problem here arises due to sealing of the gaps, which is caused by the excessive volume of oil entering the system. Minor contamination does not cause a visible compression failure, but it is necessary to check this possibility when thick blue exhaust appears. A white-blue tint in combination with excessive fuel consumption can also be a sign of a valve seal failure and an ignition malfunction. New cars “smoke the air” in the same way, but the smoke gradually dissipates (in this case there is no reason to worry).
The black version indicates potential breakdowns:
The “charcoal” tint appears due to excessive concentration of fuel in the fuel-air mixture.
The most common cause is a malfunction of the fuel supply or ignition system. A gray-black color indicates a carburetor malfunction. The reason is that the float chamber overfills due to clogged jets or faulty needle parts. In this case, you need to clean the camera. If this does not help, replace the parts using a repair kit.
The generator must always be in good working order
Any modern car is equipped with electrical equipment that is absolutely necessary for the vehicle:
- without a starter it is impossible to start the engine;
- a car cannot be driven without lighting at night;
- The heater motor creates heat in the cabin;
- The wiper motor clears the windshield of rain and snow;
- FM radio makes it possible for the driver not to get bored on the road.
But all these devices cannot work without electricity, so the car must have a power source.
The current from which all consumers in the car are powered is produced by the generator, and the performance of the entire electrical circuit of the vehicle depends on its condition.
Therefore, the generator must always be in good working order, and if any breakdowns occur with it, they must be eliminated in a short time.
There is smoke when starting the Kalina engine
- Registration
- Entrance
- To the beginning of the forum
- Forum Rules
- Old design
- FAQ
- Search
- Users
It mainly appears after parking for several hours. I sit down, turn the key, and the car starts. A puff of smoke flies out of the exhaust pipe and then everything is fine. Why? there are options?
Let me note: after a long stay, it’s as if oil is flowing into the combustion chamber from somewhere. But the level has not moved over the year. Or is it gasoline?
But the level has not moved in a year
allisandr
, smoke with blue. 15t mileage per year. it was winter. Some candles with black garbage.
Alex
, I also thought, maybe while the car is sitting under these caps, oil makes its way into the cylinders? although this has not happened since this morning. Maybe the engine stopped yesterday with other valves open?
smoke with blue during startup, then everything is fine - caps smoke with blue when the engine is running - ShPG of that, for retirement smoke with black - over-enriched mixture
What if there is a puff of blue smoke after prolonged engine braking (for example, on a long descent) after applying gas? Then it disappears, in other modes there is no smoke
What if there is a puff of blue smoke after prolonged engine braking (for example, on a long descent) after applying gas? Then it disappears, in other modes there is no smoke
Caps. They are darlings
Caps. They are darlings
Then another question, could there be increased oil consumption due to wear on the caps? and if it’s not difficult, explain the process of the appearance of blue smoke when gas is supplied after engine braking. Does this mean that oil accumulates there after braking? and then it suddenly burns out.
Thanks to all!
I'll change the caps and report back. for history.
I understand that when the engine brakes, the pistons move and oil gets into the chamber (in general it always gets in), but because... There is no fuel and oil accumulates. As soon as you give gas, the fuel ignites and the oil burns. Here comes the smoke. But that's what I think
Then another question, could there be increased oil consumption due to wear on the caps?
Then another question, could there be increased oil consumption due to wear on the caps? and if it’s not difficult, explain the process of the appearance of blue smoke when gas is supplied after engine braking. Does this mean that oil accumulates there after braking? and then it suddenly burns out.
When the throttle is closed and the speed is high, high negative pressure is created, which begins to suck oil through weak caps from the cylinder head.
When the throttle is closed and the speed is high, high negative pressure is created, which begins to suck oil through weak caps from the cylinder head.
Then, even during long-term parking when the engine cools down, in the combustion chamber
Cools the air with the fuel mixture, for example.
A vacuum occurs and oil is also sucked into the combustion chamber
,
TEB
, perhaps through the valves from the camshaft?
Malfunctions
Malfunctions of vehicle electrical equipment are very common and occupy one of the leading places in the list of breakdowns.
They can be roughly divided into faults of power sources (batteries, generators) and faults of consumers (optics, ignition, climate, etc.).
The main sources of power for a vehicle are batteries and generators.
The malfunction of each of them leads to a general malfunction of the car and its operation in abnormal modes, or even immobilization of the car.
In the electrical equipment of a car, the battery and generator work in an inextricable tandem. If one fails, after a while the other will also fail.
For example, a damaged battery leads to an increase in the charging current of the generator. And this entails a malfunction of the rectifier (diode bridge).
In turn, if the voltage regulator supplied from the generator malfunctions, the charging current may increase, which will inevitably lead to systematic recharging of the battery, “evaporation” of the electrolyte and rapid destruction.
Battery faults
Common battery problems:
- short circuit of battery electrodes/plates;
- mechanical or chemical damage to the battery plates;
- violation of the tightness of battery cans - cracks in the battery case as a result of impacts or improper installation;
- chemical oxidation of battery terminals. The main causes of these malfunctions are:
- gross violations of operating rules;
- expiration of the product's service life;
- various manufacturing defects.
Generator faults
Of course, the design of a generator is more complex than a battery. It is quite reasonable that there are many times more generator malfunctions, and their diagnosis is much more difficult.
Common generator problems include:
- pulley wear or damage;
- wear of current collecting brushes;
- wear of the commutator (slip rings);
- damage to the voltage regulator;
- short circuit of the stator winding turns;
- wear or destruction of the bearing;
- damage to the rectifier (diode bridge);
- damage to the charging circuit wires.
It is very desirable for a motorist to know the main causes of generator malfunctions, how to eliminate them, as well as preventive measures to prevent breakdowns.
All generators are divided into alternating and direct current generators. Modern passenger vehicles are equipped with alternating current generators with a built-in diode bridge (rectifier). The latter is necessary to convert current into direct current, on which the vehicle's electrical consumers operate.
The rectifier, as a rule, is located in the cover or housing of the generator and is integral with the latter.
All electrical appliances of the car are designed for a strictly defined operating voltage range. As a rule, operating voltages are in the range of 13.8–14.7 V.
Due to the fact that the generator is “tied” with a belt to the crankshaft of the engine, it will work differently depending on the speed and speed of the vehicle.
It is for smoothing and regulating the output current that the relay-voltage regulator is designed, playing the role of a stabilizer and preventing both surges and dips in the operating voltage.
Modern generators are equipped with built-in integrated voltage regulators, colloquially referred to as “chocolate” or “tablet”. It is already clear that any generator is a rather complex unit, extremely important for any car.
Types of generator faults
- Due to the fact that any generator is an electromechanical device, there will be two types of faults - mechanical and electrical.
- The first includes the destruction of fasteners, housing, malfunction of bearings, pressure springs, belt drive and other failures not related to the electrical part.
- Electrical faults include winding breaks, diode bridge faults, brush burnout/wear, turn-to-turn short circuits, breakdowns, rotor beating, and relay-regulator faults.
Often, symptoms indicating a typical faulty generator can also appear as a result of completely different problems.
As an example, poor contact in the fuse socket of the generator field winding circuit will indicate a generator malfunction. The same suspicion may arise due to burnt contacts in the ignition switch housing.
Also, the constant lighting of the generator malfunction indicator lamp may be caused by a faulty relay; the blinking of this switching lamp may indicate a generator malfunction.
The main signs of a malfunctioning autogenerator:
- When the engine is running, the battery discharge warning lamp flashes (or stays on continuously).
- Discharge or overcharge (evaporation) of the battery.
- Dim car headlights, a rattling or quiet beep when the engine is running.
- Significant change in headlight brightness with increasing speed. This may be acceptable when increasing the speed (re-throttle) from idle, but the headlights, having lit up brightly, should not increase their brightness any further, remaining at the same intensity.
- Extraneous sounds (howling, squeaking) coming from the generator.
It is necessary to regularly monitor the tension and general condition of the drive belt. In case of cracks and delaminations, immediate replacement is necessary.
Troubleshooting
On modern cars, using the “old-fashioned” diagnostic method by removing it from the battery terminal can lead to serious damage to many of the car’s electronic systems.
Significant voltage drops in the vehicle's on-board network can damage almost all on-board electronics. That is why modern generators are always checked only by measuring the voltage in the network or diagnosing the removed unit itself on a special stand.
First, the voltage at the battery terminals is measured, the engine is started, and readings are taken while the engine is running. Before starting, the voltage should be about 12 V, after starting - from 13.8 to 14.7 V.
A deviation in the larger direction indicates that you are “overcharging”, which indicates a malfunction of the relay-regulator, while a deviation in the smaller direction indicates that the current is not flowing. The absence of recharging current indicates a malfunction of the generator or circuits.
Causes of breakdowns
Common causes of generator malfunctions are simple wear and corrosion. Almost all mechanical failures, be it worn brushes or collapsed bearings, are a consequence of long-term use.
Modern generators are equipped with sealed (non-maintenance) bearings, which simply must be replaced after a certain period or mileage of the vehicle. The same applies to the electrical part - often the entire components must be replaced.
Other causes of malfunctions:
- low quality components;
- violation of operating rules or operation outside normal operating conditions;
- external factors (salt, liquids, high temperature, road chemicals, dirt).
Self-test of the generator
The easiest way is to check the fuse. If it is in good condition, the generator and its location are inspected. The free rotation of the rotor, the integrity of the belt, wires, and housing are checked. If nothing arouses suspicion, the brushes and slip rings are checked.
During operation, the brushes inevitably wear out, they can become jammed, skewed, and the grooves of the slip rings become clogged with graphite dust. A clear sign of this is excessive sparking. There are frequent cases of complete wear or failure of both bearings and stator failure.
The most common mechanical problem with a generator is bearing wear. A sign of this malfunction is a howling or whistling sound when the unit is operating. Of course, the bearings must be replaced immediately, after first inspecting the seats.
Loose drive belt tension can also cause poor generator performance. One of the signs may be a high-pitched whistle from under the hood when the car accelerates or accelerates.
To check the rotor field winding for short-circuited turns or breaks, you need to connect a multimeter, switched to resistance measurement mode, to both contact rings of the generator. Normal resistance is from 1.8 to 5 ohms. The readings below indicate the presence of a short circuit in the turns; above – direct winding break.
To check the stator windings for ground fault, they need to be disconnected from the rectifier unit. If the resistance readings given by the multimeter are infinitely large, there is no doubt that there is no contact of the stator windings with the housing (“ground”).
To check the diodes in the rectifier block, use a multimeter (after completely disconnecting it from the stator windings). The test mode is “diode test”. The positive probe is connected to the plus or minus of the rectifier, and the negative probe is connected to the phase terminal. After this, the probes are swapped.
If the values of the multimeter readings differ greatly from the previous ones, the diode is working; if they do not differ, it is faulty. Another sign indicating the imminent “death” of the generator diode bridge is oxidation of the contacts, and the reason for this is overheating of the radiator.
Repair and troubleshooting
All mechanical problems are eliminated by replacing faulty components and parts (brushes, belt, bearings, etc.) with new or serviceable ones.
Older generator models often require grinding of slip rings. Drive belts are replaced due to wear, maximum stretching or expiration of service life.
Damaged rotor or stator windings are currently being replaced with new assembled ones. Although rewinding is common among auto repair services, it is becoming less and less common - it is expensive and impractical.
Malfunctions of vehicle electrical equipment are very common and occupy one of the leading places in the list of breakdowns. They can be roughly divided into faults of power sources (batteries, generators) and faults of consumers (optics, ignition, climate, etc.). The main sources of power for a vehicle are batteries and generators.
- short circuit of battery electrodes/plates;
- mechanical or chemical damage to the battery plates;
- violation of the tightness of battery cans - cracks in the battery case as a result of impacts or improper installation;
- chemical oxidation of the battery terminals. The main causes of these malfunctions are:
- gross violations of operating rules;
- expiration of the product's service life;
- various manufacturing defects.
Checking the voltage regulator
Kalina's generator, in good condition, produces a voltage in the range of 14.5-15.1 Volts. The initial check includes measuring the voltage at its terminal (the second probe can be connected to the generator body or any other nearby ground). At the same time, in order for its results to be objective, it is necessary to warm up the engine and turn off all additional consumers of electricity, internal and external lights, interior fan, rear window heater, etc. If the voltage does not fit within the indicated parameters, the voltage regulator is most likely faulty.
You can remove the voltage regulator without dismantling the generator itself. After removal, you should first inspect the brush assembly and visually check the condition of the carbon brushes. The latter should protrude from the body by at least 5 mm. You can also check the functionality of the regulator by connecting a lamp with a power of up to 5 W to its output and applying voltage to the input. The lamp should glow only at a voltage of 12-16 V.
Generator repair kits
To eliminate these generator malfunctions, you will need to carry out repairs. When you start searching for a generator repair kit on the Internet, you should prepare for disappointment - the kits offered usually contain washers, bolts and nuts. And sometimes the generator can only be restored to functionality by replacing brushes, a diode bridge, a regulator... Therefore, the brave person who decides to repair it makes an individual repair kit from those parts that fit his generator. It looks something like this, as shown in the table below, using the example of a pair of generators for a VAZ 2110 and a Ford Focus 2.
Operating principle
The basic principle of operation of the generator is as follows: a three-phase alternating current is induced in the stator winding, which is converted into direct current using a rectifier unit attached to the cover of the device. On the cover there is a unit consisting of an electronic voltage regulator and a brush holder. The rotor rotates from the crankshaft of the car engine via a serpentine belt.
The Lada Kalina generator has the following characteristics:
- maximum output current - 85-90 A;
- voltage - 14.4-15.1 V;
- engine-generator gear ratio - 1:2.4;
- direction of rotation is right.
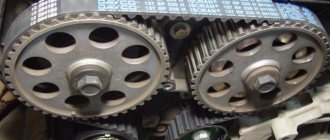
4 bolts secure the stator and covers of the device. The covers contain bearings in which the rotor shaft rotates. The rear bearing is located on the rotor shaft; it is mounted in the rear cover with a small gap. The front bearing, which slides along the rotor shaft, is installed in the front cover with a slight interference fit and covered with a pressure plate. The device is covered at the back by a plastic casing.
The generator connection diagram is quite simple. When the car's ignition is turned on, voltage is supplied to the voltage regulator through the low battery warning light. When the engine is started, the field winding receives power from 3 diodes that are installed on the rectifier block.
Typically, checking the alternator is easily done using the battery charging warning light. If the device is working properly, this lamp should light up when the ignition is turned on, and when the engine starts, it should go out. If the lamp burns brightly or at full intensity, then the generator needs to be replaced or repaired because it is faulty.
Checking the serviceability of the voltage regulator with brushes
To do this, you need to connect a 12 Volt light bulb to the two ends of the brushes, and apply 12 Volt voltage to the regulator contacts. If this device is working properly, the light should light up. When the voltage supplied to the regulator increases to 15-16 V, the light should go out.
In case of detected malfunctions in various devices, we replace them. More details about this are written in previous articles from the “Generator” section.
Source
How to replace a generator
Sometimes repairing a generator on a Lada Kalina does not help eliminate the problems associated with it. In this case, you have to replace the old unit with a new one. It is necessary to judge which generator is best to purchase from those available for sale by paying attention to its technical characteristics. Replacing the device is quite quick, the whole procedure takes about an hour.
To do this you need:
- remove the belt by loosening its tensioner;
- disconnect the plug and wire terminals;
- unscrew the nut securing the upper part of the device and remove the bolt;
- remove the bolt at the bottom in the same way;
- Remove the generator from the engine compartment.
The new unit is installed in the reverse order. Replacing a generator with a Kalina, as well as repairing it, is not difficult if you have certain skills in car repair. If such skills are not enough, then it is better to contact car service specialists.
AvtoVAZ equips VAZ 1118 cars with generators of type 5132.3771 or 9402.3701-06; there are many different manufacturers that produce spare parts for VAZ cars.
The generator for the Lada Kalina can be of different power; the industry produces current sources of 85, 100, 90, 115, 120, 135 Amperes.
Among the most famous manufacturers of VAZ parts are:
- Pramo;
- StartVOLT;
- KZATE;
- LKD (China);
- Eldix (Bulgaria);
- ISKRA (Slovenia);
- BATE (Belarus);
- Bosch.
If the belt is too loose, it will slip and the alternator will not be able to produce the required current.
Therefore, do not forget about the special tension device.
Over time, the alternator belt on the Lada Kalina may wear out, so it needs to be changed periodically.
According to the instructions, replacement should be carried out every 30 thousand km, but in general the belt can last longer than this period.
The alternator belt fails prematurely if:
- it is too tight;
- oil got on the belt;
- The quality of the belt does not meet the necessary requirements.
Changing the alternator belt on a Lada Kalina is not difficult, so we won’t dwell on this point, especially since all the replacement work is described here.
Or watch the video.
Operating principle
- maximum output current - 85-90 A;
- voltage - 14.4-15.1 V;
- engine-generator gear ratio - 1:2.4;
- direction of rotation is right.
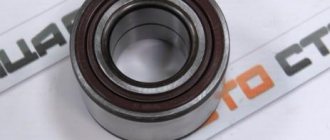
Replacing bearings
As practice has shown, the cause of many breakdowns is not only the bearings, but also the Kalina generator bracket. Car owners often fix this problem on their own. Doing this with certain skills is not so difficult.
To repair the generator, it is necessary to disassemble it. To do this, use a screwdriver to hook the tips of the stator wires and pull them out a little from the springs of the diode bridge. Then unscrew the bolts that attach the diode bridge. After this, the connecting bolt is unscrewed.
After disassembling the generator, check whether the rear bearing is in good condition. To do this, you need to twist its outer ring. If it rotates easily, without noise or rattle, and there is no play, then the bearing is in good condition. At the slightest suspicion of a malfunction, it is better to replace the bearing.
Next, you need to dismantle the Kalina generator bracket. Using a screwdriver, the stator is picked up and removed from the device casing. The bracket includes a bearing, which should also be checked. If a malfunction is detected, the part must be replaced.
The front bearing of the unit is rolled into its casing. Although AvtoVAZ does not recommend changing it, it would still be more advisable to do so, because otherwise you may then need to buy an expensive new generator for Kalina.
The bearing is removed by removing the pulley and spacer plug. After this, the rotor is removed from the rubber using a hammer, and the front casing of the unit is clamped in a vice. The bearing is carefully removed.
Checking the rectifier unit (diode bridge)
To perform this diagnostic, it is necessary to remove the diode bridge from the Kalina generator; this was described in more detail in previous articles in this section.
Then we connect the tester with the black wire to the negative plate of the block, and the red one in turn to the three contact terminals of the diodes. This way we check all the rectifiers in the block. The values on the device should be in the range from 400 to 800 Ohms. Personally, on my Kalina, during this test, all diodes showed a resistance within 535 Ohms. But the repair instructions from the Third Rome publishing house talk about numbers of 580-620 Ohms. I will say right away that when I rang two serviceable generators, the values specified in the manual were not achieved, although there were no problems with charging, so I personally doubt the accuracy of the data in this instruction.
Then we carry out the same operation, only swapping the contact wires of the multimeter. In this case, the device, with working diodes, will show infinity, that is, its readings will not change:
Main process
Replacing the generator in the case of Kalina with an 8-valve or 16-valve engine involves performing the following steps:
- First of all, you will need to install the car on the repair site and fix the position of its wheels using wheel chocks. It is also necessary to turn off the engine and disconnect the terminals from the battery to ensure the safety of the work being carried out.
- After this, you need to loosen the belt tensioner roller, which fixes the position of the generator. To do this, you will need to unscrew the fasteners and dismantle them.
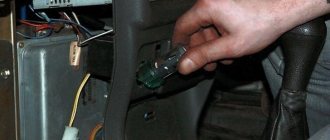
- The next step is to disconnect the plug secured by a plastic latch. To remove it, you need to lightly press it and pull it to the side. If everything is done correctly, the plug can be removed without problems.
- You will also need to remove the wire terminals located under the protective cap. Therefore, the car owner will first need to dismantle the protective cap by prying it off, and only then remove the terminals.
- The next step is to unscrew the nut securing the upper part of the generator. It is considered the most complex process among those listed, and it is better to familiarize yourself with the structure of the car in advance so that no problems arise. To make the nut give way quickly, you can move it with a wrench and then work it with a ratchet handle. Finally, all that remains is to lightly tap the protruding bolt so that it moves, after which you can remove it from the reverse side.
- Once the top bolt of the generator is removed, you can proceed to the bottom one. The actions are the same - a knob, a ratchet handle, a light knock and dismantling. However, in this case, it is recommended to hold the nut on the reverse side so that it does not turn.
- Next, you should begin dismantling the rod. This should be done carefully and carefully, since there are bearings and bushings inside. They will need to be held so that they do not fall and get lost.
The final step will be to dismantle the generator, clean the internal space of dirt, rust, possible traces of oil, and install a new unit - a standard generator or its equivalent.
You can check the functionality of the generator with a multimeter by connecting it to the battery terminals. The voltage reading should not be less than 13.4 volts.
The pitfall when replacing a Lada Kalina generator with air conditioning is its changed position, so you will have to approach it from the other side.
Thus, in order not to have to change the generator frequently, it is recommended to regularly inspect the technical condition of the car and, if necessary, repair certain parts, devices, and systems. Undoubtedly, repairs will cost the owner of Kalina somewhat less than buying new spare parts and entire units.
Brand and volume of oil for Lada Kalina gearbox
The manufacturer specifies that the new oil must be synthetic or semi-synthetic and meet viscosity grade SAE 75W-90. It is an all-season fluid that operates in ambient temperatures from -40°C to 35°C. 75W-80 and 80W-85 oils are also suitable. 80W-90 liquids can be used in regions where winter temperatures do not drop below -10...-12 °C.
In addition to viscosity, the oil must comply with API GL-4 class. This includes transmission fluids that are designed to operate in medium-loaded gears: hypoid, bevel and spiral-bevel, operating at oil temperatures up to 150 °C and contact pressure up to 3000 MPa.
Let's consider which oils are most popular in the LADA KALINA gearbox.
- LUKOIL TM-4 (GL-4) 75W-90. This is a semi-synthetic transmission fluid used in manual transmissions, differentials and transfer cases of cars and trucks. It is made from highly purified mineral base oil, synthetic components and a multifunctional additive package. The oil has high anti-corrosion, anti-foam, anti-wear and viscosity-temperature properties. It reliably protects transmission elements under high loads, ensures smooth operation of the gearbox at low temperatures and has high oxidative and thermal stability.
- SHELL SPIRAX S4 G 75W-90. Semi-synthetic gear oil API GL-4 for manual gearboxes of cars and small trucks. Used in VAG cars as a first fill fluid. The oil does not destroy synchronizers, ensures smooth operation of the gearbox, and protects transmission elements from shock loads, corrosion and wear. It has an extended service life and improves the performance of the gearbox.
- ZIC GF TOP 75W-90. Synthetic transmission oil for manual transmissions and drive axles. Compatible with synchronized boxes. In Hyuindai and Kia cars it is used as a first fill fluid. Belongs to material class GL-4/5. Meets the requirements of 75W-85 GL-4 oils. The fluid ensures reliable lubrication of all transmission elements at high speeds and heavy loads, cleans the gearbox and axles, increases the service replacement interval, reduces wear, protects against corrosion and has excellent thermal-oxidative characteristics.
- Castrol Syntrax Universal 75W-90. Synthetic multi-purpose gear oil for gearboxes and manual transmissions. Suitable for use in synchronized manual transmissions of cars and trucks, as well as final drives and differentials of trucks and construction equipment. The fluid has excellent fluidity at low temperatures and effectively protects against wear under high loads. It has an extended service life and is compatible with conventional mineral oils and sealing materials.
- LIQUI MOLY Hochleistungs-Getriebeoil GL4 (GL 4/GL 5) 75W-90. Synthetic transmission oil for manual transmissions and drive axles. It is compatible with synchronizers and is resistant to aging. Thanks to a special additive package, the fluid reliably protects transmission elements. The oil prevents wear and corrosion, works well under high loads and maintains its characteristics at high temperatures. Can be used in gearboxes that require GL-4 oils and manual transmissions that are combined with a hypoid transmission.