The role of pipes in the VAZ stove
The heating system in the car operates automatically, thanks to which the air enters the cabin at the required temperature with an error of about 2 degrees. To connect various elements to each other, where the working fluid is present, pipes are used. Experts recommend that VAZ 2110-2112 owners pay special attention to the pipes and monitor their condition.
Defects that are not corrected in time may subsequently affect the operation of the car engine. It is also important to monitor the condition of the clamps that are responsible for the tightness.
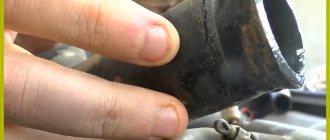
- The lower pipe serves as a supply of coolant to the radiator. Hot coolant flows here.
- The upper pipe plays a draining role; the cooled liquid leaves the heater radiator.
- Short couplings are required for the pump and thermostat.
If faulty pipes or coolant leaks are detected on a VAZ 2110-2112, professionals recommend immediately replacing the faulty elements.
"Folk" way
Folk craftsmen - these are brave and very desperate craftsmen - offer a much less labor-intensive method. The bottom line is that replacing the stove pipes (and the stove itself) is done without draining the coolant and without dismantling the instrument panel. The tools you will need are a set of screwdrivers, rags and a container (small) to drain the liquid from the pipes. In this case, replacing the heater radiator pipes is carried out according to the following scheme:
- Removing the terminals from the battery
- Close the heater tap
- We remove the right front seat (to make it easier to do the work)
- We unscrew the two screws securing the dashboard on the right side, and one screw located in the glove compartment, then, pulling the dashboard towards you, we place a wooden block
- Now there is a gap on the side of the passenger seat and you can get to the pipes and to the heater radiator itself
- Lay a rag on the floor of the cabin and prepare a container to collect the coolant
- Which will spill from the radiator and pipes
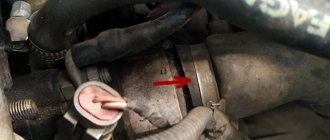
- We loosen the clamps of the pipes (photo above) and carefully, one by one, remove them from the radiator, replacing the container. 200 - 300 grams of coolant will drain into it
- Replace the pipes with new ones, and change the clamps, just in case.
- If necessary, unscrew the three bolts that secure the radiator to the stove and pull it down to the right
- We install the pipes and the new radiator in the reverse order.
Here are both methods, choose the one that suits you, and also watch a video on this topic.
Leak search
Finding out the reason for this state of affairs is not always easy. To do this, the driver will have to carefully examine the situation under the hood. Usually you can only notice a wet pan. In this case, it is worth checking the coolant level in the system. Most likely, there has clearly been a decline.
The cause and location of the leak is not easy to recognize. It is useful to “drive” the car at idle for some time so that the thermostat opens. And only when the optimal pressure is reached will the source of the leaks reveal itself. Most likely, one of the connections of the pipes is leaking, often it can be the pipes for supplying antifreeze to the heater radiator; if this is the case, we proceed to replacement.
Why did it happen so?
Perhaps the automatic requests do not belong to you, but to another user accessing the network from the same IP address as you. You need to enter the characters into the form once, after which we will remember you and be able to distinguish you from other users exiting from this IP. In this case, the page with the captcha will not bother you for quite a long time.
You may have add-ons installed in your browser that can make automatic search requests. In this case, we recommend that you disable them.
It is also possible that your computer is infected with a virus program that is using it to collect information. Maybe you should check your system for viruses.
If you have any problems or would like our support team, please use the feedback form.
In our climate, a car heater is an irreplaceable thing. It can sometimes come in handy even in summer))) Having driven through the winter without much hassle, the other day I discovered a wet spot under the car. You could even say puddle. It's always not pleasant when your car leaks.
Procedure for replacing heater pipes
Work should be carried out when the car engine has cooled down, as the coolant will need to be drained.
Preparing tools
Before you begin work, you need to prepare the necessary tools:
- screwdriver for plus;
- ratchet;
- extension;
- heads 13.8 and 7.
Dismantling faulty pipes
First you need to remove the air pipe that goes to the throttle valve (if it’s a carburetor, then the air filter).
Remove the windshield wiper blades. To do this, you need to unscrew the two 13 nuts and pull them up.
Remove the boot. Unscrew the five fastening screws, move the top part and pull it up.
Remove the frill. Unscrew the side fastenings of the frill, shown in step 2, and the four clamping screws, then simply lift it and put it aside.
Remove the stove casing. The stove casing consists of two parts. To begin, remove the left side of the casing - unscrew two screws and remove three clips, disconnect and remove through the left side. After this, you can begin to dismantle the right part of the casing - unscrew the four screws and the ground wire, disconnect the chip with the wires and snap off the two tin brackets on top, then remove it in the same way as the first part - through the left side.
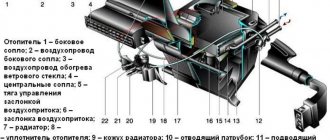
Remove the damper. To remove the damper, you need to lower it in the car, this will be in a hot air stream, then unscrew the two fastening screws and remove it.
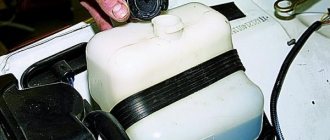
Drain the coolant. First you need to unscrew the filler plug, then open the tap on the radiator and unscrew the drain plug on the cylinder block.
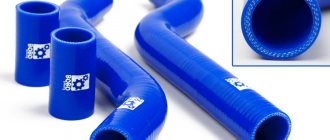
Remove the stove pipes. First, unscrew the clamps securing them and pull them - if they don’t come off, try to turn them.
After dismantling the old pipes, you can begin installing new ones.
Installation of new pipes
Experts recommend changing the clamps when replacing pipes on a VAZ 2110-2112.
- New pipes are installed, which perform drainage and supply functions.
- The remaining parts and assemblies must be put into place in reverse order.
- After installing and filling the system with coolant, it is important to check the tightness of all connections - if leaks are noticeable, then it is worth tightening them.
How to drain antifreeze
Now all that remains is to drain the antifreeze into a container. I used a 5L bottle and only drained from the block. See how to drain antifreeze here.
A piece of garden hose (about 1.5m) worked very well for draining.
That's all. After draining the coolant, I unscrewed the two clamps of the torn pipe and replaced it with a new one. That's where the pipe broke.
I didn’t encounter any particular difficulties in my work, even though I was doing it for the first time. As a result, I gained invaluable experience and money savings. The service would charge from 600 to 800 rubles. In addition, I wiped all the hidden cavities and removed debris from them. It's unlikely that a service station would do this to you. Video to help))) (replacing the stove)
Replacing the stove pipe of a VAZ 2110
As a rule, any car has a heater or, in other words, a stove. The role of such a device is important; the stove ensures the required temperature inside the cabin. With the help of an automated control system, it becomes possible to regulate the temperature with high accuracy. Of course, no one is immune from a breakdown of the stove on a VAZ 2110, so to reduce the risk of such a situation occurring, you need to check the outlet and inlet hoses more often. Replacing a hose on a VAZ 2110 stove is an important process. And in this article we will talk about how to replace the VAZ 2110 stove hose.
Hoses in the heater system of a VAZ 2110 car
Replacing a hose from a VAZ 2110 stove.
Each car has its own heating system, which most often uses liquid. In order to connect all the elements, you will need a variety of hoses. During the operation of the machine, close attention is paid to them. If the defect is not identified and corrected in time, or the hose on the stove is not replaced, problems may arise with the vehicle engine.
Note! Pay attention to both hoses and clamps, which ensure better sealing of the connection. A loose or improperly tightened clamp can cause an unplanned engine overhaul.
Cooling system pipes for VAZ 2110, 2111, 2112 (video)
Cooling system hoses VAZ 2110, 2111, 2112…
Hello dear readers of the blog RtiIvaz.ru. Today I want to continue the conversation about the auto radiator pipes of the cooling system of the VAZ Lada 2110 “ten”, Lada 2111 “eleventh” and 2112 Lada “twelfth”.
In the previous auto article, we looked at the radiator hoses of the cooling system of the VAZ 2108, 2109, 21099, 2113, 2114, 2115. We looked at the video and photos and found out what the sets of pipes of the “eight”, “nine”, “ninety-nine”, “thirteenth” are , the “fourteenth” and “fifteenth” Lada models differ from each other.
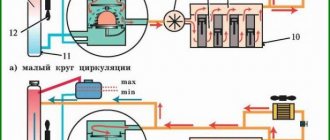
What is a radiator in a car:
A device for removing heat from the liquid that circulates in the engine cooling system.
We determined the “upper” supply and also found out which “lower” coolant outlet was a thick rubber hose. You have found out where which rubber tubes fit, today we will continue to look at the video of the Lada 2110, 2111, 2112 pipes.
The cooling system pipes are such a thing that they always seem to be in good condition, but they make themselves felt when you don’t expect them.
You've probably seen cars on the road more than once with their hoods open in a cloud of steam.
So the coolant floats, falling on the burning engine parts (exhaust manifold), escaping in a fountain through a burst rubber pipe.
Therefore, guys, be vigilant if you haven’t changed rubber hoses for a long time. Don’t tempt fate—guessing whether you’ll be lucky or not will be unlucky—but replace all the rubber hoses of your car in advance.
What kind of outlet and inlet rubber hoses of the VAZ 2110, 2111, 2112 radiator are they, look at the video and photo, friends...
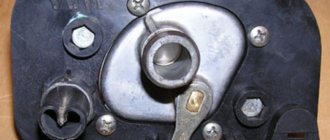
Look at the photo on the left, numbered -1, the rubber tube supplying coolant is the “upper” one, and numbered -2, the rubber tube is taking out the “lower” coolant. Numbered -3; -4 “shorts”, one of which is a bypass from the block head to the water pump, and the other “short” is a connecting coupling.
Work procedure
Replacing hoses on a VAZ 2110 stove
In the process of performing any work, a certain sequence must be observed; only if you take into account the instructions, recommendations and advice, the actions will be correct, high-quality and effective. So:
- First you need to disconnect the negative wire from the battery.
- Next, drain the coolant.
Note! Before draining the coolant, the engine must be completely cool, since at high temperatures the drained liquid will also be hot.
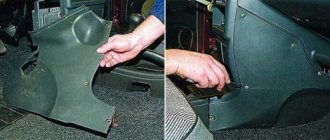
- Carefully remove the lining on the windshield - the frame trim and the sound insulation lining.
- The heating fan is removed.
Replacing hoses from the stove on a VAZ 2110
- The vacuum hose clamp is detached from the heater body.
- Using a screwdriver, remove three spring brackets designed to secure the front housing of the heating air collector.
- The fastening screws of the front housing are unscrewed.
- Now you can easily remove this housing directly.
- It is necessary to loosen the clamps and also disconnect the hoses from the fittings.
Installation of new hoses
Replacing heater hoses on a VAZ 2110
When replacing heater hoses on VAZ 2110 cars, it is also recommended to change the clamps that serve to connect all elements. It is advisable to carry out the work according to the algorithm below:
- Replacement is being made. The hoses on the stove, through which coolant is supplied and discharged from the stove radiator, are replaced with new ones.
- Other elements with nodes are secured in the reverse order.
- Coolant is poured into the cooling system and the tightness of the hoses and connections is assessed. If necessary, they need to be tightened.
Changing a tee or hose for draining fluid
Note! In some situations, coolant leaks at the connection points of the tee to the heater radiator, expansion tank and to the engine cooling system pump.
Replacing heater hoses on a VAZ 2110
In such cases, you can only get by by tightening the hose with new clamps.
Note! Tightening the clamps must be done with extreme caution so as not to damage the rubber of the hoses. This may result in replacement of the outlet or inlet element.
The hose can be repaired without removing it from the machine
VAZ 2110 hoses from the stove
It is recommended to carry out work in the following sequence:
- first the damaged end of the hose;
- the same piece of the new element is placed on a metal pipe, the length of which is about 60 mm and the diameter is 20 mm. Due to the low cost of this part, you can significantly save money and time on repairs;
- to reduce the tension of the hose, it needs to be increased by about 8 mm;
- if antifreeze leaks (see Replacing antifreeze - details of the process) from the joints of the hoses and the heating radiator, you will need to dismantle the vacuum booster.
Classic way
It is worth noting right away that it is quite labor-intensive and will take quite a lot of time. You will need a lot of patience and care (as mentioned above). The most difficult part is removing the instrument panel and installing it, as it is much more difficult to get the instrument panel into place correctly.
Tool
You will need:
- Coolant drain container
- Screwdriver Set
- Head with a wrench to unscrew the steering wheel
Let's start in order:
- Removing the terminals from the battery
- With the heater tap open, drain the coolant by unscrewing the drain plugs located on the radiator and cylinder block (into a substitute container)
- Removing the decorative trim from the steering wheel
- We unscrew the nut securing the steering wheel so that its end is flush with the end of the steering column shaft.
- The steering wheel is seated very tightly on the shaft splines, so for safety reasons it is not recommended to completely unscrew the nut securing the steering wheel: with a sharp impact, it will jump off the splines and can cause injury
- Be sure to mark the location of the steering wheel in relation to the shaft
- Knock the steering wheel off the shaft splines with sharp blows of your hand.
- Now you can finally unscrew the nut and remove the steering wheel
- Unscrew the six screws securing the lower steering column casing
- Remove the lower casing from the steering column, as well as the lining of the ignition switch (lock)
- Then remove the upper casing from the steering column
- Loosen the bolt securing the base under the steering switches
- We remove the base from the shaft, disconnect the blocks with wires (there are two of them) from the contacts of the car horn
- Now we disconnect the block with wiring from the windshield wiper and washer switch lever
- It is recommended to mark the terminals with wiring before disconnecting. This will help you avoid confusion during assembly and save time.
- Disconnect the block with wiring from the headlight and turn signal switch lever
- Pull the carburetor choke control handle (aka “choke”) towards you so that the draft comes out, remove the handle from it
- Unscrew the two screws securing the dashboard console trim
- Removing the cover from the console
- Remove the cigarette lighter from the socket
- We take out the ashtray from the nest by pressing on the plate to extinguish cigarettes
- Remove the handle that switches the heater fan
- Then we remove the three knobs that control the stove and hook them with a screwdriver
- Disconnect the block with wiring from the heater fan switch, located under the heater control panel
- Disconnect two wires from the contacts of the lamp illuminating the heater control panel
- Remove the headlight direction adjustment handle, just pull it towards you
- Now remove the instrument cluster lighting switch knob
- Unscrew the nut securing the instrument lighting switch
- Unscrew the nut securing the headlight hydraulic corrector
- We push the hydraulic corrector for headlights and the instrument lighting switch inside the panel
- Remove the side nozzles located on both sides of the dashboard using a screwdriver
- Unscrew one screw securing the trim on both sides of the dashboard
- Using a screwdriver, use a screwdriver to remove the exterior lighting switch.
- Disconnect the block with wires from the switch. Push the block inside the dashboard
- We use a screwdriver and remove the socket intended for radio equipment. If you have radio equipment installed on your VAZ 2109, remove it first
- We remove radio equipment according to the manufacturer’s instructions
- Then unscrew the screw securing the trim to the dashboard
- We insert two screwdrivers so that we can bend the plastic latches
- Raising the dashboard trim
- Disconnect the wiring harness from the cigarette lighter
- Disconnect the block with wiring from the block for lighting the cigarette lighter
- Disconnect the block with wiring from the lamp illuminating the hazard warning switch
- We disconnect the block with wiring from the hazard warning switch, and finally remove the dashboard trim
- Gently press down and remove the speaker cover located on the left side of the dashboard. Be careful - latches break easily
- Disconnect the block with wiring from the heated glass switch
- Remove the block from the rear fog lamp switch
- Unscrew the two screws securing the instrument cluster
- We take out the instrument cluster from the dashboard, unscrew the nut securing the cable from the speedometer and disconnect it
Removing the instrument panel
Attention: Disconnect the connectors with wiring for additional equipment, if installed on your car.
So:
- Disconnect the red block from the instrument cluster
- Then disconnect the block from the control system
- Disconnect the white block from the instrument cluster
- Disconnect the ignition switch block from the ignition relay
- Disconnect the ground wire of the ignition relay
- Disconnect the control lamp block for opening the air damper
- Unscrew one screw from the lower mounting of the dashboard on both sides
- Disconnect the drawer light lamp block
- Unscrew the two screws securing the heater control panel and lower it down
- Unscrew the two screws securing the air damper guide rod to the dashboard
- Unscrew two screws from the upper mounting of the dashboard on both sides
- We use a screwdriver and remove one plug at a time from both sides of the dashboard.
- Unscrew one screw from the side mounting of the dashboard on both sides
- Unscrew the screw of the central fastening of the instrument panel
- Remove the dashboard
- After replacing the pipes or the heater radiator itself, we assemble the panel in the reverse order
- After installing the panel, we check the operation of the switches and all devices to ensure they are connected correctly
Let's return to the heater radiator pipes; we have already removed the panel:
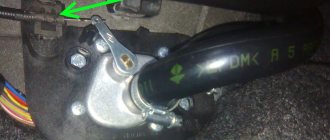
- We disconnect the plastic clamp located on the right side of the heater, which holds the damper rod that heats the windshield
- Loosen the clamps and disconnect both pipes from the heater tap from inside the car under the dashboard
Loosen the clamps and remove the pipes
- Then loosen the clamps and disconnect both pipes from the heater valve located in the engine compartment (if you are going to remove the heater valve, otherwise skip it)
Disconnect the pipes in the engine compartment
- We replace the pipes with new ones, it’s better to replace the clamps right away, even if they are still suitable, it’s better not to risk it
- If necessary, you can unscrew the three screws securing the radiator to the stove
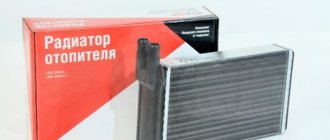
- And, raising the rod, pull out the heater radiator to check its condition and replace it
This is exactly how craftsmen are required to replace the VAZ 2109 stove pipes (replacement pipes) in service centers and auto repair shops. For owners who decide to do this work with their own hands, it is necessary to take into account that it will take 4-6 hours