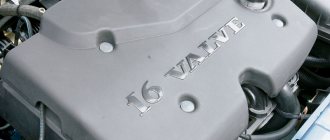
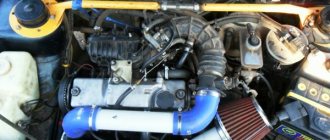
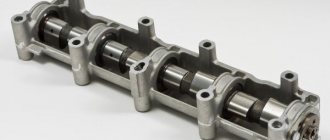
The VAZ 2109 camshaft is one of the main parts of the engine assembly, so it is very important to maintain its performance. The camshaft's job is to ensure the correct sequence of valve actuation during the combustion cycle. This part extremely rarely causes breakdowns in the nine, but still occasionally you have to check its condition. Let's look at how to properly disassemble the assembly and get to the camshaft, as well as what should be done if problems arise with this part.
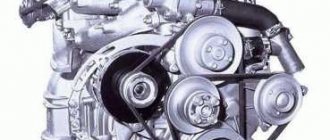
Engine assembly design
Replacing the camshaft on a VAZ 2109 is extremely rarely required due to the fact that it is one of the strongest parts in the design. The camshaft itself is a solid metal product with a set of cams, so it is not afraid of most loads.
However, under certain conditions the shaft may suffer mechanical damage or deformation. Most often these are collisions and accidents, less often - overloads. In such cases, it will simply need to be replaced with a new one along with other damaged parts.
Along with the camshaft, two more parts are often checked: the oil seal and the gear. The oil seal is a rubber-metal cuff that protects the shaft from foreign liquids, moisture and dirt. If it is damaged or deformed, this will lead to incorrect operation of the camshaft.
The gear is connected via a chain transmission to the crankshaft, which ensures the mutual operation of the 2 mechanisms. It may also become damaged, causing the engine to malfunction.
Sometimes the bed in which the part is placed becomes a problem. If liquid, dirt, dust, or oil gets there, this can affect the performance of the camshaft.
First signs of trouble
During a technical inspection, we check the above parts if the engine begins to malfunction.
On a VAZ 2109, the injector and on models with a carburetor will have similar problems: the camshaft knocks. The knocking may occur when the engine is started cold, and then stop, or not stop at all. Here's what can cause this phenomenon:
- Axial play of the camshaft has arisen, causing it to beat inside the mechanism.
- Worn cams or bearings.
- Camshaft bed defects.
- Malfunction of the fuel supply system, which leads to detonation and knocking. Because of this, the speed will fluctuate while the car is moving.
- The part is damaged: the neck is bent, the support has burst, the oil seal is worn out. If the problem is in the oil seal, an oil leak may occur. The oil level sensor will show a constant decrease in fluid.
- Using low-quality technical fluid. Usually changing the oil will solve the problem.
Based on the nature of the knock, it is quite difficult to determine where it comes from. If the knocking does not stop after the engine warms up, this is the last opportunity to detect a breakdown and fix it in time. If you don’t dare disassemble the unit yourself, take the car to a workshop, where they can replace all the faulty parts of the unit in a few hours.
How to get to the camshaft?
To get to the VAZ 2109 camshaft, you will need to dismantle several parts. Arm yourself with the following tools:
- hexagon;
- wrench 13 or similar with a socket head;
- replaceable head for 10;
- ratchet handle.
To start work, turn off the power to your “nine” by disconnecting the battery. Then you need to set the piston of the first cylinder to the top dead center position.
Now we dismantle the devices that will interfere with the work in the following order:
- Air filter.
- Gasoline pump.
- Distributor.
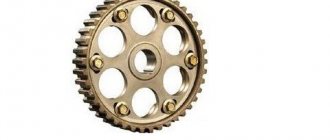
- Let's take care of the gear. Remove the timing belt from it and assess its condition. Installation of a split gear will only be necessary if the old one has visual defects: chips, damage, deformation. If everything is in order, simply remove it by unscrewing the fastener. Don't forget to pick up the key so you don't lose it.
- Remove the drive housing on which the distributor is located.
- Now the path to the camshaft housing is clear.
- Remove all body fasteners, there are 10 of them in total.
- Next, pull out the fastening studs. Once all the pins have been removed, the housing can be removed.
- And here is the camshaft. Now he can be taken out of bed and examined.
The VAZ 2109 camshaft will need to be replaced if it is bent or the cams are damaged. A new one will cost about 1000 rubles. The camshaft is installed in the reverse order. Follow the order of tightening the bolts on the body so that part of the assembly is assembled normally and all parts take their position. More specific information on how to tighten can be found in your vehicle's owner's manual.
Video “Eliminating knocking”
This video (Car Owner channel) shows the operation of a VAZ 2114 8 cl engine with a knock. And what is the way out of this situation?
The camshaft on VAZ 2109-2108 cars has to be changed quite rarely, and this should only be done if there is noticeable wear on the journals and cams. You can even check it without special equipment with your hands: by running your fingernail across the balls and cams across the cams, your finger should not catch on anything, that is, there should be no grooves or irregularities. If you can even feel wear with your finger, the camshaft must be replaced with a new one.
All work on removal and installation is carried out without any problems, even at home, because even for such a seemingly complex job, very few tools are needed. The list of what you need is given below:
- 5mm hex or similar bit with holder
- 13 open-end or socket wrench
- Socket head 10 deep
- Extension
- Ratchet handle
Before we begin performing this repair, we will need to complete the following steps:
- Remove the air filter
- Remove the fuel pump
- Dismantle the distributor
- Remove the camshaft sprocket, first removing the timing belt from it. Read more about this here.
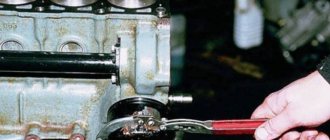
Also, you need to disconnect the auxiliary units drive housing, on which, by the way, the distributor is installed. To do this, you will need a hexagon, where we unscrew the bolt securing the housing:
And then we disconnect it, if necessary prying it with a thin flat screwdriver at the junction with the cylinder head:
Then you can start unscrewing the camshaft housing mounting nuts on the VAZ 2109-2108, and in total you will have to unscrew 10 pieces. They are all marked in the photo below:
If you plan to replace the body with a new one, then you need to unscrew the valve cover mounting studs from the old one, turning them out using a deep socket and a ratchet. After which you can remove the housings, short and long, since nothing else holds them:
Well, all that remains is to remove the camshaft itself from the bed, lifting it up:
If the shaft needs to be replaced, then a new one can be bought at almost any auto parts store, the price of which for a VAZ 2109-2108 is between 800-900 rubles. Installation is carried out in the reverse order of removal and it is worth paying attention that when replacing the camshaft, you will have to adjust the valves after assembly - accordingly, buy new adjusting washers of the appropriate size.
Design and malfunctions of valve stem seals
Modern valve seals are rubber caps with a powerful steel sleeve inside and expander springs. The task of the latter is to effectively fix the edge of the cap and the valve stem.
As a rule, rubber is used as a gasket material, which hardens over time, wears out and ceases to perform its functions normally. The result is engine oil entering the combustion chamber.
This problem can be recognized by one simple sign - thick bluish smoke begins to come out of the exhaust pipe, and oil consumption increases. In such a situation, it may be necessary to replace the valve stem seals on the VAZ 2109.
Where are the timing marks on a VAZ?
The 8-valve VAZ engine has one camshaft, and it is much easier to set marks on it than on a twin-shaft engine. Let's look at all the possible ways to find the extreme position of the camshaft and crankshaft.
Photo of VAZ 2108 timing marks
On the camshaft, as a rule, there is a mark on the pulley, such a small mark, and on the cylinder head there is an ebb with which this mark should coincide, or rather not even an ebb, but a protrusion on the shield, on the left side, when looking at the engine and camshaft from the front. Sometimes these marks are not observed; what to do in this case is described below.
The crankshaft is aligned according to the mark on the flywheel, on the gearbox, near the engine on top there is a hatch covered with a rubber plug. If you remove the plug, you will see marks on the flywheel and a protruding rod from the engine, which should coincide. But there may be a problem: the fact is that if the engine was disassembled and the flywheel was removed, then the flywheel can be placed on either side, that is, the mark will be God knows where, but not at TDC. There is no guide or eccentric on the flywheel; whichever side you put it on, that’s what it will become, even if you turn it 180 degrees.
In this case, you can look for the mark on the front of the engine - on the pulley and the return flow on the oil pump on the engine. But this is not the case on all engines; often this mark is missing. What to do in situations where no tags are found? Now the fun begins, in fact, marks are not needed on this engine, you can do without them.
Split gear adjustment technique
Of course, you understand that within the framework of one topic it is impossible to describe the methods for adjusting the split camshaft gear for all types of engines. But the principle will be very clear. We will present to you a technique for setting up a split gear on a VAZ 2108 - 2110 8V engine.
- We put a mark on the moving and stationary parts of the split gear, comparing it with the standard camshaft pulley;
- We install the gear on the camshaft, put on the timing belt. Next, check that the marks match: on the pulley and the back cover of the belt, on the flywheel, so that it is opposite the middle division of the scale;
- control of the intake and exhaust valves of the 4th cylinder by overlap. Both valves should be open the same amount. If this is not the case, then you need to loosen the bolts and rotate the camshaft relative to the outer part of the gear, obtaining the zero position of the camshaft.
Additional correction:
For low and medium speeds - turn the camshaft relative to the crankshaft in the direction of rotation. By doing this, we increase the opening angle of the intake valve, reducing the angle of gas-dynamic boost.
For high speeds , turn the camshaft relative to the crankshaft against the direction of rotation. By doing this we increase the angle of gas-dynamic boost, and accordingly, the power.
Important! When adjusting the valve timing, you must remember to set the initial ignition timing after rotating the camshaft.
Good luck adjusting the split gear.
Installation of the camshaft.
1. Clean the mating surfaces of the bearing housings and cylinder heads from the remains of old sealant and oil.
2. Lubricate the camshaft with engine oil. We place the camshaft in the cylinder head supports so that the convexities of the cams of the first cylinder are directed upward.
3. At the camshaft exit points, on the surface of the cylinder head, apply a thin layer of silicone sealant.
4. Install the beds and tighten the nuts evenly in two steps.
5. First, tighten the nuts in the sequence indicated in the diagram until the bed surfaces touch the cylinder head. The installed bed bushings must fit freely into their sockets.
6. Then tighten the nuts to a torque of 21.6 N•m (2.2 kgf.m) in the same sequence.
7. After the final tightening of the beds, carefully remove the squeezed out sealant. We check the thermal clearances of the valves and, if necessary, adjust them. Then install a new camshaft oil seal.
8. We will assemble in the reverse order of disassembly.
Engine tuning is carried out to increase the parameters and characteristics of the power and dynamics of the power unit. In this case, one important factor should be taken into account: it is necessary to replace all elements with sports ones, and not just one. First, let's replace the camshaft from standard to sports.
To remove the camshaft, you must remove the plastic alternator belt cover. After removing the casing, open the cylinder head cover
In this case, you should pay attention to the position of the crankshaft - TDC for the first cylinder
When removing the camshaft, it is not recommended to touch the large crankshaft, as this may reset the factory settings, which will be impossible to restore yourself.
Next, remove the timing belt. At this time, the camshaft must be jammed using a mounting tool. In this case, the camshaft should be with a spike in front. When removing the timing belt, you should act carefully so as not to damage the cylinder head; it is recommended to place a wooden plate or something similar under the mount to prevent damage to the cylinder head.
After the timing belt has been removed, unscrew the camshaft mounting bolt and remove its toothed wheel and key.
It is best to mark the main bearing caps; this will help avoid confusion during installation. It is also necessary to mark the disc pushers if they are replaced. This completes the stage of removing the old camshaft. Installation of a new, sports camshaft is carried out in the reverse order. Thanks to the replacement of the standard camshaft with a sports one, the knocking of “fingers” will not be heard when the engine is running. This is achieved due to an increase in the detonation limit.
Sources
- https://blogautolive.ru/remont/zamena-raspredvala-vaz-2110-2109
- https://vazikov.ru/vaz-2108-2109-21099/zamena-raspredvala-vaz-2109-na-sportivnyj.html
How to tighten main bearings and connecting rod bearings
So, taking into account the above, it becomes clear that the tightening torque of the main and connecting rod bearings is extremely important. Now let's move on to the assembly process itself.
- First of all, molar liners are installed in the bed of the molar necks. Please note that the middle liner is different from the others. Before installing the bearings, the preservative lubricant is removed, after which a little motor oil is applied to the surface. After this, the bed covers are placed, after which the tightening is carried out. The tightening torque should be that recommended for the specific model of the power unit. For example, for engines on the VAZ 2108 model, this figure can be from 68 to 84 Nm.
- Next, the connecting rod bearings are installed. During assembly, it is necessary to accurately install the covers in place. The specified covers are marked, that is, their arbitrary installation is not allowed. The tightening torque of the connecting rod bearings is slightly less compared to the main bearings (the indicator ranges from 43 to 53 Nm). For Lada Priora, the main bearings are tightened with a torque of 68.31-84.38, and the connecting rod bearings have a tightening torque of 43.3-53.5.
We make a washer.
For the material for the washer, I took a piece of galvanized sheet about 0.5mm thick and secured it to a piece of MDF panel with four self-tapping screws (so it wouldn’t fidget).
I drew 2 circles with a marker (inner diameter 25mm, outer 35mm) and hollowed out the inner diameter with a chisel.
I cut out the outer diameter with metal scissors, and I ended up with a curve like this, with the washer blank all covered in burrs:
I processed the inner diameter of the washer with a round file, and sharpened the sharp corners on the outer one:
Install the washer.
We put the washer on the camshaft (it should fit freely, if not, then adjust the dimensions).
I entered freely:
Put the cover back and tighten it.
Attention! Be sure to check if the camshaft is jammed. To do this, take a key set to 17 and try to rotate the camshaft
To do this, take a key set to 17 and try to rotate the camshaft.
It should turn with the same force as before installing the washer.
If the camshaft becomes very difficult to turn, or is completely jammed, then remove the cover again, take out the washer and grind it to thickness:
Shutdown.
After the washer is adjusted, the cap is tightened and the camshaft rotates freely - start the engine and enjoy the silence of its operation!
Replacing the camshaft oil seal on a VAZ 2109.
The VAZ 2109 camshaft oil seal is a ring with a solid outer race and an elastic inner edge. Over time, this elasticity is lost, which means the oil seal ceases to cope with its task 100 percent, and the oil begins to leak, creating many problems for the motorist: constantly dirty protection, increased oil consumption, timing belt rupture, etc. So as not to waste money in the future To solve all these problem-consequences, do not allow them to happen - only after noticing oil leaks and making sure that it is the oil seal that is to blame for them, change it immediately.
1. Turn off the power to the car.
3. Using a 17 socket, loosen the tension roller and remove the timing belt.
5. Remove the key.
6. Remove the oil seal by slightly prying it with a flat-head screwdriver. Before installing a new one in its place, lubricate the working side with engine oil.
7. Install the sealing collar with the lubricated side inside the block head. Using a wooden stick, carefully so as not to damage anything, tuck the lip of the oil seal onto the camshaft.
8. Finally seat the oil seal in its seat using a mandrel of suitable diameter.
9. Reassemble in reverse order:
Step-by-step instruction
If your engine is knocking and you decide to replace the camshaft, then prepare everything you need in advance. It is difficult to carry out this work without relevant experience, so it is good if you are assisted by a more experienced partner.
Stages of work
- The first step is to remove the camshaft pulley VAZ 2114 8 cl.
- We take out the pulley key located in the camshaft groove.
- Unscrew the nut that secures the rear cover of the timing belt.
- Unscrew the nuts that secure the bracket to the cable.
- Having loosened the screws of the hose clamps responsible for ventilation of the crankcase gases, we remove them.
- Having loosened the clamp of the hose through which the crankcase gases are ventilated, remove it.
- After unscrewing the nuts, remove the valve cover.
- We remove the gasket.
- After unscrewing the nuts and bolts, remove the plug.
- In several circles (to reduce the spring pressure), unscrew the 10 nuts securing the camshaft bearing housing.
- We remove the camshaft housings VAZ 2114 8 cl.
- After the rear timing belt drive cover is removed from the cylinder head, remove the camshaft.
- Remove the camshaft oil seal.
- Before installing a new shaft, it is necessary to clean the contacting surfaces of the cylinder head and bearings if any sealant or grease remains on them.
- Lubricate the bearing journals and cams with fresh grease.
- We place the shaft in the cylinder head supports so that the cams of the 1st cylinder are oriented upward.
- We apply sealant to the cylinder head planes that come into contact with the bearings.
- We install the bearing housings and tighten the nuts in 2 circles.
- First, we do not completely tighten them as shown in the photo until the bearing housing and the cylinder head are in contact.
- Going in the same sequence around the second circle, we tighten the nuts to a torque of 2.2 kgf/m.
- Remove the leaked sealant.
- We insert the oil seal.
- We install the camshaft toothed pulley and belt drive.
- We turn the crankshaft clockwise to place the same alignment marks on the camshaft pulley and the rear cover of the timing belt drive.
- Rotate the crankshaft about fifty degrees (2-3 teeth on the camshaft pulley).
- Using a feeler gauge, check the gaps at the 1st and 3rd camshaft cams.
- The distance between the cams and washers should be 0.20 millimeters for the intake valves and 0.35 millimeters for the exhaust valves. The error should not exceed 0.05 mm.
- After adjusting the remaining valves, the work can be considered completed.
Tightening diagram
First of all, it is important to remember that you need to pre-tighten the bolts in this order:
- the first two are installed above and below in the central holes;
- the third and fourth below, respectively, to the right and left of the middle one;
- the fifth and sixth at the top are also on both sides of the central one;
- the seventh and eighth go into the leftmost holes;
- the ninth and tenth to the right.
Next, you will need to tighten all the bolts in this order:
- the first stage - twisting is carried out to 2 kgf*m;
- on the second round, tightening is carried out according to the above algorithm, with the only difference being that the force is brought to 8 kgf*m;
- on the third pass, all bolts are turned exactly 90 degrees;
- The fourth stage fully corresponds to the previous one and is the final one.
When is it time to change the camshaft
Emergency intervention in the operation of the VAZ 2114 8 cl camshaft is necessary in the event of any obvious malfunctions. Signs may be different, for example, a knocking sound is heard when the engine is running or problems with the seals. You need to check what’s wrong in such a situation immediately, either yourself or at a service station.
If you determine that the problem is in the seals, then 10 minutes will be enough for you to make a replacement. The oil seals are located in easily accessible places and installing a new one does not require dismantling large systems and components. If you don’t know which one you need to replace, you can check this simply by looking at which one is already installed.
A more complex malfunction may occur if you hear a knocking sound in the engine. This malfunction may not progress, that is, the knocking does not increase, while the readings of all sensors are normal
Some drivers take this calmly; they are not bothered by this state of affairs and continue to use the vehicle without paying attention to it. But the solution is simple, if your engine knocks, it means that the camshaft end play has increased
In this case, you can put a washer between the camshaft and the cover and there is a high probability that the knocking will stop. A fairly simple way out of this situation.
Some cars are equipped with camshaft position sensors, whose task is to signal in case of malfunction or malfunction of the system. But sometimes sensors fail and may need to be replaced. It is inexpensive and the price of such a sensor on the market does not exceed $10, and you can find out which one to buy from the car’s instructions. Installing such a sensor is simple, so there is no point in stopping there.
Replacement
If checking the oil pressure and ventilation system shows that the leak is caused by a violation of the integrity of the camshaft oil seal, the element must be replaced.
Replacement process
We have prepared instructions for such a case.
- Turn off the power to the car. To do this, simply remove the negative terminal from the battery and throw it to the side.
- Set the piston from the first cylinder to the TDC position - top dead center.
- Remove the drive gear from the camshaft.
- After removing the gear, make sure that the key is not left on the camshaft. Be sure to remove the key and set it aside in a visible place so as not to lose this element.
- Using an awl or flathead screwdriver, remove the old oil seal. It usually comes out quite easily with little effort.
- Do not forget to first make sure that the new camshaft oil seal you have chosen is not a fake, has no defects on the working edge, and there are no dents or sagging rubber on the product. Unfortunately, today there are more than enough fakes and products of questionable quality. By installing such an element instead of a damaged old one, the repair will not bring results, since the oil will still continue to leak.
- If the seal turns out to be good, install it. To make your task easier, make a small chamfer around the perimeter of the working edge using a needle file. This will make the edge of the new oil seal fit lighter and easier on the camshaft.
- Treat all rubbing elements with regular engine oil and place a new oil seal on the camshaft.
- Using a piece of wood or a wood stick, straighten the edge a little. It sometimes bends a little during installation.
- Arm yourself with a mandrel that matches the diameter of the oil seal and complete its installation in its seat.
- The process is completed by reassembling the unit, which involves installing the camshaft pulley and returning the negative terminal to the battery.
- Start the engine and check how effectively the new camshaft element does its job.
Reassembly
If the leak suddenly continues, be sure to re-check the condition of the crankcase ventilation system, make sure there are no pinches on the hoses and measure the oil pressure. Perhaps you have overlooked something. Or the seal was defective.
https://youtube.com/watch?v=HV36-sJcgz4
With the right approach, the procedure takes no more than 30-60 minutes. Even a beginner can do this task.
Causes of oil leaks
As you know, a damaged oil seal leads to oil leakage, which is unacceptable. But before blaming this element for everything, you need to know about other reasons that lead to similar symptoms.
| Cause | Your actions |
| Dirty crankcase ventilation system | When the system is contaminated, the fluid flow is disrupted, pressure increases, and traces of oil leakage from the crankcase appear. You need to clean the crankcase ventilation system |
| Pinched crankcase ventilation system hoses | If the hoses are pinched, this will also soon lead to a leak. The problem can be solved in two ways - restore the structure of the hoses or replace them with new ones in case of wear |
| Deformation, wear of the oil seal | This is a case that we will talk about in more detail in our article. Replacing the oil seal is not difficult, so it is not necessary to contact a service station. |
Damage to the oil seal leads to leaks. As a result, oil gets onto the timing belt, which negatively affects its condition, performance and efficiency of the entire engine. Therefore, replacement is a necessary measure.
Eliminate camshaft knock (axial runout) with your own hands
Many already know that the VAZ 2111 injection engines have the following disease: “Axial camshaft runout”. This disease does not progress and does not cause damage to other timing components, but it manifests itself in the form of an unpleasant camshaft knock. It just so happened that the developers of the 2111 engine missed this point.
Where carburetor engines used to have a fuel pump and distributor, injection engines have a regular plug into which the camshaft rests. The camshaft axial play set by the manufacturer should not exceed 0.15-0.20mm. Over time, as the camshaft pastel wears out, the axial play increases, and a distinct knock begins to be heard from under the valve cover. Of course, you can continue to drive with this knock and not worry, but not every car enthusiast will be pleased.
I am sure that almost any auto repair shop will tell you: “Either ignore this knock, or change the entire head!” But there is one simple and absolutely free way to eliminate this annoying knocking noise by placing a washer between the camshaft and its side cover! Below is a detailed description and photo report of the work done.
Checking the camshaft axial play.
Remove the timing belt cover and start the engine. Then, with the engine running, press the handle of a screwdriver into the camshaft gear bolt. If the knock disappears when pressed, the reason is: Axial runout of the camshaft.
How to set timing marks on a VAZ 2108, 2109, 2199 if there are no marks?
If the timing belt has not yet been removed and you just need to make sure that the timing marks are installed correctly, first unscrew the spark plugs to make it easier to turn the crankshaft. Then put the car on a jack with the front wheel hanging, put it in gear and rotate the hanging wheel - this is the easiest way to turn the crankshaft. By looking into the spark plug hole, you can see what position the piston is in, and if you stick a screwdriver in there and slowly turn the crankshaft, you can easily catch TDC by looking at the screwdriver.
When TDC is determined in this way, remove the valve cover and look at how the camshaft is installed, how it should be - a little lower.
If the timing belt has already been removed and you need to set the position of the crankshaft and camshaft, then you should start by making sure that none of the pistons is at top dead center. This is necessary so that when the camshaft is turned, the valves do not rest against the piston and become bent.
Now we proceed to install the camshaft in the desired position. To do this, we need to remove the valve cover and look in which direction the cams are facing. In this case, we are not interested in all the cams, but only those that are responsible for the first cylinder, since we will set the TDC of the first cylinder.
Under the valve cover we will see the crankshaft, and there are many cams on it (8 in total, 2 cams per cylinder). The first two cams are our first cylinder. And we need to align the shaft in such a way that these two cams simultaneously press on the valves. This will be TDC, valve overlap. At the same time, the cams of the fourth cylinder (the two farthest cams) will not put pressure on the valves, but will look up in the letter V. This is TDC. The beauty is that the camshaft itself is correctly installed at the desired point under the action of the valve springs and does not go anywhere. Now you can install the crankshaft.
Now you need to set the piston of the first or fourth cylinder to TDC, no matter which one you look at, they move synchronously. It is better to shine a flashlight into the spark plug hole, the piston will be visible there. When the piston is expected to reach top dead center, you need to insert something long, such as a screwdriver, into the spark plug hole. By turning the crankshaft back and forth a few degrees, you can catch the TDC, the screwdriver will come out to the maximum amount. That's it, the marks are installed, you can put on the timing belt.
The timing belt is put first on the crankshaft, then on the camshaft, tensioned as much as possible on the right side of the sprockets, and on the left side it is tensioned with a tensioner pulley.
2.7. Removing and installing the camshaft
| GENERAL INFORMATION |
Camshaft and valve drive of a 4-cylinder petrol engine
| 1. Main bearing caps 2. Nut, 20 Nm 3. Key (operating without tightening) 4. Camshaft 5. Valve cotters 6. Outer and inner valve springs 7. Valve guide. Repair version with collar 8. Cylinder head 9. O-ring | 10. Valve guides 11. Valves 12. Plug 13. Plug 14. Lower valve spring retainer 15. Oil seal 16. Upper valve spring retainer. Designation: wide chamfer on the outside, chamfer on the inside 17. Hydraulic disc pusher |
4-CYLINDER PETROL ENGINE
Removal
| EXECUTION ORDER |
| 1. Remove the upper timing belt guard. |
| 2. Remove the cylinder head cover. |
| 3. Set the crankshaft to the TDC position for cylinder 1 (see subsection 2.5.2). |
| Warning Do not change the position of the engine crankshaft again. |
| 4. Loosen the toothed belt and remove it from the top of the camshaft gear (see subsection 2.5.1). |
| 5. Wedge the camshaft at the front with a spike. To do this, insert a suitable spike or a strong screwdriver into the hole of the camshaft gear and press it against the upper edge of the cylinder head. To avoid damage to the sealing surface of the cylinder head, use a wooden gasket. Hold the screwdriver firmly and loosen the camshaft bolt. Unscrew and remove the camshaft gear, if necessary, drive it in with light blows of a rubber hammer. Remove the key from the camshaft. |
| 6. Mark all main bearing caps. Four covers, from right to left, looking in the direction of travel, mark them with numbers from 1 to 4. |
| 7. Remove covers 1 and 3. Then unscrew covers 2 and 4 alternately crosswise. |
| 8. Remove the camshaft. |
| Warning If the disc pushers are removed, they must be marked so that they can be installed again in their original places. Place the disc tappets with the sliding surface (moving towards the camshaft) down. |
Installation
EXECUTION ORDER
1. Before installation, if necessary, you can check the camshaft runout at the factory. Wear limit: 0.01 mm. 2. If the old camshaft is installed again on an engine with high mileage or noise in the valve drive, it is recommended to check the axial clearance. Wear limit: 0.15 mm. The measurement is carried out with the poppet tappets removed and the first and last main bearing caps installed. 3. Install a new camshaft sealing ring. Pre-oil the lips and the outer edge of the O-ring.
4 Make a trial installation of the bearing caps, paying attention to the position of the centers. The covers must be installed so that the holes in the covers and the cylinder head match. When doing this, pay attention to the marks.
5. If the disc pushers were removed, install them in their original places. Lubricate the disc pushers with a thin layer of oil and do not distort them during installation.
Warning Disc pushers cannot be swapped!
6. Lubricate with oil and install the camshaft.
Warning In this case, the cams of cylinder 1 must be directed upwards. Install the bearing caps according to the marks. Pay attention to the position of the centers.
7. Tighten covers 2 and 4 crosswise to a torque of 20 Nm.
8. Install covers 1 and 3 and tighten to 20 Nm.
9. Install the camshaft key. Install the drive gear and tighten to a torque of 80 Nm, while holding the gear with a spike.
10. Place the toothed belt on the camshaft gear, paying attention to the correct position of the intermediate shaft and vibration damper (see subsection 2.5.2).
11. Tension the toothed belt (see subsection 2.5.1).
12
Install a new cylinder head cover gasket, carefully tightening the cover bolts to a torque of 10 Nm.
13. Install the toothed belt guard.
Warning If new disc tappets are installed, the engine must not be started for approximately 30 minutes, otherwise the valves will hit the pistons!
Replacement Guide
This video shows how to fix camshaft runout and replace the gasket.
Tools
For repairs you will need a minimum set of tools:
- spanner set to “17”;
- head with extension 10;
- slotted (flat) screwdriver;
- cuff mandrel;
- hammer.
Necessary tools for repair
Stages
The procedure for replacing the camshaft oil seal on a VAZ2109 consists of two stages: removal and installation. When removing parts, remember the order in order to follow it when reassembling.
Removal
- First of all, you should turn off the power to the car by removing the negative terminal from the battery.
- Next, you need to set the position of the piston in the first cylinder to TDC of the compression stroke. To do this, mark the crankshaft and camshaft.
- Now, by loosening the camshaft mounting bolt and the tension roller, you can remove the timing belt.
- Then unscrew the bolt and remove the camshaft pulley and key.
- Using a screwdriver or awl, remove the camshaft oil seal.
Installation
- Before installing a new consumable, you need to lubricate its edge with engine oil.
- The part is installed with the working edge facing the cylinder head. Then you need to use a screwdriver to tuck the edge of the rubber ring on the camshaft.
- After installation, the gasket must be driven in using a hammer and a mandrel of the appropriate diameter until it stops.
- After installing the cuff, all oil stains should be removed so that smudges can be seen later.
- Next, the previously removed parts are installed in reverse order.
After completing the repair, you should start the engine and check its operation: no knocks or extraneous sounds should be heard.
If the engine is knocking, then you need to look for the cause of the knocking and fix the problem, perhaps you need to tighten the bolts.
Timing assembly
If you initially placed the first cylinder at TDC, then you will not have any problems with assembly. If you decide not to bother, then now you have a great opportunity to set the gas distribution mechanism according to the marks
If you did everything correctly during dismantling, then when assembling the timing drive, pay attention to several points. Many people have questions about proper camshaft pulley installation.
Remember that it is placed with the protrusion inward
It is also important to tension the belt correctly. A correctly tensioned belt allows you to turn the engine 90° with two fingers. Conclusion
Problems with the camshaft cuff on “nines” are not uncommon. Therefore, it is advisable for every owner of a car of this model to know how to replace the camshaft oil seal on a VAZ 2109. The work is not difficult, but since you have to work with the timing drive, this work must be done very carefully. Any mistake is fraught with malfunctions in the operation of the entire power unit.