Just a few years ago, installing a car alarm with your own hands seemed like the job of experienced electricians. However, the rapid development of Internet communications (forums, video instructions, richly illustrated reviews and informational articles on websites) has prompted many car enthusiasts to think about the possibility of self-installation.
Are there any advantages to installing it yourself, what qualifications and tools are needed for this, what kind of alarms are there, and how to technologically install a car alarm yourself - the answers to these questions are intended to help those who still doubt their abilities.
For video instructions with practical tips on installing an alarm system yourself, see the end of this article.
Advantages of installing a car alarm
A car alarm is an integral part of a purchased car, no matter new or used. And, if it is missing or has become unusable, or for some reason does not suit the new car owner, the need arises to equip or re-equip the car.
When purchasing a new car, a car dealership almost always offers to install a car alarm, warning that if the equipment is installed elsewhere or independently, the car will be “removed from warranty.” Such a warning scares off many car enthusiasts, but, meanwhile, it is completely illegal: refusal of warranty service is legal only if it is proven that the cause of the car breakdown was unqualified installation. If you carefully follow the alarm manufacturer's instructions, such a reason is practically excluded.
Advantages of installing a car alarm yourself:
- Saving money is the first advantage of self-installation: in specialized installation centers the cost of work is comparable to the cost of the alarm itself, and in car dealerships these costs are even (sometimes twice) higher.
- Getting pleasure from all stages of working with fairly complex equipment (selection, acquisition, installation, debugging) and confidence in the quality of their implementation is undoubtedly an advantage for technology lovers.
- Individual solutions (choosing the location of the control unit, forced alarm switch off, security system sensors, as well as adding non-standard additional devices) when installed independently can significantly complicate the actions of an attacker, who often acts according to a template scheme.
This is not a complete list of the advantages of self-installation, and every car enthusiast can add their own “advantages” to it.
Central locking device
Central locking is a rather complex system that includes electrical as well as mechanical components. This system makes it possible to carry out various manipulations with all car locks at the same time. To do this, the driver simply needs to turn the key or press a small button on the remote control. The system is capable of controlling not only door locks, but also the gas tank hatch lock, as well as the trunk lid. The design of the system can be quite complex, and the process of connecting the security system to the central locking without any knowledge of its structure is impossible.
The central lock consists of several connected elements. This is a control unit, door sensors, buttons, and activators.
Types and configurations of car alarms
When installing an alarm system yourself, the degree of complexity of the process depends on the type of equipment chosen. And the type, in turn, is determined by what security and service functions the car owner would like to receive from the alarm system. By and large, modern car alarms (more precisely, security systems) can be divided into three large classes:
- Simple car alarms;
- Alarms with feedback;
- GSM alarms.
Simple car alarms (colloquially “openers”) have a minimum set of service functions:
- remote arming (disarming),
- remote unlocking (locking) of doors,
- “panic” mode (scaring away with sound and light signals or searching for a car in a large busy parking lot).
Several security functions are usually added to this set:
- in case of unauthorized access, engine start blocking,
- triggering of sound and light signals from penetration into the interior, engine compartment and trunk (unauthorized unlocking) and from mechanical impacts on the protected vehicle (impact, rocking).
A distinctive feature of this type of alarm is the outdated (and therefore easily identified by attackers) radio communication protocol (simply - a radio command transmitted from the key fob to the control unit). This is perhaps the main drawback of such a system.
In addition, commands are sent from the key fob, and what the car “responses” to them can only be understood when it is within sight and/or audibility. Therefore, such alarms are also called one-way, and their range of action is limited to several tens of meters. The main advantage of alarm systems for cars of this class is their low price.
Car alarms with feedback have an expanded range of service functions and a modern interactive radio communication protocol. In everyday language, this means that the owner of the car has the opportunity not only to send a control signal, but also to receive from the car a report on its execution, as well as information about the current state (whether there have been any hacking attempts) on the screen of the key fob pager. As for the dialogue protocol, it provides not just a command to the control unit, but the exchange of data with it, which is a very difficult task to intercept.
Finally, it should be noted that the service capabilities of this type of equipment have significantly expanded:
- remote engine start,
- turbo timer (engine idling to cool the turbocharger after parking and arming),
- window closer (hatch if equipped) – automatic raising of the windows if they were open,
- special interior lighting modes and much more.
The range of such alarms can reach several hundred meters, and the price is on average two to three times higher than that of openers.
GSM car alarms are a fundamentally new level of security systems. The main unit contains a GSM module (hence the name), a geopositioning module (GPS) and a controller (in fact, it is a computer for collecting, processing and issuing information).
The first module is essentially similar to a mobile phone - receiving and transmitting signals within the range of mobile communications. The second one uses a satellite to determine the geoposition of the car at the current moment. The controller processes information from sensors and calculates the parameters of control signals.
Monitoring the condition and controlling the vehicle can thus be carried out via SMS and voice messages, as well as through a web interface (on the Internet, or, as they say now, via telematics).
In addition to a qualitatively new expansion of functionality, this type of alarm has an unlimited range of action within the coverage area of the cellular network. Unfortunately, the price of such equipment is fundamentally higher than the cost of traditional car alarms.
Once the type of alarm has been selected and the required set of security and service functions has been determined, it is necessary to understand whether all these functions are provided by a specific model of the security system and whether all the necessary sensors and actuators are included in the delivery package.
For example, a car owner would like to install a tilt/roll sensor, and there is the possibility of connecting such a sensor, but the sensor itself is not included in the kit. Therefore, before purchasing an alarm, you must carefully study its technical characteristics.
How to choose an anti-theft system?
First of all, before purchasing an anti-theft system, you should decide on your budget; the functionality of the car alarm will largely depend on it. Therefore, before you buy a device, you should note in advance all the characteristics required for it.
This list includes:
- System range. Usually, the larger the radius, the better, because even if you move further away from your car, you will always know about the state of its protection.
- The automatic engine warm-up function has become popular recently among our car enthusiasts. Thanks to it, you can set the alarm so that at a certain time the engine starts on its own. This is especially true in winter, when you don’t really want to get into a cold car.
- Auto-lock option - if the driver forgets to turn on the alarm, this option will activate the protection independently.
- Protective functionality. For example, it could be an automatic grabber, with which you can diagnose the installed system.
- Anti-scanner. Thanks to this feature, the system will be protected from digital hacking if attackers try to intercept commands. Before purchasing, check reviews from car enthusiasts to know which systems of which brands work well and which ones are prone to malfunctions.
Tools and materials for installing car alarms
The set of tools for installing a car alarm is well known to anyone who has dealt with electrics:
- multimeter for measuring voltage and determining breaks (short circuits) in electrical circuits;
- a set of screwdrivers or a universal screwdriver (most often a regular Phillips screwdriver is required, but a number of car brands require an asterisk);
- a set of socket wrenches (most often a head of 10 is enough);
- soldering iron;
- special tool for stripping wires, or a knife and wire cutters;
- plastic “mounting tool” – for dismantling plastic interior panels.
In addition to the tool, you will need the following consumables:
- high-quality black electrical tape (so that it does not differ much from the factory wiring);
- plastic clamps for fastening wiring, the main unit, and some types of sensors;
- foam;
- Double-sided tape.
You may also need additional wires, since the standard ones are sometimes not long enough
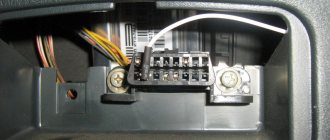
Features of the VAZ central lock
Everyone knows that the Lada models listed here use central locking controlled by negative polarity. This literally means the following: we apply “0 Volt” to one wire - all locks close. We apply the same voltage to the other wire (second) - they unlock. This is done in many European cars. What does it mean to “supply “0 Volt”? This means connecting the wire to ground.
The central locking control unit has the following wiring:
- Black wire – ground (connected all the time);
- Pink – power supply “+12V” (built-in fuse is used);
- Yellow, red - connected to the actuators in the doors (these wires are not connected to the signaling system!);
- Brown, white - control wires, just those that have already been mentioned.
Let's look at the central locking connection diagram, which is implemented “from the factory”:
First, we can decide that the triangular connector (labeled “C”) is suitable for our purposes, since it contains control contacts
But please note that the standard circuit uses a microswitch located in the driver's door. We will break two wires coming from this switch, and the relays built into the alarm unit will be connected to the breaks
Other options are excluded.
The procedure for installing and connecting an alarm system in a car
Before proceeding with installation, it is necessary to carefully study not only the instructions supplied with the alarm, but also the operating instructions for the car in order to understand the possible locations of the main unit, sensors, antenna, LED indicator, actuators (for example, activators, if the car is standard not equipped with central locking). In addition, you need to study the standard electrical circuits of the car in order to understand in which places it is advisable to connect the electrical circuits of the security system.
General rules to follow when installing and connecting the alarm:
- all non-standard connectors (for example, wire extensions) must be carefully soldered and insulated;
- wiring is laid in places that do not allow moisture to enter;
- where it is necessary to bend the wiring, you should put a protective rubber or plastic tube (“cambric”) on it;
- When carrying out installation work, you must disconnect the battery.
If it is necessary to check the voltage in electrical circuits, under no circumstances should you allow the contacts of the vehicle’s standard connectors to short-circuit with the body (ground).
The sequence of the main stages of installing an alarm system may be different: some experts recommend starting with installing the main unit, others advise connecting the central locking or light part first.
It seems that it is advisable to start with determining the location of the “heart” of the alarm system - the main unit, since the convenience of subsequent installation depends on this. The general recommendation is to place the unit behind the dashboard in the area of the steering column. This option involves dismantling the dashboard panel - an operation that requires a certain skill. There are options for placing the block under the panel, but in this case the convenience of performing subsequent operations becomes significantly less.
To dismantle the dashboard panel, you must also remove the side plastic trims of the windshield, and then disassemble the plastic steering column housing (to access the ignition switch). An indicator LED is usually placed in the left trim, and wires are laid to the antenna, which is usually placed on the windshield above the rear view mirror or in the upper corner.
The main practical aspects of panel dismantling operations can be viewed in detail in the video at the end of this article.
Connecting a car alarm
After determining the location of the main alarm unit, the stage of connecting it to power follows (it is better to do this with the ignition off), which is similar to connecting a car radio. One of the wires of the ignition switch is usually used as a positive wire, or a wire connected through a fuse to the “plus” of the battery. The negative wire is attached at one end to the metal body of the car, and at the other end it is inserted into the main alarm unit.
The next operation is connecting the central lock. In modern cars, the central locking contacts can be found in one place - the so-called comfort unit, usually located on the driver's side. This connection point may be located in another location, so it is necessary to study the electrical diagrams of a specific car model. If central locking is not standard on the car, then it will have to be installed additionally.
Light signaling uses cyclic activation of direction indicators as alarm indicators. To solve this problem, the connection points should be looked for in the area of the hazard warning switch.
The alarm unit is connected to the ignition switch, as a rule, using a pair of separate wires according to the diagram of the security system manufacturer.
To open doors in modern cars, you can use the corresponding dashboard contacts. To open the hood and trunk, it is necessary to install the “limit switches” included in the alarm kit.
The sound alarm siren is installed with its horn down in the engine compartment in places with minimal exposure to moisture and temperature. Most often in the area of the shock absorber cup or windshield wiper mechanism
The ideal place for the shock sensor is the middle part of the car, but most often (due to the difficulty of positioning it there) installation is carried out near the location of the main alarm unit.
The alarm disable button (VALET) is installed in a hidden place, and the “secrecy” parameter is determined solely by the ingenuity of the car owner.
Trust but check
Now that the installer has completed the job, it's time to accept it. Even if a famous master did it, it’s worth checking everything at once, everyone makes mistakes. The author of these lines once managed to block the power supply of the airbags by miscalculating a bundle of absolutely identical yellow wires. If the alarm was installed in a car dealership or in an “ara-service”, then control is required.
Let's go step by step:
- Check the control of all door switches, trunk, hood. Open the doors one at a time - on many cars the wires from the door switches are not parallelized, and there are results of the work of the “masters” where the alarm only controls the driver’s door.
- We control the operation of the locks: we arm the car, open the door with the key and try to start it. The fuel pump should work normally, all circuits that turn on with the ignition should work. Only the “Check Engine” light on the dashboard is allowed. The engine should not start.
- We check the central locking if the car did not have a standard one and additional drives were installed. We carefully look at the behavior of the locking rods: they should make a full stroke when locking and unlocking, but if the rod does not reach the extreme position even a little (making a characteristic back-and-forth movement of a millimeter at the end of the stroke), then adjust the drive again, even if everything is now works: after a while problems will begin.
- If autostart was installed, check whether both keys work (take a pause of 10-20 seconds between using different keys: the immobilizer may be activated with a delay, and immediately after turning off the ignition, even a “blank” engine will start again). Next, we test how the car starts and turns off using the key fob. Pay attention to whether all circuits turn off after turning off the car - if there are errors in the installation, the radio may not go to sleep. The double click of the door locks after turning off the engine should not frighten - this simulates the driver's exit, and thus makes the car “fall asleep”.
- We check the auto-arming and auto-reset of the alarm: first disarm the car and do not take any action. After 10-15 seconds, the car should lock itself and arm itself. Repeat the same steps, but after disarming, opening and closing the door - the car should not be armed. Otherwise, one day it will be locked with the keys inside - according to the law of meanness, if something can happen, it will happen at the most inopportune time.
- We check the auxiliary functions: monitoring the temperature in the cabin and the engine temperature (if your alarm system supports it), auto-folding mirrors, and so on.
- We definitely ask where the Valet service button is installed. It will also come in handy - set the secret emergency shutdown code yourself (we already wrote about this using the StarLine A93 as an example), do not leave the default code.
Everything is fine? You can go home.
Checking alarm operation and adjusting sensors
If you install the alarm yourself for the first time, errors at some stages are almost inevitable. It is important that they do not lead to serious negative consequences due to non-compliance with the general rules of installation work.
Therefore, checking that the connection points are selected correctly and that the security and service functions operate properly should be carried out at each stage until final assembly. The process of programming the corresponding functions is described in detail in the instructions for the alarm.
Adjusting the sensitivity of sensors, especially the shock sensor, deserves special attention. The adjusting screws are usually located in a visible place, and the adjustment itself is carried out (after connecting the sensor) by test mechanical effects on the body (tapping). If you leave the sensor at maximum sensitivity, the alarm may be triggered by slight gusts of wind or vehicles passing nearby.
After final assembly, you should once again carefully check that all the desired functions of the installed equipment operate.
The video below shows in detail the process of installing a car alarm with feedback yourself.