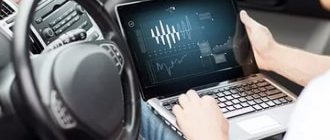
A video recorder is a device that is used to record the situation on the road while the car is moving or parked. Nowadays there is such a gadget in almost every car. Usually it is connected through the cigarette lighter, but often there are several modern devices in the car that require the same connection, so the question of how to connect the recorder without a cigarette lighter interests many car enthusiasts.
- Fastening the wires
- How to connect a DVR without a cigarette lighter
Connection through the ceiling lamp
Video: connecting the recorder to the lampshade
- Video: connecting the recorder to the ignition switch
- Video: how to connect a DVR to the fuse box
Preparing the device for installation
In general, this connection is called by the officials as hidden wiring of a DVR. Hidden because the wire will only be visible in the place where it connects to the recorder. We also suggest finding out where it is best to place the DVR.
Unscrew the ring that secures the positive (central) terminal of the DVR:
As soon as you unscrew it, the contact will fall out, followed by the spring and fuse. The contact is a cup. We strip a piece of red wire and insert it into the black ring. We place the bare area under the cup, assemble the spring, install the fuse and tighten the ring with the contact.
How to install a DVR?
We install the DVR on the glass. We disassemble the glove box and take it out. The part with the adapter and attached drives remains here for now, and we pull the wire to the recorder from here:
Of course, the stand will need to be disassembled. Then we hide the wire under the ceiling and connect it to the recorder. We make a reserve loop around the mirror and connect.
We remove the two upper connectors; there is a yellow wire on the brown one. Connect the red wire of the recorder to it. And on white there is black. Connect the negative (black) wire of the DVR to it.
Insert the connectors into place, wind up the rest of the DVR wires and tie them with electrical tape to any wiring harness. Reassemble the glove compartment.
Lada Granta, like any other modern car, is complemented by car owners with their usual equipment: a recorder, radar detector or navigator. All this electronics is powered from the cigarette lighter connector, but on our cars, unlike most foreign cars, the power to the cigarette lighter is not turned off after stopping the engine, you have to pull out the plug manually, and the occupied niche for the cigarette lighter is not convenient for everyone. To get out of this situation, you can connect the equipment to the car wiring. This can be done in two ways, the simplest one is implemented on a Luxury vehicle, thanks to the presence of the “Comfort Block”, but we will connect the rest of the equipment in a more complex way. I would like to warn you in advance: any tampering with the electrical wiring outside of an accredited service center will void the vehicle’s wiring warranty. Before visiting the dealer for warranty wiring repairs, it is recommended
remove installed devices.
Connecting the recorder and radar detector
For those who still decide to install it themselves, the following lines. Since most of the “Norms” and “Standards” are on our roads, let’s start with them. We will power the wiring from the light control module (LCM). Remove the cover of the fuse box, unscrew one screw securing the MCU, and disconnect the block.
We find contacts numbered 10 and 8. Contact 10 is a plus (+), contact 8 is a minus (-). You can connect it either into a wire break or re-crimp it together with the standard wiring. We drag the instrument wires under the roof sheathing, along the roof pillar, connect and return everything to its place. Now the power to the devices will be connected when the ignition is turned on and turned off when the engine is stopped.
The option for the “Lux” version is simpler. We will connect to the navigation light block. We snap out the lamp board, this can be done with a simple slotted screwdriver and look for white-red and brown wires there. The red and white wire is positive (+), the black wire is negative (-). We connect and return everything to its place. Now power will be supplied to the devices when the vehicle is disarmed and will stop 10 minutes after arming.
This completes the installation.
Do you also want to know how to install the on-board computer STATE X1 in the Lada Granta? Read how. And also see other articles on repair, tuning and maintenance of Grants.
A visual video on connecting the recorder and radar detector to the Lada Granta:
Connecting the recorder to the lighting lamp and the cost of installation services
To perform independent installation, connection and configuration of a video recording device, certain technical and electromechanical knowledge is required. Not every driver or vehicle owner knows how to work with wiring. To avoid negative consequences, it is best to seek help from special car service stations or services. Any company that provides installation and configuration services for video recording devices must have an appropriate certificate.
It is impossible to determine the exact cost of providing installation and configuration services, since the price is determined by a number of factors, for example, the type of equipment, the number of video cameras, the make of the car, etc. The average price for installing and connecting a DVR in a car is 1,500 rubles. As practice shows, this price is set for connecting a recording device with one built-in camera, hidden laying of connecting lines (under the casing). When connecting the DVR to the vehicle’s on-board network, as well as installing additional equipment (GPS module, remote video cameras), the price varies from 2,000 to 5,000 rubles.
The video shows the operation of a DVR connected to the lamp.
Installation and connection to a power supply of video recording devices at a professional level costs from 9,000 to 30,000 rubles. The cost of connection and installation includes:
- Installation of individual fixing modules;
- Organization of remote control and viewing of video information;
- Connection of the “black box” complex.
When installing and configuring equipment of this type in cars that are under warranty, the company must provide the appropriate warranty and package of documents. The completed documentation is transferred to official representative offices and dealers of a specific car brand.
How to connect a recording device to a lighting fixture yourself? Before starting installation work, you need to purchase certain equipment:
- Screwdrivers;
- Tester;
- Connecting terminals (if necessary);
- Insulating tape;
- Knife;
- Hexagon;
- Plastic clips.
Power is supplied to the lampshade immediately after opening the lock on the door. The supply of energy stops approximately ten minutes after the car is set to alarm, since all devices are de-energized. The lighting device is considered the preferred method of hidden connection of video recording equipment, since the lampshade is located closest to the windshield. Before starting the connection, install the device on the windshield.
Next, the connecting cable lines are laid. In some car brands, sun visors must be removed to conceal wiring. This will not be difficult, since such actions are performed by pressing the fasteners on both sides, and then carefully pushing the devices down. In some cars, these visors are screwed on with screws, in which case they need to be unscrewed.
Next, remove the protective panel from the lampshade
You can carefully pry up the decorative trim with a screwdriver and, using your hands, remove it from the mount
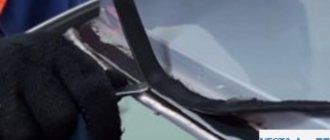
Then you need to unscrew the two screws and smoothly remove the housing of the lighting shade. After this, the contact group is turned off and the wires are disconnected from the housing.
The ceiling trim is carefully detached and a connecting cable is pulled under it in the direction from the DVR to the lighting fixture. Next, the contacts from the adapter are displayed. Connecting cables must be stripped on both sides. The wires are then twisted and insulated. When connecting wires, polarity must be observed. To prevent the wires from sagging, they can be secured with special ties or madeleine.
After completing the connecting steps, you should check the operation of the DVR. If the connection is correct, an image will be displayed on the monitor or the indicator lamp will light up. The final step is to install the lampshade into the connector and secure it with bolts. The trim and sun visors are installed in place.
Connecting a DVR without a cigarette lighter in a car
Some DVRs contain small built-in batteries - they are enough to continuously record images for 10-15 minutes. To fully use the device, you need to connect the device to the vehicle’s on-board network. The standard connection via the cigarette lighter is inconvenient because:
- the cigarette lighter may be busy;
- excess wires hanging from top to bottom;
- In some cars, the power to the cigarette lighter is not turned off; when the ignition is turned off, this can drain the battery.
The owner is wondering how to use the recorder in a car without a cigarette lighter to ensure safety.
By battery
The method, although reliable, is not easy to implement. It is better to entrust such work to a person with a technical education. To reproduce the connection, you will need to purchase an adapter, a charging mechanism and a 15A fuse.
Proceed in the following order:
- Install the DVR in the planned location.
- Connect the cables through the adapter, taking into account the polarity.
- Pass the wire under the trim and pull it to the engine compartment.
- Install the fuse.
- Connect the positive to the battery terminal, and the negative to the on-board power supply cable.
Please note that with this type of connection the camcorder will not turn off at all, so the battery will drain quickly.
When using such a connection, it is advisable to install a camera shutdown button at the same time in order to save battery power.
Basic methods
If the cigarette lighter is faulty or occupied by other devices, use non-standard methods for connecting the DVR. With their help, there will be no need to use extra connectors.
The DVR is connected in the following ways:
- through a lampshade located on the ceiling;
- to ignition;
- directly to the battery;
- to the radio power supply;
- to the inner surface of the cigarette lighter.
The most common methods used are connection through the lampshade and ignition.
Before installing the recorder in the car, you need to decide where to mount the device.
Let's consider two fastening options:
using a suction cup;
It is recommended to use the standard fastening method - with a suction cup, since the suction cup comes complete with the device and can be easily removed from the glass, unlike adhesive tape.
Lamp lighting
If the device is located on top, it is recommended to connect the DVR to the lampshade. This is the closest power supply point. To complete the task you will need the following tools:
- flat screwdriver and Phillips screwdriver;
- a set of cables with which the device will be connected to electricity;
- a set of fastening brackets with Velcro;
- insulating tape;
- soldering iron;
- female cigarette lighter socket (optional).
Wiring Guide:
- The upper lampshade is disassembled using a screwdriver with a Phillips or flat tip - depending on the type of fastener.
- The contacts of the lampshade and the recorder are connected plus to plus, minus to minus. You can connect the ends of the wiring to the lamp plug.
It is impossible to insulate wires; this is stated in all rules for using electrical equipment. A poor connection often causes interference in video recording and distorts the recording. To determine which wire to connect the lamp to the recorder using a multimeter, marking the wires will also help. Red is a plus. Black is a minus.
The standard plug for supplying power to the recorder does not fit - it is disassembled or an additional female cigarette lighter socket is purchased. It is recommended to entrust the analysis to a specialist with technical education or work experience. Safety when connected to the lampshade is ensured by the power module. It is sold in many stores.
To ensure maximum safety when connecting to a lighting device, a power module is used. It must be purchased separately from the set as it is not included in the package.
Example of installation on a Lada Granta
For example, consider installing a recorder through a lampshade on a Lada Grant. On this car, the lamp does not turn off immediately after turning off the ignition, but after 10-15 minutes.
In order not to cut the standard power cable of the recorder, we will buy a female cigarette lighter socket with wires.
Let's disassemble the lampshade. Attaches with two screws and one latch.
Turn off the power supply to the lamp.
Next you need a soldering iron. We solder the “mother” socket with the lampshade. Red wire to red, black to black.
Next, we insert the power supply of the recorder into the socket and put everything back together.
We watch the video montage through the lampshade.
Through the ignition
When connected through the ignition, the DVR will begin to function only after turning the key. Sequence of actions for installing the device:
- Fix the equipment and connect it via an adapter.
- The cables are laid along the bottom or top of the windshield and connected to the ignition system.
- The plus from the ignition is connected to the plus of the recorder, the minus to the minus. The only difficulty here is determining where the plus and minus are. You can look at the car diagram or use a tester and call the contacts.
- Now attach the negative to the negative terminals of the wiring.
Via power supply to the radio
The connection takes place according to the standard procedure - by connecting wires and insulating the junction point. Some radio models operate at a voltage of 5V, then the switching cables go directly to the plug.
First of all, you need to measure the voltage level at all points. For this purpose, a test device is used. The standard unit or additional transformer is located inside the dashboard. The recorder is mounted on a metal support frame. It is worth making sure that the equipped unit does not interfere with the climate control control mechanisms.
It is not recommended to place the power supply close to air ducts that heat up during operation. If the connection is made to points with a voltage of 5V, then you need to lay the wires to the area where the DVR will be located.
To battery
Such a connection is a complex undertaking, but very reliable. The load on the battery will not be large. But in this case it is necessary to use an adapter or a combination with a starter-charger. Additionally, purchase a 15 A fuse.
The recorder is connected through the engine compartment. This is done in one of two ways - directly using a fuse or through a mounting block in which backup power points are located.
The contact with the plus sign is fed to the battery, and the minus is fed to a free wire of the same polarity. Detailed algorithm:
- The DVR is placed in the selected location.
- Connect the wire through the adapter, observing the polarity. If the user confuses, the device may fail or burn out.
- Now the cable is passed under the casing and sent to the engine compartment. To better protect the circuit, install a fuse.
What is the danger of non-standard connection of the recorder?
Sometimes connecting the DVR using non-standard methods and on your own with imperfect knowledge is considered dangerous. Vehicle manufacturers advise against resorting to such measures, since standard fuses and electrical circuits are intended for short-term use. With constant use, cables are subject to thermal aging.
The fuse does not react to such phenomena - it is created taking into account the possibility of switching off when boundary current indicators occur. If the user begins to connect the recorder to the battery, but you need to buy a special power disconnect button so that you can turn off the power to the recorder. With a direct connection, the device will work continuously, which means the battery will quickly discharge.
All of the above methods will soon cease to be used, because 90% of car radios are equipped with a USB port. These connectors are used for charging gadgets and phones. It’s worth adding to the material and telling you how to hide the wires. There are special boxes on sale that are installed on top of the upholstery. There you can hide the cables.
Another decent option is to swipe it behind the glove compartment. But to do this you need to remove it. When laying wires, make sure that they do not come into contact with moving elements and do not heat up when operating with the heating system pipes.
Another method is to hide the wires under a rug. The upholstery is also removed, and the cable is pulled in the direction of the central tunnel.
It is possible to install a video recorder in a car yourself without using a cigarette lighter, but it is difficult. This work should only be carried out by a person experienced in this field. If the car owner has not installed it before, it is recommended to call a specialist.
I think many people are familiar with the lack of sockets for connecting the recorder and charging a mobile phone, as well as a bunch of wires coming from the cigarette lighter doppelganger.
In new cars, car owners do not want to be powered from the wiring (for example, from the ceiling light), because... this may void the warranty. For such cases, the Chinese came up with another method, without a collective farm and rations.
1. Car Power Adapter Converter Inverter DC12V to 5 V 3A - 190r
2. Auto Car Blade Fuse Taps Add-a-Circuit Adapter Holder 32 V (ATO, ATC) - 60r (you need to choose according to the type of fuses in your car)
Instead of a double fuse, I saw options with soldering the wire directly to the fuse, but for 60 rubles you can buy such a thing and not bother.
3. Micro USB cable - 120 rubles for 2 m., I found a meter cable in the bins.
4. Consumables: double-sided tape, electrical tape, 5 ampere fuse, M8 nut
The “fuse double” has 2 connectors, one for the original fuse from the block, the second goes to the adapter. We connect the fuses. I will insert it into the fuse box in the car in the place of the automatic transmission fuse (since I have a manual transmission, it is empty)
We crimp the “+” from the adapter with the wire from the fuse. (the fuse double comes with its own crimp sleeve)
We throw the negative wire onto the body. I have a stud next to me that attaches the torpedo to the body. We check the functionality of the circuit.
Next we hide the adapter. I glued it to the fuse box with double-sided tape.
Then we stretch the USB cables to the location of the gadgets and connect them to the adapter. I pulled one cable through the driver's pillar along the ceiling to connect the recorder and brought the second one out from below the pillar to charge the phone. (the lower cable was specially brought out with a margin so that if necessary, you could connect the radar detector to the instrument panel)
This is how everything looks assembled: 2 micro USB wires on top and bottom, the cigarette lighter is free. The recorder turns on when you turn on the ignition in the car.
Ps On my Octavia, the fuse block cover does not close tightly due to the “double”, so I’ll have to do a little tricky work and solder the wire directly to the fuse. But in this case, you can only use an empty slot, or there should be a 5-amp fuse in place of the original fuse, so as not to burn the gadgets.
Price: 400 rubles including accessories and USB cable.
Possible duplicates found
Automotive community
12.8K posts 34.8K subscribers
Community Rules
We prohibit:
-Break the rules of the site.
-Create posts that do not correspond to the topic of the community.
-Advertise anything.
-Accordions are not advisable (ignoring the accordion meter is punishable by flugegeheimen).
-Brew chamomile tea in a giraffe costume.
We are allowed:
-Participate in the life of the community.
-Suggest topics for posts.
-Call the administrator or community moderators if necessary.
-Express ideas to improve the Automotive Community.
-Image a horse when commenting.
Cancellation of the warranty entails maintenance not completed on time, and not installed additional ones. the equipment is not from the dealer for a lot of money. This story is told in the ears by the dealers themselves when they are scamming for extras. Ask them to show at least some paper about this. To remove a car from warranty due to an incorrectly installed add-on. electronics, the dealer must first prove that it was this equipment that caused the failure of factory electronics components.
That's it. In all my cars, the regulator was connected to the dome light or to the ignition switch and the dealer didn’t even hesitate even once.
and I have a buffer of half a kilowatt. The wires are connected directly to the battery, a normal one is 25 kg. The dealer didn’t even fart when my battery died, he replaced it under warranty.
KG in this case stands for “Flexible Cable”.
Welding cable KG 25, GOST 24334-80, high-current copper, cross-section 25 sq. mm
A 500 watt BUFFER is like one tit? Ahah
What are the difficulties with AvtoVAZ?
Well, if they remove the warranty, it will definitely not be the entire car, but only the part that was damaged by the additional extra charges. I myself had a question about installing a recorder, for 28 ka from a dealer, or 6 ka from non-officials, I decided to take a chance with a ceiling light)
I know little about electronics and even less about cars
— connect to the wiring of a pissing light fixture — will void the warranty
— doesn’t it entail connecting to the fuse block of all the important, bitch, components of the car?
The question is a little different: by connecting it to the wiring, the integrity of the insulation is violated, which can lead to questions, but with such a connection, you can remove everything in a minute.
You have a lot of empty pins there, why come up with such hemorrhoids?
We plugged the pin into the standard place and ran the wire where needed.
here is the link, choose which ones you need and install
For example, in my car, as far as I remember, powering the interior light is a very different story, and the book says that connecting anything additional there is strictly prohibited. And when a customer complains about electrical issues, this is one of the first points at which the official dealer is ordered to measure electricity consumption. Why? Very simply, the interior lamp is included in the power circuit, which goes into sleep mode in a special way. And if consumption along this chain exceeds the norm, then the car will not go into “anabiosis”, which occurs approximately 15-20 minutes after being locked in the parking lot. And modern cars are stuffed with overdrive electronics. And in practical terms, this means that after leaving such a “live” car overnight, in the morning the driver may well find that there is almost no charge left in the battery.
The USB cables are somehow tightly curled
Not right away, but the braid will come around.
I did it a little easier. I connected to the cigarette lighter wiring with a splitter and routed this entire beard under the dashboard.
Choosing a place to install the DVR is impossible without taking into account the following requirements:
- maintaining visibility of the road surface;
- ensuring optimal shooting angle;
- free access to the gadget at any time to quickly change settings.
The windshield is considered the traditional place to install the device in question, but another option is the torpedo.
Be sure to read our expert's very useful article in which he talks in detail about how to set up a DVR.
Another useful gadget is a memory card for the DVR. How to choose and install it correctly, read our author’s material.
We also recommend that you read an interesting review of the best 3-in-1 DVRs and a description of the principle of their operation.
So, here are the two best options for installing the device.
- The windshield behind the rearview mirror is ideal if the recorder is compact and lightweight. The camera's view is maximum, and nothing interferes with the driver. The disadvantage is the difficulty of quickly deploying the camera if necessary, for example, to film a conversation with a traffic police inspector. The view can be spoiled by a dangling wire, especially when the car performs sharp maneuvers.
- The area on the dashboard is suitable for heavier models of DVRs, which are fixed more securely on a horizontal plane. Among the advantages of this option, it is worth highlighting the ability to take the gadget with you when the car is stationary, as well as its stable fixation. Disadvantages include the fact that the car's hood limits the camera's lower view.
Project 4: How to connect a DVR: options, diagrams, examples.
Kuzyma
Beginning
- 9 Jun 2011
- #1
- 10 Jun 2011
How to connect a DVR
Connecting a car recorder in the usual way from the cigarette lighter circuits makes it difficult to record video while parked, since they are de-energized without the ignition key.
Therefore, we abandon the standard connection diagram, install several parts and get the ability to independently turn on the recorder in the parking lot.
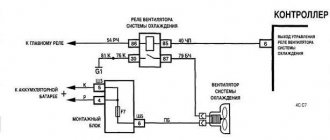
Diodes - to decouple circuits, you can take Schottkys, for example from an old computer power supply, or any others with a current of 1 A and higher.
On the diagram: F1, F2
- standard ones in the car fuse box;
S1
- ignition;
S2
— any small-sized key for turning on the recorder in the parking lot (in the example in the photo it is indicated by an arrow, it is additionally installed on the interior lamp of the Lancer X);
F3
- any fuse for current 0.5-2A
R
— recorder connection connector.
Almost all the parts are “hidden” under the car’s headliner.
Attachments
Kuzyma
Beginning
“ground” from the interior lamp lamp.
“+” switchable from the radio
“+” non-switchable from the battery pulled through the fuse to the subwoofer (you can from the radio, but I was too lazy to disassemble the panel again)
Dmitriu
Advanced
- 10 Jun 2011
Why engage in perversion? Why solder any circuits?
All cars have a middle position of the ignition key (well, it’s a little different on cars without a key).
And anyway, why plug the recorder into the cigarette lighter? Are there not enough extra wires? It’s easier to attach a high-quality tee to a separate fuse, secure the cigarette lighter tee under the dashboard and enjoy the absence of hanging wires.
Kuzyma
Beginning
- 10 Jun 2011
Added after 4 minutes 41 seconds:
Why engage in perversion? Why solder any circuits?
All cars have a middle position of the ignition key (well, it’s a little different on cars without a key).
You apparently didn't read the topic carefully.
Do you leave the key in the lock every time you park? Tell us your parking location! :ROFL:
Mikhailoff
Moderator
- 10 Jun 2011
Kuzyma
I’m not an electronics engineer, but in general I understand such simple circuits (or I think I understand, maybe I’m mistaken). And therefore - a question. Why are there diodes there? What is their meaning? It is enough just to cut it in parallel to two wires. One - through the ignition switch, the second - through the key on the lampshade. I see that the diodes block passage in the opposite direction, in case I turned on the ignition and forgot to turn off the key on the lamp, and vice versa. But in my opinion nothing will happen without diodes. Two pluses from the same circuit will simply meet... And fuse F3 - why? No, well, the fuse probably won’t be superfluous, but it simply duplicates fuse F2. or am I missing something?
It would be much more interesting to look at a circuit that would provide a power delay of 5-10 seconds when turned on, and continue to supply power for 5-10 seconds after turning off. This would be useful in situations: You turned off the engine, but did not turn the key all the way, so that the radio would continue to work. And after some time you need to start the car again. But on most cars the key will not turn to the starter position until it is completely unscrewed in the opposite direction. Therefore, you turn off the ignition completely, and then immediately turn it on again and start the car. What is the registrar doing at this time? It receives a signal to turn off and begins to turn off. This lasts from 1 to 4 seconds, depending on the recorder model. In the meantime, it turns off - you have already turned the ignition on again. But the recorder can no longer catch the command to turn on, because it has not yet turned off. Thus, it turns out that the car is started, but the recorder is turned off. And such quick mode changes often lead to the recorders freezing, which can be treated by pressing the reset button or removing the battery. To avoid such situations, a circuit with a delay on and off is needed. And if the turn-on delay is easy to do with the help of one resistor and one connector, then the turn-off delay is no longer so easy to do. On an old car, I soldered a circuit using one 555 microcircuit. But the circuit is not the simplest. Cheap though.
Kuzyma
Beginning
- 10 Jun 2011
1. It’s nice to talk with an intelligent person. You are not an electronics engineer, but you absolutely understood the purpose of a pair of diodes. Denouement. This doesn’t make you wonder in any car, “what would happen if. "
2. Purpose of F3. The cigarette lighter, where many people get voltage to power various devices, including the recorder, has a 16A fuse.
Let me remind you: a fuse is a metamorphosis that contains a calibrated wire with a cross-section designed for a certain current. The higher the current, the larger the cross section and vice versa. At some value it melts, breaking the chain.
So the Chinese manage to install power conductors on a device with a cross-section that “puffs” (sometimes with a natural flame!) at currents noticeably less than 16A (current of a standard fuse). And if the parking record switch is turned on while driving, then this short circuit current will reach the sum of the fuse currents! Therefore, despite the fact that I am a neat person, I would not clean it up.
3. We need to experiment with your option, I think it’s easier to implement. Add a capacitor of approximately 6800 μF or more to my circuit after the diodes (you need to experiment, it depends on the current consumption of a particular device) and the recorder will not turn off either during startup or during other short-term voltage drops. Why it needs a diode, I think you can guess for yourself!
Quick installation of the DVR into a USB connector
The advantages of this method of installing a DVR or radar detector:
- Connecting the accessory to the USB connector; we do not interfere with the car’s wiring (we maintain the warranty);
- Minimum time required (about 5-10 minutes);
- The recorder wire does not dangle, it is hidden;
The order of laying the wire (from the windshield) to the USB connector (at the bottom of the panel):
- If you decide to place the device behind the interior mirror (option A), then we hide the wire under the ceiling trim (put our fingers under the edge). If the accessory is fixed to the panel (option B), then we lay the wires under the edge of the dashboard in the area of the windshield;
- Remove the windshield pillar trim (remove the seal, pull the trim away from the door, snapping off the plastic clips, then pull up, removing the hooks at the bottom of the trims from the panel). We fix the wire into standard clamps;
- We lay the wire between the right side of the panel and the body. The gap is formed after dismantling the door seal;
- We lay the wire through the groove and pull it towards the tunnel under the glove compartment;
- We hide the wire between the tunnel and the panel. To ensure it is securely fixed, wrap a little electrical tape around the wire.
The process of connecting the DVR is also shown in the video:
The disadvantage of connecting additional electrical equipment this way is that the USB connector will be busy all the time.
How to properly install a DVR in a car
p, blockquote 6,0,0,0,0 —>
Each of the options for installing DVRs has its pros and cons. Let's look at the most common of them.
p, blockquote 7,0,0,0,0 —>
Suction cup
It is the simplest existing method of mounting a DVR. Requires no tools during installation. It is usually supplied complete with the equipment. When choosing a location for installing the recorder on a suction cup, the car owner is usually guided by the following rules:
p, blockquote 8,0,0,0,0 —>
- the DVR and the suction cup should not interfere with the visibility of the driver’s area, and ideally the passenger area too;
- DVR controls must be within reach of the driver's service area;
- The recorder must provide a maximum viewing angle.
To install the DVR on a suction cup you need:
p, blockquote 9,0,0,0,0 —>
- degrease the suction cup installation site using a soft rag moistened with alcohol or another mild, non-greasy solvent;
- wait for the installation site to dry;
- fasten the suction cup, checking the reliability of the fastener.
Some car owners wet the installation site with water before attaching the suction cup. In case of good degreasing, this is not necessary.
p, blockquote 10,0,0,0,0 —> adsp-pro-1 —>
p, blockquote 11,0,1,0,0 —>
- supplied complete with equipment;
- ease of installation and dismantling, there is the possibility of daily installation and removal of the suction cup;
- compactness.
Main disadvantages: unstable installation, especially in the cold season, unaesthetic appearance.
p, blockquote 12,0,0,0,0 —>
The suction cup behind the rearview mirror is installed for small-sized DVR models. Main advantages: it practically does not interfere with visibility, is invisible to inspectors and thieves, and has a more aesthetic appearance.
On double-sided tape
A sticker in the form of double-sided tape is more practical than a suction cup, but has a number of disadvantages:
p, blockquote 14,0,0,0,0 —>
- it is impossible to dismantle the DVR without damaging the sticker;
- the quality of installation depends on the material of the selected double-sided tape (it must be heat and moisture resistant);
- in the absence of experience, the DVR may not be installed correctly the first time;
- When attaching the recorder directly to the windshield, the device may overheat when exposed to direct sunlight in the warm season.
There are options for removable mounting of the DVR with a platform permanently installed using a sticker. It's more optimal.
On the dashboard
Some models of DVRs have the option of mounting on a car dashboard. Most often this is done using double-sided tape. The advantages of such fasteners:
p, blockquote 16,0,0,0,0 —>
- it is easier to connect the power supply;
- ease of installation;
- reliability of fastening;
- ease of access to the recorder controls.
The main disadvantage is the reduced viewing angle.
p, blockquote 17,0,0,0,0 —>
In the rearview mirror
A video recorder built into the rearview mirror is usually installed at service centers. It has a permanent power connection. These are usually premium models.
p, blockquote 18,0,0,0,0 —>
Methods for connecting a DVR
To start the camera functioning, after installation, it must be connected. The connection may be different depending on where the device is located. Let's say if the gadget is mounted at the top of the windshield, then it would be advisable to connect it to a lamp located on the ceiling. The most popular places to connect include:
To the lampshade
Through the radio
Battery connection
Connection using the ignition switch
These are fairly simple and standard ways to connect the recorder. Often the cigarette lighter serves as the connection point, but this method is not entirely convenient, since it only functions when the ignition is on.
Installing a DVR with a rear view camera
Considering the driving culture and the state of domestic roads, there is no need to talk about the benefits of a DVR.
And if until recently an ordinary video camera on a suction cup was a source of pride for a car owner, then the functionality of a modern recorder is comparable to the capabilities of a computer. Below we will look at the selection criteria and consider how to install a DVR with a rear view camera, depending on its design and your wishes. Let's talk about the main thing right away: decide on the type of device. There are only two of them:
— classic is a separate two-channel display that is installed on the dashboard or windshield;
- a mirror with a built-in front camera and a connector for connecting a rear view camera - combines the functions of a mirror and a display, mounted on a standard mirror in the cabin or replaces it.
The obvious advantage of the second option is the possibility of permanent installation. At the same time, the windshield and dashboard are not cluttered with additional gadgets, and the DVR itself, outwardly indistinguishable from an ordinary mirror, does not arouse interest among unscrupulous citizens.
Both types of two-channel DVRs of the latest generation with a remote rear view camera are equipped approximately the same, and their installation differs only in the way the display is mounted. More about this.
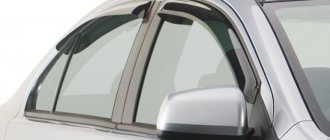
Fastening the wires
There are two ways to attach the wires that go to the recorder from the power source.
- Hidden installation involves fixing the wires under the dashboard and then under the pillar trim. When using this method, it is important to leave a little free wire near the gadget so that it is convenient to turn the recorder if necessary.
- Open installation involves the use of plastic brackets to secure the wires to the side post and ceiling. Velcro brackets are included in many models. This method is not the most reliable, but easier to implement. As for the questionable reliability, the Velcro will often come off.
Typical recorder installation locations
The installation location of the device is important for laying power wires and choosing where to connect the DVR. The main places for installing DVRs were the top panel of the dashboard and the windshield of the car.
The advantages of mounting the device on the dashboard are the stable position of the recorder and the ability to remove it when parked in the yard. The disadvantage of this arrangement is that the lower view of the video camera is limited by the hood of the car.
When installing the DVR on the windshield, the hanging power cord interferes with the view, which often manifests itself during sudden maneuvers of the car. Otherwise, the location of the camera behind the interior rearview mirror is quite convenient.
Connection methods without a cigarette lighter
If your DVR is connected via a USB connector, there will be no problems with an always busy cigarette lighter. In other cases, it remains to use non-standard connection methods using a standard plug.
Connection to the lampshade
In this case, connecting a DVR without a cigarette lighter involves using the lampshade as the nearest power supply point.
- Use a Phillips or classic screwdriver to disassemble the front interior light.
- Solder the plug wires to the cable connectors or the negative and positive pads.
- Make sure that all connections are secure, otherwise the device will experience interference and the video recording may be distorted.
- Use a universal multimeter to check the mains voltage of the lighting system, determine the ground in the lamp cable and the connection points of the positive wire.
- Disassemble the standard plug of the device, since it is not suitable for supplying power from the lighting system to the recorder. At this stage, it is important to have electrical installation skills.
- Thanks to a special power module, you can ensure complete safety when connecting to a lampshade. The built-in 150 ohm resistor is a key benefit of the power supply. In some cases, it is worth adding load resistors to the electrical circuit if the DVR consumption is less than 200 mA.
- Get rid of the trim on the side walls of the windshield so that you can use a hidden installation of wires to the dome light or the hole in the dashboard.
- If you prefer an open installation, you can lay the cable at the junction of the windshield and the pillar. Make sure that the color of the wire matches the interior trim. Secure it firmly with adhesive plastic staples.
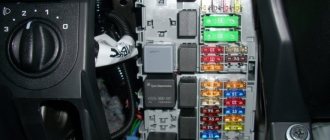
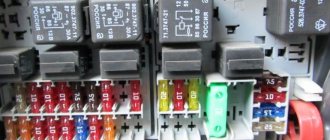
Connection to fuse box
Connecting the DVR plug to the fuse box is a safe method. Let's look at how to connect a DVR in this way, and what you need for this:
- buy a classic fuse for your car;
- solder the wire from the positive contact of the plug to one of the legs, and solder the wire with the ring to the negative contact of the plug;
- fix the wire with the ring on the dashboard frame with a screw;
- All that remains is to install a fuse in the free socket of the block.
If the recorder's power supply is 5 volts, there is no need to disassemble the plug. The voltage of the car battery is reduced to the required level due to the electrical circuit of the plug.
Connecting to the power supply of the car radio
In this case, the process is even simpler, since the power supply of this device also corresponds to 5 V. There is no need to use adapters and adapters. It is enough to fix the gadget and power it to the orange wire that leads to the car radio. The wire can be found under the front panel.
You may be interested in interesting material that tells in detail how to connect your phone to the radio.
Connection to ignition
The method under consideration is considered the least used, since the recorder will only be able to operate after turning the key.
For this method you will need to do the following:
- fix the gadget and connect it using the adapter;
- wires can be laid along the bottom or top of the windshield and connected to the ignition system;
- at the next stage, you need to find the positive terminal using a tester and attach a wire with the same polarity to it;
- All that remains is to secure the negative (to the negative contacts of the wiring of the car or radio).
Connecting a DVR without using USB
This method is suitable for those who want to leave the USB connector free. The following is a list of contacts to which you can connect the DVR. To be completely sure, we recommend rechecking the contacts with a multimeter.
1. Connection to the ERA-GLONASS lighting unit.
Details in the video:
2. To the ISO connector of the radio:
- +12V from the battery - contact A4;
- +12V when ACC is on - pin A7;
- "Ground" - pin A8.
3. To the block with wires for the front seat heating buttons:
- +12V - to the yellow and blue wires (pin 2), power supply after turning on the ignition;
- "Ground" - black wire (pin 6).
How did you install such accessories? Maybe the ignition switch or cigarette lighter was activated when connecting?
Let us remind you that you can buy additional equipment on AliExpress. By the way, to control the power of additional devices in the car, you can use the standard Vesta buttons.
Photo: logbook vlad21074
Found an error? Select it and press Ctrl+Enter..
Danger of non-standard connection of the DVR
In most cases, non-standard connection of a DVR on your own, also taking into account illiterate execution, is considered potentially dangerous. Car manufacturers recommend avoiding such measures, since the fuses of the standard device and the electrical circuit are designed for short-term operation. If used continuously, the wires will be subject to heat aging. The fuse, in turn, does not react to such phenomena, since it is designed taking into account the ability to turn off at limiting inrush currents.
If you plan to connect the DVR to a battery, be sure to provide a circuit break button. Direct connection assumes constant operation of the device, therefore, when the ignition is turned off, the battery will be discharged.
If the connection is made correctly, the functionality of the recorder will not be lost and the image quality will remain high.
Helpful Tips and Precautions
Be sure to turn off the power to the on-board network before starting work on connecting the DVR - just remove the terminal from the battery. You should also follow the recommendations for installation and further operation.
- Securely insulate connections.
- Supply power via fuse.
- First check that all connections are made correctly, and only then attach the terminal to the battery.
- Strictly observe polarity when connecting the gadget.
- Make sure that no moisture gets inside the case, otherwise the power must be turned off.
- Make sure to purchase a memory card with sufficient capacity.
- Always take the device with you if the car is not in use for a long time. It’s also better not to leave the fastener, otherwise the thief will notice it and decide that it’s worth looking for the rest in the glove box.
- Immediately turn off the DVR if you notice smoke or a strange smell in the cabin, otherwise a sudden fire may occur.
- Turn on the recording immediately after you get behind the wheel, because it’s not for nothing that unforeseen circumstances are called that way. An accident on the road can happen at any time.
- If the recorder fails, you can save yourself from trying to repair the gadget, since there is nothing inside it that the average user could fix on their own. Contact service.
You can read about how to connect an LED strip to a car in a detailed article by our specialist.
Additionally, we recommend reading the article, which describes how to install a rear view camera.