I have seen more than once that people connect the fan directly without a relay or any fuses... And no one thinks about how dangerous this is and how hot the button is! Here is a small manual with weight control which is safer.
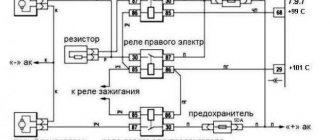
A little theory: when mass is applied to contact (85), it closes to (86), the constant “+12v” contact, the winding is triggered and bridges contacts (30) and (87). those. A negative is applied to the fan wire and it works!
Added a complete connection diagram for forced fan activation!
To maintain the engine temperature, the VAZ 2110 cooling fan switching circuit is used. Switching the fan motor on and off is controlled automatically.
Circuit diagram for switching on the cooling fan for a VAZ 2110 carburetor engine.
The circuit diagram for switching on the cooling fan of the VAZ 2110 on carburetor and injection cars is different. On cars with a carburetor engine, a thermobimetallic sensor TM-108 is used for this, and on cars with an injection engine, control is carried out by a controller.
When the fan is controlled by a sensor, the switching temperature depends on the sensor setting temperature, which is indicated on the housing. If the fan does not turn on when the temperature rises to the sensor response temperature, you must first check the serviceability of the sensor. To check, just close the contacts on the sensor and if it turns on, you need to change the sensor. If after closing the terminals the fan does not work, then the cooling fan switching circuit and the integrity of the fuse need to be checked.
How to check the thermostat
The function of the thermostat in an internal combustion engine is to regulate the flow of coolant, directing it in either a small or large circle. While the engine is cold, its valve blocks the flow of coolant into the cooling radiator. This allows the engine to warm up faster.
Check the thermostat by determining the temperature of its pipes by touch. When the engine is warm, they should all be hot. If the pipe leading from the thermostat to the cooling radiator is cold, the locking device is faulty.
The fan does not turn on.
But there are malfunctions in which the controller does not recognize the malfunction and the fan may not turn on when the temperature reaches above 105 degrees. C. In this case, to check the circuit and sensor, it is necessary to remove the connector from the temperature sensor while the engine is running. If the circuit is working properly and the sensor is malfunctioning, the fan will turn on and turn off when the connector is returned to its place.
If the circuit malfunctions, it is necessary to check the integrity of the fuse, the serviceability of the relay and wires, according to the circuit. For a quick check, you need to bridge terminals 30 and 87 of the fan relay, located in the heater shaft on the passenger side. If the fan works, without removing the relay from the block, connect the case and pin 86 of the relay with a test lamp, the relay should work and the fan should turn on. In this case, the controller or the wire connecting the relay to pin 46 of the controller is faulty.
If you do not hear the characteristic click of the relay turning on, and a positive signal is supplied from the main relay to pin 85 of the relay, and if there is a click and the fan does not turn on, change the relay. When installing a jumper between pins 30 and 87 does not turn on the fan, check the integrity of the fuse and the presence of power at the fan terminals. If there is power on one terminal and no power on the other, this indicates a possible malfunction of the fan motor.
Scheme for switching on the cooling fan of an injection engine.
Maintaining normal engine operating temperature is very important to maintain engine performance. The cartoon arrow on the instrument panel, of course, shows the temperature not at all accurately and gives, rather, approximate indicators. The electronic engine control system of the VAZ-2110 with any injection engine uses completely different data, more accurate. They affect the operating temperature and the frequency of turning on the cooling fan.
Connection diagram
We've figured out the types of fans, now let's connect a new one. Let's start by replacing it in the power supply. Everything is relatively simple here. We buy a device of the same size and install it to replace the burnt one. If the number of pins in the connectors of the old and new ones coincide, simply insert the “plug” into the “socket” on the power supply board, observing the colors.
If we have a two-pin socket on the power supply, and a three- or four-pin plug on the cooler, then we connect it so that only the power wires are used. We leave the rest hanging in the air. As an example, the photo below shows a four-pin plug installed in a two-pin socket.
If the elements of the printed circuit board interfere with connecting the plug, you can simply cut its body in two, thereby shortening it to the size of a two-pin one. We do the same if the socket has three or four pins, and the fan plug has two. We simply connect it to the appropriate sockets, leaving the rest unused. Of course, in this case there is no question of any adjustment of the rotation speed or speed control, but it will constantly spin.
Important! In order not to insert the plug of the new fan backwards, before disconnecting the old one, it makes sense to write down how it was connected and the colors of the wires, not forgetting that in a four-pin plug the colors are different from two- and three-pin ones.
Installing additional fans
If we decide to install an additional valve in the system unit, we will have to find a separate socket to connect it. It would be good if motherboard manufacturers took this into account and equipped their product with additional sockets. Usually they are three-pin and signed as CHA-FAN. In the figure below, the motherboard has two such connectors.
This motherboard has two headers for connecting case fans
There is another option - use the PWR-FAN connector (if available). This socket is designed to connect the power supply fan, but most modern power supplies have their own sockets for these purposes. Any type of 12V fan can be plugged into these outlets, but keep in mind that their rotation with a two-pin plug will not be controlled by the system, and if it fails, we will know about it after the fact.
Expert opinion
Alexey Bartosh
Specialist in repair and maintenance of electrical equipment and industrial electronics.
Ask a Question
Important! A cooler with a four-pin plug connected to such connectors will be controlled, but the system will not be able to change its speed at its discretion. However, this is not necessary for the case model.
How to connect to the power supply directly
If there are no additional sockets on the motherboard or they are all occupied, the last option left is to connect the case cooler directly to the power supply. It is most convenient to use a Molex connector for these purposes. Normally it is used for IDE drives, which are already outdated, so there will be free sockets on almost any power supply.
A free Molex connector can be found in the power supply of any computer.
The purpose of the wires of this connector is as follows:
- black - minus (general);
- yellow - +12 V;
- red - +5 V.
Since all case fans are powered by 12 volts, we will be interested in the black and yellow wires. If our cooler is equipped with a two- or three-pin plug, then the connection diagram will be similar to the figure.
Connecting fans with two- and three-pin plugs to the Molex connector
If we have a fan with a four-pin plug, then we connect it like this:
For these purposes we will need a Molex plug. You can buy it either at a disassembly site (they can simply give it as a gift), or in a store as part of an adapter. We buy an adapter, cut off the plug, solder the fan to it - and you're done.
Healthy! If you look hard enough, you can make it even simpler - buy a ready-made adapter for the cooler.
Reducing the speed of the case fan
Typically, case fans perform only auxiliary functions, so they are often turned on at reduced speeds. This has little effect on the quality of cooling, but the noise level is noticeably reduced. You can, of course, turn on the cooler through a quenching resistor, but this is extra work on calculating its resistance and soldering, plus a significant energy consumption for heating the resistor itself.
When does the radiator fan turn on on a VAZ-2110
To really understand how to change the fan switching temperature on a VAZ-2110 injector, you need to know exactly the factory design parameters and the principle of fan switching itself.
In carburetor engines, the fan turned on at about 100 degrees.
On old-style 2110 carburetor engines, the fan was turned on using a thermobimetallic sensor. It was installed directly in the radiator bank and set to a certain temperature. Since the normal operating temperature of antifreeze is 80-90 degrees , the bimetallic plate made contacts at approximately 100-105 degrees .
Possible cooling fan malfunctions
The driver notices that the temperature on the device has reached a threshold value. There is no fan noise. You should urgently choose a safe place and stop. Turn off the ignition. Operating the engine at a temperature above the threshold for 20 minutes causes irreversible consequences.
There are seven known reasons why the fan on a VAZ 2110 does not turn on.
- The safety valve of the tank is stuck and not sealed.
- The integrity of the conductors is broken, there is poor contact at the connection points of the circuit elements.
- The fuse link on the control panel has burned out, there is no contact in the fuse sockets.
- The temperature sensor is faulty.
- The relay for turning on the electric fan drive is damaged.
- The fan motor has burnt out.
- The controller is faulty.
How to change the temperature?
Over time, more and more complaints appear about the operation of the cooling fan activation system. The most important design flaw is the lack of several fan operating modes and the abrupt start of its motor . Indeed, in the summer heat the fan has to work at full strength, and this is understandable. However, most often the fan produces excessive performance, which leads to rapid cooling and frequent starts.
This leads to a current overload on the on-board network.
In addition, the starting temperature threshold is too high, so the engine often overheats . Unfortunately, you can only change the fan startup parameters by reflashing the electronic control unit or upgrading the electric motor activation system. Reflashing the ECU is carried out by a competent specialist, and it is possible to set any desired temperature for turning the fan on and off.
Basic methods
Diagram for connecting an additional fan sensor.
There are also several solutions to changing the operating modes of the fan motor. The simplest of them is to install an additional switching sensor from carburetor engines (in the diagram above). It is configured to turn on at a temperature of 97-100 ° C , which will be quite enough. And in order for the fan to operate in this mode at half power, a resistance from the VAZ heater is installed in the circuit.
The radiator fan is one of the main elements of the engine cooling system. Its role is to force the radiator to flow when heating the coolant to a certain temperature.
Cooling system design features
Depending on the design features, the fan can be turned on in 3 ways:
- using a power sensor for activation of the VSO. This sensor is also called a fan temperature relay, since the power contacts of the electric motor pass directly through the sensor. With this scheme, the load on the thermal relay increases significantly, which reduces its service life;
- using the fan switch sensor, but now closing the contacts in the temperature switch triggers the relay, through which the power contacts of the cooling fan are connected. This connection method is much more reliable than the previous option;
- using an electronic engine control unit. The ECU, focusing on the coolant temperature sensor installed in the engine cooling radiator, supplies power to the VCO through a relay. A resistive temperature sensor is used as a meter. It is this switching circuit that is used on the vast majority of modern cars. On cars equipped with air conditioning, one of the electric fans will be controlled by the comfort unit. This is necessary for forced cooling of the condenser when the interior air conditioning system is activated.
How does the fan turn on?
Unlike carburetor engines, in VAZ 2110 injection engines the fan is turned on not directly from the temperature sensor, but through the electronic control unit (ECU). The sensor is installed on the outlet pipe of the cylinder head.
VAZ 2110 injector cooling fan does not turn on: reasons, how to check
When the coolant heats up to a temperature of 100-107 0 C, the sensor is triggered and sends a signal to the ECU, which processes it and sends it to the relay. The relay closes the circuit and supplies power to the fan drive (electric motor) through a fuse.
Considering the described switching process, the reasons for the fan not working may be:
- faulty temperature sensor;
- faulty relay;
- blown fuse;
- electrical circuit break;
- Problems with the electric fan drive.
In addition, the expansion tank cap can also affect the timely activation of the fan. If it is faulty and its valve is not capable of maintaining pressure above atmospheric, the water, which is part of the coolant, will definitely boil at 100 0 C, and the sensor set to a higher temperature will not have time to operate.
Procedure. Step-by-step instruction
If after completing the next step the problem goes away, further checks are stopped.
- Open the hood.
- Wait for the engine to cool down.
- Perform an initial visual inspection: integrity of the hoses, reliability of the clamps, absence of leaks or cracks.
- Make sure that the expander cover elements are in good condition. Remove scale, rust, clear holes, wipe, assemble. The absence of noticeable damage to parts gives hope that the product will work.
The valve design is elementary. The cover contains a spring. Functionally, it is designed to regulate the pressure in the cooling circuit. A hot engine increases it, a cold engine decreases it.
Compressing at a value of 1.1 atmospheres, the spring relieves excess pressure and prevents the destruction of hoses and the tank. As the motor cools, it creates a vacuum effect. The tank will begin to flatten. The valve equalizes the pressure.
The lid screws tightly on the thread, eliminating distortions. There should be a gap between it and the body. An overtightened valve will not work. It is difficult to test the device's operation in road conditions. You can check by replacing it with a known good one.
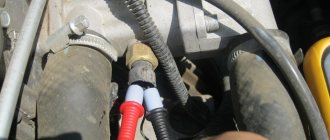
Inspect the electrical wiring elements to ensure a reliable connection
Possible factors for damage to electrical circuits:
- vibration;
- oxidation;
- burning;
- breakage, fraying of electrical wires;
- insulation aging, short circuit.
Switch the tester to resistance measurement mode. Remove it with special tweezers and ring the fuse link F7 located in the mounting block.
Fuse box diagram
Attention! It is important to find out and eliminate the cause of burnout.
Replace the burnt-out element with a serviceable one with a rating of 20A. Inspect and clean the nest. Insert fuse.
It was not possible to find out the reason, the protection triggered again - look for a short circuit.
Disconnect the fan plug. Use a tester to measure the circuit of the electric motor windings. Zero resistance or a break indicate the need to replace the radiator blower electric drive.
Interturn short circuits that cause multiple replacements of fuse links cannot be measured with the device.
Sensor check
Start the car. Pull out the coolant temperature sensor connector. The fan starts working - the sensor needs to be replaced. Secure the disconnected wire. Drive to a nearby service station.
Relay test
There is a hatch on the floor at the front passenger's feet.
Below it is a built-in panel with three relays of the same type:
- fan installation;
- fuel pump;
- ignition (main thing).
By replacing each other, try to start the airflow. The VAZ 2110 fan does not work - go to the next step.
Check the electric motor
Winding measurements did not reveal a malfunction. Apply voltage briefly from the battery using additional insulated conductors. The operation of the fan indicates a malfunction of the controller, which does not output a signal to the relay.
- The only correct solution is to turn on the airflow directly and urgently visit a service station.
- Prevention of breakdowns of the cooling system of the VAZ 2110 injector 16 valves.
- Periodically inspect the components of the cooling system.
- Monitor the cooling temperature on the device, listen to the operation of the fan.
- Maintain coolant level. Replace after 2 years or 30,000 km.
- Use the solution to remove rust and scale.
- Signs of a change in the properties of the coolant are a change in color, an increase in fluidity.
- Check the density with a hydrometer.
- Do not mix coolants.
- Every twelve months, rinse the expansion tank cap with water and check it on a stand with a pressure gauge.
- Avoid contact of aggressive liquids with electrical wiring and electric motor windings.
How to check the fan circuit
1. We start the test with the simplest thing - determining the condition of the fuse. We are looking for it in the mounting block, which is located under the hood. Its marking is F7.
2. We take it out, and visually, or using a multimeter, check for functionality. If it burns out, replace it with a new one (20 A). If everything is fine with him, we put him in his place and move on.
Fan connection 2108, 2109, 21099
Until 1998, on cars with the old mounting fuse block 17.3722 (finger type fuses), relay 113.3747 was included in the fan circuit. After 1998 there is no such relay.
Also, before 1998, the TM-108 switching sensor was used (the closing temperature of its contacts is 99±3ºС, the opening temperature is 94±3ºС), after 1998 the TM-108-10 with similar temperature ranges or its analogues from different manufacturers. The TM-108 sensor only works in conjunction with a relay; the TM-108-10, reinforced for high current, can work both with and without a relay.
Scheme for switching on the engine cooling fan on a VAZ 2109 with mounting block 17.3722
- Fan motor
- Motor start sensor
- Mounting block
- Ignition switch
K9 - Relay for turning on the fan motor. A - To terminal “30” of the generator
Scheme for switching on the engine cooling fan on a VAZ 2109 with mounting block 2114-3722010-60
- Fan motor
- Sensor 66.3710 for turning on the electric motor
- Mounting block
A - To terminal “30” of the generator
Connection diagram for VO VAZ 2110
The circuit diagram for switching on the cooling fan of the VAZ 2110 on carburetor and injection cars is different. On cars with a carburetor engine, a thermobimetallic sensor TM-108 is used for this, and on cars with an injection engine, control is carried out by a controller.
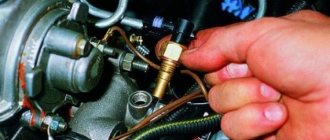
Design and testing of the VAZ 2110 fan switch sensor
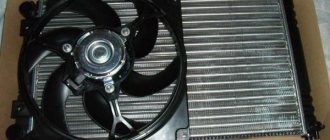
To maintain optimal temperature conditions of the car engine, a cooling system is designed. Its main elements are channels for antifreeze in the cylinder block, pipes, a thermostat, a radiator, and the electrical part includes a VAZ 2110 fan switch sensor, a temperature sensor and an electric motor with an impeller for cooling the radiator. Late detection of cooling system defects can lead to engine overheating and costly repairs.
Fan switch sensor LS 0108 (TM-108)
If the cooling fan does not work
To drive the fan, a DC electric motor with excitation from permanent magnets ME-272 or similar is installed. Technical data of the electric fan and fan switch sensor:
- Rated rotation speed of the electric motor shaft with impeller, 2500 – 2800 rpm.
- Electric motor current consumption, 14 A
- Sensor contact closure temperature, 82±2 degrees.
- Sensor contact opening temperature, 87±2 degrees.
The cooling system fan may not turn on due to:
- electric drive malfunctions;
- blown fuse;
- faulty thermostat;
- a failed thermal sensor for turning on the cooler;
- faulty VO relay;
- broken electrical wiring;
- faulty expansion tank plug.
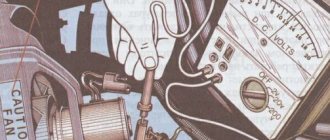
To check the VAZ fan electric motor itself, we apply 12 V voltage from the battery to its terminals - a working motor will work. If the problem is with the fan, you can try to repair it. The problem is usually the brushes or bearings. But it happens that the electric motor fails due to a short circuit or break in the windings. In such cases, it is better to replace the entire drive.
The BO fuse is located in the mounting block of the car's engine compartment and is designated F7 (20 A). The test is carried out using a car tester turned on in probe mode.
- In a car with a carburetor engine, you need to check the sensor - turn on the ignition and short-circuit the two wires going to the sensor. The fan should turn on. If this does not happen, the problem is definitely not with the sensor.
- For injection cars, it is necessary to warm up the engine to operating temperature and disconnect the sensor connector, disconnecting it from the vehicle’s on-board network. In this case, the controller must start the fan in emergency mode. The electronic unit perceives this as a failure in the cooling system and forces the fan drive to operate in constant mode. If the drive starts, the sensor is faulty.
Symptoms of failure
But, like any other spare part of a car, the temperature sensor can fail. So, what malfunctions can occur if the sensor stops working:
- The cooling fan will run continuously.
- The cooling fan will not operate.
In the first case, the car will operate in emergency mode and a constantly turned on fan can cause the winding to burn out. In this case, the product will have to be changed completely. In the second case, the engine will begin to overheat and at a certain point will boil .
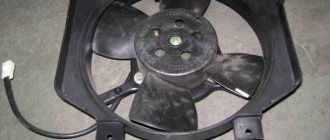
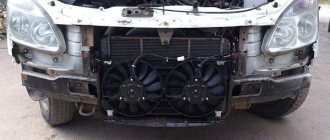
Replacing an electric fan in a car
- We park the car on a flat surface and immobilize it with the parking brake.
- Open the hood and disconnect the negative terminal.
- Using a 10mm wrench, unscrew the fastenings of the air filter housing.
- Using a screwdriver, loosen the air duct clamp on the air flow sensor and remove the corrugation.
- We unscrew the screws securing the cover of the air filter housing and remove the filter element.
- Using a size 8 wrench, unscrew the air intake mount and remove it.
- Using a 10mm wrench, then an 8mm wrench, unscrew the nuts securing the fan casing around the perimeter (6 pieces in total).
- Disconnect the wire block on the fan connector.
- Carefully remove the fan casing along with the drive.
- Using a 10mm wrench, unscrew the 3 bolts holding the electric motor to the casing.
- We put a new one in its place.
- We install the structure in place, fix it, and connect the connector.
- We carry out further installation in the reverse order.
Control circuit modernization
The cooling fan on the top ten turns on at a temperature of 100-105°C, while the normal operating temperature of the engine is 85-90°C, so the fan turns on when the engine overheats, which naturally has a negative effect.
This problem can be solved in two ways: adjust the switch-on temperature in the “brains” or make a button. We'll focus on the second one. Turning on the fan from the button is very convenient: if you get into a traffic jam, turn it on, drive out, turn it off, and no overheating occurs.
A button for selecting the fan operating mode was installed in the cabin (always off, constantly on, automatically turned on via a sensor) - this “tuning” is not mandatory, but will be a very useful addition.
There will be a large current at relay contacts 87, 30, on the wire from the battery to the fuse and the fan ground, and therefore we must use wires there with a cross-section of at least 2 mm, otherwise the thinner wire will not withstand it and will burn out.