How to install a head unit on a car with basic equipment?
Since the Lada Granta base is not equipped with musical equipment, and only a push-button radio is installed on board, the question justifiably arises: how is the standard radio installed in the cabin? In reality, this is a simpler procedure than it might seem at first. The occurrence of problems during installation is excluded, since a seat is already provided for the standard device on the Lada Granta panel, regardless of the level of equipment.
You can purchase the device in a retail chain or on an Internet site, where you can actually find an improved version, equipped with a navigation system with a detailed map of the Russian Federation. Don't forget to buy an additional luxury panel. Although multimedia will fit into the standard panel without any problems, the appearance will not be so beautiful. The price for this device reaches 2.5 thousand rubles.
Next comes the installation of the radio. The design feature of the landing niche in the Grants panel does not provide for the need for additional wiring.
- The first step is to remove the plastic pocket in the audio system opening. This is done using a flat-profile screwdriver. There is access to several connectors that involve connecting a radio.
- We remove the frame from the head unit and fix it at the location of the pocket.
- Next we move on to the connection. To do this, connect a couple of connectors and install the device in the landing niche.
- After this, you can install the speakers in the front door cards. The procedure involves the need to dismantle door trims with unlocking handles and adjust the position of the glass. Using a special template, we begin cutting out the mounting holes.
We attach the speakers to the cards using self-tapping screws. We insert the cables from the speakers into the input connectors intended for this on the rear panel of the car radio. We install the decorative door panels in their original places and evaluate the sound provided by the standard head unit. Thus, the radio is connected.
Why do you need to adjust the valves in the engine?
How to remove the radio on a Lada Priora?
Surely many Lada Priora owners have at least once encountered the need to remove the standard radio in order to replace it with another head unit or to gain access to music and electrical wiring.
There are two ways to remove the radio. Namely, using spokes from windshield wiper blades and or removable keys from another radio. If such keys are not available, you can use two manicure nail files.
- The least effective way is to use windshield wiper spokes, since the spokes are thin and to remove the radio, you will need an assistant who will push the radio from the glove compartment while you pull the spokes.
- The simplest and fastest method to remove the standard radio without resorting to outside help is to use removable keys (nail files).
- Next you need to follow the step-by-step instructions
- We take removable keys (or files).
There are slots under the SCAN and TA buttons.
We insert the keys into them until they stop.
We move the keys apart in the direction of the arrows.
We take out the radio tape recorder.
Note:
- These methods are suitable for removing standard radios of the Ural and Supra brands (with an SD card).
- If the radio does not come out all the way, check whether the wire from the antenna or the USB input cable going into the glove box is holding it.
Subwoofer connection diagrams
Let us remind you that on the website you can find other useful instructions for tuning Lada cars.
Keywords: cassette player Lada Granta | cassette player Lada Kalina | cassette player Lada Priora | cassette player Lada Vesta
Found an error? Select it and press Ctrl+Enter..
The Lada Vesta car is standardly equipped with a standard radio with push-button control. The Lux package includes a powerful multimedia center with a touch screen. Regardless of the type of radio installed, the main connectors and connections located on the rear wall of the case are absolutely similar. A Lada Vesta car can be equipped with an active acoustic system for reproducing bass frequencies or a passive speaker. In the second case, you will need to connect the amplifier to the Vesta standard radio. Connecting a speaker with a woofer directly to the car radio will not give a positive result. A passive device can be connected to the “speaker” outputs of the head unit, but the volume and sound quality will be low.
Dismantling a standard music center
Often, standard head units (aka radios) are removed using the method described above, since they are attached to 2 or 4 clips. For example, the factory player on a Lada Priora car is held on by two latches, and to unlock them, thin steel strips must be inserted between pairs of radio channel switching buttons “2” - “3” and “5” - “6”.
Advice. Before you start disassembling the factory radio, find out about the method of its fastening, so as not to poke the pieces of hardware at random if you do not find technological openings.
In Priora, stripes must be inserted between the buttons
To remove car radios that are fastened with screws, you need to prepare a simple set of tools:
- thin flat screwdriver or knife;
- Phillips screwdriver;
- set of small sockets (from 6 to 10 mm).
With this mounting option, the factory turntable must be unscrewed using the heads
On different brands of cars, standard players can be mounted in different ways, but the principle is approximately the same: the device is screwed to brackets that are covered from the outside with a plastic lining. As an example, we propose to consider removing the radio on a Korean Hyundai Solaris car, performed in the following order:
- Use a flat-head screwdriver or knife to pry up the lower corner of the plastic decorative panel framing the stereo. Pull the edge and grab it with your hand.
- Gently pull it towards you and release the first latch, and then move around and unlock the rest.
- Holding the panel with both hands, remove it and, if necessary, disconnect the connectors located at the bottom.
- Unscrew the 4 mounting screws with a Phillips screwdriver and pull out the radio.
Factory car radio Hyundai Solaris
Advice. When dismantling any player, do not rush to disconnect the battery from the on-board network, since the device will power down in 10-15 minutes. It may be blocked and the next time you turn it on, it will require you to enter a security code that you do not have.
How to connect an amplifier and subwoofer?
In addition to the need to connect a radio, many people want to connect a subwoofer and amplifier. Not every Lada Granta owner will be able to enjoy the sound generated by the standard radio. This fact forces car audiophiles to lean toward the additional installation of high-quality audio amplifiers and subwoofers. The goal is known - great sound.
To install the indicated devices yourself, we resort to the following simple manipulations.
- First, we dismantle the lower part of the center console.
- We remove the panel and find mini ISO connectors.
- We insert the plug of the previously purchased adapter into one of these sockets (indicated in yellow). We do not touch the blue and green cables. Owners who have already performed this procedure note the following - we can no longer use standard wires, so we resort to the “mini iso” connector.
- Next, we connect a special fuse to the battery, having previously connected the cable from the amplifier (marked in red) to it.
- The subwoofer in combination with the loudspeakers is connected to the amplifier. We connect the battery ground wire (black) to the LADA Granta body and the corresponding terminal on the amplifier.
- After the measures have been taken, we return the panel and radio to their place.
- Enjoy the updated and high-quality sound.
LADA Granta
And the plant promises to bring Granta to the market with a standard audio system in the middle of the year. Let's see! Let's listen!
The sound obtained from the standard Granta multimedia system does not suit all car owners. And even if you like the display of the radio visually and functionally, the sound quality usually leaves much to be desired. Therefore, many are looking for various options on how to properly install the main or additional subwoofer in Granta in order to get a more interesting sound, in accordance with their musical preferences.
The most popular place to install a subwoofer among Granta owners is the trunk or rear parcel shelf. This installation option is preferable because the distance from the listener to the subwoofer should be at least half a meter. Otherwise, the sound breaks and loses its acoustic characteristics.
Types of subwoofers
First of all, subwoofers are divided into active (with a built-in amplifier) and passive (with an external amplifier). There are subwoofers that can be bought completely complete with a box; you can buy just the speakers. Many people make the box themselves, especially since its production does not take much time and they install speakers in it.
Standard size
An important characteristic of a subwoofer is its size. The subwoofer's size is the diameter of its speaker, measured in inches.
Usually in car audio they use 10, 12, 15 inch woofers:
- A 10-inch speaker has a diameter of 25 cm;
- a 12-inch speaker has a diameter of 30 cm;
- 15-inch speaker - diameter 37.5 cm.
Subwoofer box
There are several types of sub boxes:
- The simplest one is a closed, sealed box, which is easiest to make with your own hands.
The case with a bass reflex is more complex, but the sound is more powerful.
- The bandpass housing can limit the frequency response of the subwoofer. It increases power more than a bass reflex enclosure.
- Free air is a method of installing a subwoofer speaker in the horizontal rear parcel shelf of a car. This installation has lower efficiency than a cabinet subwoofer and requires a special speaker for this type of installation.
- The stealth case is a self-made case, the rear wall of which follows the curves of the trunk wall. This type of installation is convenient because it is compact and frees up more space in the trunk.
Which subwoofer to choose
A sedan is the most difficult body type to install a subwoofer because here the car is divided into 2 parts - the interior and the trunk. Installing a subwoofer in a Lada Granta in the cabin does not make sense due to the lack of sound quality due to the listeners being too close. A more or less decent result will be obtained from 12 inches in a bandpass or bass reflex housing, which will work on reflection from the rear wall of the trunk. The best way to get sound in a sedan is to install a 15-inch subwoofer or a pair of 12-inch ones. For this option, it is more convenient to better arrange the space in the trunk by installing stealth housings for both subs on both sides.
It’s easier to install a sub in a Granta in a station wagon or hatchback. The interior and trunk form a single space here, so good bass is easy to achieve. Even a dozen will sound good in such a salon. If you use a 12-inch subwoofer, it is better in a closed housing.
How to install
Installation of the radio on the Grant should be done in the standard socket provided by the manufacturer. After this, the speakers and additional parts are installed. The presence of a factory communication harness ensures the fastest and easiest connection.
Car radio
If a standard-sized head unit is selected, the process of installing a radio in the Lada Granta consists of the following steps.
To remove the latches from the front frame, you need to hook the plug pocket by its edges. The electrical wiring plugs are carefully disconnected. The glove box housing needs to be folded down. The travel stops, mounted at the top of the rear wall, are disengaged from the instrument panel. The cover is dismantled - to do this, you need to carefully pull it towards you. To route the cable to the player, lift up the car's floor covering, which is located next to the passenger seat. The standard slides required for installing the head unit are installed using bendable elements.
Acoustics
After you have managed to install the radio in the standard connector, you need to install speakers. Lada Granta liftback cars with basic equipment are equipped with standard wiring for acoustics. It is laid under the decorative door trim.
The speakers should be placed in the doors. For this purpose, the metal frame of the doors on the Lada Granta already has holes with a diameter of 16 cm. However, there are no holes provided for this in the trim - the car owner will need to make them himself. In this case, the diameter of the hole in the casing must be equal to the size of the diffuser.
After installation, the speaker ring should be secured to the trim using screws. The top is covered with a decorative mesh.
Some difficulties may arise during installation. When the car owner decides to install speakers whose diameter does not exceed 13 cm, he will need to “build up” the missing plane. When choosing front speakers for the Lada granta liftback, experts advise giving preference to those models in which the metal grille and plastic frame have a minimal protrusion above the door surface. Otherwise, it may be difficult to open the glove compartment.
The car enthusiast can choose compact or enlarged rear speakers. In the latter case, they are built into the luggage compartment shelf. The diffusers in this arrangement are protected by original meshes - they are offered by the car plant.
Tips for installing a radio in Lada Priora
In order to avoid unforeseen difficulties during the installation of the radio in the Lada Priora, it is recommended to use the advice of experienced car enthusiasts:
- 1. Before installing the radio, you need to thoroughly study the connection diagram for media devices. If the player's connectors are connected incorrectly, there is a high probability of failure of some vehicle systems;
- 2. There are many models of radios from different manufacturers. Some of them have individual connectors with an additional adapter included for the ISO standard. This fact should be taken into account when choosing an audio device for the Lada Priora, since one of the connection options in this situation would be cutting the wires and directly soldering them to the car’s wiring;
- 3. When directly connecting the standard radio, you can use special terminals;
- 4. The connection diagram for the audio player via ISO will remain the same when replacing the radio with a new one.
Do not twist or wrap electrical tape to connect wires directly. This type of insulation is dangerous when operating a car in winter, since at low temperatures the adhesive-based tape is deformed and destroyed, which will lead to a short-circuit in the car's wires.
Connecting a Lada Granta subwoofer
Connecting the subwoofer to the standard Grant radio directly will not work due to the design features of the product. In order to achieve maximum quality of sound reproduction, you need to use an additional amplifier. A car ULF can be of any type and design. If a single-channel device is used, then only a bass speaker is connected to it. When using multi-channel ULF, you can completely change the interior acoustic systems, which are not of high quality, and install high-level acoustics with crossovers. Connecting the amplifier to Grant's standard radio begins with determining the location for its installation. Typically, a car's low-frequency unit is placed in the luggage compartment, next to the low-frequency speaker.
After installing the unit, you need to connect power wires and audio signal lines to it. The power is connected by a special power cable, the cross-section of which is selected depending on the power of the amplifier. At a distance of 10-15 cm from the car battery, you need to install a fuse block. Its rating should not exceed 50 A. The negative power terminal is connected to the vehicle ground. The signal from the radio output can be supplied in two ways. On the back wall of the car radio there are standard rectangular connectors.
To connect a low-frequency device, yellow contacts from blocks “B” and “C” can be used. They are designated ISO and mini-ISO respectively. On block “B” there are contacts for connecting front and rear speaker systems, and on block “C” there are linear ULF outputs of the standard radio. The automotive low frequency unit can be equipped with line inputs and high level inputs. The connection of the amplifier to the standard grant button radio can be done through the contacts of the ISO block with the index “B”. The signal intended for the operation of speaker systems cannot be fed directly to the input of the low-frequency system. The output voltage is too high and may damage the input semiconductors of the external system. To correctly connect a car radio and an external power amplifier or unit, you need to use level converters. They can be bought at any specialized store. The front panel of the converter indicates how to solder the connecting wires. The device combines the front and rear channels and reduces the output voltage level to a safe value.
The converted signals of the right and left channels are output to “Tulip” type connectors. They can be supplied to the inputs of an additional low-frequency block. There may be a problem with laying cable lines to the amplifier. To do this, you need to use high-quality shielded wires with central copper cores. It is not recommended to use copper-plated steel wires to connect the converter and the amplification unit.
Installation of a 4-channel amplifier. — Lada Priora Sedan, 1.6 l., 2008 on DRIVE2
Hi all. For a long time I’ve been itching to buy myself a 4-channel amplifier, but the sub was quite clogged with the standard radio. But unfortunately there was no way to buy it. And then, quite by chance, a work colleague was selling a completely new amplifier for a ridiculous price. That’s when I realized that dreams do come true if you really want to.
Meet:
Prology club ca 400
Here you will probably say: Kirill, wait, this is a piece of crap, garbage, a set of spare parts, not an amplifier, but a portable heater! I don’t agree with you here; I already had experience installing an ultra-budget 2-channel Supra amplifier on a subwoofer. With proper setup, proper connection and selection of wires, I was more than satisfied with the amplifier. After purchasing everything I needed, I started looking for a place for installation. After much calculation and reflection, I found the most optimal place from my point of view. Under the acoustic shelf.
This is where he belongs)))
Next, having measured the metal frame of the rear shelf, I made this base from plywood:
That's about it.
I covered it with carpet. Of course, there was no need to make a cutout in the center, but I wanted to at least somehow lighten the design, and even make a bad heat sink.
Covered with carpet.
Next is the installation process. In principle, nothing complicated. I fastened the podium with self-tapping screws. I carefully marked and drilled holes in the beam with a metal drill for self-tapping screws. I pulled out the wires. The most hemorrhoidal places are the wiring in the front doors and the plus line in the engine compartment. I dealt with the first one very quickly, but to install the plus one I had to disassemble the frill of the window lifters and unscrew the fuse box in the passenger compartment. Lie in a position that is unnatural for a person and carefully pull the wire through the rubber plug.
The amplifier is in its rightful place.
The wiring was located behind the rear seat.
Somehow having collected the entire instrument, cursing everything in the world, I crawled home)))) The next day I got around to setting up the amplifier and matching the volume with the sub. Impressions: I got what I wanted! I am a very picky person, but here I just lost myself in the music)) There is no background noise, there is still power reserve. There is no trace of extraneous interference, which I was very afraid of getting from a cheap amplifier. Even at maximum, the amplifier is barely warm, which makes me happy. He never went into defense. So, with a competent approach and relatively straight hands, even a super-budget amplifier can be made to play the way you want!
PS Recently I repaired and painted the center console. There are fewer and fewer awkward color schemes from AvtoVAZ in the cabin)))))
Issue price: 1,000 ₽
Decoding problems
The main pitfall of the described procedure lies in the security code embedded in the memory of most radio tape recorders. The bottom line is this: disconnecting the music center from the external power supply for 10-15 minutes will lead to the fact that the next time you turn on the car radio, it will require you to enter a security code (usually a four-digit one), without which it will not function.
The device requests a code after connecting to the on-board network
If the card with the code is lost or missing, the issue can be resolved in several ways:
- when it comes to a standard device, for a certain fee they will help you find the code at a dealership that sells cars of your brand;
- there are companies and individual specialists dealing with these problems;
- the free way is to search for code using various programs.
Serial number location
Regardless of the method chosen, you will have to remove the radio from the socket to find out the serial number. It is printed along with a barcode on a tag glued to the side or top of the case. After taking out the device, rewrite these numbers, and then try to calculate the PIN code using them using various online calculators on the Internet. If it was not possible to determine the required code using this method, then remove the music center and take it to specialists in this field and prepare to pay for their services.
The issue of removing a car radio from its socket is not very difficult and will not require much time. But the consequences can be unexpected for an unprepared motorist. Hence the last piece of advice: find the lost pin code before turning off and removing the player in order to save your time and nerves.
The standard multimedia system 2190 on the Lada Granta has many useful functions, but this does not mean that one day you will not need to connect additional equipment to it (rear view camera, etc.) or remove it altogether. For example, to replace with more powerful multimedia systems or, conversely, to install a double-din radio without a touch screen.
In any case, you may need to dismantle the MMC on Grant, which we will talk about now.
- 10-02-2015
- 204 396
AvtoVAZ equips modern Lada cars (Granta, Kalina, Priora and Vesta) with standard push-button radios, and in the top version (Luxury trim levels) with more modern multimedia systems (MMS) with a touch screen. In this article we will tell you how to connect an amplifier and subwoofer to the standard radio and MMC of Lada cars.
How can I set up my radio to receive calls from my phone?
A special feature of the installation is the ability to communicate between the radio and the telephone. This function is available through the existing Bluetooth system. Connecting a mobile phone to the system is not difficult. The work takes about 10 minutes, and it is performed according to the following scheme:
1. Bluetooth is activated on the mobile device.
2. On the radio panel, press the button with the handset (left or right).
3. After the device name is displayed on the radio screen, you need to connect by pressing the confirmation button on the mobile phone itself and entering the code “0000”.
4. The PIN code is changed by pressing the Scan button on the radio, entering a new combination and confirming using button 8.
5. To make a call, enter the subscriber’s name on the numeric keypad, select his number and press the left button with the phone icon.
6. The right button with the image of a handset ends the conversation.
To receive a call when Bluetooth is activated, the driver must press the button on the radio panel with the handset lifted. The connection may take about 5 seconds, but there will be no problems with subsequent communication.
In the improved Lada Priora, the standard radio transmits sound from the phone to standard speakers. Speakerphone allows the driver to be minimally distracted from the driving process, not break the law by talking on a mobile phone while on the road, and at the same time conveniently answer important calls. This system is attractive and is present in most modern foreign cars.
The high-quality equipment of the model allows you to get maximum comfort when buying a domestic car. But the standard Priora 2 radio is installed only on the “Lux” modification.
In other configurations, the owner will have to carry out modifications independently. And instead of a standard audio system, if desired, you can install a more expensive, but also more functional device.
Hello again and welcome to the logbook!
Due to numerous requests from Drayvovites, I hasten to tell you about the standard Priora tape recorder =). Yes, yes, you heard right =) such a thing exists =)
I’ll say right away that this 1Din device with a false panel has the following characteristics: reads CD/MP3, is equipped with USB, two-channel output, has built-in BlueTooth and is equipped with an LCD display =)
Next it’s worth talking about equalizer presets. We only have 4 of them =(.
The next stage of my story will be the quick settings block. You can dig into them by pressing the central toggle switch once.
Further. If we press the central toggle switch longer, we will find ourselves in a block of settings, which, as a rule, are set once. =)
Next I’ll tell you about BlueTooth. It’s a useful thing, I’ll tell you. =) only one thing is annoying, if you are not alone in the car and you receive an incoming call, the contents of which you would like to keep to yourself, then you have to reset it, because all passengers will be able to listen to the interlocutor, because it broadcasts through all the car speakers =)
By the way, you only need to connect your phone to the device once and then it will connect on its own, unless, of course, Bluetooth mode is activated on your phone. So, let’s call.
By the way, using Bluetooth, you can listen to music from your phone =)
That's probably all, although it would be necessary to show two tulips for the exit, located in the same glove compartment. =)
So, let's draw some conclusions. Among the advantages, it is worth noting the following: - fits quite well into the interior of the car. - no need to carry the socket with you. - good ergonomics, you don’t need to reach for it to control, the hand can easily find all the buttons. - LCD display displays information clearly, without distortion, everything is perfectly visible in any lighting. - price, with this audio system + 4 speakers and antenna the car becomes more expensive by 6,000 rubles. (declared by AvtoVAZ) Of the minuses: - frequent freezing when listening to a flash drive on which there is a lot of different information. - incomprehensible antenna: in the city the reception is worse than in the countryside. =) - very limited functionality, small number of settings. - after a conversation via Bluetooth, when listening to USB, for example, not often, but still, the radio starts playing. =(— for building a good car audio, IMHO, it’s still not suitable. Even though people wrote on the forums that they connect amplifiers and subwoofers.
Verdict. People who just listen to the radio or songs from the 70-80s in the car are definitely a must have =). Also suitable for the first time for those who, like me, are financially limited when buying a car, but want music to be everything it was =) And in the future he plans to install more respected audio devices. =)
Something like this. If you have any questions, don’t hesitate...
How to install
Installation of the radio on the Grant is carried out in a standard socket located above the climate control controls. Thanks to the use of a factory wiring harness, accelerated connection of acoustic equipment is ensured. Laying additional lines is required when using a low-frequency loudspeaker in the luggage compartment or high-frequency tweeters mounted on the front roof pillars.
All installation work is carried out indoors with artificial lighting; in clear weather, installation in open space is allowed. For safety reasons, it is necessary to disconnect the standard battery from the vehicle's on-board network.
Car radio
Step-by-step instructions for installing a radio in a Lada Granta of the “standard” or “norm” modifications:
- Hook the central pocket-plug by the edges to remove the latches from engagement with the front frame.
- After removing the element from the socket, it is necessary to disconnect the plugs of the factory wiring harness, located in special sockets on the rear part. The car has 2 8-pin connectors for connecting power and speakers.
- Fold the glove box housing down; there are travel stops on the upper part of the rear wall that need to be disengaged from the dashboard frame.
- To expand the working area, it is recommended to remove the cover by pulling it towards you.
- Raise the decorative floor covering of the car along with the soundproofing mat near the passenger seat. Pull out the factory antenna cable equipped with a plug that needs to be extended to the installation location of the player.
- Place standard slides for attaching the radio using special bendable elements.
- Further installation of the radio in Grantu is carried out after switching the loudspeakers.
Installing the stock radio is slightly different from the procedure described above:
- Since the standard frame is designed for 1DIN size equipment, a replacement unit is required. To do this, you will need to carefully pry and remove the plastic climate control controls. The frame itself is fixed with latches, which are removed one by one from the mounting sockets using a plastic spatula.
- For final dismantling, it is necessary to disconnect the connectors connected to the control buttons for the air conditioning, hazard warning lights and heated rear window. It is necessary to make notes that will allow you to correctly connect the plugs on the new panel.
- Remove the keys, climate control parts and ventilation deflectors from the center console, which are transferred to the new unit.
- The “luxury” version of the cladding, designed for mounting a 2DIN radio, consists of 2 sections. The lower part is equipped with additional fastenings with screws, under which it is necessary to install counter elements. The parts are placed in standard places around the perimeter of the instrument panel in the upper and lower parts of the landing window.
- Place a separate adapter frame, which is supplied with the head unit, in the mounting socket of the radio.
- Place the cladding in place, securing the part with latches and screws. The switching cables for acoustic equipment and control buttons are routed through the corresponding holes into the car interior.
- Install a standard player into the guide slides, having previously connected it to the on-board network and antenna. The assembly is secured with side latches; if dismantling is required, the clamps are bent with a screwdriver.
- Install a horseshoe-shaped decorative cladding located around the perimeter of the central part of the decorative panel. Reinstall the plugs for the hazard warning, air conditioning and heated glass buttons, and then place the keys in the standard sockets.
How to remove the standard
Removing the standard radio on a Priora is carried out without disassembling the console and decorative frame. The tool is inserted between buttons 2-3 and 5-6 or under the Skan and TA keys, depending on the model of the head unit. When the ends of the keys or plates rest against the latch, a characteristic click will be heard, indicating that the lock has disengaged. After this, the keys are moved apart and the tape recorder is pulled out. In some cases, the device cannot be removed this way.
Then, using 1 key on the right side, disengage the latch, and with the other hand, push the tape recorder out through the glove box. When one side moves out of place by 2-3 mm, press the left latch and pull out the car radio. It will be impossible to completely remove the device, since it is held in place by the antenna wire. To do this, you need to cut off the plastic tie under the dashboard from the glove box. After this, the GI can be completely removed. To replace the MMC, you need to disconnect 2 connectors from the back - the power connector and the output to the car speakers.
In some cases, to dismantle the landing body it is necessary to remove the decorative panel. To do this, unscrew the mounting screws under the air conditioning controls and the 2 upper fastening elements, and then remove the cover from the gear shift knob. If a 1-DIN version is installed instead of a standard car radio, then it is necessary to install a decorative frame that will cover the remaining hole.
Connecting the amplifier to the standard radio
Connecting the amplifier to the standard radio of most cars is carried out in the following order:
- Before starting work, be sure to disconnect the battery terminals.
- A red +12V wire is pulled from the battery to the amplifier. A fuse should be installed as close to the battery as possible.
- The black wire (ground) is connected at one end to the metal part of the body, and the other to the amplifier.
- The amplifier is connected with special wires to the speakers and subwoofer.
- Wiring is laid from the radio to the amplifier using special connectors on the radio. It should be located separately from the standard wiring to avoid interference.
- You only need to attach the terminals to the battery after the installation is complete.
The amplifier is located in the passenger compartment or trunk of the car. If it is located in too narrow a space, additional cooling will be required, since the amplifier gets very hot during operation.
In this way, the amplifier is connected to the radio of a Lada Priora, Grant, as well as Kalina 2, Lancer 10 and many others. Differences appear only in the last point, since the radios have different connectors. The connection is made through the radio connectors marked ISO or mini-ISO.
Since different radio models have different connector locations, before installing the amplifier, you need to familiarize yourself with the diagram of their location. It can be found in the receiver's instruction manual.
Converter for connecting the amplifier to the standard radio
Another way to connect an amplifier to a standard radio is to use a converter. This is a device that converts the acoustic outputs of the radio into linear ones.
There are pros and cons to using a converter.
Advantages of a converter for connecting an amplifier to a standard radio:
- In this case, no changes are made to the standard radio. This point is very important, especially during the warranty period of the radio.
- Low price converter.
- Easy to install.
- Reliability of the converter, rare breakdowns.
Regardless of how the amplifier is connected to the car's standard radio, it is necessary to observe safety precautions during operation:
- Use only high-quality wires without damage;
- All wire connections must be well insulated;
- Be sure to remove the terminals from the battery before starting work and do not put them back on until the installation is complete;
- Before starting installation, familiarize yourself with the layout of the radio connectors.
When the amplifier is installed correctly, it increases the power of the standard radio, improves the quality of the reproduced sound, and eliminates interference
In order to enjoy high-quality sound without interference for as long as possible, it is very important to choose good equipment and wiring
17.01.2012
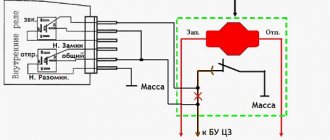
It is possible, and not only via power wires, since the unified connector of the head unit has linear outputs designed for this. Another thing is that they are not the usual nests for the so-called “Tulips”.
Below is a picture of the pinouts of these connectors.
Unfortunately, the sub output is not implemented, nor is its control implemented.
But this is not a global problem, since the existing outputs can be used for these purposes.
When using contact No. 3 - GND of linear outputs, hum may appear at the amplifier output when the engine is running. In this case, simply do not place the wires of the line wire screens on this contact, but fasten them to the minus, or the radio body and the background will disappear...
It should be noted that the first version of the head unit of the Priora car was much more modest in functionality, characteristics and design. Photo below:
For those who are looking for connector specifications, the following photo:
Open the instructions for the car and, accordingly, inside it for the radio here...
Instructions for radio tape recorder Grant norm (On Do)
Instructions for new Priora radio, Granta Luxury
- https://xn--80aal0a.xn--80asehdb/do-my-self/tuning/tuning-lada-vesta/282-podklyuchenie-usilitelya-i-sabvufera-k-shtatnoy-magnitole-lada-granta-kalina- priora.html
- https://1avtozvuk.ru/sovety/instrukciya-po-podklyucheniyu-usilitelya
- https://mgp-avto.ru/mozhno-li-k-shtatnoj-magnitole-priory-po/
Features of installing a radio on a Lada Priora
As a rule, installing a radio on a Priora involves several types of audio players:
- 1 DIN;
- 2 DIN.
2 DIN media player for LADA Priora
These designations indicate the dimensions of the hole for installing the radio, which correspond to the dimensions 180x50x160 mm for 1 DIN and 180x100x160 mm for 2 DIN. If you want to install a more modern version of a 2 DIN radio, the car owner will have to carry out the procedure of sawing the partitions of the front console of the car in order to widen the hole for the player. In some cases, to adjust the dimensions, it becomes necessary to cut out or purchase an appropriate transition frame for the console, which is much more difficult than installing 1 DIN.
If you nevertheless decide to install a 2 DIN system, then it is best to entrust the installation work to an experienced specialist, otherwise there is a risk of damaging both the console itself and the car interior trim.
It should also be noted that 2 DIN standard radios have an extensive range of functions:
- long service life thanks to shock-resistant housing;
- paired amplifiers increase signal reception several times;
- the ability to switch the frequency of the radio signal by all passengers in the car thanks to the Music Zone system;
- function of built-in radio navigator;
- built-in USB connector allows you to connect external devices to view and play files;
- the presence of a bass amplifier for music for higher quality sound.
Built-in USB port and amplifier outputs
Characteristics of the standard radio "Lada Grants Liftback"
The radio for the Lada Granta liftback is supplied as standard equipment. Product in 2-DIM format (100 x 180 mm).
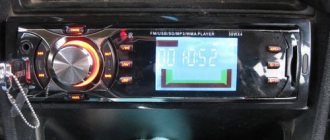
In addition to the classic radio, there is a built-in card reader, Bluetooth, and a USB output for connecting flash drives. The only disadvantage of the audio module is that it is a push-button type. Which is not to the liking of many car enthusiasts, which is why they install more modern modifications.
During the startup of the audio module, a greeting from Lada Kalina 2 is displayed. This is not an error, as many owners think. This type of audio was originally developed for the Lada Kalina 2. Obviously, the manufacturer did not change anything and started production for the Granta. Installation/disassembly of the module is somewhat complicated due to the tight fit, so be prepared for this.
It is based on the Windows operating system, which allows you to connect to the World Wide Web via a 3G modem. There is no such option out of the box; you first need to reflash the device, but more on that later.
Via Bluetooth, it is possible to connect to a phone, and the “hands-free” option is activated. Which is very convenient and practical when driving. The owners were also pleased with the stock radio. At first glance it looks simple, but it turns out not to be so. Available programming function for a specific channel on a given topic.
For example, as soon as a news broadcast comes on, the radio automatically switches to the programmed channel. The audio module reads the following formats: MP3, WMA, WAV, WMV. Control of the standard radio of the Lada Granta liftback is accessible and intuitive, even for an inexperienced owner.
Installing speakers in the front doors on a Lada Granta
Installation of a multimedia system is not limited to installing a car radio. For normal operation of the entire audio system, it is also necessary to install acoustics and speakers in the doors of the Lada Granta. To cut holes in the plastic door trim, it is better to remove it from the car.
We remove the door handle, then dismantle the plastic casing of the door opening lever and the glass position adjustment lever.
The front door trim already has a hole for the speaker, equal to 16 cm. Next comes connecting the speaker and installing it in its original place using 4 screws, followed by installation of the door trim and installation of the speaker grille
Installation of an audio system on Granta of different configurations
In the “standard” configuration in Grant, power wiring harnesses are already pre-installed, which are located in the console opening. The wires are connected exclusively to the car radio, so don’t be surprised if you can’t find them in the doorways.
In the Lada Granta Norma, the power wires coming from the console are already connected to the doorways. You just need to connect the sound system in full accordance with the assembly diagram. It often happens that the pre-installed door wiring does not match with some speaker connectors. Here we get out of the situation by purchasing additional suitable wires.
During assembly, the Lada Granta “luxury” is equipped with a special touchscreen multimedia system and already installed speakers. The improved radio is complemented by a Bluetooth system and a 5-inch display with a linear output.
Among other things, the built-in car radio allows you to connect a memory medium – a USB 2.0 flash card, through which you can listen to recorded music.
How to perform a flashing?
The stock firmware for the Lada Granta radio has become very popular among car enthusiasts. This does not require installation of a new type of radio. This function does not have any effect on the sound quality, but it allows you to provide the interface with additional options that are not available for the standard version of the radio. For example, you can generate a convenient touch keyboard that allows you to communicate with the Internet.
To flash stock multimedia, you should get an SD card formatted in “FAT” or “exFAT”.
- First, download the firmware from the network. It’s easier to find her among the “Grantavod” members of the forum.
- After downloading, we copy the necessary files to the root directory of the card itself, having previously saved them on a flash drive.
- We insert the card into the corresponding slot of the car radio and reboot it.
- After filling out the download status scale, we use the updated interface with expanded capabilities.
To resume options: “Radio” and “Bluetooth”, remove the SD card and reboot the system again.
Automotive forums will delight with the developments of many craftsmen who, as a result of experiments, offer firmware versions with the presence of updated radio software and other functions in the menu. There is an opinion that these “specialists” have learned the secret of reading and decoding data from the CAN bus combined with the MMC. Sometimes the firmware requires you to calibrate the screen before communicating with an alternative interface.
Priora, Granta, Kalina
Let's start, perhaps, with the Russian automobile industry, which has such car models as Priora, Granta and the updated Kalina. All these models are equipped with standard car radios and navigation systems.
Kalina - in this car, the standard car radio can be installed in two types. The first is a 2 DIN car radio without a CD drive and without TouchScreen. The second car radio - without a CD drive, with a 7-inch display with TouchScreen, with support for MMC cards. The screen on Kalina is resistive and is more durable, and this also allows it to work in both extreme heat and cold. Not all playback formats are available on the MMC device. Basically, the car radio reads such popular music formats as mp3, wma and wav. In addition to music, it can also play video files.
The next time you turn on the GPS navigator, everything from the Windows folder will be deleted. To do this, find our installed driver and copy it to a folder called StsticStore.
We turn it on again and check it on the GPS, see if everything works, launch it by double pressing the Home button. Next, we return to the Windows menu on the desktop. At this point, the system will ask you for the driver again, but since we have already copied it in advance, in the window that appears we simply indicate its path StaticStoreUSBSER.dll. All these given options will help you and this problem will no longer bother you. The information that the Navitel version for Windows CE is not distributed is no secret to anyone. It turns out that you can’t buy it, which means you’ll have to download it from torrent trackers. For convenience, you can take versions 7.5 or 8.0. Navitel must find our GPS receiver, and for this we need to reflash it for further work with Com5 at an approximate speed of 4800. This comes with add-on patches with which you can do this.
We write Navitel to the MMC card in the root folder called NavitelContent, where the card itself will be located. Then we insert the card into the radio and launch Navitel. A sound signal will inform you that a connection with satellites has been established.
The standard car radio on the Grant and Priora has a similar navigation system, so the settings of the standard radio on the Grant, as well as the settings on the standard radio on the Priora, are the same.
Removing the device according to the instructions
The algorithm for removing the radio if you have the keys is outrageously simple. It is worth considering in order to understand how to act if they are lost. The order is as follows:
- Remove the front panel of the player and the decorative plastic frame, prying it up with a flathead screwdriver if necessary.
- Insert the first key into the gap between the housing and the mounting frame, located at the end. You should feel slight resistance as the tool bends the latch.
- Repeat the same action with the second key.
- Grasp the radio with your hands by the protruding parts on the sides of the case and carefully remove it from the niche.
To remove the radio, 2 keys are used
Types of radio mounts
To choose a method for removing a car player, you need to understand how it is fixed inside the panel. The following types of fastenings exist:
- on 2 side clamps;
- on 4 latches located on the side and top of the case;
- fastened with self-tapping screws or screws to the brackets.
Example of mounting a standard head unit
Note. The last method of fixation is typical for standard devices that are supplied to the car by the manufacturer.
Latch on mounting frame
The principle of fastening with latches (clamps) is that the body of the radio is enclosed in a metal mounting frame, and is not directly built into the panel niche. This intermediate part, which has special petals with protrusions or grooves (depending on the brand and model of the device), is securely fixed in the niche. The player body is equipped with mating latches that engage when the player is inserted into the socket.
The counterpart of the latch on the body
To unlock the latches and remove the car radio, keys of various shapes are used, supplied by the manufacturer complete with music for the car. They are lost over the years of car operation, since they are used extremely rarely. As a rule, the key is a shaped strip of metal or a handle inserted into 2 pairs of holes located on the front panel of the device.
This is what most car radio removal keys look like
The mountings of standard radios are most often made with bolts, screwed to brackets and hidden under the front plastic panel. Here you cannot do without a minimum set of tools to dismantle this panel and unscrew the mounting screws or bolts.