The article will tell you what to do when the exhaust manifold gasket burns out and what symptoms indicate this. Experienced craftsmen say that in the entire intake device, it is the gasket that plays one of the most important roles. It affects how well the entire exhaust system will work. If the manifold seal is replaced after the specified time, the operation of the vehicle will not be as safe as possible. In fact, the manifold is a specialized device used to completely remove exhaust gases from the power unit itself.
Its tasks also include improving the quality of filling the cylinders and purging the entire working space. You should also know that the exhaust device operates at high temperatures and high gas pressure. It is immediately necessary to say where this element is located. It is located on the cylinder head. As for the second side, it is in contact with the catalyst or exhaust pipe. Well, the most important task of the gasket can be considered to be that it allows you to protect the cylinders from exhaust gases entering them. If they break through, problems may begin, such as rapid wear of certain engine elements.
The exhaust manifold gasket has burnt out - the following symptoms indicate this:
- There is not the most pleasant smell of exhaust gases in the cabin.
- The engine does not always start the first time.
- Incomprehensible sounds are heard from the compartment where the power unit is located.
If you are able to detect one of the above signs, you should immediately carefully inspect the exhaust system. Regarding the manifold, it is made of special steel that can withstand very high temperatures.
Given this fact, a full replacement of the collector is not carried out very often. The main reason for its breakdown may be the ingress of simple water onto the surface. It seems incredible, but this is how the first cracks appear on a part. It is the gasket that can be considered the weakest link of the entire exhaust gas removal system. As a rule, they wear out due to the fact that they are not made from the highest quality material or due to unusually long use under high loads.
Today they are made from special asbestos, which is reinforced with steel. The material is quite old, but it is not eternal and wears out over a certain period of time. You can change the gasket without much difficulty. You don't even have to have any skills here.
Mechanics advise that the gasket be changed regularly. There is no point in waiting for it to be completely destroyed.
The sequence of actions is as follows:
- First you need to open the hood of your vehicle.
- Remove the air intake element. Next, the carburetor is dismantled. This way you can get directly to the collector.
- The heat shield that covers the collector is removed.
- From each cylinder, unscrew several nuts holding the necessary element.
- The next step is to unscrew a few bolts directly from the exhaust pipe.
- Dismantle the collector.
- The old gasket or some of its remnants will remain on the cylinder head.
- Clean the seat thoroughly to install a new gasket.
- Everything is cleaned to perfect shine.
- Be sure to lubricate the seat with graphite lubricant.
- A new gasket is installed. Press it down firmly.
- The structure is assembled in the reverse order. Act extremely carefully so as not to forget or confuse anything.
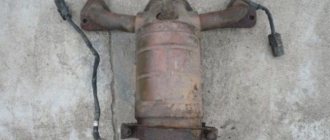
The exhaust manifold gasket is responsible for sealing the joint between the exhaust manifold, which removes exhaust gases, and the cylinder head. The part ensures the normal operation of the VK, and, as a result, the safety of the car.
Exhaust manifold functions
It consists of several pipes that merge into one, but has different mountings and configurations for different engines. To produce VC, high-carbon cast iron, stainless steel and titanium are used, sometimes coated with ceramic/chrome.
The task of the “spider” (as the exhaust manifold is called in the Russian Federation) is to transfer combustion products collected from all cylinders to the exhaust pipe. Gases from the AC enter the catalyst or directly into the exhaust pipe and then to the muffler. The exhaust manifold is attached to the engine, or more precisely to the cylinder head (cylinder head), sealing the joint using a special element.
Preparation stages
To replace the manifold or its gasket, in any case you will have to dismantle the VK. But before you get to the element you are looking for, you will first need to go through some preparatory steps. Namely, tighten the fasteners, and then remove the air filter and carburetor if the first stage does not help.
We recommend: How to change the battery in Volkswagen keys
| Stage of work | Your actions |
| Tightening the fastenings | Often, loose manifold fastenings caused the entry of contaminants, which disrupted the performance of the exhaust system. If the tightening did not give any result, then the gasket is definitely burned out or the collector itself is damaged, which is less likely |
| Removing the air filter |
|
| Removing the carburetor | Removing the carburetor is carried out in the following sequence:
|
Dismantling the unit
All dismantling work must be carried out only on a cold engine. To make it easy to unscrew all fasteners, you can pre-treat them with WD40, several hours or even a day before the repair begins.
Causes of malfunctions
The gasket is placed between the exhaust manifold and the cylinder head. The stamped asbestos gasket is resistant to high temperatures, can be compressed (creating the necessary impermeability) and has increased strength. To enhance the latter quality, the exhaust manifold gaskets are additionally reinforced with steel.
IMPORTANT! The main task of the gasket is to prevent exhaust gases from penetrating under the hood, where they can cause ignition of parts/assemblies of the engine compartment.
The gasket is recognized as the most vulnerable point of the exhaust manifold, which operates under extreme loads in both temperature and pressure. It is not surprising that gaskets have to be changed not only on cars with significant mileage, but also on almost new cars.
Gaskets need to be rotated for several reasons:
- poor factory quality;
- engine overheating due to intensive use;
- engine repair (a used gasket loses its properties when dismantled).
Tools and necessary parts
To remove the exhaust manifold on a VAZ 2114 in order to replace the gasket or entire part, you will need the following tool:
- open-end and ring wrenches for 8, 10, 13, 17;
- wrench with heads 17, 19;
- screwdrivers, pliers.
It is also a good idea to have tools such as a Dremel, nut saw or nut pick on hand. As a rule, the fasteners on the exhaust system parts stick tightly.
A few days before your planned repair, begin treating accessible nuts with WD-40 or another penetrating lubricant. Repeat the operation 2-3 times. This will make the task of removing the manifold a little easier .
The question often arises: is it worth using a sealant after removing and replacing the gasket? Experts believe that if you apply sealant to the gasket, it should only be high-quality silicone. A bad sealant can bring a lot of trouble to a VAZ 2114 engine: when it burns out, it turns into “pellets” that are pulled into the crankcase. And this is unnecessary contamination of the piston system.
Replacing the gasket
The marker of a failed gasket is considered to be soot that forms in the place where the exhaust escapes. In this case, proceed to replacing the defective seal.
What is needed for repair
To replace the exhaust manifold gasket, prepare the following materials and tools:
- screwdrivers (slotted and Phillips);
- sharp knife or spatula (remove used gasket);
- spanners included;
- anti-rust liquid (for example, WD-40);
- 5 liter wide-neck container (for draining antifreeze);
- dry rags.
ATTENTION! When replacing the manifold gasket on a VAZ 2114 (as on other factory models), it is necessary to drain the antifreeze in advance, otherwise the engine intake windows can be flooded.
Step by Step Actions
The process of replacing a seal when it fails is simple, but has nuances for different engines. In general terms, the algorithm for dismantling and subsequent installation of the VK gasket looks like this:
- Open the hood and remove the air intake with the carburetor, under which there is a manifold.
- Remove the thermal screen covering the VC (some older models do not have a screen).
- Unscrew the bolts that attach the spider to the exhaust pipe, and then the bolts connecting it to the engine block.
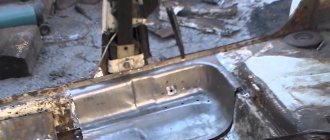
- Proceed to removing the exhaust manifold itself, on which sits a burnt-out gasket, which often “sticks” to the VC.
- Carefully clean the area between the cylinder head and the manifold with a spatula, removing carbon deposits and fragments of worn gasket from the second.
- Once the area is shiny, coat it with graphite lubricant and install a new gasket.
- Treat the fasteners with the same lubricant (to prevent corrosion).
Finally, return all dismantled parts to their rightful places.
Replacing the gasket VAZ 2114
First, remove the engine protection from the car standing on the overpass, having previously drained the antifreeze, and then proceed as follows:
- Remove the air filter, having first disconnected the negative terminal of the battery.
- The fuel pipes with the accelerator cable are disconnected from the throttle.
- Disable the idle speed/throttle sensors.
- Disconnect the crankcase ventilation and brake booster hoses, turning off the receiver.
- Remove the latter by disconnecting the wires at the injection control unit.
- Dismantle the fuel rail without unscrewing the injectors.
- The receiving pipe is detached from the VC.
- Remove the intake and exhaust manifolds one by one.
- Remove the old gasket.
- Clean the joint between the manifold and the cylinder head with a knife.
- Install a new gasket and perform reverse installation.
- Fill in coolant.
The exhaust manifold gasket will last a long time if you use quality fuel and monitor antifreeze levels to prevent engine overheating. You also check the reliability of the joint between the cylinder head and the cylinder head and immediately change the gasket if you notice its malfunction. In addition, you need to buy gaskets from reputable manufacturers.
What does a faulty collector affect?
There are many stories about the rupture (and even explosion) of a cracked manifold while the car is moving.
Of course, none of them are true, but nevertheless, a leaky manifold is a very serious problem that requires an immediate solution, and here’s why: through burnouts and cracks, air can enter the exhaust system, diluting the exhaust gases.
As a result of this, the lambda sensor will incorrectly determine their composition and incorrectly adjust the composition of the fuel-air mixture injected into the engine, which will lead to tripping, a drop in speed and carbon deposits on the spark plugs.
Bent valves due to incorrect valve timing
These same cracks will affect the crankcase ventilation, disrupting it. This will lead to timing problems and increased valve wear. And finally, exhaust gases escaping through the burnouts will enter the engine compartment and, partially, into the interior, causing unpleasant odors and discomfort during trips.
A severely burnt manifold gasket can lead to exactly the same consequences as cracks on the part itself.
Types of elements
Today two types of exhaust manifolds are produced:
- whole;
- tubular.
Solid parts have shorter channels, which are then combined into one chamber. Material: heat-resistant cast iron. The part has low gas removal efficiency. This is because the shorter manifold passages act as a barrier to gas pulses from the cylinder block.
Most parts are produced for mass use, and their quality often suffers. Such collectors do not have a vacuum zone. If they get too hot and then cool, the cast iron can crack. Then you will need to remove the VAZ 2114 exhaust manifold and replace it.
For sports and extreme use, a large number of exhaust manifolds are produced with various shapes and methods of connecting pipes. They are made of stainless steel. Car enthusiasts call these parts spiders. There are short spiders and long ones.
For example, on a 4-cylinder engine, the pipe system is represented by the formula 4-2-1. So, each cylinder has its own pipe. Then these pipes are connected into two, and then into one. This system is used in tuning. It allows you to increase the car's power and torque. The short 4-1 system is used in sports.
Removing the carburetor and intake manifold
You need to have the following tool on hand:
- Flathead and Phillips screwdrivers.
- 8" socket or tubular wrench.
- Open-end or socket wrench set to “13”.
- Ratchet (if necessary).
To remove the VAZ 2109 manifold (carburetor), you must first dismantle the injection system. The disassembly process looks like this:
- Disconnect the hose that supplies antifreeze from the cooling system to the carburetor starter. To do this, loosen the clamps and carefully drain the liquid. Work must be carried out on a cold engine.
- Remove the exhaust pipe. To do this, unbend the fixing plate and unscrew the nuts with a “13” wrench. Using the same wrench, unscrew the nuts that secure the pipe to the bracket.
- Remove the throttle valve drive cable mounting bracket. Remove the spring and loosen the nut, disengaging the cable.
- Disconnect the idle air solenoid valve.
- Disconnect the vacuum tube and carburetor heating hoses.
- Remove the crankcase ventilation pipe.
- Unscrew all four nuts that secure the carburetor body to the intake manifold.
- Carefully lift the carburetor body, being careful not to damage the studs.
The next step is to dismantle the intake manifold. You will need the same tools as in the previous step. The procedure consists of the following steps:
- Unscrew the two fastening nuts and bend the platform under the carburetor back.
- Remove the hoses that connect to the intake manifold.
- Unscrew all the nuts (there are 7 of them) that secure the manifold.
- Remove the intake manifold of the VAZ 2109, slightly rocking it to the sides.
Features of the neutralizer
Now let's look at the work and functions performed by the catalyst in VAZ cars. It is also called a catalytic converter. This device is one of the most basic parts of the exhaust system of these cars. It is designed to reduce as much as possible the toxicity of exhaust gases that will be released into the atmosphere.
The design of the device consists of a housing, a heat-insulating block and the block itself with the carrier. Special mention should be made of the block carrier. It is this component of the catalyst on the VAZ, and on many other cars, that is equipped with ceramic carriers that are not subject to deformation when operating at high temperatures and with increased vibrations.
The design of this element consists of several longitudinal honeycombs, which are designed to increase the area of work with exhaust gases. Special substances are used to reduce the toxicity of exhaust gases in cars. Platinum, palladium or rhodium are mainly used for these purposes.
Neutralizer device
These chemicals are designed to significantly speed up the reactions that take place in the neutralizer. These substances work in the oxidation of hydrocarbons. The reaction produces ordinary water vapor. Rhodium acts as a catalyst in reduction reactions.
Its main role is to reduce nitrogen oxides into as harmless substances as possible. The block in which these substances are located is placed in a special oblong-shaped housing, and a heat-insulating layer is located between it. Also located in this housing is an oxygen sensor.
Practice has shown that at the operating temperature of the exhaust gases, the catalyst can reliably retain more than 90% of all toxic gases. So, this part has significant efficiency.
Replacing a device on a 16-valve engine
Catalyst for 16-valve engine
In this case, the catalyst is located together with the exhaust manifold, and you should look for it under the hood of the car, in the immediate vicinity of the cylinder block. To replace the unit, we need a catalyst with zero resistance, or – as it is popularly called – a “spider”. It is quite possible to replace the device in your own garage. The first nuance when replacing a unit is dismantling the fuel rail. The second is the presence of two lambda probes. The first is located directly on the catalyst and is responsible for setting up the fuel system. The second one is located after it, on the flange. Very often it is called “ecological”. If the lambda malfunctions, the sensor generates an error and fuel injection begins to work incorrectly, resulting in an increase in traction and, accordingly, fuel consumption. There are also two ways to solve this problem. The first is to purchase a “spider” with one regulator and flash the electronics unit from Euro-3 to Euro-2. But there is one BUT, there is only one thread on such a spider, and it is on the flange. This means that to install the device you will have to assemble an extension cord consisting of wires and two connectors, popularly called “male and female”. The second is to purchase a “spider” with two regulators and simply install it in its regular place. In this case, there is no need to reconfigure the electronics.
Exhaust system
The main elements of the exhaust system on these cars are the exhaust pipe, additional and main mufflers, as well as a converter. The exhaust pipe on the VAZ 2114 is connected to the converter using a special hinge. A similar design was already used on the VAZ 2109.
To ensure a more reliable and tight connection, there is a graphite ring between the flanges. In order to prevent the car body from heating up, engineers provided a special gasket above the neutralizer. It plays the role of a heat sink element.
VAZ developers installed a special oxygen sensor at the inlet part of the neutralizer. Car enthusiasts know it as a lambda probe. What functions does it perform? Everything is quite simple here. This part is needed in order to determine as accurately as possible the amount of oxygen in the exhaust gases.
So, the information received from this sensor is fed to the ECU and is then used to quickly adjust the amount of fuel that will then flow into the cylinder block. As in many other VAZ models, the mufflers are securely fixed to the underbody of the car. For this, engineers used special suspensions.
The vibration that accompanies the release of gases is significantly reduced with the help of these suspensions. This ensures silence in the car interior.