A malfunction of the chassis of “our brother” is a common thing and now, as a rule, no one is surprised why, for example, a strut or wheel bearing died. Every driver knows that no spare part will last on “our” roads.
Today I’ll tell you how to replace the front wheel bearing on a Grant with your own hands. In addition, you will learn how to understand that a wheel bearing is “dying”, as well as the causes of wheel bearing failure.
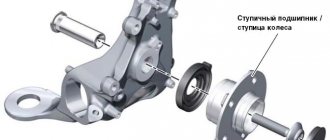
A wheel bearing, as you can guess from the name, is related to the hub, and not just any, but the most direct one, thanks to this part the hub, and with it the wheel, can rotate.
How can you tell if a wheel bearing is faulty?
- There is a hum, a grinding sound;
- Backlash;
- Vibration while driving.
Reasons why the hub fails
Wheel bearing life
100 thousand km, however, due to the constant loads and shocks that the part experiences while driving on a bad road, its service life is often significantly less. In addition, premature failure is affected by mechanical damage, after which the boot is destroyed and dust, dirt and moisture enter the bearing. High loads and temperature changes quickly damage the wheel bearing, after which driving such a car becomes unsafe. Getting jammed while driving can lead to an accident with tragic consequences, so do not delay repairs under any circumstances.
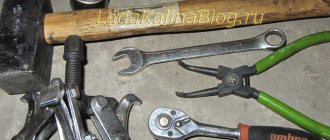
The work is not easy, and therefore will require certain skills and special equipment. Namely:
- Three-jaw hub puller, wheel bearing puller, and circlip pliers;
- Hammer, chisel, set of keys (including a “30” key) and screwdrivers;
- Jack or lift.
Where are the front and rear hubs on the Lada Grant? Description, purpose
The front hub joint is located on the front left (right) side of the axle shaft. The rear hinge is located in the rear left (right) suspension block.
The main purpose of the bearing is to firmly hold the hub and ensure wheel rotation. Structurally, the front (rear) hub consists of:
- outer and inner metal frame;
- a separator in which metal balls and rollers are located;
- insulating rings;
- special filler - graphite-based lubricant.
The device of the hub on the Lada Grant
Front
- rounded fist;
- external and internal dirt-reflective metal rings;
- front roller bearings;
- hub;
- washer;
- hub nut;
- retaining ring, plug.
Rear hub device
- hub mechanism axis;
- metal ball bearing;
- mud ring;
- retaining ring;
- washer;
- screw;
- sealing ring;
- rubber boot;
- hub cover.
Resource for replacing hub mechanism elements
The average service life of wheel joints is 80 – 85 thousand km. The indicator is average, as it depends on the following factors:
- quality of workmanship of the part;
- frequency of operation of the technical device;
- driving style;
- quality of road surface;
- aggressive environment;
- high operating temperatures;
- compliance with technical inspection intervals.
Signs that a hub needs to be replaced
- the appearance of uncharacteristic noise during wheel rotation;
- wheel runout in the steering column;
- vibrations at different speeds. Sometimes there is vibration at a certain speed;
- metallic grinding noise as the wheel rotates;
- front wheel hub play.
Diagnostics of the hub mechanism
- We place the car on a level platform, squeeze the parking brake if we are checking the front row. For the rear, we install wheel chocks.
- Let's jack up the front (rear) part.
- We turn the car wheel and carry out troubleshooting.
- We shake the wheel up and down with our hands. In good condition there should be no play. Otherwise, we dismantle and replace worn elements.
Symptoms of a problem
Problems associated with the front hub are identified by the following symptoms:
- extraneous, unnatural noise from the wheel during rotation;
- wheel beating, vibrations of varying degrees of intensity;
- sounds of scraping metal;
- front wheel play appears.
Causes of breakdowns
- Unsatisfactory condition of roads. The fact is that when driving on an uneven surface, wheel bearings take on increased load, sudden impacts, and exposure to high and low temperatures. Over time, the metal components of the product become brittle and begin to break down.
- Aggressive environments. Due to the fact that the element is located in the center of the wheel, it is constantly in contact with moisture, water, dust, and dirt. In winter it is exposed to cold temperatures and in summer to hot temperatures.
- High operating temperatures. The rotation process is accompanied by the natural release of heat; constant heating and cooling occurs (especially in winter conditions), which has a detrimental effect on strength and wear resistance.
Preparatory stage before replacing the hub mechanism
Required materials and tools:
- hydraulic (mechanical) jack;
- wooden stand;
- wheel wrench;
- screwdriver with a flat, cross-shaped bit;
- hammer;
- knob, nozzles;
- spanners;
- stationary vice;
- chisel;
- two-jaw and cup pullers. The exact dimensions of the pullers are indicated in the operating instructions;
- forceps;
- metal brush;
- lubricant type “CV joint - 4”;
- rags;
- caliper for measuring diameter;
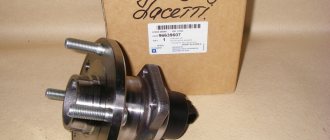
- new wheel bearings;
- additional lighting provided that the work is carried out in the dark.
How to replace a bearing in a Lada Grant?
Replacing the rear wheel bearing will require the following tools:
- a special puller designed for hubs;
- chisels paired with a hammer;
- puller for removing retaining rings;
- “30” size heads;
- vice;
- a device that allows you to press out and reinstall the bearing;
- flat-profile screwdriver.
Replacing the front hub of Lada Granta
- We place the car within the perimeter of the repair area and provide priority safety measures.
- Let's jack up the right (left) side.
- Unscrew the bolts and remove the wheel.
- Let's unlock the hub.
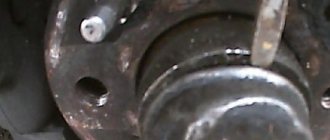
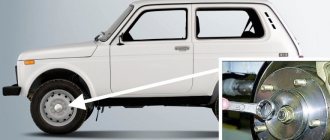
- On the back side, unscrew the two bolts that guide the brake caliper.
Location of two bolts
- We remove the caliper, hang it on a wire (we fix it on the steering tip).
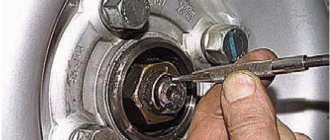
- Unscrew the hub nut and remove the brake disc.
Removing the hub nut
- We unscrew the two bolts - the rack clamps. If necessary, we use a liquid to remove deposits like WD-40.
- Disconnect the strut with the steering knuckle and unscrew the ball joint fasteners.
- We remove the CV joint.
Next, install the new hub assembly and assemble the structure in the reverse order.
Replacing the front wheel bearing of Lada Granta
- The front hub joint is located in the steering knuckle housing, remove it. Pre-clamp the structure in a stationary vice.
- We install the metal spacer - the head at “22” on the surface of the hub. We apply targeted blows with a hammer to press it out.
- We disconnect the inner race of the hinge and remove the separator with metal balls.
- To remove the outer part of the hinge, use pliers and remove the retaining rings.
- To dismantle the inner part of the cage we use a chisel. Gently tap with a hammer. Press-out puller
- Use a puller to press out the axle shafts.
Pressing in a new wheel bearing and assembling the unit
- We clean the surface from dirt, deposits, and rust. We remove the old grease from the hub and wipe it with a rag. We measure the diameter of the hub, it should be 35 mm.
- Apply a thin layer of graphite grease to the surface. Press in the new bearing.
Replacing the front wheel hub bearing of Lada Granta
Tools:
- Jack or ditch lift
- Stand - 2 pcs.
- Wheel key
- Medium flat screwdriver
- Hammer medium
- Kerner
- Driver for socket attachment
- 10mm wrench attachment
- 19mm wrench attachment
- 30mm wrench attachment
- Torx wrench attachment E12
- Torx wrench attachment E14
- 7 mm straight box spanner
- 17 mm straight box spanner
- Punch
- Bolt M12×1.25 mm - 2 pcs.
- Bench vice
- Chisel
- Double jaw puller
- Cup puller
- Circlip Pliers
- Metal brush
- Needle file
Parts and consumables:
- Grease "CV joint-4"
- Rags
- Wheel bearing - 2 pcs.
Notes:
Replace the bearing when it fails. There are two ways to replace a bearing. The first is by removing the steering knuckle assembly, the second is without removing it from the car. The operations for replacing the wheel bearings of the left and right wheels are similar. Carry out the work on an inspection ditch or overpass.
1. Apply the parking brake, raise the front of the vehicle using jacks or a trench lift, and place it on jack stands.
2. Remove the wheel using a wheel wrench.
3. Using a screwdriver, remove the hub protective cap.
4. Using a hammer and center punch, straighten the collar of the hub bearing nut that has been dented in two places.
5. Have an assistant press the brake pedal; At the same time, use a 30 mm wrench to loosen the hub bearing nut.
Note:
The nut is tightened with a large torque, so the attachment and wrench must be strong enough to transmit the necessary force.
6. Unscrew the hub bearing nut completely and remove the washer.
7. Remove the front brake disc as described in this article.
8. Disconnect the wheel drive from the hub. How to do this, see here (for the right wheel) or here (for the left wheel).
Note:
In order not to disturb the wheel alignment angles, you can replace the bearing without removing the steering knuckle.
9. Connect the ball joint to the knuckle and compress the hub. There are two ways to remove the hub: 1) by striking through a soft metal drift;
2) Using the front wheel brake disc. Pass M12×1.25 mm bolts about 130 mm long through two diametrically opposite holes in the disk and screw them into the holes of the hub to a depth equal to its thickness. By sharply hitting the bolt heads with the disk, compress the hub.
10. If the hub cannot be removed this way, remove the steering knuckle. To do this, unscrew the nuts of the bolts securing the shock absorber strut to the steering knuckle and remove the bolts as described here. Disconnect the ball joint and remove the steering knuckle.
11. Place the steering knuckle on the vise jaws and press the hub out of the knuckle through a mandrel or head of suitable diameter, applying force to the end of the hub.
12. Remove the hub from the fist. In this case, the outer part of the inner ring of the bearing remains on the hub.
13. Remove the mud ring from the hub.
14. Insert a blunt chisel between the ends of the inner race of the bearing and the hub and, using a hammer on the chisel, move the inner ring.
15. Use a puller to compress the inner race of the bearing.
16. Using snap ring pliers, remove the bearing snap ring.
17. Using a cup puller, press the bearing out of the steering knuckle and remove it with the puller.
18. Remove the bearing from the puller.
19. Clean and lubricate the inner surface of the steering knuckle with grease.
20. Using a file, clean out the nicks on the hub from the chisel. Press the new bearing into the steering knuckle, applying force to the outer race of the bearing.
21. Install a retaining ring into the groove of the steering knuckle socket. When pressing the hub, rest the puller washer on the inner race of the bearing.
22. Carry out further assembly in the reverse order, tighten the bearing nut to the prescribed torque, and be sure to lock it by jamming the collar.
Note:
Before installing the brake disc, thoroughly clean the mating surfaces of the hub and brake disc from rust and scale, since even the smallest particle sandwiched between the mating surfaces will cause the brake disc to run out and vibrate during braking.
If the bearing was replaced with the steering knuckle removed, then it is necessary to check and adjust the wheel alignment angles at a service station.
The article is missing:
- Photo of the instrument
- High-quality photos of repairs
Source: carpedia.club
Replacing the rear wheel hub of a Lada Granta
- We place the car within the perimeter of the repair area and secure the front row of wheels with wheel chocks.
- Using a wheel wrench, we tear off the mounting nuts, jack up the car, and remove the wheel.
- We unscrew the screws securing the brake drum to the structure.
- Remove the hub cap and remove the axle shaft from the splines.
- We fix the structure in a stationary vice. Gently tap the outer edge with a chisel.
- If necessary, use WD-40 liquid to remove deposits and rust.
- We dismantle the hinge and use a vice, although some craftsmen use special pullers. In general, whatever is more convenient for you.
- Using a metal mandrel, we knock out the inner ring.
- To finally press out the hinge, use a hammer and chisel and gently tap along the outer perimeter of the frame.
Replacing the rear wheel bearing of a Lada Granta with your own hands
Note to the driver. Before starting installation work, clean the surface from debris and dirt. Apply a thin layer of oil and be sure to lubricate the outer race of the hinge.
- We install the new hinge and lightly press it into the cavity.
- Evenly tighten the hinge until it touches the outer edge.
- We fix the retaining ring and install the hub in its original place.
Installation in a regular place. Assembly of the structure
- Apply a thin layer of graphite grease, put the assembly on the shaft, and secure it with a nut.
- We complete the tightening with a torque wrench (tightening torque 30 Nm).
- Use a chisel to counter the nut and put on the cap.
This completes the disassembly, assembly, and replacement of the rear wheel bearing.
Note to the driver. The Lada Granta Sport modification has a rear hub with a pre-installed ABS sensor.
It often happens that during the process of dismantling the hub mechanism, a bolt or pin breaks. The reasons for this are different, ranging from the old age of the metal to manufacturing defects.
So, how to remove a broken bolt. We carry out the work in several stages:
- mark the center of the stud;
- drill with a drill to 2.5, after 5.5, 9.5 mm;
- scroll with a bolt with a diameter of 9.5 - 10.0 mm;
- remove remaining metal and shavings.
How to check the rear wheel bearing of Lada Granta 2190
Before getting acquainted with the technology for diagnosing the rear wheel hub assembly, let’s find out the reasons for the failure of the Lada Granta hub bearing:
- Service life (operation);
- Wear from loads due to aggressive driving style;
- Destruction of the surface of the raceways due to driving over potholes, etc.;
- Drying of the lubricant, heating;
- Moisture and dirt getting inside.
The listed reasons are the main ones; ball bearing failure sometimes occurs due to a malfunction of adjacent components.
As mentioned above, if you begin to notice extraneous noise from the wheels, as well as possible vibrations, then the bearing assembly of the VAZ 2190 (Granta) must be checked on both sides, for this:
- We lift the car with a jack, hanging the wheel;
- Spin the chassis by hand to verify the source;
- The ease of rotation is also impaired;
- A backlash appears, which is also felt by the hands;
- To accurately determine the type of failure, you will have to disassemble the unit and remove the hub.
- The following are videos that we recommend watching before making a diagnosis.
Which ball bearing is humming - how to determine:
Replacing the Grant rear wheel bearing
To find out what condition the Lada Granta rear wheel bearing is in, you need to hang the wheel in a free state and rotate it by hand. Ideally, the wheel should spin evenly and smoothly without knocking or sticking.
But it happens that the car owner hears extraneous noise while driving, like a buzzing or howling, or when shaking a suspended wheel, he notices a rather significant play. In this case, we can say that the support bearing of the rear wheel hub may fail.
If we talk about the durability and reliability of the bearings of the Lada Granta car, then we must admit that many car owners, when operating their car in the first thousand kilometers, noted failure or breakage of the hub.
Perhaps in the future this error will be corrected by the manufacturers of the Lada Granta, but today we will proceed to the independent step-by-step repair and replacement of the bearing on the rear wheel hub of the Lada Granta car.
In the Lada Granta model, the front hub bearing also requires adjustment and replacement from time to time, but here for now we will talk about the rear hub bearing.
The hub is equipped with a double-row ball bearing, which, it should be noted, requires absolutely no maintenance - no lubrication, no adjustment.
Hub configuration
The rear wheel hub of a Lada Granta car consists of:
— mud ring, — thrust washer, — lock ring, — hub fastening nut, — hub axle, — sealing ring, — Lada Granta hub bearing, — hub cap, — hub.
To repair and replace the bearing, you will need the following tools:
- universal puller, - thin chisel, - lock ring remover, - 30mm socket wrench (head), - puller for pressing out the bearing.
So, let's proceed directly to the bearing replacement itself:
1. Remove the protective cap.
2. Unlock nut 5 securing the hub.
3. Engage first gear and install supports for the front wheels.
Review of manufacturer prices for front and rear hinges
How to choose and buy quality parts
Service center specialists strongly recommend purchasing consumables and components exclusively from specialized stores, representative offices, and official dealers.
To a lesser extent, you need to use the services of unverified suppliers who sell spare parts at an unusually low cost.
When purchasing, check the catalog numbers with the actual data specified in the operating instructions for the technical device. If such a brochure is not available, consult a specialist.
Reviews
| № | Positive |
| 1. | Gennady: I’ve been actively using the car for two years, there are no comments on the chassis or suspension. Once I replaced the rubber boot on the left CV joint. |
| 2. | Kirill: I have driven the car over 80,000 km, I can say that the CV joint still has service life, but it is necessary to prepare for repairs. In general, the parts are maintained within the period specified by the manufacturer. |
| 3. | Vyacheslav: the car is a year and a half old, I bought it at a dealership, no complaints. I systematically carry out technical inspections, buy original consumables, and do not skimp on preventative maintenance. |
| 4. | Dmitry: replaced the “grenades” only at 90,000 km. The service station master said that the mileage is good, not every car gets that much mileage. I believe that careful driving contributed to extending the life of the vehicle's chassis. |
| 5. | Leonid: I’m pleased with the build quality of the car, there are no complaints. Breakdowns happen, but they are insignificant, I fix them myself. |
| 6. | Vasily: if you don’t take into account minor flaws, then the car is good, better than previous generations. |
| 7. | Victor: I drove Grant for a year and a half, didn’t do any repairs, visited a service station only for diagnostics. |
| Negative | |
| 1. | Ivan: I replaced the right CV joint for the first time at 45,000 km, after which the left one needed repairs. In general, the workmanship is low, I am dissatisfied with the machine. |
| 2. | Alexander: standard CV joints are weak and poorly made. After purchasing a car, experts recommend installing foreign analogues. True, the cost is 15% more expensive than domestic ones. |
| 3. | Vladlen: after two years of active driving, I can’t say anything bad. Minor defects are present, but they can be easily fixed. |