On front-wheel drive cars of the Lada Granta family (Sport, Liftback, Sedan. 2190, 2191), the rear wheel wheel bearings are just as susceptible to wear and periodically fail as the front ones. As a rule, extraneous noise appears during acceleration - vibration, sometimes grinding.
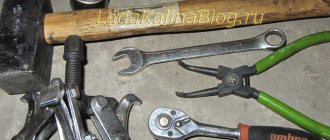
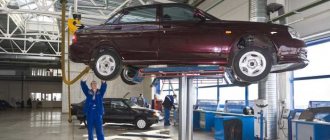
Replacing the Lada Granta wheel bearing, in turn, is carried out independently, without the use of special tools (press, puller), you only need a stationary vice, as well as a standard set of keys.
This article describes in detail the process of replacing the rear wheel hub bearing, with photos and videos. Also, after the instructions, information is provided on the selection of spare parts, catalog numbers, brand, article, manufacturer and prices (be sure to read this information before buying a rear wheel bearing for Grant).
How to check the rear wheel bearing of Lada Granta 2190
Before getting acquainted with the technology for diagnosing the rear wheel hub assembly, let’s find out the reasons for the failure of the Lada Granta hub bearing:
- Service life (operation);
- Wear from loads due to aggressive driving style;
- Destruction of the surface of the raceways due to driving over potholes, etc.;
- Drying of the lubricant, heating;
- Moisture and dirt getting inside.
The listed reasons are the main ones; ball bearing failure sometimes occurs due to a malfunction of adjacent components.
As mentioned above, if you begin to notice extraneous noise from the wheels, as well as possible vibrations, then the bearing assembly of the VAZ 2190 (Granta) must be checked on both sides, for this:
- We lift the car with a jack, hanging the wheel;
- Spin the chassis by hand to verify the source;
- The ease of rotation is also impaired;
- A backlash appears, which is also felt by the hands;
- To accurately determine the type of failure, you will have to disassemble the unit and remove the hub.
- The following are videos that we recommend watching before making a diagnosis.
Which ball bearing is humming - how to determine:
Replacing the Grant rear wheel bearing
To find out what condition the Lada Granta rear wheel bearing is in, you need to hang the wheel in a free state and rotate it by hand. Ideally, the wheel should spin evenly and smoothly without knocking or sticking.
But it happens that the car owner hears extraneous noise while driving, like a buzzing or howling, or when shaking a suspended wheel, he notices a rather significant play. In this case, we can say that the support bearing of the rear wheel hub may fail.
If we talk about the durability and reliability of the bearings of the Lada Granta car, then we must admit that many car owners, when operating their car in the first thousand kilometers, noted failure or breakage of the hub.
Perhaps in the future this error will be corrected by the manufacturers of the Lada Granta, but today we will proceed to the independent step-by-step repair and replacement of the bearing on the rear wheel hub of the Lada Granta car.
In the Lada Granta model, the front hub bearing also requires adjustment and replacement from time to time, but here for now we will talk about the rear hub bearing.
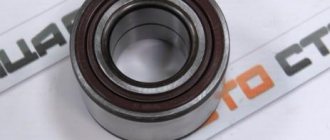
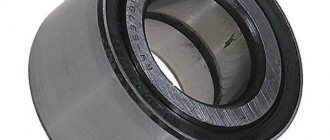
The hub is equipped with a double-row ball bearing, which, it should be noted, requires absolutely no maintenance - no lubrication, no adjustment.
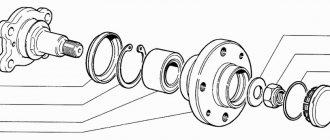
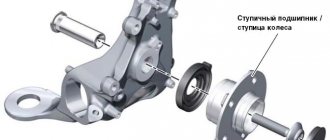
Hub configuration
The rear wheel hub of a Lada Granta car consists of:
— mud ring, — thrust washer, — lock ring, — hub fastening nut, — hub axle, — sealing ring, — Lada Granta hub bearing, — hub cap, — hub.
To repair and replace the bearing, you will need the following tools:
- universal puller, - thin chisel, - lock ring remover, - 30mm socket wrench (head), - puller for pressing out the bearing.
So, let's proceed directly to the bearing replacement itself:
1. Remove the protective cap.
2. Unlock nut 5 securing the hub.
3. Engage first gear and install supports for the front wheels.
Causes of breakdowns
Below are the 2 most common reasons for element failure:
- Loss of bearing tightness. The fact is that the product body contains a certain amount of lubricant to reduce friction between the internal elements. The lubricant is retained by special protective covers made of rubber or plastic. Accordingly, these materials deteriorate over time, which leads to a gradual loss of lubrication and failure of the hub element.
- Large production resource. No matter how carefully you operate your car, over time most components and elements become unusable. Each part has its own service life. The bearing, whose service life is about 60 thousand kilometers, is no exception. In some cases (regular or periodic driving through potholes, under conditions of increased wear), the element fails much earlier than the above indicators.
Where are the front and rear hubs on the Lada Grant? Description, purpose
The front hub joint is located on the front left (right) side of the axle shaft. The rear hinge is located in the rear left (right) suspension block.
The main purpose of the bearing is to firmly hold the hub and ensure wheel rotation. Structurally, the front (rear) hub consists of:
- outer and inner metal frame;
- a separator in which metal balls and rollers are located;
- insulating rings;
- special filler - graphite-based lubricant.
Troubleshooting
As noted above, a constant hum is the main sign that the wheel bearing has become unusable. Extraneous sounds begin to appear at speeds of 40-60 km/h. Another old-fashioned diagnostic method is tapping the tires with your foot. If the wheel wobbles or there is play, then most likely the hub is faulty.
You can also check the serviceability of the element by hanging the back of the Lada and rotating the wheel. Play, crunching, and vibrations in a suspended wheel will indicate a hub failure.
The device of the hub on the Lada Grant
Front
- rounded fist;
- external and internal dirt-reflective metal rings;
- front roller bearings;
- hub;
- washer;
- hub nut;
- retaining ring, plug.
Rear hub device
- hub mechanism axis;
- metal ball bearing;
- mud ring;
- retaining ring;
- washer;
- screw;
- sealing ring;
- rubber boot;
- hub cover.
Resource for replacing hub mechanism elements
The average service life of wheel joints is 80 – 85 thousand km. The indicator is average, as it depends on the following factors:
- quality of workmanship of the part;
- frequency of operation of the technical device;
- driving style;
- quality of road surface;
- aggressive environment;
- high operating temperatures;
- compliance with technical inspection intervals.
Signs that a hub needs to be replaced
- the appearance of uncharacteristic noise during wheel rotation;
- wheel runout in the steering column;
- vibrations at different speeds. Sometimes there is vibration at a certain speed;
- metallic grinding noise as the wheel rotates;
- front wheel hub play.
Diagnostics of the hub mechanism
- We place the car on a level platform, squeeze the parking brake if we are checking the front row. For the rear, we install wheel chocks.
- Let's jack up the front (rear) part.
- We turn the car wheel and carry out troubleshooting.
- We shake the wheel up and down with our hands. In good condition there should be no play. Otherwise, we dismantle and replace worn elements.
Practical advice
In order not to repeat the mistakes of novice car enthusiasts, I want to give you some tips.
They will definitely come in handy when repairing a LADA Granta car:
— buy bearings only from trusted sellers. Preferably in a car store, and not in your hands;
- do not buy a cheap product. The price, of course, tempts you, but then you will have to replace the product again.
- You may not have to replace the rear wheel bearing. Just try tightening the nut with a torque wrench. If the hum goes away, you can continue driving.
- if you have already undertaken to replace the bearing on one side of the car, it is advisable to do it on the other, even if it cannot be replaced. Its resource has also been exhausted. After a short period of time it will need to be replaced.
During the renovation process, you may encounter unexpected problems and questions. Feel free to write in the comments, contact me. I'm always in touch and ready to help with practical advice!
Preparatory stage before replacing the hub mechanism
Required materials and tools:
- hydraulic (mechanical) jack;
- wooden stand;
- wheel wrench;
- screwdriver with a flat, cross-shaped bit;
- hammer;
- knob, nozzles;
- spanners;
- stationary vice;
- chisel;
- two-jaw and cup pullers. The exact dimensions of the pullers are indicated in the operating instructions;
- forceps;
- metal brush;
- lubricant type “CV joint - 4”;
- rags;
- caliper for measuring diameter;
- new wheel bearings;
- additional lighting provided that the work is carried out in the dark.
Preparing to replace a part
In order to quickly and efficiently replace a part, you need to properly prepare for this. So that you always have the necessary tool at hand and you are not distracted by searching for it in your neighbors' garages.
Assemble a set of tools and accessories.
I offer this list:
- a set of keys and sockets. It is advisable to have a ratchet; - a jack is required; - hammer, screwdriver, chisel and vice; — two types of puller; - metal pipe; - Vedashka liquid.
It is advisable, but not necessary, to have a torque wrench.
And familiarize yourself with the design of the hub using the sketch. You are ready. Let's start replacing.
Replacing the front hub of Lada Granta
- We place the car within the perimeter of the repair area and provide priority safety measures.
- Let's jack up the right (left) side.
- Unscrew the bolts and remove the wheel.
- Let's unlock the hub.
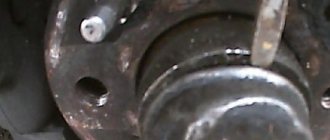
- On the back side, unscrew the two bolts that guide the brake caliper.
Location of two bolts
- We remove the caliper, hang it on a wire (we fix it on the steering tip).
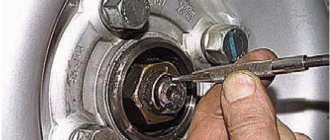
- Unscrew the hub nut and remove the brake disc.
Removing the hub nut
- We unscrew the two bolts - the rack clamps. If necessary, we use a liquid to remove deposits like WD-40.
- Disconnect the strut with the steering knuckle and unscrew the ball joint fasteners.
- We remove the CV joint.
Next, install the new hub assembly and assemble the structure in the reverse order.
Replacing the front wheel bearing of Lada Granta
- The front hub joint is located in the steering knuckle housing, remove it. Pre-clamp the structure in a stationary vice.
- We install the metal spacer - the head at “22” on the surface of the hub. We apply targeted blows with a hammer to press it out.
- We disconnect the inner race of the hinge and remove the separator with metal balls.
- To remove the outer part of the hinge, use pliers and remove the retaining rings.
Replacing the rear wheel hub of a Lada Granta
- We place the car within the perimeter of the repair area and secure the front row of wheels with wheel chocks.
- Using a wheel wrench, we tear off the mounting nuts, jack up the car, and remove the wheel.
- We unscrew the screws securing the brake drum to the structure.
- Remove the hub cap and remove the axle shaft from the splines.
- We fix the structure in a stationary vice. Gently tap the outer edge with a chisel.
- If necessary, use WD-40 liquid to remove deposits and rust.
- We dismantle the hinge and use a vice, although some craftsmen use special pullers. In general, whatever is more convenient for you.
- Using a metal mandrel, we knock out the inner ring.
- To finally press out the hinge, use a hammer and chisel and gently tap along the outer perimeter of the frame.
Replacing the rear wheel bearing of a Lada Granta with your own hands
Note to the driver. Before starting installation work, clean the surface from debris and dirt. Apply a thin layer of oil and be sure to lubricate the outer race of the hinge.
- We install the new hinge and lightly press it into the cavity.
- Evenly tighten the hinge until it touches the outer edge.
- We fix the retaining ring and install the hub in its original place.
Installation in a regular place. Assembly of the structure
- Apply a thin layer of graphite grease, put the assembly on the shaft, and secure it with a nut.
- We complete the tightening with a torque wrench (tightening torque 30 Nm).
- Use a chisel to counter the nut and put on the cap.
This completes the disassembly, assembly, and replacement of the rear wheel bearing.
Note to the driver. The Lada Granta Sport modification has a rear hub with a pre-installed ABS sensor.
It often happens that during the process of dismantling the hub mechanism, a bolt or pin breaks. The reasons for this are different, ranging from the old age of the metal to manufacturing defects.
So, how to remove a broken bolt. We carry out the work in several stages:
- mark the center of the stud;
- drill with a drill to 2.5, after 5.5, 9.5 mm;
- scroll with a bolt with a diameter of 9.5 - 10.0 mm;
- remove remaining metal and shavings.
MrPodshipnik
Bearing replacement, repair
Enter the marking or size (for example: 8*22*7) of the product and the country of sale
- Car brands
- Auto components
- Moto
- Velo
- Equipment
- Tool
- Technique
New instructions
- How to make your own repairs and replace the bearing on the steering column in a ZOOM bicycle 10/09/2019
- How to independently, at home, replace a bearing in an electric motor of a Philips food processor 10/05/2019
- We repair a DAB heating circulation pump and change the bearing ourselves 10/04/2019
- How to repair a Shimano fishing reel yourself and replace a faulty bearing 10/03/2019
- We replace the bearing and repair the SBR_ 132_A concrete mixer ourselves 10/02/2019
How to replace the rear wheel bearing on a Lada Granta
Drivers who have a Lada Grante car at their disposal sometimes have to make a decision to replace a failed bearing. Carry out repairs yourself or at a service station (service station)? Choose the first option!
The replacement process is not as complicated as it might seem at first glance. I suggest you replace it in your garage, yourself. Read this article and you can replace the part yourself.
- Determining the suitability of a bearing on a Lada Granta
- Choosing a new bearing for Lada Granta (VAZ 2190)
- Preparing to replace a part
- Step-by-step instructions for dismantling and installing a bearing on a Lada Granta
- Practical advice
- Video: DIY replacement of the rear wheel bearing of a Lada Granta
- Photos on the topic
Review of manufacturer prices for front and rear hinges
How to choose and buy quality parts
Service center specialists strongly recommend purchasing consumables and components exclusively from specialized stores, representative offices, and official dealers.
To a lesser extent, you need to use the services of unverified suppliers who sell spare parts at an unusually low cost.
When purchasing, check the catalog numbers with the actual data specified in the operating instructions for the technical device. If such a brochure is not available, consult a specialist.
Choosing a new bearing for Lada Granta (VAZ 2190)
To do this, you need to know the original number of the Lada Granta bearing (VAZ 2190). The manufacturer AvtoVAZ indicates No. 21080-3104020. You can use GOST number 256706 AKE12. These two numbers are acceptable when selecting a part.
I also recommend using analogues:
— Russian manufacturer SPZ No. 2108-3104020;
— made in Russia VBF No. 2108-3104020;
— FAG German supplier No. 54512A;
- Swedish analogue of SKF VKBA1307.
Be sure to check the dimensions when purchasing. They should be like this:
— internal diameter – 30mm; — outer diameter — 60mm; - width - 37mm.
And of course, the part itself must be free of dents and rotate freely. Once you have purchased the bearing, you can begin replacing it.
Reviews
| № | Positive |
| 1. | Gennady: I’ve been actively using the car for two years, there are no comments on the chassis or suspension. Once I replaced the rubber boot on the left CV joint. |
| 2. | Kirill: I have driven the car over 80,000 km, I can say that the CV joint still has service life, but it is necessary to prepare for repairs. In general, the parts are maintained within the period specified by the manufacturer. |
| 3. | Vyacheslav: the car is a year and a half old, I bought it at a dealership, no complaints. I systematically carry out technical inspections, buy original consumables, and do not skimp on preventative maintenance. |
| 4. | Dmitry: replaced the “grenades” only at 90,000 km. The service station master said that the mileage is good, not every car gets that much mileage. I believe that careful driving contributed to extending the life of the vehicle's chassis. |
| 5. | Leonid: I’m pleased with the build quality of the car, there are no complaints. Breakdowns happen, but they are insignificant, I fix them myself. |
| 6. | Vasily: if you don’t take into account minor flaws, then the car is good, better than previous generations. |
| 7. | Victor: I drove Grant for a year and a half, didn’t do any repairs, visited a service station only for diagnostics. |
| Negative | |
| 1. | Ivan: I replaced the right CV joint for the first time at 45,000 km, after which the left one needed repairs. In general, the workmanship is low, I am dissatisfied with the machine. |
| 2. | Alexander: standard CV joints are weak and poorly made. After purchasing a car, experts recommend installing foreign analogues. True, the cost is 15% more expensive than domestic ones. |
| 3. | Vladlen: after two years of active driving, I can’t say anything bad. Minor defects are present, but they can be easily fixed. |