Diagnostics - causes and symptoms of malfunctions
The main reason for replacing a VAZ 2114 bearing under normal conditions is natural wear. The hub assembly is subjected to regular loads, which causes the rolling elements to become unusable.
Other causes of part damage:
- incorrect previous replacement, which resulted in wear of the element;
- strong impacts of the wheel on potholes;
- aggressive driving;
- foreign particles entering the hub: dirt, dust, other particles;
- overheating due to frequent, sharp braking.
How to quickly find wheel bearing noise:
Checking the front bearing of the VAZ 2110:
The hub has a number of signs that indicate its replacement. These include:
- increased noise from the front wheel;
- hum at a certain speed;
- crunching, grinding noise when moving, turning;
- abnormal play of the suspended wheel;
- excessive heating of the disk.
Having noticed at least one of the signs, the owner must take action and replace the wheel bearing.
A little about the device and functionality
The main purpose of the part is to ensure uniform rotation of the car wheels. Given the name of the part, it is easy to guess that wheel bearings are the connecting link between the hub and the axle to which the brake disc and wheel are attached.
The design of the part fully corresponds to the classic type of rolling bearings. These are two metal rings into which conical rollers are pressed, protected from the body by a durable rubber insulator.
Unlike foreign competitors, domestic bearings are created using outdated HUB technology. They are quite difficult to install, require very precise tightening torque and require plenty of lubrication.
The operation of the mechanism lasts for several years. It is recommended to change a spare part for a VAZ 2114 approximately once every 100 thousand kilometers. But negative operating factors can accelerate the wear process:
- Bad roads. The entire force of the shock load falls on this mechanism of the system. Over time, the metal gets tired and the bearing begins to fail.
- Aggressive reagents. In Russia, in order to save money in winter, aggressive chemicals are often used to remove ice from roads.
- Sudden temperature changes. In winter, owners of warm garages unknowingly shorten the service life of many metal parts, for which sudden temperature changes when leaving and entering the garage create a large load.
Design of the unit being repaired
Structural layout of the VAZ 2114 hub:
- steering fist;
- internal anti-splash ring;
- steering knuckle ring;
- retaining bearing ring;
- hub bearing;
- front hub;
- anti-splash ring;
- hub cap;
- cap seal;
- hub cap;
- screw;
- hub washer.
Note:
The order of the elements is required. Violation of the layout or installation of components not provided for by the technical requirements is strictly prohibited on the hub. The operation of the unit will be disrupted, which will lead to avalanche wear of parts and increased danger of operating the vehicle.
Step-by-step replacement of the front wheel bearing
- First, you need to place and strengthen the front part of the car in a suspended state, of course this is an obvious disadvantage in this model; you cannot get under the bottom with a jack. In this case, boards will help, which can be used to lift the machine higher and then insert the auxiliary installation. To make it safer, we place stumps of bricks under the bottom. Next, you need to clean the hub nut from rust and dirt using VDS-40 so that it comes off easier.
- Using a 30 mm wrench, unscrew the nut and remove the wheel, then disconnect the drive shaft CV joint from the hub and remove the caliper along with the disc. Remove everything from the hub, first the brake cylinder, unscrew the guide, remove the pads from which the caliper is attached, also need to be removed with the same wrench, then remove the brake disc, first unscrewing the clamping pins, and completely unscrew the hub nut and remove the housing. We unscrew the steering knuckle, here it is better to use a 17 mm L-shaped wheel wrench, it is very convenient to unscrew it.
- We release the drive to make it easier to pull out the grenade, you can turn the steering wheel to the side to remove the hub, you can make an improvised puller from the brake disc and bolts, which go to the engine blog for a penny, these bolts are very difficult to find, so construction ones will do. Certainly; These are not the bolts that we need, the threads do not match, so it is better to take a smaller diameter. Inserting the bolts into the hub itself is not an easy task, but there is an option to press the bolts with the brake disc and knock them down with the wheel itself. Therefore, we press the brake disc tightly so that the bolts are level and use a reverse hammer to insert the wheel itself.
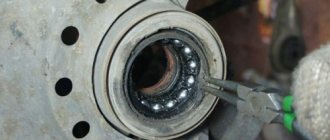
- We put it on the bolts, put two support nuts so that you can press against them normally, and by pulling the wheel towards you several times, the hub should come out with the inner race of the bearing. And the outer one with the balls remains inside. After removing the excess, you need to remove the inner race from the bearing hub. To do this, we take a puller and a wheel to make it easier to remove and nothing will wobble. It will be uncomfortable in weight, it would be better in a vice, so you need to screw the hub to the wheel in order to somehow fix it, and with the help of a bolt and a wheel, the cage will easily come out. To remove the bearing retaining ring, you will need pliers.
- After this, remove the inner ring - this is the part of the puller that will squeeze out the bearing. Place it on the inside, and on the outside there is a sleeve into which the bearing and thrust washer will go. Now all that remains is to tighten the bolt and the bearing will go into the sleeve. Here you can be pleased with the quality of the parts, not the machine itself, but the puller itself. The thrust ring with which we squeeze out the bearing is bent, since the outer radius is needed here, and it just needs to be turned over to the other side and put everything back again. Next, remove the puller and here it is the bearing. There can be considerable pressure there if you see that the washer is stuck to the bearing and is almost aligned.
- We wipe everything away from dirt and impurities, spray with VDS-40 so that the new bearing fits in easier. We put the inner locking ring in place. We also spray the bearing itself and place it straight inside and again use a puller, then we simply squeeze the bearing into the steering knuckle, which is very difficult. As soon as the bearing rests against the retaining ring, remove the puller. We install the outer retaining ring, spray the hub to press it in with the same puller, only now you will need the inner race from the old bearing so that the emphasis is placed specifically on the bearing. We place the inner race of the old bearing on the inner race of the new bearing so that the emphasis is placed specifically on the bearing. Then we put the hub in place and use a wrench to fasten it with its hub nuts. And then we do everything in reverse order.
- There is another proven way to replace a bearing. When the hub nut is 100% unscrewed, getting to the bearing is hindered by the front axle shaft, which must be removed from the splined part of the steering knuckle. For this purpose, you will need to unscrew the two bolts securing the ball joint, then the CV joint can freely come out of its own socket. All that remains is to carefully knock out the hub itself; here it is better to use a wooden guide and a hammer. Usually, strong blows are not needed, the hub sits in the steering knuckle without any tension and is knocked out without much effort, although it happens that it takes more effort and time.
Wheel bearing dimensions for VAZ 2114
Before installing a new part, you must ensure that it is compatible with your vehicle. There is a table of analogues for this.
| No. | Manufacturer, country | Catalog number | Dimensions, mm | Price, rubles |
| 1 | Pilenga | PW-P 1307 | 34*64*37 | 400 |
| 2 | Torque, Finland | T-12106 | 500 | |
| 3 | Lada (original) | 2108-3103020 | 400 | |
| 4 | ASP Mensan | BCR001 | 540 | |
| 5 | SPZ | 2108-3104020 | 400 |
Important:
Each wheel bearing has its own unique number. Based on this, an appropriate replacement is selected.
How to check
Before you begin replacing the front or rear bearing of your hub, we recommend that you conduct a simple check of the functionality of this unit. This will allow you to accurately determine the culprit of the malfunction and verify the real need to replace the elements.
There are two verification methods, each of which has its own nuances.
Verification method
What to do
After a long ride, touch the area of the wheel where the noise is coming from.
If the area is hot compared to the other side, the bearing needs to be replaced
Raise the car, unscrew the wheel bolts, lift the side you are checking. Rock the wheel with more force
If the sound is dull, have a second person apply the brake and repeat the procedure. If there is no noise, the bearing must be replaced
Replacement instructions
Replacing the rear wheel bearing on a VAZ 2114 is carried out as follows:
- Loosen the wheel bolts and wheel locknut before jacking up the vehicle.
- Raise the car using a jack. Tighten the hub nut completely and remove the wheel. Unscrew the mounting bolts on the drum.
- Remove the drum. If it is rusty, pre-treat the joint with WD-40. If after this the drum still does not budge, use long pins. Screw them into the holes and tighten them one by one until the part moves out of place. You can gently help with a hammer by tapping it on the back side.
- Unbend the stopper and unscrew the locknut. If it is tight, use a wrench extension.
- Using a universal puller, press the hub.
- The inner race remains on the shaft, and the outer part of the bearing remains in the housing. If you want to replace the pads at the same time, you need to remove the axle mounts.
- Now it's time to demonstrate the entire mechanism.
- As a rule, the rear part of the axle is attached to the brake shield. To dismantle you will have to use a hammer.
- Remove the wheel bearing race using a universal puller. If the brake system does not need to be changed, this operation can be performed directly on the vehicle's axle shaft.
- We place the hub on bricks or bars, as shown in the photo. Use a hammer to knock out the old rear wheel bearing.
- Be sure to remove dirt and wash the hub in gasoline. Clean the axle shaft in the same way. Use thick lubricant to treat the seating surface. Place the new bearing in the hub bore. Mounting chamfers will help avoid distortions.
- Press the bearing with your hand and press it in about 3 millimeters. Place the old bearing on top.
- Using the side of the hammer, carefully hammer the part inward. If the process is difficult, you can cool the bearing in the freezer and warm up the hub.
- Once the rear hub bearing is in place, you can install the circlip. For this purpose, round nose pliers are used. Don't forget to lubricate the axle first.
- Carefully attach the assembled mechanism to the trunnion. Be careful to avoid distortions. Then place a washer on the threads and screw on the hub locknut.
- Using a nut, press the hub onto the axle. Tightening torque: 220 N*M. Place the drum, secure it and screw the chassis.
How to remove a hub nut from a thread - radical methods for VAZ owners
Sometimes power options are not enough, this is especially observed on cars of the VAZ family, where bearings are often adjusted. In this case, auto mechanics advise switching to radically aggressive dismantling methods:
- Break the fasteners with a chisel, hammer or nut splitter/nut splitter;
- A series of holes are drilled along the groove for locking;
- Heat the connection with a gas burner;
- Solve the issue by welding (welding a similar nut or a larger one).
Replacement
First, let's set priorities. If you just want to save money, so you do the work yourself without any experience, then this is a wrong decision that can lead to dire consequences. If you have experience and certain knowledge, you can safely do the repairs yourself.
In any case, we recommend watching the training video instructions, where you will be told in detail about all the nuances of such work. This way you will gain additional experience and useful knowledge.
After this, we proceed directly to the work of replacing the wheel bearings. There are several ways. We will tell you about each of them in more detail, and you will decide for yourself which option suits your skills and capabilities.
- The first method involves carrying out work without removing the steering knuckle from the car. But here you will definitely need a special puller to dismantle the bearings. The advantage of the method is that there is no need for subsequent wheel alignment adjustment. But this is the most inconvenient way. To press out and reinstall the wheel bearing, we recommend driving the car into an inspection hole.
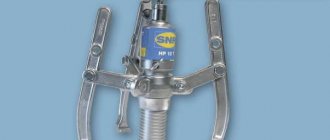
Puller
- The second method will require removing the steering knuckle. A workbench will also be useful for removing the bearing. In this case, you will definitely break the collapse. If you don’t want to go to a service station after repairing yourself, use a couple of tricky tricks: Before removing the lower bolt of the strut and steering knuckle, apply marks;
- One mark will allow you to determine the position of the bolt;
- The second mark will be responsible for the position in the steering knuckle strut;
- During the reassembly process, try to ensure that the marks match each other as accurately as possible. This method allows you to simultaneously make adjustments to the chassis and check the condition of the components.
The third method will require removing the bearing along with the stand and dismantling it using a vice. This method is complex compared to others.
It remains to press out the element
Before work, do not forget to turn on the handbrake and place wheel chocks under the wheels to avoid accidental movement of the vehicle.
- Remove the strut, knock out the tie rod ends and unscrew the fasteners of the upper support to the body of your car.
- Position the jack so that it does not become an obstacle during operation. It all depends on your personal understanding of comfort.
- The wheel bolts are unscrewed, after which the nut of the desired bearing is removed using a 13 mm wrench.
- Using a 17 mm wrench, you dismantle the caliper, which is secured with wire to prevent sagging on the brake hose.
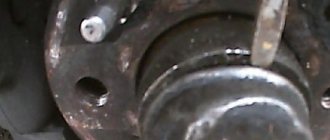
Dismantling works
- After this, the brake disc and ball joint are removed.
- The hub will now be knocked out of the steering knuckle, giving you access to the damaged bearing.
- All that remains now is to press out our problematic element using a puller.
- If you do not have a device such as a puller, use a metal tube whose diameter is slightly smaller than the diameter of the bearing.
- Clean the landing site, treat it with lubricant, after which you can install a new spare part.
- Reassemble in reverse order. Do not forget to simultaneously check the condition of various components, lubricate, change gaskets as necessary.
As you can see, there is a lot of work to do. Do not rush to conclusions regarding the ease or difficulty of such a task. If you want to do everything quickly, efficiently, without having any experience, contact the service station. Otherwise, be prepared to spend a whole day, or even more, on repairs.
What to choose?
Rear and front wheel bearings today are produced by both domestic and foreign manufacturers. The choice, as they say, is yours.
But we still want to give some recommendations on this matter.
- Chinese analogues. We strongly advise against choosing them to repair your VAZ 2114. They are of dubious quality, although they are the most affordable. Such bearings will not be enough for a long service life.
- Imported, mainly from Europe. The price is higher compared to analogues, but the quality is at the same level. When buying imported bearings, pay attention that they are not successful Chinese counterfeits. There are many of these now, unfortunately.
- Domestic. Pay attention to the parts made by Vologda or Samara craftsmen. The quality is quite high, and the price is affordable and adequate. What you need for the VAZ 2114.
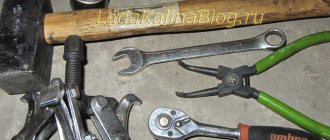
To work on replacing the element yourself, you will additionally need:
- Special puller for bearings;
- 30mm socket wrench;
- 19 and 17 mm wrenches.
How can you unscrew the hub nut? The simplest option
None of the unscrewing methods guarantees the safety of the hub nut. The simplest option involves a complete replacement of the part. To ensure that the nut is removed, you will need to prepare:
- chisel and hammer;
- drill and drill bit (thickness no more than 3 mm);
- new nut.
This option will be relevant if the hub nut cannot be unscrewed by other means. Moreover, it can be used on all vehicles, including expensive foreign cars and ending with domestic Lada cars. First you need to drill the part using a drill.
The part must be drilled along the groove. Then the part is broken using a chisel and hammer and replaced with a new one. If this option is unacceptable, then you will have to use another, more delicate method.
Design features of the hub nut
The hub nut is located in a unit whose operation occurs under conditions of high temperatures, mechanical and external influences. Therefore, alloy steel with anti-corrosion coating is used for manufacturing. The part, in addition to the standard nut elements, has grooves. After reaching the required torque, a locking pin is inserted into them or mechanically fixed with a chisel. The outside of the nut is surrounded by 6 standard edges. We gain access to the locknut after removing the protective cap.
Another way to unscrew the hub nut
To work, you will need to prepare a metal brush, a reliable screwdriver, universal WD-40, an iron tube and a wrench. The socket wrench must be strong. The work is performed in the following sequence:
- First, the threads are cleaned of traces of corrosion. To do this you will need a metal brush;
- The surface of the nut must be coated with a special product - WD-40. Other types of penetrating lubricants can be used;
- the part must be left for a quarter of an hour;
- Now the collar is put on and blows are struck with a hammer. The impact force must be gradually increased;
- Strikes must be struck without excessive effort. After deformation, the part should unscrew.