Replacing the strut and shock absorber is not a common repair. The original ones can last 160,000 kilometers. But they eventually need to be replaced or repaired due to wear or failure.
Luckily, you can perform replacements at home on many car models. For the most part, you only need a set of general tools.
However, on some models you need to use special tools such as a spring compressor to remove the strut from the car, but this is not common, most assemblies are released as one piece.
This guide will walk you through the step-by-step process of replacing these important car parts yourself.
So let's start with a quick explanation of how the struts work in your car.
How does a shock absorber work?
Next to each wheel assembly you can find a spring, its function is to dampen the vibrations of the car when driving on an uneven road surface, and also to soften the shock if the wheel hits a pothole on the road.
But springs alone cannot cope with keeping the car body in a stable condition and limiting the constant rocking of the body as on sea waves; to eliminate this effect, car struts are additionally installed, which will create the effect of a smoother ride for the driver and passengers.
In general terms, it consists of an oil-filled cylinder with a rod connected to an internal piston. A set of valves allows oil to flow slowly through the piston in either direction as needed.
At the lower end it connects to the control arm or axle. The support connects to the steering knuckle, which holds the wheel. At the upper end, the shock absorber is connected to the car body.
The stand assembly consists of a mounting base - a housing, a spring and fasteners. The mechanism itself has various configurations, even computerized ones, for increased efficiency and more precise control.
In short, since the spring helps insulate the car body from direct “impact” on the road, the shock absorber helps dampen the movement of the spring, make it less harsh and prevent the spring from continuing to rock the body due to inertia after the shock has been absorbed.
Often it is located in the internal space of the spring, to save space and more effectively resist road irregularities.
We recommend reading: How to test a car battery with a multimeter
You can often hear expressions such as strut or shock absorber, and speakers often mean the same element by these concepts. But actually:
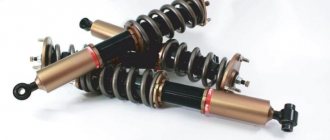
A shock absorber is in fact an oil pump, a tube with a rod, piston and valves in an iron casing.
A strut is the same shock absorber, but already assembled with a spring and attachment mechanisms to the car body.
Sometimes the strut can be dismountable, that is, you can remove the spring and replace only the shock absorber itself, but it happens that the shock absorber already comes with all the fasteners welded to its body and it is no longer possible to pull it out directly from there; it would be more correct to call such an assembly a strut.
Signs of problems
If the right or left rack fails, this can lead to an emergency situation. It is for this reason that it is so important to carefully monitor your vehicle. Timely repair work will avoid a large number of problems.
The following signs and characteristic symptoms indicate a breakdown of the front struts:
- during the movement there is a constant creaking, knocking and clicking sound;
- the car constantly rocks and oscillates from side to side;
- the car skids seriously when turning;
- To perform braking, a much longer braking distance is required than with working shock absorbers;
- the vehicle squats heavily as soon as the driver accelerates or brakes. Unpleasant sensations are present both behind and in front;
- the machine clings to the surface very poorly;
- rubber wears out very quickly and unevenly;
- Brake fluid leaks from the shock-absorbing system;
- the supports, spring and rod become covered with destructive corrosion;
- a significant increase in noise level during acceleration. This indicates that the fasteners of the built-in bushings have been damaged;
- the housing is deformed, which is why the piston cannot move normally in the inside of the cylinder;
- The springs are not positioned very correctly, as a result of which the car body begins to sway while driving.
This is interesting: Characteristic features of Totachi motor oils: 3 tips for choosing a real product
Such phenomena usually occur due to the poor quality of the main elements of the racks, due to improper installation, as well as due to the natural process of wear and aging of the built-in elements.
It is impossible to say which racks you need to buy. It all depends on material wealth and the vehicle itself. In any case, there is no need to save on these elements. It is worth buying designs that have a large number of positive reviews and are produced by trusted manufacturers.
Replacing struts and shock absorbers
Now that you know the difference between the shock and strut assembly and their functionality, it's time to replace them.
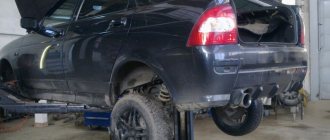
- Park the car on a level surface and open the hood. Place the transmission in the park position (in an automatic transmission) or in gear (in a manual transmission) and additionally put it on the handbrake.
- If your vehicle is equipped with Automatic Ride Control (ARC), turn off the air suspension before raising the vehicle.
- Loosen the wheel nuts on the side.
- Jack up the tire and secure it securely.
- Remove the wheels.
A) Replacing the rack
- Working from the engine compartment, remove the three top mounting nuts holding the strut to the body assembly.
- On some vehicle models, it is necessary to disconnect the tie rod end from the bottom of the steering knuckle.
- To do this, you may need a puller to disconnect the tie rod from the steering knuckle.
- On some other models, you may need to remove the brake caliper, brake rotor, and even the hub assembly before removing the strut assembly.
- Also, if your car has an ARC system, you will need to disconnect the electrical connectors, air pipes and sensors.
- When rust does not allow you to turn the mounting bolts, apply penetrating oil to the threads or use WD40 - a lubricant with very high fluidity and permeability, even in micro crevices.
NOTE. On some models, you must first compress the coil spring before you begin to loosen the strut mounting bolts. To do this, you will need a spring remover; you can buy it in a store or order a homemade one from a car mechanic who deals with similar things.
- Begin loosening the nuts on the two lower mounting bolts that secure the strut to the steering knuckle.
- Using a hammer, carefully push out the mounting bolts, remove the nuts from the mounting bolts, and finish removing the bolts.
- Carefully remove the strut flange assembly from the steering knuckle.
- If you have difficulty separating the strut mounting flange from the steering knuckle, use a rubber mallet or wood block to tap the strut mounting flange to help separate the strut from it.
- On other models, you may have to spread the knuckle and strut mount apart, using a pry bar to separate the components.
- Once you have removed the knuckle spacer, use a piece of wire to secure the knuckle to the suspension to prevent the knuckle from turning and sagging.
- Remove the strut assembly from the vehicle.
We recommend reading: Repair of diesel engines of passenger cars
B) Replacing the shock absorber
- Working from the engine compartment, loosen the top mounting nut holding the shock absorber to the body. On some models, you can access the top mount bolt from underneath the vehicle after the vehicle is jacked up and securely secured.
- If the rod turns when you try to remove the top mounting nut, try holding the rod in place with pliers from under the car.
- Support the bottom of the shock absorber with a jack.
- Apply penetrating oil to the bolts to make it easier to remove if necessary.
- Loosen and remove the lower mounting bolt that holds the shock absorber in place.
- Remove the top mounting bolt and slowly lower the jack a few centimeters. Leave the jack in place to support the axle or control arm.
CAUTION: Removing the shock absorber
In some cases, it is necessary to support the axle (usually with a jack) to which the shock absorber is connected before actually removing the mounting bolt. This will prevent downward shock (shock absorber expansion) after removing the mounting bolt, which could cause serious damage to the vehicle.
After removal, leave the jack supporting the control arm or axle in place.
Procedure
To change the front struts, for example, on a Hyundai Getz, you need to perform a number of the following manipulations:
Remove the engine compartment seal, as well as other elements that prevent access to the upper strut support.- After removing the plug, unscrew the nut securing the strut rod to the upper support. This is done with a head with an extension and a wrench while the car is on wheels and the rack is not removed. It is much more difficult to do this with it removed, because you will have to look for a tool to fix the rod from twisting.
- Loosen the wheel mount and lift the car with a jack so that the wheel does not touch the floor. For insurance, be sure to place a stand under the car.
- Remove the wheel. Using a wire brush, clean the threaded connection of the stabilizer bar joint, the screw securing the brake hose, and the bolts securing the steering knuckle strut. Moisten them with Vedashka or kerosene.
- Unscrew the nut securing the stabilizer joint and the screw securing the brake hose. If the car is equipped with an ABS system, remove the tube with the sensor wires from the rack.
- Unscrew the nuts from the bolts securing the knuckle to the strut. Knock out the bolts with a hammer. On some cars you will also have to remove the bushing. After removing the bolts, nothing holds the rack down.
- Remove the nuts securing the upper support to the body. Remove the strut assembly with support and spring.
- Compress the spring with ties until a small gap appears between its outer coil and the support cup.
- Unscrew the previously loosened nut from the rod. Remove the upper support and the spring with the cup.
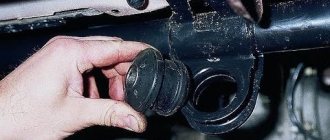
- Inspect the boot and bumper, and if necessary, replace them with new ones.
- If the manufacturer of a new shock absorber recommends bleeding its products, carry out bleeding in accordance with the recommendations.
- Place the bumper with the boot on the rod of the new strut, do not forget to move the gasket under the spring from the old strut to the new one. Place the spring on the strut body, aligning its lower coil with the seat under it. Place the support on top of the cup and screw on the stem nut.
- Remove the tie rods from the spring and insert the upper support studs into the holes provided for them and tighten with nuts.
- During assembly, pay attention to the anti-roll bar; if you notice that it moves too freely, then it’s time to change the rubber bushing in its bracket, or better yet, both.
- Pull the stand mount from below, screw on the wheel, remove the stand, and lower the car.
- Tighten the wheel mount, the rod nut, and the nuts on the upper support studs.
As you can see, the process is simple, do the same on the other side and the front ones are ready. Camber adjustment is not provided on this model, which means that when installing serviceable components on an undamaged body, the desired camber value is obtained. And since we did not change the length of the steering rods, the wheel alignment angles should be normal (if the toe-in was adjusted correctly before the replacement). This means you don’t have to do “geometry”.
Please note that it is recommended to replace shock absorbers in pairs. This way you will insure yourself against unexpected behavior of the car on the road.
Rear axle
Often on passenger cars, the rear axle is equipped with only a shock-absorbing element (unlike the front axle, where the shock absorber is installed in a cartridge, and the entire assembly is called a strut). In this case, to replace, you will need to unscrew the upper and lower fasteners. In cases where the shock absorber is located separately from the spring, you will not need ties, and the process itself will take much less time.
Most often, on rear axle shock absorbers you have to change the bushing, which breaks over time and causes play.
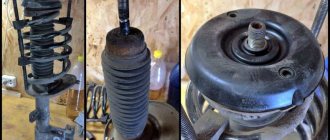
Replacing the shock absorber in the strut assembly
After you remove the strut from the car, you can replace the shock absorber itself (if it pulls out of the strut) yourself.
- First, a couple of important things you need to know:
- The spring in the strut is under high pressure.
- Use a quality spring compressor to disassemble the stand. Using a poor quality compressor can cause a serious or fatal accident.
- You can purchase a spring compressor (spring compressor) from your local auto parts store.
- Install the spring puller and gradually begin to compress it until the upper strut support comes loose.
- Unscrew the locknut holding the top of the assembly in place.
- Remove the top
- Replace the old shock absorber with a new one and assemble the strut.
Do-it-yourself installation of new ones, after disassembly or repair
Proceed in reverse order.
- Thoroughly clean the mounting lugs. If necessary, remove corrosion and paint damaged areas.
- Check the condition of the mounting bolts. If there are grooves, cracks and corrosion holes, we replace them with new ones.
- When installing combined struts (spring + shock absorber), install the spring tie.
Clamps can be used
- We secure the upper bowl (eye) without tightening the nut all the way.
- Using a jack, align the lower eye with the stand.
- We tighten the fastener without tightening it.
- We install the wheel, lower the car into the transport position or set the suspension arm to a typical level for driving.
- Tighten all nuts using a torque wrench.
What you need to know when reinstalling
Follow the same procedure in reverse order from the removal method you used, keeping in mind the following guidelines.
- Reinstall the strut assembly or shock absorber and tighten the mounting bolts by hand.
- Tighten all mounting bolts.
- When installing the tie rod to the steering knuckle, tighten the fasteners.
- Reinstall the wheels
- Lower the vehicle and gradually tighten the wheel lock nuts in a crisscross pattern. Check your repair manual or vehicle owner's manual for torque specifications.
- Tighten the upper strut mounting nuts.
- Finally, if you replaced the front elements, do a wheel alignment.
Tools needed to complete the work
To replace the front shock absorbers in the MacPherson strut suspension you will need:
- standard wrenches (open-end wrenches, socket wrenches, heads of standard sizes);
- remover of ball joints and steering tips;
- spring ties;
- means for processing bolted joints (WD-40);
- marker or center punch;
- percussion instrument (hammer);
- rags;
Shock absorbers must be replaced in pairs; replacing only one element is not allowed. Therefore, it is necessary to purchase two struts or shock absorbers and additional elements at once - anthers, bump stops.
Although the MacPherson suspension on different cars has the same design, there are always certain differences in design, which affects the work algorithm.
For example, let's look at the technology for replacing front shock absorbers on a VAZ-2110. Note that there are two ways to perform the work - by disconnecting the strut from the hub and removing the strut assembly with the steering knuckle.
This is interesting: Do-it-yourself wheel balancing
Top Five Tips When Replacing Struts or Shock Absorbers in Your Car
- When purchasing a new shock absorber, purchase a quality replacement.
- Always replace these mechanisms only in pairs (front or rear axle) to keep the suspension in balance, unless you need to replace a fairly new faulty unit.
- Even if you're replacing front or rear, always replace one unit at a time, as shock absorbers can help keep suspension components in place. You will avoid potential damage to other parts.
- When replacing the rear one, you will need access to the trunk or under the trim in the rear of the car.
When replacing, this guide can only give you a general idea of the actual process. However, the specific steps vary between brands and models. Although for some car models this manual will be what you need.
If you have no idea how this is done at all and have never seen it, then it is better to go to a service station and see with your own eyes how the process happens and only then try it yourself, since, for example, removing springs can be a very dangerous task and even lead to death if these parts are handled incorrectly. Be very careful and attentive.
How do you like the article?
Life time
The total operating time of front shock absorbers, as well as the frequency of their replacement, directly depends on three main factors:
- part quality;
- level of compliance with vehicle weight;
- manner of traveling by car.
For this reason, on some machines parts have to be changed every 6 months, while on others the designs last for 7 years.
Such a difference in service life is based on improper operation of vehicles, as well as poorly selected main structures and springs. Neglect of these rules can lead to the fact that the load will not be distributed evenly, which will automatically negatively affect the service life of the entire shock-absorbing system of the car.
Preparing the device for installation
The first step before installation is to properly prepare it. For this:
- Turn the consumable and gently squeeze it.
- Hold this for 20 seconds.
- Turn the device upside down and hold for 15 seconds.
- Pull the rod out all the way without turning the consumable over.
- Turn the stem down.
- Repeat all these steps again.
- Turn the stem down.
- Hold the consumable with the stem up and check its operation.
- Do not turn the consumable over until you place it on the vehicle.
Features of replacement work on a Ford Focus 3
As already noted, the general design of the MacPherson suspension is similar on different models, but differs in design. So, if you take a Ford Focus 3, then replacing the front shock absorbers on this car is done differently than on a VAZ. Below are the nuances of the operation on Ford Focus 3:
- It is impossible to change only the shock absorber itself, and it is replaced together with the body. Therefore, the method of removing the strut together with the hub is not suitable for this car;
- There is no adjustment bolt on the Ford, and the strut is attached to the hub with only one bolt connection.
- The anti-roll bar strut is attached to the shock absorber strut, which is disconnected during disassembly.
- In the process of removing the shock absorber strut, the ABS sensors should be removed from the hub (after first disconnecting the battery from the on-board network).
- To pull the hub off the rack, after unscrewing the fasteners, loosen the eyes through which the bolt passes. This is done using a thin chisel, which is “driven” into the slot between the eyes with a hammer.
But otherwise, the technology for replacing the shock absorber is the same as described above - disconnect the hub from the strut, unscrew the bolts securing the upper support to the body. After dismantling the strut, we disassemble it, replace the shock absorber and body assembly, put everything back together and install the strut on the car.