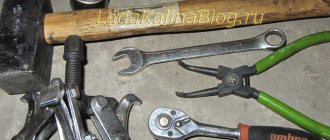
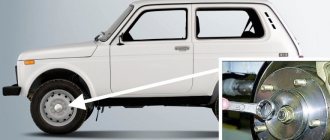
If you notice that the front wheel is a little loose, you should definitely eliminate the play. In many cases, the culprit for a loose wheel is the wheel bearing. The problem can be detected when driving onto a curb or other obstacle. At the same time, you will feel a certain “emptiness in the wheel.” Quite often, a problem with play can be solved by tightening the wheel bearing. On cars of the classic Zhiguli family, the work of tightening the bearings is extremely simple. In order to check the play in the bearings, it is necessary to jack up the wheel so that it comes off the ground. Then you should grab the top and bottom edges of the wheel and swing it. If the wheel dangles in a vertical plane (up and down), these are probably bearings. If the wheel dangles along a horizontal axis, pay attention to the ball joints. So, you have already decided for yourself that the bearings should be tightened. What will you need for this? - the bare minimum of tools: a 19mm wrench for unscrewing the wheel bolts and a 27mm socket - this is necessary for tightening the adjusting nut. You will also need two hammers. One is larger and the second is smaller. A new shim and a straight screwdriver will come in handy. Now about everything in detail and in order! The front wheel bearing is adjusted as follows. 1. At the very beginning of work, it is necessary to put the car on the handbrake and gear. Place shoes under the wheels. This is necessary so that when hanging the car does not jump off the jack. 2. The second step is to prepare a wrench for the wheel bolts. On classic Lada models, a 19mm wrench is used for this. It must have a head, do not try to remove the wheel with a spanner! Use this key to loosen the tension on the wheels - the car is still standing with its wheel on the ground. 3. After the wheel bolts are loosened, the wheel should be jacked up. Pay attention to the surface on which the jack rests. It should be smooth and firm. If the ground under the car is soft, you can use a board to support the jack. When the car's wheel leaves the ground, you should place a spare tire under the lower arm of the front suspension - just in case. What if the jack doesn't hold up - unlikely, but possible. 4. When the wheel is hung, and there is already a spare tire under the lower arm, you should unscrew all four bolts on the wheel and remove the wheel. You will see the brake disc, as well as the so-called “cap” of the hub. The cap must be removed. After all, it is under it that the adjusting nut is hidden. To remove the cap you will need a medium sized straight screwdriver and a hammer. Use a screwdriver to rest against the cap, and then knock it out with gentle blows. The blows should be light, and they should be applied along the entire circumference of the cap. 5. When you have already removed the cap, you will easily see the nut; it is the one that regulates the tightening of the wheel bearing. Pay special attention to the “Tunion” - the element onto which the nut is screwed. The trunnion has two recessed channels, they serve to lock the nut. The flange of a new nut is “driven” into these channels - this is how the locking is done. 6. The old nut should be unscrewed. In this case, in many cases it is necessary to clean the old trunnion channel from the nut elements. Pieces of the nut may have remained in the trunnion after the last locking. You can use a small screwdriver for cleaning. 7. The old nut is unscrewed. And you start tightening the new nut. It is at this moment that the front wheel bearing is being tightened. Under no circumstances should you tighten the nut with all your might! While tightening the nut, you should shake the wheel in a vertical plane and turn it. The wheel should not wobble, but it should also spin easily. If you tighten the adjusting nut too much, the bearings will be clamped and will probably fail very soon in this position. Too loose a tightening will cause the wheel to become loose. The tightening torque of the adjusting nut is the most important in the entire operation. It is the tightening that determines how long the bearing will last and how well it will perform its function. 8. To determine the tightening torque at which the wheel does not loosen and at the same time rotates easily, you should put a wheel rim with a tire on the hub and tighten it with two bolts. While tightening the adjusting nut, the wheel should be loosened and rotated. Determine the moment when the wheel is loose, then tighten the nut little by little. Tightening should stop as soon as the wheel stops loosening; there is no need to tighten the nut any further. The wheel should rotate easily, but there should be no wheel chatter. 9. When you find the optimal position of the nut, it will be necessary to lock it. Despite tightening the nut quite tightly, it may well become loose or, on the contrary, tighten over time. Therefore, special flanged nuts are used for locking. The collar is punched with a hammer, through a screwdriver, chisel or the back of a second hammer and pressed into the groove of the trunnion. It is better to carry out locking with the wheel lowered to the ground. The wheel, tightened with two bolts, should be lowered from the jack. In this case, the blows from the hammer will be transmitted to the bearings less strongly. 10. The nut cap that was previously removed should be cleaned of old grease and new grease should be hammered into it. 11. After locking, the car should be raised again, the disk and tire should be removed, and the hub cap should be carefully driven into place with a hammer. 12. Then you can put the disc back on, tighten the bolts, lower the wheel and tighten it. 13. When driving out on the road after work, pay special attention to the sounds in the car. Not a note should be heard from the bearing! If the bearing is humming, the adjusting nut should be loosened. In this case, you will need another nut to re-lock. The work described above can be done by the most ordinary car enthusiast. The front wheel bearing is tightened within one hour, you will also need the desire to solve the problem yourself.
Front wheel bearing
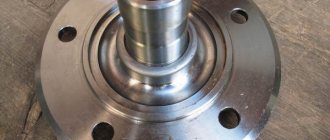
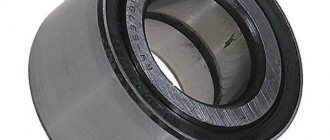
To ensure uniform rotation of the front wheels, special bearings are installed in their hubs. These are double-row roller bearings that do not require regular maintenance or lubrication.
The front hubs of the “seven” are equipped with tapered roller bearings
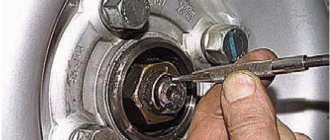
The reason is simple: they are pressed into the hub, so they can be destroyed when you try to remove them. Therefore, the driver removes the wheel bearings only when he decides to change them. Here are the main signs of wheel bearing failure:
- the front wheels rotate with a characteristic low hum. This indicates wear of one or more rollers in the wheel bearing. Worn rollers dangle inside the separator, and when the hub rotates, a characteristic hum occurs, which becomes louder with increasing wheel speed;
- a crackling or squeaking sound coming from behind the wheel. The driver usually hears this sound when turning. He says that one of the wheel bearing rings has collapsed. As a rule, the inner ring of the bearing breaks, and it usually breaks in two places at once. When turning, the hub carries a huge load, as does the bearing in it. At such moments, the fragments of the inner ring begin to rub against each other at the fracture points, resulting in a characteristic cracking or squeaking sound.
In all of the above cases, there is only one solution: replacing the wheel bearing.
Checking the wheel bearing
At the slightest suspicion of a bearing malfunction, the driver is obliged to check it, especially since there is nothing complicated about it.
- The wheel, from which characteristic sounds are heard, is jacked up. Then the driver manually spins the wheel so that it rotates as quickly as possible and listens. If the bearing is worn out, a characteristic hum will be clearly audible to anyone who does not have hearing problems. In some cases, bearing noise cannot be detected when the wheel is spinning too quickly. Then you need to spin the wheel as slowly as possible. If at least one roller in the bearing is worn out, the wheel will definitely hum.
- If manual rotation of the wheel does not reveal the problem, then you should pull the wheel without removing the car from the jack. To do this, the driver grabs the top and bottom of the tire and pulls the wheel several times, first away from himself, then toward himself. If the bearing rings are broken, then a slight play will be clearly felt on the wheel.
- If the play was not detected by pulling the wheel, then the wheel should be rocked. The driver grabs the top of the tire and begins to swing it away from him and towards him. Then he does the same with the bottom of the tire. Backlash, if any, is almost always detected. Either when the bottom of the tire rocks, or when the top rocks.
Wheel Bearing Adjustment
Once play is identified, the wheel bearing is carefully inspected. If the play is insignificant, and no signs of wear or damage were found on the bearing, then this indicates a weakening of the bearing fasteners. In this case, the driver will not have to change the bearing; it will be enough to simply adjust it.
- Using a screwdriver, remove the protective plug from the wheel bearing.
- After this, the adjusting nut located above the bearing is tightened so that the wheel cannot be turned by hand.
- This nut is then gradually loosened two to three turns. After each loosening, the wheel is turned and checked for play. It is necessary to achieve a situation where the wheel rotates freely, but no play is observed.
- When the desired position is found, the adjusting nut should be locked in this position. Drivers usually do this with a simple chisel: hitting the side of the nut with a chisel slightly bends it, and it no longer unscrews.
Diagnostics - causes and symptoms of malfunction
The condition of a wheel bearing is assessed based on a number of factors. The main signs of a node malfunction include:
- noticeable wheel play;
- hum, rustle, crunch from a spinning wheel;
- the suspended axis rotates unevenly, there is wedging;
- excessive heating of the disk;
- increased noise when cornering.
The main reason for replacing a wheel bearing is due to normal wear and tear. The gap increases and eventually stops responding to adjustment.
How to check the wheel bearing of a VAZ-2107:
How to determine front wheel bearing wear: vazoved
I drive a LADA VESTA CROSS, Moscow
Then there will simply be no one to pay the fines! This is a Korean tablet video recorder 15 in 1 for Android..
I forgot about fines and Yandex Navigator.
There is FULL HD shooting, radar detector and GPS with 32 satellites. I got it at a reasonable price for such great functionality: HERE
Other causes of failure:
- wheel impacts;
- technological violations during the previous replacement;
- entry of foreign particles into the separator cavity (dust, dirt, metal shavings);
- aggressive driving style.
If at least one malfunction is detected, it is necessary to replace the parts. Continued operation of the vehicle is dangerous.
Lada 2106 Akkerman71 › Logbook › Front suspension 2. Fixed hubs
Hi all. Today there will be a little more letters) there is a little free time, you can press buttons). For the upcoming complete overhaul of the front suspension, I am collecting the necessary parts. One of the upgrades that the “patient” will undergo is non-adjustable hubs with one double-row bearing,
instead of two classic bearings, which from time to time need adjustment, without which wheel play appears and, as a result, control suffers, the wheels “walk” a little to the sides because of this, you have to steer the steering wheel, and they also absorb all these unnecessary beats ball joints and steering rods; excess loads damage them faster. There is a lot of information on the Internet about this and about installing non-adjustable bearings from a front-wheel drive family using adapter bushings on classic knuckles. The most common option is to install a 2108 rear hub with bearing dimensions of 60x30. Many people install and drive, but personally I don’t like this option. The bearing is not designed for heavy loads, since the main load comes from the engine and from the turning front wheels, so on the back of the 08 they made them smaller in size, so I didn’t consider this option at all. This whole thing is serious and I want to be completely calm and confident in the durability and, most importantly, the safety of all components and assemblies)). In second place is the installation of IZH Oda front hubs; a large front bearing 2108 with dimensions 64x37 is already installed in them. This option is already acceptable, in my opinion. The bearing is designed for installation “under the motor” and will run for a long time, which you won’t have to worry about. IzhOda hubs are installed either through adapter bushings, which is much simpler, or on modified classic knuckles, which is much more difficult to perform, since you still need to find a very good turner who will take on this and will not spoil anything the first time)) and with this they are just big problems)) I also refused this option, firstly, IzhOda is already a big rarity in our area, it takes a long time to look for hubs from them and used ones are used, this is not a new part, production will be present in any case. Therefore, I chose for myself the most reinforced third option with the largest possible size bearing and custom-made metal hubs. Bearing dimensions 72x37
installed on Moskvich 2141 and Renault Logan, compared to the front 2108 it is larger and looks preferable. The matter remained with the manufacture of hubs. From all the large factories with good machines, in our city (as elsewhere) only memories remain), everything was closed a long time ago, the equipment was cut into scrap metal, so I spent a long time looking for who and where to make it. As they say, “he who searches for a long time will always find”) I found someone who makes such hubs, even with adapter bushings,
source
Replacing the wheel bearing of a VAZ 2107
The chassis of the VAZ 2107, like all classic models, is not distinguished by its design complexity, but at the same time it fully complies with the somewhat inflated endurance requirements that road surfaces impose on us. The 7 has a reliable and simple wishbone suspension, but it does not last forever, and can remind you of itself from time to time with tapping and creaking.
Signs of a worn out bearing
We immediately pay attention to the knocking of the suspension and play in the steering, and try to find and neutralize the tired part as soon as possible. The front wheel bearing behaves completely differently.
As a result of wear and tear, it does not immediately show its fatigue, but gradually. When turning right, the left wheel bearing begins to hum, and when turning left, vice versa.
It is quite possible that the bearing adjustment nut has become loose, but then the hum should be accompanied by a knocking sound. This can be easily determined by checking the play on the front wheel. To do this, hang the car on a jack and grab the wheel by the lower part and the upper part with your hands, then rock it. If there is play, then it will be enough to tighten the adjusting nut with a torque of 2 kg/cm and tighten it with a blunt chisel. If the hum continues after this, it means the bearing has worn out and needs to be replaced.
Removing the front hub of a VAZ 2107
Before starting work, place the car on a level surface, secure the rear wheels with wheel chocks and tighten the handbrake. After this, we jack up the front wheel with a jack, but it is advisable to place a stand under the lower arm after we remove the wheel. We loosen the jack, the bulk of the car falls on the stand, and now the car is securely fixed.
- Using a blunt chisel or screwdriver, remove the hub protective cap.
- Remove the front brake caliper. To do this you will need to remove the brake pads. We unpin the pad pin, take it out, and then you can use a pry bar or a large screwdriver to press the pistons into the caliper. After this, you can remove the brake pads.
- The front brake caliper is attached to the axle with two bolts that need to be unscrewed. In order not to disconnect the caliper from the brake system, we hang it on a wire so that the brake hose is not stretched.
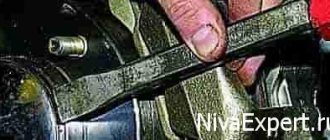
- Let's move on to the hub. Using a 27mm socket, unscrew the hub adjustment and fastening nut. To avoid any surprises, let us remind you that the right wheel has a left-hand thread, and the left one has a right-hand thread. It's hard to confuse. Having oriented towards the cardinal points, unscrew the nut.
- Remove the hub from the axle and place it on a horizontal surface.
Replacing a VAZ 2107 wheel bearing
To replace the wheel bearings of rear-wheel drive VAZ models, it is better to have a set of mandrels and drifts for pressing out and pressing in the bearing races. Or at least a vice. But if all this is not there, we can handle it with our bare hands. We will do this in the following sequence:
- Press the oil seal out of the hub using a pry bar or a wide screwdriver. There is no need to worry about it; when replacing a bearing, the oil seal also needs to be changed, so removing the oil seal with a certain amount of healthy cynicism is justified here.
- We use any tool to knock out the old races from the hub, after which we carefully inspect the inside of the hub and rinse it with diesel fuel or gasoline to remove any remaining old grease and dirt. It is advisable to wipe the seats with a rag after this.
- We press the new bearing races into the hub. In principle, there are spacers and mandrels for this, but if everything is done carefully, you can do it with a hammer. For final shrinkage of the clip, we use the old clip.
- When the clips are in place, coat them liberally with Litol 24, but in moderation.
- We install the oil seal very carefully. There are also special mandrels for this, but if you don’t overdo it with a hammer and press it evenly, then you won’t have to run for a new oil seal.
The bearing is in place.
Adjusting the wheel bearing of VAZ 2107
Installing the bearing is half the battle. The main thing is to adjust it correctly and take it seriously. It was not for nothing that the engineers at VAZ received their salary of 120 Soviet rubles, and it was not for nothing that they wrote that the tightening torque of the nut should be in the range of 1.9-2.0 kgf/m. No one can tighten the nut by eye, so they use a torque wrench for this.
After tightening with the required torque, rotate the wheel in both directions, and then loosen the nut 15-20 degrees. We check the hub for the presence of play; if there is none, then you can roll the nut with a blunt chisel, fill the cap with grease and close it. The front suspension is reassembled in the reverse order, and the grease in the bearing is replaced every 20,000 km. Listen to the bearings, and good luck on the roads!
Source
Where does wheel bearing play come from?
Good afternoon dear friends! Today we’ll talk about a problem that may appear when diagnosing the front suspension - wheel bearing play .
Let's look at the main reasons for the occurrence of this backlash, whether it should exist at all, and if it should, then what is acceptable. What can it lead to if you start this problem and don’t pay attention to it, how can it be eliminated. We will also learn how to correctly adjust the hub bearing using the example of a VAZ 2107. How to do it yourself in the garage, and the dangers of incorrect adjustment. Plus, visual videos will help in analyzing this topic.
What bearings to put
When a wheel bearing requires replacement, the question immediately arises of which part to install. Many people advise using original components. However, today the quality of parts leaves much to be desired and the issue of choice remains quite relevant.
Table: type, installation location, and size of bearings
| Installation location | Bearing type | Size, mm | Quantity |
| Front wheel hub (outer support) | Roller, conical, single row | 19,5*45,3*15,5 | 2 |
| Front wheel hub (inner support) | Roller, conical, single row | 26*57,2*17,5 | 2 |
| Rear axle shaft | Ball, radial, single row | 30*72*19 | 2 |
Manufacturer's choice
When choosing a manufacturer of a wheel bearing for a VAZ “Seven”, we can recommend SKF, SNR, FAG, NTN, Koyo, INA, NSK. The companies listed have many locations around the world. These products are of high quality and meet the most stringent requirements.
Among the domestic manufacturers that supply bearings for cars of the Togliatti plant, we can highlight:
- CJSC "LADA Image" - manufactures and sells original Lada wheel bearings through secondary markets;
- Saratov plant - produces parts under the SPZ brand;
- Volzhsky Plant - uses the Volzhsky Standard brand;
- Vologda plant - sells products under the VBF brand;
- Samara plant SPZ-9.
What are axle shafts, why are they needed and how are they designed?
In rear-wheel drive cars, which the “seven” actually belongs to, the rear wheels are driving. It is they, rotating, that make the car move. The torque is transmitted to them from the gearbox through the drive (cardan) shaft, gearbox and axle shafts. There are only two axle shafts: one for each rear wheel. Their role is to transmit torque from the corresponding gear of the gearbox to the wheel rim.
Axle shaft design
The axle shaft is an all-metal shaft made of steel. At one end there is a flange for attaching the wheel disk, and at the other there are splines for engagement with the gearbox gear. If we consider the axle shaft assembly, then in addition to the shaft, its design also includes:
- oil deflector;
- sealing gasket;
- oil seal (cuff);
- bearing.
In addition to the shaft, the design of the axle shaft also includes an oil deflector, a gasket, an oil seal and a bearing.
Each of the axle shafts is installed in the corresponding (left or right) rear axle housing. An oil deflector with a gasket and an oil seal are used to prevent lubricant from leaking out of the casing. The bearing is designed to ensure uniform rotation of the axle shaft and distribute shock loads coming from the wheel to the rear axle of the vehicle.
1 — oil deflector; 2 - gasket; 3 - seal; 4 - oil seal; 5 - axle shaft; 6 - casing; 7 — bearing mounting plate; 8 — brake shield; 9 — bearing; 10 — fixing sleeve
Reasons for failure of hub parts
The most unreliable part that is subject to wear and breakage is the wheel bearing. This is the only moving part, the wear resistance of which is ensured by high quality material and lubrication. Thanks to this, in normal operation it lasts up to 100 thousand kilometers or more.
Given the state of our roads, this service life may be sharply reduced. This happens for the following reasons:
- Impacts due to the wheel hitting potholes at high speed. The resulting dynamic loads primarily affect the bearings and only then the remaining suspension parts.
- Loss or contamination of lubricant. If the boots are damaged, the lubricant is washed out from the inside of the bearing, and the part becomes clogged with dirt and requires urgent replacement.
- Incorrect tightening when replacing or servicing. An over-tightened bearing will overheat and fail. A weak tightening torque causes play and intense wear of the part.
- Errors when pressing the bearing during replacement. Distortions and damage greatly reduce the service life of the part. Therefore, you should trust the replacement only to experienced locksmiths with a good reputation.
Breakage (deformation) of the hub itself can only occur as a result of strong impacts on the edges of road potholes or an accident.
To extend the life of the unit, you need to monitor the condition of the anthers and drive the car carefully, avoiding potholes and slowing down in front of them.
Bearing Failure Determination
Some recommendations will help you make sure that you need to replace the wheel bearing on your VAZ 2107:
The easiest way to determine the need to replace the hub unit is to grab the front wheel and shake it in different planes
If you feel the presence of play, then it’s time for a more detailed diagnosis and most likely replacing the bearings. The front wheels of the car should be hung on a jack, while being sure to take precautions: pull the handbrake, install shoes and additional stands under the car. Grasp the top and bottom of the front wheel with your hands and then make movements. It is important to wobble the wheel, not the car as a whole.
Thus, you can accurately determine whether the product in question needs to be replaced. Another way to determine the need for replacement is to listen for humming, knocking, and grinding noises in the wheel as it rotates.
Having decided that you really need to replace the VAZ 2107 wheel bearing, you need to purchase new products and begin the replacement workflow.
Replacement features
The front hub of the VAZ 2107 car has a pair of roller bearings, one of which is called internal, and the second external. The manufacturer recommends replacing these products in pairs, on both front wheels of the car. We will find out further what the replacement of the parts in question is.
Initially, it is necessary to tear off the nuts securing the front wheel of the VAZ 2107 car. After this, install the jack and jack up the front part of the car. At the same time, do not forget to install shoes under the wheels, as well as a special safety stop to prevent the jack from falling.
- Removing the caliper. Changing the front wheel bearing is much more difficult than replacing the rear one, but it can be done even with no experience. First of all, the 2 bolts that secure the caliper are uncoiled, after which they are unscrewed. It is not necessary to disconnect the brake hose; it is enough to tie up the removed caliper so that it does not interfere with further work.
- Removing the outer product. The cap is removed using a screwdriver, behind which there is a hub nut. The nut must be unscrewed, for which you will need to use a chisel and a hammer. Behind the nut there is a lock washer that must be removed. Now you can pull out the outer bearing.
- Removing the hub. To remove the hub, you need to pull it towards you. It is removed along with the brake disc. To disconnect the disk itself after removal, unscrew the two “12” bolts. The brake disc is removed to make replacement easier, but it is not necessary to disconnect it.
- Removing the inner bearing. Using a screwdriver, you need to pry off the oil seal located on the inside and covering the inner bearing, then pick it out and pull out the split spacer ring. The ring may not stand, so we focus on the situation. After this, the inner bearing can be removed.
- Next, the old clips are removed using a special puller or an ordinary steel tube of suitable diameter. The next stage of replacement involves cleaning the inside of the hub from old grease, after which you can begin assembly.
REPLACING BEARINGS
The procedure is no more complicated than others associated with repairing a VAZ 2107 car. After hanging it on a jack and removing the wheel, the replacement is performed directly. First, remove the caliper by unscrewing its mounting bolts. It is not necessary to remove the brake hose; it is enough to carefully hang the caliper so that it does not interfere with operation.
Next, you need to use a flat-head screwdriver to pry up the cap covering the nut and remove it. By unscrewing the hub nut and removing the washer and separator, you can remove the hub with the brake disc. Then everything is simple:
- We take out the oil seal;
- Remove the separator;
- We take out the ring separating the inner and outer bearing;
- Using an extension of the required size and a regular hammer, knock out both clips.
Installing new bearings and assembling the hub occurs in the reverse order. Before assembly, it is necessary to remove old grease by thoroughly washing all parts.
- We press in the races of new bearings;
- Lubricate and install the internal separator;
- Insert the ring;
- Press in the oil seal.
All that remains is to put the hub in place and screw on the caliper. After inserting the pre-lubricated outer bearing cage and thrust ring into place, tighten the hub nut until it stops. By gradually loosening the nut, we achieve free rotation of the wheel with complete absence of play. Thus, the bearing operates in normal mode, which means it is in this position that the nut needs to be locked.
We remove the used lubricant from the protective cap and apply new one, after which we put it on the hub. We put the wheel in place and screw it on, and remove the car from the jack. The job is done, the fault has been successfully fixed, the replacement has been completed. After a short run, it is recommended to check the hub for play and, if necessary, adjust it.
Repair of VAZ 2101, 2106, 2107 hub
Maintenance-free front hubs on VAZ 2107 (bushing drawing)
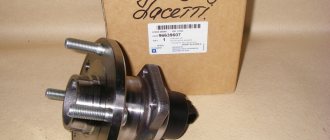
This time we will talk about maintenance-free front hub bearings. Having changed 3 bearings over the winter (sometimes they didn’t last, sometimes they overtightened them, sometimes they fell apart during maintenance), I got tired of all this, surfing the Internet and DRIVE came across articles about maintenance-free bearings on the front. There are several options: 1. Buy a ready-made kit. There are people who sharpen hubs and axles for them. 2. hub with axle from Izh od (also suitable) - I couldn’t find it 3. Rear hub from 08 VAZ + bearing also rear and + adapter sleeve - that’s what you need and in terms of cost.
hub with bearing
Since I didn't look carefully at the bearings? and bought an extra stopper, but they were in the box. Next, we will need classic wheel nuts, 08 ones will not fit, and the ring that presses the bearing is also classic.
all assembled + bushings
made the bushings according to the drawings
3,1
The first time I did it according to the first one, I’ll say right away it was in vain, the size 22 was not the topic and during installation the bushing swelled while I was inserting it. but more on that later.
here is my modified drawing
So we collect all this and happily go to the garage (well, that’s how it was for me), we begin to take everything apart
Having unscrewed the nut and the caliper, I had the first problem: I bent the brake disc (I don’t know how, but I did, I realized this when I was putting everything back together after the second problem), so I knocked over the old hub with the dead bearings, we start assembling it and now it’s not a problem, there’s an error in size, no Well, it’s okay and you can knock it out, and in the end I put everything back in the car in the garage and we’re waiting for it to be re-sharpened...
this is how it was inflated due to the wrong size, after measuring the axle, I changed the dimensions
Finally, they machined the bushings for me, and I, happy, flew to the garage to finish it... Since everything was put back in place temporarily, we disassemble everything: we remove the caliper, peel off the brake disc, knock off the hub (I’ll tell you right away that everything came off quickly on the left side, but on the right I had to suffer.) When everything was removed and wiped clean of fuel oil and grease, we put it back together.
I figured it wasn't bad
We put the bushing on the axle, now everything is easy to install
now with the hub
Install the second part of the bushing
Well, a washer with a nut (the nut and washer are original - classic)
Now everything needs to be tightened. I pulled it with a ratchet and then, using a piece of a meter-long pipe, tightened it with force. I don't have a torque wrench, and I don't need one yet.
I almost forgot about the disks
Driving with the front wheel bearings tightened on a VAZ 2107. Accident or luck?
Hi all! Today I want to tell you my story about how I overtightened the front wheel bearings on my car and regretted it. Most people who have owned domestic classics know very well that the front wheel bearings require proper adjustment.
At that time I didn’t know how to do this. It was autumn. It was already late afternoon. I was about to go outside, but then the devil pulled me to tighten the wheel bearing. Having jacked up the car, I removed the hub cap and tightened the hub nut with a 27mm wrench. The wheel then made 3 revolutions, then it suddenly stopped. Well, I think, now we can go. I went to a neighboring village, which was 20 km from my city. I picked up my friend and we went for a ride.
We spent our time with good health benefits. As they say, a little of every good thing. It was already late, so it was time to go home. I took the girl and drove towards my town. On the way, my friend Seryoga called me and offered me a beer. Naturally, I agreed and increased my speed and drove towards him. The speedometer needle was at 130 km/h. I picked him up and we went to the convenience store. Approaching the store and pulling over to the side of the road, I heard some kind of metallic knock in the right wheel.
It was very dark outside, so I didn’t see what was happening there. The wheel had huge play. It felt like it was about to fall off. There were five kilometers left to go home. I drove in first and second speed the whole way. After the trip, I left the car near the house and went with a friend to drink beer. In the morning I woke up and went to see what happened to the wheel. What I saw was a shock to me.
The entire disk was covered in lithol and metal shavings. There was no longer a hub cap at that time. It was decided to change the bearings. I went to the auto store and bought everything I needed to replace it. I jacked up the car and removed the wheel and brake caliper. Then he unscrewed the hub nut and took out the washer. The completely dry bearings simply fell out of there.
Then, using the Internet, I replaced the races and bearings. This was my first, hand-made replacement. True, I couldn’t install the oil seal in its place myself. It’s good that a drunk man passed by, and it was he who helped me with this matter. By the way, I installed the oil seal exactly flush, thanks to him. Then he asked me for a cigarette, but since I don’t smoke, I was forced to refuse him.
Then I adjusted the bearings, leaving a slight play. Now I sit and think. Along a forest road, where there were only trees around, I drove for about a hundred meters. But at any moment anything could happen to the wheel, especially in such and such a state. The consequences could be far from pleasant. I think I was just lucky. I have learned this lesson throughout my life. Adjust your wheel bearings correctly!
How to replace a wheel bearing on a VAZ 2107
The hub is a very important structural element of the front suspension of the VAZ 2107. A serviceable bearing in it guarantees controllability of the car in motion.
External manifestation of the malfunction
The decision about the need to replace the bearing should be made when an extraneous hum (grinding) occurs in one of the front wheels. At the same time, the hub gets very hot (you can feel it by touching it with your hand). And this is a prerequisite for brake failure.
The play that occurs in the hub can cause damage to the brake discs installed in it, the balancing of the front suspension is disrupted, which leads to accelerated wear of the rubber.
How to check for a fault
To do this, it is recommended to perform a number of simple operations:
- Hang the wheel on a jack, not forgetting to take measures to prevent unauthorized movement of the car (installing shoes, parking brake);
- Place a stop under the lower arm, which allows you to remove the car from the jack, but leave the wheel in the hanging position.
It is highly advisable to use an additional support under the vehicle body. It plays the role of insurance, preventing the machine from falling if it slips from the installed stop.
- Taking the wheel in both hands (top and bottom), move it towards and away from you. A serviceable bearing will not show any play or extraneous knocks;
- Then the wheel should be rotated. Extraneous noises (grinding, humming, knocking) indicate a malfunction.
But bearing replacement is not always necessary. You may just need to adjust the play by tightening the hub nut to maximum and then loosening it little by little until the wheel rotates freely. The backlash, in this case, may disappear. Such a solution to the problem is only possible if there is little bearing wear.
Where is the wheel bearing located?
Having read the name itself, you can already understand that the bearing is connected to the hub, and so it is located in its inner part, usually when replacing this bearing, people remove the brake disc together with the hub, because separating the brake disc is only a waste of time, but changing the bearing on the installed hub will not work at all, so it will need to be removed (without removing the brake disc) and then replaced.