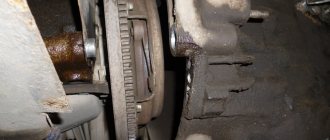
The clutch is controlled by a pedal inside the cabin. When you press it, the clutch is disconnected from the gearbox, and when you press it, it engages. This ensures a smooth start of the car from a standstill and silent gear shifting. The node itself consists of a large number of elements interacting with each other. The VAZ 2107 is equipped with a single-disc clutch with a central spring .
Clutch basket
The clutch consists of two discs and a release bearing. The clutch used on the VAZ 2107 is simple and reliable. The pressure (drive disk) is installed on the flywheel. Inside the basket there is a driven disk connected to the gearbox input shaft with special splines.
The clutch can be single-disc or multi-disc. The first is considered more reliable. The clutch functions as follows. When you press the pedal, the release bearing mounted on the input shaft pulls the petals of the basket towards the engine block. As a result, the basket and driven disk are disengaged, and it becomes possible to change speeds.
For the VAZ 2107, wheels from the VAZ 2103 (for engines up to 1.5 liters) and VAZ 2121 (for engines up to 1.7 liters) are suitable. Externally they are very similar and have a diameter of 200 mm. These discs can be distinguished by the width of the linings (29 and 35 mm, respectively) and the presence of a 6 mm mark in one of the grooves of the VAZ 2121 damper.
Clutch disc
The driven disc is sometimes called a drum. There are pads glued to it on both sides. To increase elasticity, special slots are made on the disk during the manufacturing process. In addition, the drum is equipped with eight springs located in the plane of the disk. These springs reduce the frequency of torsional vibrations and reduce dynamic loads.
The drum is connected to the gearbox, and the basket is connected to the engine. During movement, they are pressed tightly against each other, rotating in the same direction.
The single-disk scheme used on the VAZ 2107 is distinguished by its reliability, comparative cheapness and ease of maintenance. This clutch is easy to remove and repair.
The driven disk for a 1.5 liter engine has dimensions of 200x140 mm. It can also be installed on a VAZ 2103, 2106. Sometimes a drum from a Niva (VAZ 2121) is installed on a VAZ 2107, differing in size (200x130 mm), a reinforced damper system and a large number of rivets.
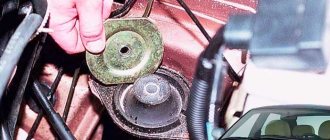
Release bearing
The release bearing, being the most vulnerable element of the clutch, turns the rotation gear on and off. It is located in the middle of the disc and is rigidly connected to the pedal through a fork. Each press of the clutch pedal loads the bearing and shortens the bearing's life. Do not press the pedal unnecessarily. A bearing is installed on the gearbox drive shaft guide.
In the clutch kit, the release bearing is designated 2101. A bearing from a VAZ 2121, designed for high loads and having an increased service life, is also suitable. However, in this case, you will also need to replace the basket, since pressing the pedal will require great effort.
Clutch fork
The fork is designed to disengage the clutch when the clutch pedal is pressed. It moves the release bearing and, as a result, the inner edge of the spring.
Most often, if the fork is faulty, it becomes impossible to disengage the clutch. However, sometimes it continues to malfunction. If you do not replace the fork right away, you will have to replace the entire clutch assembly later.
Replacing the release bearing on a VAZ 2101-VAZ 2107
Removal: 1) At the very beginning of the operation, you will have to remove the box from the car. (see details in the instructions: “Replacing the box on a VAZ”)
2) Now take a screwdriver in your hands and remove the springs securing the bearing to the fork.
3) Gradually pull along the shaft, in other words, pull the release lever towards you - it is removed from the shaft.
4) After removing the bearing, unclench the ends of the spring attached to the gear shift fork. After decompressing, simply remove this spring. If you find the bearing is in good condition, but the spring is not, replace the spring with a new one and continue to use your bearing. The spring is fine, but the bearing is not - take the spring and insert it into the new part.
Note! Please note that sometimes the bearing is still intact, but has already traveled quite a few kilometers, so you should not exclude the possibility of failure in the near future.
Installation
The new spare part is installed on the vehicle in the reverse order of removal.
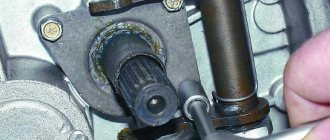
Note! Before installation, it is necessary to lubricate the splined part of the input shaft, indicated by the arrow, with the lubricant described in the set of necessary tools, because over time the lubrication of the shaft disappears, and malfunctions with the splined part may occur due to friction between non-lubricated parts.
Below is a link to a video with a visual demonstration of the replacement process:
How to change the clutch
A slipping clutch indicates that it needs to be replaced. It is convenient to carry out all stages on an overpass. If this is not possible, use a jack, but be sure to place protective supports under the car.
To replace the unit in question, prepare:
- pliers;
- rags;
- mount;
- mandrel;
- set of keys and screwdrivers.
It is not at all necessary to completely remove the gearbox; changing the clutch is not difficult without this. It is enough to move it to the side so that the shaft moves out of the basket. Nevertheless, for your own convenience, it is better to dismantle the gearbox. This, by the way, will allow you to inspect the seals and crankcase along the way.
Tools used
To perform this clutch replacement you will need:
- Jack
- Pliers
- Screwdrivers
- Set of keys
- Mandrel for removing the clutch basket
- Rags
We recommend purchasing original clutch repair kits for the VAZ 2107, which will allow you to completely restore the damaged unit. It is also possible to repair and replace clutch elements separately, however, this leads to a certain complication of such work, so most car owners still choose the appropriate repair kits and easily replace the clutch. Let's talk in more detail about how to change the clutch on a VAZ 2107.
Fault diagnosis
How do you understand that the clutch release bearing (hereinafter referred to as the clutch release bearing) has already reached the end of its service life and is time to change it? This question interests many VAZ 2107 car owners. And for good reason, because although this element can be called insignificant, a lot depends on it.
The service life of the clutch device on domestic cars depends not so much on the conditions of use of the car, but on its mileage. A car owner who likes to squeeze the gas all the way down and drive on the roads will need to change clutch elements more often than a driver who prefers a measured way of driving.
When the wear of the clutch elements reaches the point of no return, the device begins to slip if the engine picks up speed. If you regularly drive with such a clutch, then in the future, and maybe even on the next trip, the driven disk of the mechanism will overheat, which will not allow the driver to continue driving. And even get moving.
A failed UPS that has exhausted its service life
Help, I have a problem! About two weeks ago, the clutch pedal in my car (VAZ 2107) failed! At first I thought that the cable was “covered”. I thought about changing it, but then I saw that the cable was intact. I’ll even say more - the cable is in excellent condition. Then I decided to adjust the rod. Having done this, I was able to travel for about five more days. The pedal has failed again, can you tell me what to do?
And there are hundreds of such questions on the Internet. As you understand, we are gradually bringing the topic to signs of a faulty clutch system. What are the signs that it is time to replace the release bearing of the mechanism? There may be several of them:
- the clutch pedal falls to the floor, although the cable is fine;
- while driving, when pressing the clutch pedal, a slight grinding noise is heard;
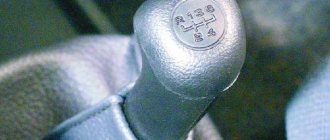
- first gear does not engage, therefore, movement can only be started from second speed;
- While driving, some noise appeared, which disappeared when the clutch pedal was depressed.
VPS at the installation site
If at least one sign of a malfunction appears in your car, then it’s time to change the VPS.
What should you pay attention to to clarify the diagnosis of clutch failure?
When accelerating or braking the car to change gears in the gearbox, the crankshaft is constantly disconnected and connected to the power transmission. This operation is performed very often and intensively, so over time the signs of a clutch malfunction become more and more obvious. All clutch malfunctions are divided into two general types: incomplete engagement of the clutch (driving) and incomplete disengagement of the clutch (slips).
Any experienced car owner knows how to check the clutch for complete disengagement. To do this, start the engine at low speeds, fully depress the clutch pedal and engage first gear. If it engages easily, then the clutch has completely disengaged the drive - everything is in order.
When you hear the smell of burning while driving, on a steep climb the car suddenly loses speed, and in general, it accelerates poorly - “slipping” of the clutch is obvious. That is, the clutch does not disengage completely - both discs do not close tightly enough.
A very simple and at the same time very reliable way to independently diagnose clutch problems:
First, warm up the engine so that the cold, thick oil does not create additional resistance. Next, the car is put on the handbrake. This should be done on a flat surface, without steep slopes. After this, the engine is accelerated to 1500-1700 rpm, the clutch pedal is depressed, first gear is engaged, and then the pedal is smoothly released.
As a result, the engine should stall. The engine does not stall, or the engine stalls after some time - the clutch definitely requires repair or replacement.
Clutch device for VAZ 2101, 2103-2107 cars
Structurally, the clutch of VAZ rear-wheel drive cars does not differ from each other, with the exception of the use of slightly different sizes and additional elements in cars with more powerful engines (2106-2103 and 2121). The clutch is a mechanism that controls the transmission of torque from the engine crankshaft to the transmission input shaft.
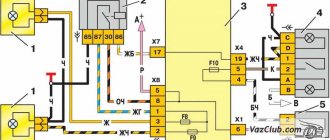
VAZ 2101 clutch design and drive diagram: 1 - flywheel; 2 — clutch driven disc; 3 - basket; 4 — release bearing with clutch; 5 — hydraulic drive reservoir; 6 - hose; 7 — master cylinder of the hydraulic clutch release; 8 — servo spring of the clutch pedal; 9 — clutch pedal return spring; 10 — clutch pedal travel limit screw; 11 — clutch pedal; 12 — hydraulic clutch release pipeline; 13 — ball joint fork; 14 — clutch release fork; 15 — release spring for clutch release fork; 16 - hose; 17 — working cylinder of the hydraulic clutch release; 18 - bleeder fitting
The flywheel, also known as drive disk 1, is rigidly attached to the crankshaft. Clutch basket 3 is fixed to the flywheel with six bolts, and between them, on the splines of the gearbox input shaft, there is clutch driven disc 2 with friction linings. If it is necessary to disengage the clutch by pressing pedal 11, the clutch release fork 14 presses on the release bearing 4 and disconnects the drive disk from the basket by moving the driven disk 2. The clutch release fork is driven by the hydraulic system.
Replacing the master and slave cylinders
The master cylinder creates pressure in the hydraulic system, transmitting force from the pedal pusher to the working cylinder rod. It lasts a long time, and the repair kit often requires replacement, rather than the cylinder itself. The slave cylinder serves to transmit force to the clutch fork pusher. Hydraulic fluid from the master cylinder presses against the piston in the slave cylinder and operates the fork.
Their malfunctions are manifested by dips or tight movement of the clutch pedal, difficult operation of the gearbox (gears are switched with a crunching sound, vibration). Visually, a problem with the main or working cylinder can be seen by fluid leaks.
The clutch cylinder is replaced if the “mirror” of the cylinder or its other elements are damaged, which happens quite rarely. Replacement parts wear out much more often, and then you can simply install a new repair kit.
Replacing the master cylinder, video
The master cylinder is located next to the brake booster, below the brake reservoir. Its dismantling is done in the following order:
- Pump out the liquid from the cylinder expansion tank (with a rubber bulb or a syringe with a hose);
- When there is no liquid left in the expansion tank, remove it from the cylinder (disconnect the rubber fasteners);
- Unscrew the nut that secures the pipeline to the cylinder, hose pipeline to the side;
- Loosen the clamp that secures the hose to the cylinder and remove the hose;
- Unscrew the nuts that secure the cylinder, remove it, and pour out the remaining liquid.
After dismantling, you need to inspect the cylinder for wear of metal parts and rubber gaskets. If necessary, replace the repair kit or install a new cylinder. Installation is done in reverse order.
Replacing the working cylinder, video.
The slave cylinder is located next to the gearbox, on the clutch housing. It can be accessed both from below and from the engine compartment. Dismantling procedure:
- Loosen the nut that secures the hose to the cylinder. Do not remove the nut completely, do not disconnect the hose;
- Use pliers to remove the tension spring;
- Using pliers, straighten and remove the restrictive cotter pin from the pusher;
- Remove the bolts that secure the cylinder to the clutch housing;
- Remove the bracket that was attached to the cylinder with these bolts and to which the tension spring was attached;
- Remove the cylinder by sliding the pusher out of the hole in the clutch fork;
- Now you can completely unscrew the nut and remove the hose from the cylinder. As with the master cylinder, installation is done in the reverse order.
Often, problems with the drive are caused by low-quality hydraulic fluid. When working, pay attention to its color and consistency. Often wear products accumulate in the liquid and they begin to act as an abrasive.
Clutch disc cost
How much does it cost to replace a clutch disc (hereinafter referred to as DS)? This question was probably asked by every car owner who encountered a breakdown of this element. We will try to give you the most current figures, those that are found on the market.
Today, on the Ukrainian car market it is quite possible to purchase a domestically produced DS for 2107 for an average of 210 hryvnia. If you're lucky, you'll find it cheaper. But, depending on the stores, this price can vary and reach 250 hryvnia.
In Russian car stores this element costs about 500 rubles. This cost is average, so you can find DS both cheaper than this price and more expensive (mostly up to 700 rubles).
Is it possible to do without a pit/lift?
But the first question arises immediately after the thought of replacing the clutch appears. Is it possible to do without a pit/lift/overpass? Unfortunately, not every motorist has such amenities. The answer will be short - you can. But it is not complete, as you may have noticed. Therefore, it is worth describing a little the procedure for carrying out repairs without amenities. If you are of a thin build, then you only need to raise the car by 40-50 centimeters. But, of course, this position of the car will not add convenience. If you live in a rural area, then making a small trench - a couple of meters long, 50 cm wide and the same depth - is not difficult. In this case it will be much more convenient. But it’s better, of course, it’s easier to repair the VAZ-2107 on a normal pit or a lift. The clutch fork, which is also sometimes necessary to replace, is removed and installed only after dismantling the gearbox.
How to change the clutch bearing yourself?
When replacing any part of the clutch mechanism, it is recommended to install a new release device. Its price is low, so you shouldn’t skimp on buying a part, even if it has not reached its intended service life. The work of replacing the clutch release bearing is not too complicated, so you can do it yourself if you have the necessary tools and some repair skills. To install a new part, you need to perform the following steps sequentially:
- Remove the gearbox and disconnect the pressure fork from the clutch.
- Remove the bearing from the transmission input shaft.
- Remove the spring clip from the piece of the outer body of the part.
- Check the new part for ease of rotation and presence of lubrication.
- Install the spring retainer onto the coupling.
- Place the assembly onto the gearbox shaft.
- Connect the plug to the coin and secure with a spring.
- Reinstall the gearbox.
Clutch “leads” - signs, causes and how to fix
If the clutch is slipping, the reason may be:
- Increased clearance between the support part of the pressure bearing and the fifth basket. It must be set within 4–5 mm by changing the length of the adjusting rod of the working cylinder.
- The spring sectors of the driven disk were deformed (warped) from overheating. The disk needs to be replaced with a new one.
- The driven disk is stuck on the splines of the drive shaft of the front gearbox. Both elements are defective and new ones are installed if necessary.
- There is not enough brake fluid in the main cylinder reservoir or an accumulation of air bubbles in the hydraulic drive system. The working fluid is replenished to the required level, and the hydraulic clutch system is pumped.
If the clutch starts to disengage at the beginning, it means there is no free play. This malfunction can be corrected by adjustment. On the contrary, with increased free play, the clutch begins to disengage at the end of pressing the pedal. In this case, it is necessary to increase the length of the RCS rod. Reduced free play indicates a decrease in the thickness of the driven disk linings, which means a new one needs to be installed.
Stage two - from below the machine
Now make yourself comfortable under the car and carry out the following manipulations:
- Disconnect the cardan drive from the flange on the gearbox side. Only mark the position of the splines, otherwise after assembly the cardan will make a terrible noise.
- Unscrew the nuts securing the outboard bearing. And don’t lose them, it’s better to tighten all the nuts right away.
- Lightly tap the driveshaft out. You throw it to the side so that it doesn’t get in the way under your feet.
- You tear off the nuts on the box cushions. Don't twist it all the way yet.
- Remove the clutch slave cylinder and secure it so as not to accidentally damage the hose.
- Unscrew the speedometer cable and disconnect the reverse sensor.
That's all, now place a support under the box and use a crowbar to move the gearbox away from the engine block. A little pain and the box comes off.
Clutch kit price
Now, in the era of the development of the Internet, there is no need to run to stores and look for the necessary spare part. It is enough to have access to the World Wide Web and you will have any detail in a couple of clicks. Prices for clutch discs for the VAZ-2107 vary from 470 to 2000 rubles. The cost of replacement work in Moscow and the Moscow region is 2–2.5 thousand rubles.
What advice can you give when choosing a disk? First, rummage through the forums and read reviews. Secondly, when purchasing a disc, do not be lazy to inspect it. Examine the splines especially carefully - there should be no nicks or burrs there, otherwise there is a risk that the disk simply will not fit on the shaft or will not be removed during the next replacement.
Take a look at the friction linings: they should all be uniform in composition and free of cracks. Another point is the quality of the riveting. The key to quality here is the identical dimensions of the flange. Try to swing the damper springs; if there is play, then you should refuse the purchase. And the last thing worth paying attention to is the presence of markings on the damper plate.
Replacing the clutch on a VAZ 2101-VAZ 2107
Welcome! The clutch is one of the important parts of the car, because with its help we change gears. The main job of this unit is to disconnect it from the flywheel while squeezing the clutch and for further switching the box. This unit looks like two disks on top of one of which there is a clutch housing, and the clutch also includes a release bearing and clutch assembly. But over time, one of the disks or the release bearing itself becomes unusable, which is why they will need to be replaced.
When should you change the clutch? During operation, the clutch of any car wears out over time, and the first signs of a worn clutch that a car will show are:
1. Increased noise which begins to appear very clearly when changing gears in the car.
2. Jerks can also occur when starting off in a car, and they can also occur while driving when you depress the clutch pedal, then engage a gear, and then when you release the pedal, your car jerks forward a little.
Note! This mainly happens due to the damper springs that are installed on the driven disk, and in the photo below they are shown by arrows. These springs are needed so that the clutch disengages smoothly and thus does not cause discomfort when driving, and when these springs become unusable, when the clutch is disengaged, as mentioned earlier, a jerk occurs, which often has a very negative effect on the comfort of driving a car!
3. In addition to all this, if the clutch malfunctions, the effect that the clutch “slips” may occur. This is when you are driving a car and at the same time you press the gas pedal, let’s say to the floor, and your car does not accelerate, but the engine speed increases sharply and even reaches the red zone, this effect is popularly called the clutch “Slipping”.
We recommend: Removing scratches on a car body without painting
4. And in conclusion, let’s note another effect called the “Leads” clutch. The first signs of this effect are as follows: let’s say you engage first gear and at this time the clutch pedal is still fully depressed, but even despite this the car starts to roll. This effect is called the “Leads” clutch.
How to replace the clutch on a VAZ 2101-VAZ 2107?
Note! Before you start replacing, be sure to make sure that the clutch malfunction is not caused by any other reasons, because replacing this unit itself is very labor-intensive and time-consuming compared to replacing the same clutch slave cylinder, due to which the same problem may occur. the effect that the clutch “Drives”! (If you want to take a closer look at the malfunctions of a particular unit of the entire clutch system, then use the “Search” form, which is located in the upper right corner of the site, and enter into the search the malfunction that you specifically need, for example: “Clutch is slipping” and you will get all results in which this combination of words was found)
Signs of breakdown
It is not difficult to independently determine the need to replace the clutch on a VAZ 2107. This work must be performed in the following cases:
- The appearance of extraneous noise when changing gears and engaging the clutch.
- Jerks appear when starting to move and when starting off.
- Wheels may slip under load.
- The clutch pedal begins to fall.
- In case of significant breakdowns, pressing the corresponding pedal does not engage the clutch, which does not allow you to change gear.
It should be said that you should not delay repairs if such symptoms are present, since a broken clutch will invariably “pull” the gearbox and other expensive components with it, and such repairs will have a high cost. There may be several reasons why the VAZ 2107 clutch slave cylinder needs to be replaced. This includes an aggressive driving style, when such components are subject to increased load, and the use of low-quality spare parts. It is recommended to carry out such repair work every 50-60 thousand kilometers of the vehicle. By this time, most clutch units have increased wear, which will require diagnostics and replacement of this unit.
Procedure for bearing replacement
To get to the faulty unit, you will have to remove the gearbox, clutch and flywheel. Carry out similar work on a lift, pit or overpass, using a special crankshaft bearing puller (a device for pressing out of blind holes).
Crankshaft bearing puller
The replacement procedure is as follows:
1.First, disassemble the crankshaft bearing removal tool into its component parts, otherwise you will damage the thread when installing it. After this, lubricate the conical protrusion on the puller bushing with engine oil or grease - this will protect its surface from damage.
2.Install the press-out spacer sleeve into the inner race of the bearing and drive the device in until it stops.
3.To remove the bearing from the crankshaft, do the following. First tighten the puller screw by hand. Then, holding the press-out sleeve from turning with a 14-point open-end wrench, tighten the screw with a 17-point socket. Resting against the blank wall of the hole in the crankshaft flange, the shank of the device moves out of the coupling, pushing it along with the bearing out of the socket.
4. Having removed the damaged part, wipe the seat in the crankshaft from dust and lubricate it with engine oil. Don’t forget to check and, if necessary, replenish the amount of lubricant in the new bearing - manufacturers often sin with excessive efficiency.
5. When installing the new VAZ 2107 crankshaft bearing in place, make sure that it does not warp. The final pressing is carried out with a hammer and a suitable mandrel. If one is not found, then use the dismantled unit or hammer the bearing with a hard rubber mallet.
6.Installation is complete when the top plane of the bearing is flush with the flange.
If you are unable to find a press-out, do not despair. Every experienced auto mechanic knows how to remove a bearing from a crankshaft without a tool. In this case, you will need: a drift with a diameter of 15 mm (you can use a suitable bolt) and plastic material - lithol, plasticine or bread crumb mixed with sawdust. It is placed through the opening in the inner race in such a way as to fill the space under the bearing. Then a drift is inserted into the hole and hit with a hammer. Expanding to the sides, the soft mixture squeezes the bearing out. This way you can replace the faulty unit and avoid troubles in the future.
Something else useful for you:
Work execution algorithm
1. When replacing the clutch on a VAZ 2107, you will need to remove the gearbox. The transmission can remain in its place, but it is necessary to unscrew its mount and move the gearbox to a distance that will be sufficient for the clutch basket to come out of the input shaft of the box. Experts still recommend dismantling the gearbox, which will make it easy to replace the gearbox input shaft oil seal, repair the clutch housing and replace the rear crankshaft oil seal. In this case, it is impossible to do without completely dismantling the gearbox. With the box removed, replacing the clutch master cylinder is easier. 2. Next, open the hood and turn off the power to the car. Remove the negative terminal from the battery. 3. Also, when replacing the clutch, you will need to loosen the starter, for which you remove the air filter housing, and also unscrew the fastening nuts at the starter. 4. In the car interior, the covers, sound insulation and mats should be removed from the gearbox handle. The lever itself is disconnected from the box, for which you use a screwdriver to pry up and remove the white plastic sleeve. 5. All remaining work is done under the car. You need to disconnect the exhaust pipe, unscrew the driveshaft, the slave cylinder and disconnect all the wires.
6. Dismantle the starter and remove or move the gearbox. It is recommended to dismantle the box together with an assistant, since this is labor-intensive work, and the weight of this unit is such that it will be difficult to hold it alone. 7. To remove the clutch basket, you must use the appropriate mandrel, which is installed in the hole for centering the disc. The mandrel is inserted all the way until it rests against the bearing on the crankshaft. The basket is fixed, after which the bolts that secure it to the casing are unscrewed. 8. Remove the clutch disc and basket. You should remember or photograph which side the disk was installed, which will subsequently eliminate any difficulties when putting it back in place. 9. Having dismantled the clutch elements, it is necessary to inspect the condition of the disc and basket, determine the degree of wear and possible damage to this unit. If there is significant wear, the clutch should be replaced, for which you will need an appropriate repair kit. 10. It is also necessary to install a new clutch basket using an appropriate mandrel, which will fix it motionless, which will allow you to tighten the fastening bolts. Many car owners try to save money on such repairs by not installing the entire assembly, but replacing only worn parts. It must be said that with such repairs, there may soon again be a need to replace individual clutch elements, which will lead to a significant increase in the cost of maintaining and repairing the vehicle. Assembling the installed new clutch must be done in reverse order. That is, the basket with the disk is attached, the starter is fixed, the gearbox is mounted, all the wires are connected, after which the filter housing is installed and the battery terminals are clamped. After completing the repair, it is imperative to check the functionality of the clutch.