Many owners of domestic cars consider tuning a VAZ-2114 torpedo with their own hands to be a pressing topic for themselves. The improvement of the dashboard is carried out in order to improve its appearance and for functional modernization, which is considered one of the important points in tuning cars from domestic manufacturers.
Nowadays, there are a large number of different tuning options. Most often, car enthusiasts carry out minor restyling of the car’s exterior, while improving the VAZ-2114 dashboard is considered a significant improvement.
Sequence of work
Let us highlight the main stages of changing the appearance and features of tuning a VAZ-2114 torpedo with your own hands:
- First, disassemble the front panel of your car. Literally every owner of a domestic car should know how to remove this part. There is nothing complicated here. Everything is quite clear, because the dismantling process does not require special knowledge and skills.
- Next, modify the torpedo elements. At this stage, you may encounter many nuances. They directly depend on what you want to change and modify in the car. Everything should be thought through very carefully.
- At the end of the work, install the already remade and updated panel in place.
Panel painting
An excellent option for tuning a VAZ-2114 torpedo is painting the dashboard yourself. Before you start painting, you need to do the following:
- Thoroughly clean the entire surface from dirt and dust.
- Sand the dashboard with soft sandpaper to degrease it.
- Apply sealant.
- Carefully coat the torpedo with paint.
Before painting parts of your car, carefully read the instructions for using paint solutions. Despite the simplicity of restyling, certain skills will still be needed to perform this tuning and, most likely, this work is best left to professionals.
Methods for tuning the dashboard
There are several ways to improve the appearance of the instrument panel. The surface of the torpedo can be painted, covered with leather, special linings can be used in the design, or it can be given originality using combinations of various materials. Of course, painting or “dressing” a panel in leather or other materials is not the easiest task, but the result that is obtained in the end is worth it.
Before you begin the process of transforming the surface of the torpedo, you should study the PPD and the vehicle passport. The use of certain materials for tuning the instrument panel (for example, fur or some ordinary fabrics) is not allowed. For painting, you need to take a special paint intended for car parts. At elevated temperatures (for example, while the stove is operating), other types of paints undergo decomposition.
Someone goes further and customizes the entire dashboard with spectacular lighting
When planning a combination, you should pay special attention to the selection of colors. The choice of paint should be made taking into account the color of the covers in the cabin or even the body. White and black colors go well with other colors. If you have any difficulties selecting combinations, then, on the advice of specialist designers, you should use color combination tables.
Panel painting
Repainting the dashboard gray
Before you start painting the panel you will need:
- Clean its entire surface from dirt and dust;
- Treat the panel with soft sandpaper to degrease;
- Next, apply a sealant;
- Applying paint.
But to perform such tuning, certain skills are still required and, for this reason, it would be better to entrust this matter to professionals.
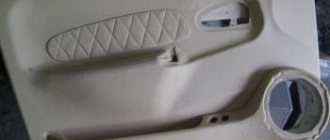
Panel cover
Covering a previously dismantled dashboard with leather or carbon fiber involves covering it (the torpedo) with a ready-made pattern that has cutouts for parts. Having thus prepared the surface of the panel, you can proceed to the next stage. Tuning the instrument panel of a VAZ 2114 is a process no less interesting than preparing the surface. The illumination of instruments, gauges and arrows play a big role in it. The ideal option is to match the colors of the multimedia system with the backlight of the torpedo.
To tune the VAZ 2114 instrument panel, you can use special overlays that have stylized images of the tachometer and speedometer. With these overlays you can change the color of the backlight thanks to the built-in light filters and transparent elements of the design. But such overlays should be used wisely, otherwise you may end up with uneven illumination (bright on the right and dim on the left) or the existing lamps may not be bright enough to penetrate the overlays.
A popular cover option among VAZ owners
The process of tuning the VAZ 2114 panel begins with dismantling the standard dashboard. The instrument panel should be disassembled correctly and every self-respecting driver should master this skill. This is actually not difficult at all and can be done using pliers and an ordinary screwdriver. Next, if there is such a need, the light bulbs are replaced. For example, factory green ones are replaced with red or blue bulbs. The next step will be the installation of a new overlay and directional arrows, as well as the installation of protective glass. The result is a new VAZ 2114 torpedo.
Many owners of this domestic car will be able to do the tuning of the VAZ 2114 panel with their own hands. But experienced drivers advise not to change the shape of the panel by building up additional walls using polyurethane foam or cutting off excess parts. The prevention of such actions is explained by the following: the manufacture of a torpedo is carried out on the basis of complex calculations that have a great impact on the safety of both the driver and passengers.
Panel cover
Covering a previously dismantled dashboard with natural, artificial leather or carbon fiber involves covering it with a ready-made pattern. It is best to prepare such templates in advance, that is, cut out the elements with a small allowance. Just like the previous version of tuning the VAZ-2114 torpedo, the upholstery is carried out after first cleaning the panel from all kinds of contaminants. The adhesive composition is chosen in such a way that it does not damage the material during the process of application and drying.
Special pads
To modify the VAZ-2114 instrument panel, special overlays are used that have stylized images of the speedometer and tachometer. You can purchase such pads at literally any auto parts store. With this VAZ-2114 torpedo tuning, you can change the color of the backlight using built-in light filters and transparent elements. However, you need to attach such overlays correctly, because the result may be uneven illumination, for example, it is dim on the right and bright on the left, or the factory light bulbs will not have enough power to break through your additional built-in overlays.
Europanels for VAZ-2114
European-style shields appeared on the domestic automotive market relatively recently. Despite this, they were very quickly able to gain the trust of many car enthusiasts. The main reasons for this are the stylish appearance and the ability to mount this version of tuning the VAZ-2114 torpedo without the risk of damaging the windshield wiper blades.
The main reason for the high demand for panels among domestic buyers is the material from which they are made. Standard factory shields are made of soft plastic that is unpleasant to the touch, which begins to rattle in the near future. The European standard panel is made of softer material, which looks much more attractive. Positive emotions are also caused by the ventilation of the interior space of the cabin with such a product.
Installing the trim on the panel of a VAZ 2114
The alteration of the instrument panel was long overdue, everything in the car had long been overlit in white and the original greenish one on the instrument panel stood out from the overall picture. I spent a long time selecting the type and type of backlight boards, as well as the design of the panel overlay.
Having seen the overlays from the Pandora studio, I was, one might say, fascinated by the work. At first I was leaning towards everyone’s favorite panel with 3D rings, but then I decided on the “F” style optitron. Now all that remained was to resolve the issue with the backlight boards.
Many options were found, in different styles and methods of execution. And while I was choosing in Pandora, I decided that I could complete my overlays with backlight boards. I decided to order a set from them right away: an instrument panel overlay and a VDO instrument panel backlight board.
I will not describe in detail the procedure for disassembling the panel and installing the backlight boards and overlays, I did everything according to the Pandora studio video, which I will attach below, I will describe only some of the nuances and functionality.
Instrument arrows
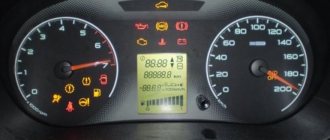
Another element of a car dashboard that is easy to improve yourself is the arrows of the measuring instruments. As many car enthusiasts have noticed, in the factory configuration the car panel is very similar to a parody of a parrot:
- heating device backlight – yellow;
- green buttons;
- all indicators are orange.
Quite often, such a diverse range of colors interferes with comfortable movement at night, because they all merge into one obscure color. At the same time, it is quite difficult to notice the instrument arrows. To improve the situation, tune the torpedo on the VAZ-2114 by installing red LEDs.
To do this, carefully disassemble the VAZ-2114 instrument panel. Place one LED under each of the arrows and put on special heat shrinks. Lead the wires of each of the devices outside the panel, and then connect them to the heater wiring. Upon completion of work, reassemble the shield in the reverse order.
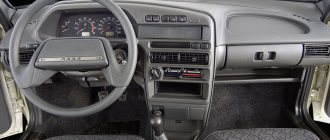
How to remove the instrument panel
To make it easier to dismantle the VAZ 2114 dashboard, you need to familiarize yourself with its design.
The dashboard includes the following elements:
- Dashboard base.
- Overlays.
- Bracket.
- Stub.
- Ashtray.
- Two crossbars.
- Right dashboard screen.
- A shield that blocks access to the wiring.
- Central bracket.
- Left screen of the instrument panel.
- Left cross member.
The elements that make up the VAZ 2114 dashboard are arranged in a certain sequence
Before you begin tuning the dashboard, you must first remove it. For this you will need:
- a set of keys;
- flat and Phillips screwdrivers;
- flashlight.
Complete dismantling of the dashboard is performed in the following order:
- Remove the left screen. Using a screwdriver, unscrew the 3 mounting screws.
The left screen of the VAZ 2114 console is removed with a Phillips screwdriver - Remove the right screen. It is secured with 5 screws.
- They remove the tape recorder. To do this, disconnect the negative cable from the battery. Pull out the tape recorder and disconnect the block with wires from it.
- Disconnect the wires from the cigarette lighter and ashtray illumination, and then remove them as well.
- Remove the heater damper control levers, do this using a flat-head screwdriver and the handle of its switch.
Use a screwdriver to remove the heater damper control levers. - Remove the center console panel. Unscrew the 4 screws located on its left and right sides, and then remove the plastic cover. There is a plug next to the heated rear window button; pull it out and unscrew the screw. Now the trim is removed and the instrument panel can be removed.
Open torpedo - there is access to the necessary elements - Disconnect the panel posts from the floor. Unscrew all the screws and also remove the cross member.
The panel stand is dismantled using a wrench - The intermediate body is pulled out of the torpedo socket.
- Disconnect the nozzles of the ventilation and heating system and unscrew the bracket fastenings.
- Remove all elements, including the APS block, master cylinder, and harnesses. This is done when the panel is completely removed.
- Measuring instruments are removed. The console is pryed up with a screwdriver, the cable is unscrewed from the speedometer, the wires are disconnected, but the sequence of their connection is remembered.
- Dismantle the linings that go onto the windshield.
- Remove the console.
At the last stage, the dashboard is finally removed
This procedure for performing work is provided only in the case of a complete replacement of the dashboard. When it is necessary to replace or tune individual elements, it is enough to provide access to the selected parts.
Replacing the steering wheel
The safest is the steering wheel that is installed on a domestic car by the manufacturer. Attaching a new steering wheel is considered an excellent option for tuning a VAZ-2114 torpedo with your own hands. However, it should be remembered that installation of a non-certified product entails changes in the rotation force. This directly affects the car's handling, especially in critical situations.
Therefore, in our opinion, the optimal action in this case would be to install a factory steering wheel with a new braid. The trim can be made of materials that provide better hand contact with the surface of the steering wheel. For example, genuine leather is perfect for this. This “steering wheel” looks stylish and fits better in the hands due to the increased thickness of the rim.
Additional on-board computer
The instrument panel of a domestic car has a special opening for attaching an additional trip computer. This nest is closed with a special plug. We decided to use this place for its intended purpose and perform tuning of the VAZ-2114 torpedo. In the photo you can clearly see what the dashboard improvement option looks like.
A route computer, or, as it is also called, an on-board computer, is an electronic device that allows the driver to receive information about fuel consumption, driving mode and other important parameters. In addition, many models of “brains” for cars allow diagnostics of the electronic engine control system. It is important to note that on-board computers are also mounted on cars with carburetor engines. However, in order for the equipment to perform its functions, it may be necessary to install special sensors on the dashboard.
Today there is a large selection of these devices on sale from different manufacturers. While they differ in the number of functions, they can also differ in the location of installation on the dashboard. Sequence of work:
- Connect the wiring harness block, which is intended to connect the VAZ-2114 trip computer, to the block on the back of the computer.
- Use a separate wire to connect the contact of the computer block to the contact of the diagnostic block.
- Insert the device into the slot.
Having done this work yourself, you will receive an updated instrument panel of the VAZ-2114, which has a completely different appearance.
Removal procedure:
Let's figure out how to remove the dashboard on a VAZ 2114. Using a Phillips-head screwdriver, carefully unscrew the 3 screws (top, middle and bottom) that secure the left console screen.
Next, remove the trim itself and the protrusion located at the bottom, then remove it from the body bracket.
Using a Phillips screwdriver, unscrew the next five screws, which are located in the right panel of the console, then remove the screen itself.
Then disconnect the negative cable terminal from the battery. If a radio is installed in the car, then remove it, also disconnect the connector of its harness with a wire or remove the plug container from the shield. Next, the wiring harness block must be disconnected from the cigarette lighter. You also need to remove the ashtray light bulb socket. Then remove the handle from the levers by carefully prying it off with a narrow screwdriver.
The next step is to remove the heater fan switch handle. To do this, you need to pull it towards you or pry it with a screwdriver.
Using a Phillips screwdriver, unscrew the two self-tapping screws located above the instrument cluster, as well as the two self-tapping screws located under it.
Prying off the plug, remove it and unscrew the self-tapping screw located under it.
Next, unscrew the two screws of the lowermost fastening of the lining.
Then remove the dashboard trim.
Now we mark the order in which the wiring harness blocks are connected to the switches, and disconnect them.
We place the already completely removed instrument panel and unscrew the bolts securing the steering column. Using the same screwdriver, unscrew the two screws, as shown in the photo.
Using an 8 mm wrench, we also unscrew the 2 screws of the lowest mounting of the bracket to the dashboard.
Next, unscrew the self-tapping screw securing the light guide using a Phillips screwdriver and remove the light guide.
Then we unscrew the screws that held the heating control unit, and also remove the lamp sockets from its reverse side.
Then we remove the decorative insert, but only after we have removed all its external parts.
We unscrew the nuts numbered one and two with a wrench or pliers (21 cm).
Then you need to remove the lamp responsible for illuminating the hydraulic corrector.
Carefully unscrew the screws for the lower and upper fastenings of the instrument panel, as well as the fastenings to the left cross member, using a Phillips screwdriver.
Now all that remains is to remove the instrument panel. That's it, now you know how to remove the instrument panel on a VAZ 2114 (VAZ 2115).